MediaPipe 示例
主要介绍 MediaPipe 的人脸检测、手掌检测、骨骼检测、整体检测、背景分割、3D 对象检测等示例。
提示
参考资料:
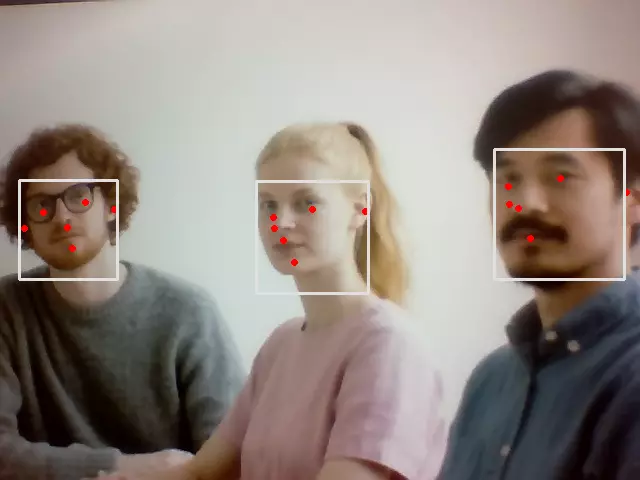
人脸检测
读取摄像头画面并进行人脸检测,在检测出来的人脸上绘制方框。
运行案例步骤:
- 新建
face_detection.py文件 - 将代码复制到
face_detection.py文件 - 使用
python3 face_detection.py运行案例 - 鼠标点击预览窗口,按
q键终止程序
face_detection.py
#!/usr/bin/env python3
# -_- encoding: utf-8 -_-

import cv2
import mediapipe as mp
mp_face_detection = mp.solutions.face_detection
mp_drawing = mp.solutions.drawing_utils

cap = cv2.VideoCapture(0)
with mp_face_detection.FaceDetection(
model_selection=0, min_detection_confidence=0.5) as face_detection:
while cap.isOpened():
success, image = cap.read()
if not success:
print("Ignoring empty camera frame.") # If loading a video, use 'break' instead of 'continue'.
continue

    # To improve performance, optionally mark the image as not writeable to
    # pass by reference.
    image.flags.writeable = False
    image = cv2.cvtColor(image, cv2.COLOR_BGR2RGB)
    results = face_detection.process(image)

    # Draw the face detection annotations on the image.
    image.flags.writeable = True
    image = cv2.cvtColor(image, cv2.COLOR_RGB2BGR)
    if results.detections:
      for detection in results.detections:
        mp_drawing.draw_detection(image, detection)
    # Flip the image horizontally for a selfie-view display.
    cv2.imshow('MediaPipe Face Detection', cv2.flip(image, 1))
    if cv2.waitKey(1) & 0xFF == ord('q'):
      break

cap.release()
cv2.destroyAllWindows()
预览效果:
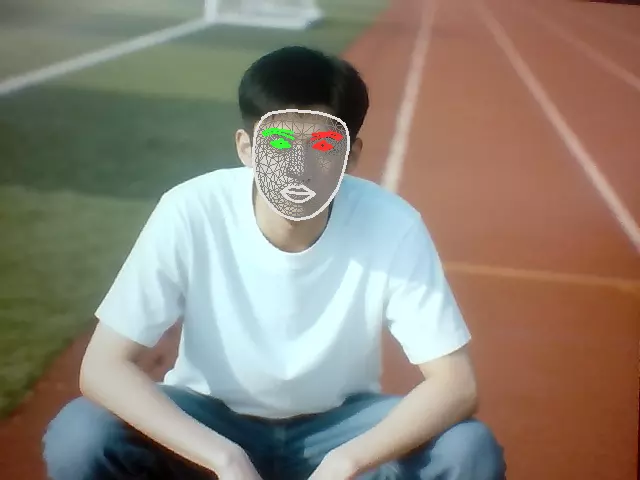
人脸面具
读取摄像头画面并进行人脸检测,在检测出来的人脸上贴上面具。
运行案例步骤:
- 新建
face_mesh.py文件 - 将代码复制到
face_mesh.py文件 - 使用
python3 face_mesh.py运行案例 - 鼠标点击预览窗口,按
q键终止程序
face_mesh.py
#!/usr/bin/env python3

# -_- encoding: utf-8 -_-

import cv2
import mediapipe as mp
mp_drawing = mp.solutions.drawing_utils
mp_drawing_styles = mp.solutions.drawing_styles
mp_face_mesh = mp.solutions.face_mesh

drawing_spec = mp_drawing.DrawingSpec(thickness=1, circle_radius=1)
cap = cv2.VideoCapture(0)
with mp_face_mesh.FaceMesh(
max_num_faces=1,
refine_landmarks=True,
min_detection_confidence=0.5,
min_tracking_confidence=0.5) as face_mesh:
while cap.isOpened():
success, image = cap.read()
if not success:
print("Ignoring empty camera frame.") # If loading a video, use 'break' instead of 'continue'.
continue

    # To improve performance, optionally mark the image as not writeable to
    # pass by reference.
    image.flags.writeable = False
    image = cv2.cvtColor(image, cv2.COLOR_BGR2RGB)
    results = face_mesh.process(image)

    # Draw the face mesh annotations on the image.
    image.flags.writeable = True
    image = cv2.cvtColor(image, cv2.COLOR_RGB2BGR)
    if results.multi_face_landmarks:
      for face_landmarks in results.multi_face_landmarks:
        mp_drawing.draw_landmarks(
            image=image,
            landmark_list=face_landmarks,
            connections=mp_face_mesh.FACEMESH_TESSELLATION,
            landmark_drawing_spec=None,
            connection_drawing_spec=mp_drawing_styles
            .get_default_face_mesh_tessellation_style())
        mp_drawing.draw_landmarks(
            image=image,
            landmark_list=face_landmarks,
            connections=mp_face_mesh.FACEMESH_CONTOURS,
            landmark_drawing_spec=None,
            connection_drawing_spec=mp_drawing_styles
            .get_default_face_mesh_contours_style())
        mp_drawing.draw_landmarks(
            image=image,
            landmark_list=face_landmarks,
            connections=mp_face_mesh.FACEMESH_IRISES,
            landmark_drawing_spec=None,
            connection_drawing_spec=mp_drawing_styles
            .get_default_face_mesh_iris_connections_style())
    # Flip the image horizontally for a selfie-view display.
    cv2.imshow('MediaPipe Face Mesh', cv2.flip(image, 1))
    if cv2.waitKey(1) & 0xFF == ord('q'):
      break

cap.release()
cv2.destroyAllWindows()
预览效果:
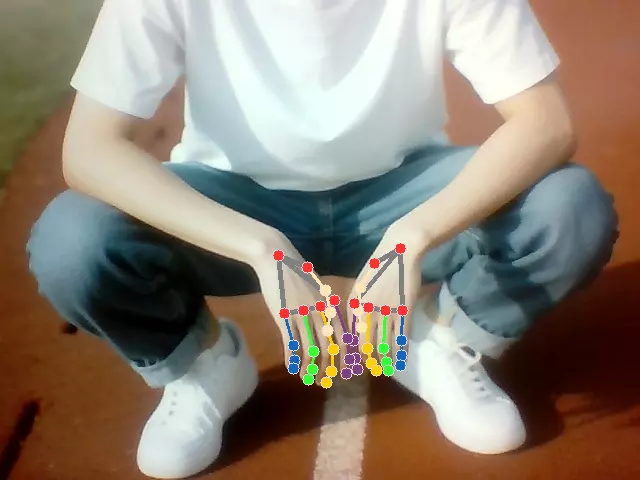
手掌检测
读取摄像头画面并进行手掌检测,在检测出来的手掌上绘制骨骼。
运行案例步骤:
- 新建
hand_detection.py文件 - 将代码复制到
hand_detection.py文件 - 使用
python3 hand_detection.py运行案例 - 鼠标点击预览窗口,按
q键终止程序
hand_detection.py
#!/usr/bin/env python3

# -_- encoding: utf-8 -_-

import cv2
import mediapipe as mp
mp_drawing = mp.solutions.drawing_utils
mp_drawing_styles = mp.solutions.drawing_styles
mp_hands = mp.solutions.hands

cap = cv2.VideoCapture(0)
with mp_hands.Hands(
model_complexity=0,
min_detection_confidence=0.5,
min_tracking_confidence=0.5) as hands:
while cap.isOpened():
success, image = cap.read()
if not success:
print("Ignoring empty camera frame.") # If loading a video, use 'break' instead of 'continue'.
continue

    # To improve performance, optionally mark the image as not writeable to
    # pass by reference.
    image.flags.writeable = False
    image = cv2.cvtColor(image, cv2.COLOR_BGR2RGB)
    results = hands.process(image)

    # Draw the hand annotations on the image.
    image.flags.writeable = True
    image = cv2.cvtColor(image, cv2.COLOR_RGB2BGR)
    if results.multi_hand_landmarks:
      for hand_landmarks in results.multi_hand_landmarks:
        mp_drawing.draw_landmarks(
            image,
            hand_landmarks,
            mp_hands.HAND_CONNECTIONS,
            mp_drawing_styles.get_default_hand_landmarks_style(),
            mp_drawing_styles.get_default_hand_connections_style())
    # Flip the image horizontally for a selfie-view display.
    cv2.imshow('MediaPipe Hands', cv2.flip(image, 1))
    if cv2.waitKey(1) & 0xFF == ord('q'):
      break

cap.release()
cv2.destroyAllWindows()
预览效果:
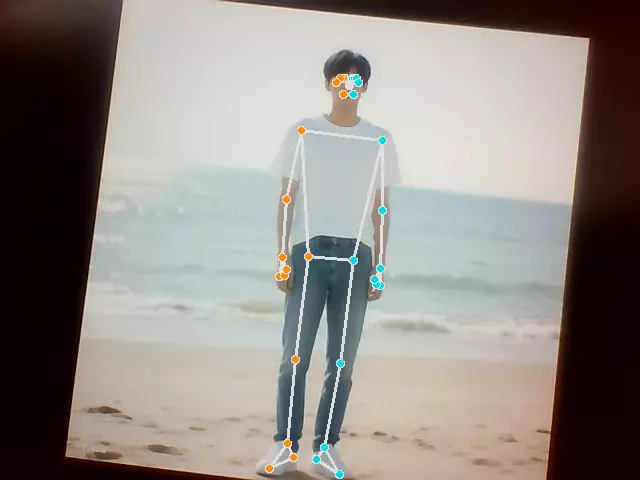
骨骼检测
读取摄像头画面并进行人体检测,在检测出来的人体上绘制骨骼。
运行案例步骤:
- 新建
pose_detection.py文件 - 将代码复制到
pose_detection.py文件 - 使用
python3 pose_detection.py运行案例 - 鼠标点击预览窗口,按
q键终止程序
pose_detection.py
#!/usr/bin/env python3

# -_- encoding: utf-8 -_-

import cv2
import mediapipe as mp
mp_drawing = mp.solutions.drawing_utils
mp_drawing_styles = mp.solutions.drawing_styles
mp_pose = mp.solutions.pose

cap = cv2.VideoCapture(0)
with mp_pose.Pose(
min_detection_confidence=0.5,
min_tracking_confidence=0.5) as pose:
while cap.isOpened():
success, image = cap.read()
if not success:
print("Ignoring empty camera frame.") # If loading a video, use 'break' instead of 'continue'.
continue

    # To improve performance, optionally mark the image as not writeable to
    # pass by reference.
    image.flags.writeable = False
    image = cv2.cvtColor(image, cv2.COLOR_BGR2RGB)
    results = pose.process(image)

    # Draw the pose annotation on the image.
    image.flags.writeable = True
    image = cv2.cvtColor(image, cv2.COLOR_RGB2BGR)
    mp_drawing.draw_landmarks(
        image,
        results.pose_landmarks,
        mp_pose.POSE_CONNECTIONS,
        landmark_drawing_spec=mp_drawing_styles.get_default_pose_landmarks_style())
    # Flip the image horizontally for a selfie-view display.
    cv2.imshow('MediaPipe Pose', cv2.flip(image, 1))
    if cv2.waitKey(1) & 0xFF == ord('q'):
      break

cap.release()
cv2.destroyAllWindows()
预览效果:
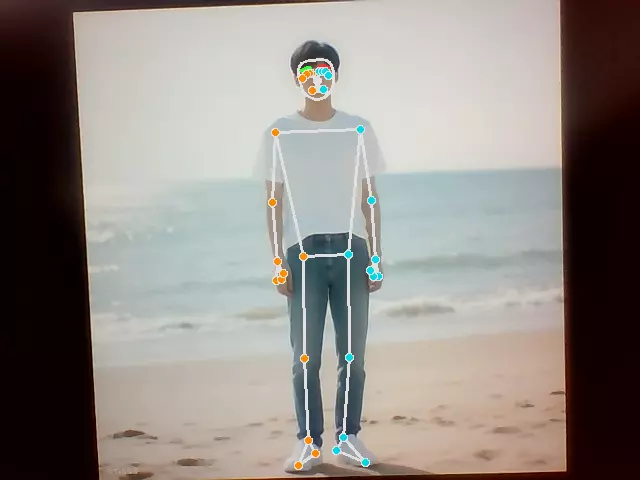
整体检测
读取摄像头画面并进行整体检测,在检测出来的人体上绘制骨骼和面具。
运行案例步骤:
- 新建
holistic_detection.py文件 - 将代码复制到
holistic_detection.py文件 - 使用
python3 holistic_detection.py运行案例 - 鼠标点击预览窗口,按
q键终止程序
holistic_detection.py
#!/usr/bin/env python3

# -_- encoding: utf-8 -_-

import cv2
import mediapipe as mp
mp_drawing = mp.solutions.drawing_utils
mp_drawing_styles = mp.solutions.drawing_styles
mp_holistic = mp.solutions.holistic

cap = cv2.VideoCapture(0)
with mp_holistic.Holistic(
min_detection_confidence=0.5,
min_tracking_confidence=0.5) as holistic:
while cap.isOpened():
success, image = cap.read()
if not success:
print("Ignoring empty camera frame.") # If loading a video, use 'break' instead of 'continue'.
continue

    # To improve performance, optionally mark the image as not writeable to
    # pass by reference.
    image.flags.writeable = False
    image = cv2.cvtColor(image, cv2.COLOR_BGR2RGB)
    results = holistic.process(image)

    # Draw landmark annotation on the image.
    image.flags.writeable = True
    image = cv2.cvtColor(image, cv2.COLOR_RGB2BGR)
    mp_drawing.draw_landmarks(
        image,
        results.face_landmarks,
        mp_holistic.FACEMESH_CONTOURS,
        landmark_drawing_spec=None,
        connection_drawing_spec=mp_drawing_styles
        .get_default_face_mesh_contours_style())
    mp_drawing.draw_landmarks(
        image,
        results.pose_landmarks,
        mp_holistic.POSE_CONNECTIONS,
        landmark_drawing_spec=mp_drawing_styles
        .get_default_pose_landmarks_style())
    # Flip the image horizontally for a selfie-view display.
    cv2.imshow('MediaPipe Holistic', cv2.flip(image, 1))
    if cv2.waitKey(1) & 0xFF == ord('q'):
      break

cap.release()
cv2.destroyAllWindows()
预览效果:
背景分割
读取摄像头画面并进行人物的背景分割,将背景替换成单色背景。
运行案例步骤:
- 新建
back_seg.py文件 - 将代码复制到
back_seg.py文件 - 使用
python3 back_seg.py运行案例 - 鼠标点击预览窗口,按
q键终止程序
back_seg.py
#!/usr/bin/env python3

# -_- encoding: utf-8 -_-

import cv2
import mediapipe as mp
import numpy as np
mp_drawing = mp.solutions.drawing_utils
mp_selfie_segmentation = mp.solutions.selfie_segmentation

BG_COLOR = (192, 192, 192) # gray
cap = cv2.VideoCapture(0)
with mp_selfie_segmentation.SelfieSegmentation(
model_selection=1) as selfie_segmentation:
bg_image = None
while cap.isOpened():
success, image = cap.read()
if not success:
print("Ignoring empty camera frame.") # If loading a video, use 'break' instead of 'continue'.
continue

    # Flip the image horizontally for a later selfie-view display, and convert
    # the BGR image to RGB.
    image = cv2.cvtColor(cv2.flip(image, 1), cv2.COLOR_BGR2RGB)
    # To improve performance, optionally mark the image as not writeable to
    # pass by reference.
    image.flags.writeable = False
    results = selfie_segmentation.process(image)

    image.flags.writeable = True
    image = cv2.cvtColor(image, cv2.COLOR_RGB2BGR)

    # Draw selfie segmentation on the background image.
    # To improve segmentation around boundaries, consider applying a joint
    # bilateral filter to "results.segmentation_mask" with "image".
    condition = np.stack(
      (results.segmentation_mask,) * 3, axis=-1) > 0.1
    # The background can be customized.
    #   a) Load an image (with the same width and height of the input image) to
    #      be the background, e.g., bg_image = cv2.imread('/path/to/image/file')
    #   b) Blur the input image by applying image filtering, e.g.,
    #      bg_image = cv2.GaussianBlur(image,(55,55),0)
    if bg_image is None:
      bg_image = np.zeros(image.shape, dtype=np.uint8)
      bg_image[:] = BG_COLOR
    output_image = np.where(condition, image, bg_image)

    cv2.imshow('MediaPipe Selfie Segmentation', output_image)
    if cv2.waitKey(1) & 0xFF == ord('q'):
      break

cap.release()
cv2.destroyAllWindows()
预览效果:

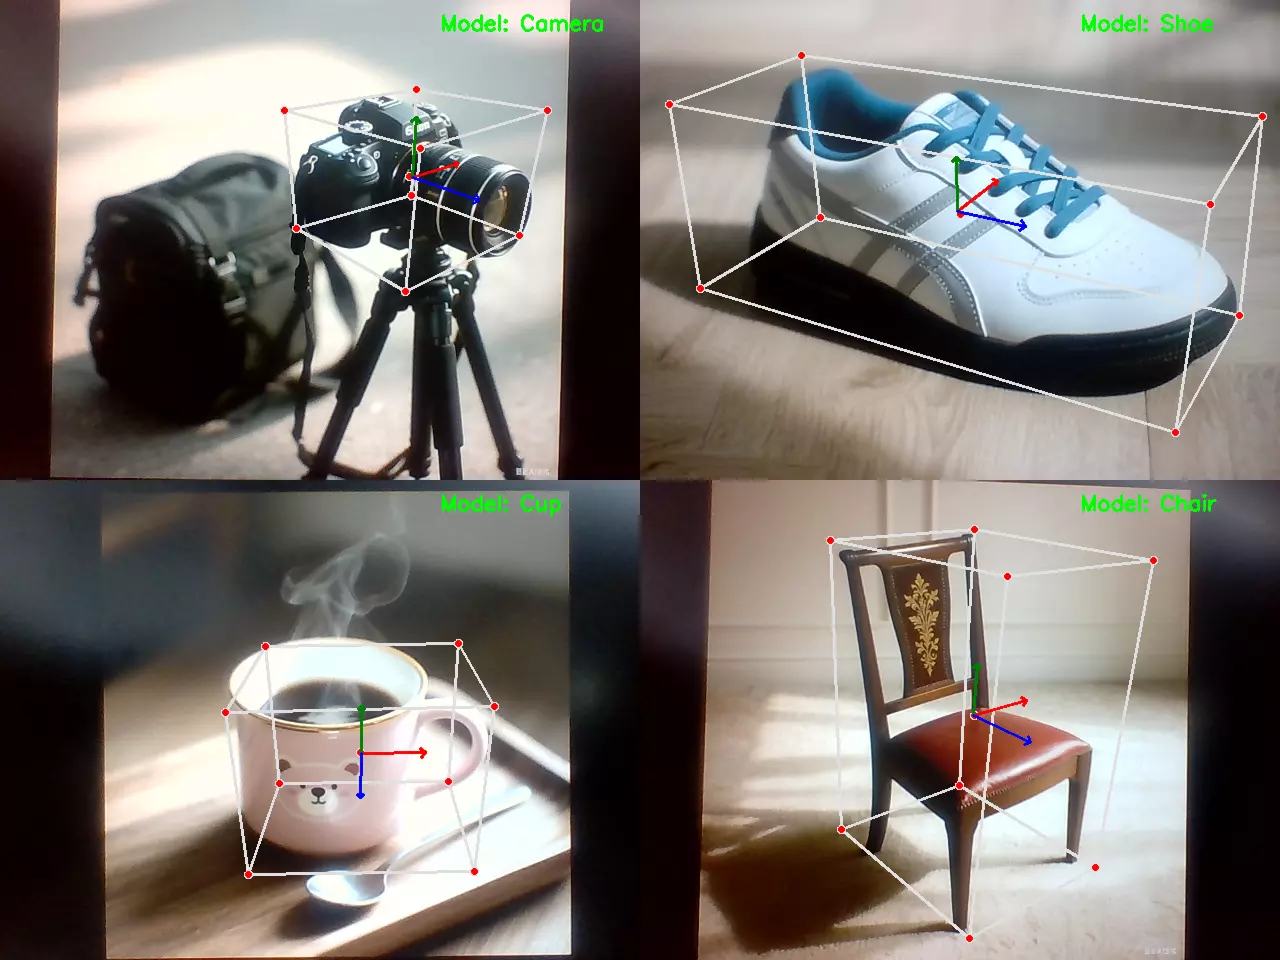
3D 对象检测
读取摄像头画面并进行 3D 对象检测(支持鞋、椅子、杯子、相机四种模型),在检测出来的物体上绘制 3D 边界框。
运行案例步骤:
- 新建
3d_object_detection.py文件 - 将代码复制到
3d_object_detection.py文件 - 使用
python3 3d_object_detection.py运行案例 - 鼠标点击预览窗口,按
q键终止程序
3d_object_detection.py
#!/usr/bin/env python3

# -_- coding: utf-8 -_-

import cv2
import mediapipe as mp

# Initialize MediaPipe components

mp_drawing = mp.solutions.drawing_utils
mp_objectron = mp.solutions.objectron

# Available models

MODELS = ['Shoe', 'Chair', 'Cup', 'Camera']
current_model = 0 # Start with first model

# Initialize video capture

cap = cv2.VideoCapture(0)

# Create initial Objectron instance

objectron = mp_objectron.Objectron(
static_image_mode=False,
max_num_objects=5,
min_detection_confidence=0.5,
min_tracking_confidence=0.99,
model_name=MODELS[current_model]
)

while cap.isOpened():
success, image = cap.read()
if not success:
print("Ignoring empty camera frame.")
continue

    # Process image
    image.flags.writeable = False
    image = cv2.cvtColor(image, cv2.COLOR_BGR2RGB)
    results = objectron.process(image)

    # Draw results
    image.flags.writeable = True
    image = cv2.cvtColor(image, cv2.COLOR_RGB2BGR)

    if results.detected_objects:
        for detected_object in results.detected_objects:
            mp_drawing.draw_landmarks(
                image, detected_object.landmarks_2d, mp_objectron.BOX_CONNECTIONS)
            mp_drawing.draw_axis(image, detected_object.rotation,
                               detected_object.translation)

    # # First flip the image for display
    # image = cv2.flip(image, 1)

    # Then add text to the already-mirrored image
    # Note: We adjust the x-position to account for mirroring
    text_x = image.shape[1] - 200  # Right side position
    cv2.putText(image, f"Model: {MODELS[current_model]}", (text_x, 30),
               cv2.FONT_HERSHEY_SIMPLEX, 0.7, (0, 255, 0), 2)

    # Show final view
    cv2.imshow('MediaPipe Objectron', image)

    # Key handling
    key = cv2.waitKey(5) & 0xFF
    if key == 27 or key == ord('q'):  # ESC or 'q' to quit
        break
    elif key == ord('f'):  # 'f' for next model
        current_model = (current_model + 1) % len(MODELS)
        objectron = mp_objectron.Objectron(
            static_image_mode=False,
            max_num_objects=5,
            min_detection_confidence=0.5,
            min_tracking_confidence=0.99,
            model_name=MODELS[current_model]
        )
        print(f"Switched to model: {MODELS[current_model]}")

cap.release()
cv2.destroyAllWindows()
预览效果: