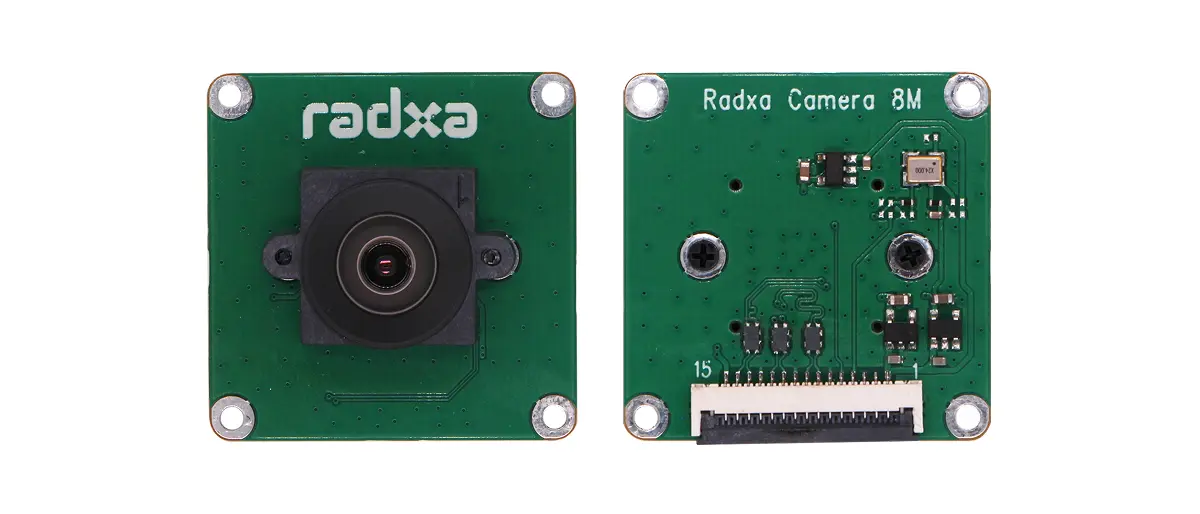
瑞莎 8M 219 摄像头
瑞莎 Dragon Q6A 的板载 MIPI CSI 接口可用于连接瑞莎 8M 219 摄像头,实现图像采集功能。
接口规格
摄像头接口
瑞莎 8M 219 摄像头接口规格如下:
- 接口类型:15-Pin 1.0 mm 间距 SMD 卧式 FPC 接口
- 连接方式:翻盖式,下接触
主板 MIPI CSI 接口
瑞莎 Dragon Q6A 的主板 MIPI CSI 接口规格如下:
- 接口类型:15-Pin 1.0 mm 间距 SMD 卧式 FPC 接口
- 连接方式:翻盖式,下接触
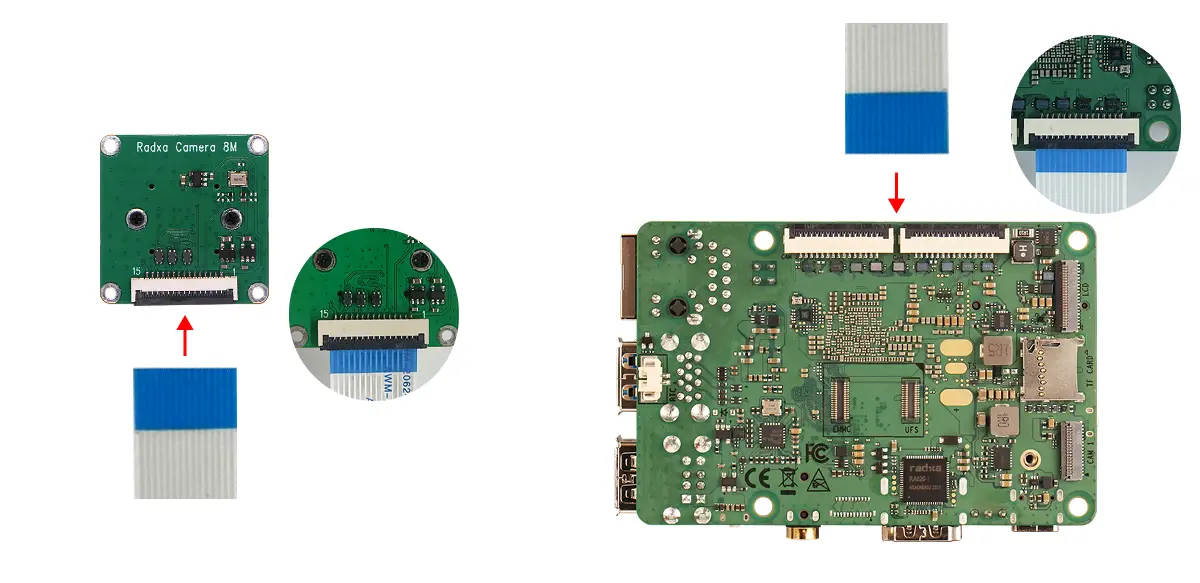
摄像头排线
使用 15-Pin 1.0 mm 间距转 15-Pin 1.0mm 间距异面 FPC 排线
硬件连接
将 FPC 排线的 15-Pin 金属接触点末端插入摄像头接口,将 FPC 排线的 15-Pin 金属接触点末端插入主板 MIPI CSI 接口。
注意事项
- 确保排线两侧边缘与插座边缘平齐,无歪斜或部分裸露的触点
- 确认排线无折痕、无松动,且锁扣处闭合状态
软件使能
使用瑞莎系统自带的 Rsetup 工具使能瑞莎 8M 219 摄像头。
Rsetup 使用指南
- 选中选项 : 对应选项会高亮显示
- 确认选择 : 按
Enter - 取消选择 : 按
ESC - 切换选项 : 按
Up、Down、Left、Right控制 - 多选界面 : 按
Space选择,按Enter确认选择;选择对应功能后,对应选项框会出现一个*,表示该选项已启用
在终端命令行运行 rsetup 命令启动 Rsetup 工具:
radxa@dragon-q6a$
rsetup
在 Rsetup 工具中依次进入 Overlays -> Manage overlays。
- 通过方向键找到 [ ] Enable Radxa Camera 8M 219 选项
- 按空格出现 [*] Enable Radxa Camera 8M 219 说明已选中该功能
- 按
Enter确认并保存设置,使能摄像头。 - 重启系统,使配置生效。
提示
若主板有多个 MIPI CSI 接口,Rsetup 可能会显示 [ ] Enable Radxa Camera 8M 219 on CAM * 选项,选择对应 MIPI CSI 接口的选项即可。
预览摄像头
使用 libcamera 预览摄像头画面。
安装依赖
radxa@dragon-q6a$
sudo apt update
sudo apt install build-essential git pkg-config -y
sudo apt install meson ninja-build -y
sudo apt install python3-pip python3-yaml python3-jinja2 python3-ply python3-pyparsing -y
sudo apt install libyaml-dev libevent-dev -y
sudo apt install libudev-dev libgnutls28-dev openssl libexpat1-dev -y
sudo apt install libdrm-dev -y
sudo apt install libjpeg-dev -y
sudo apt install libglib2.0-dev -y
sudo apt install qt6-base-dev qt6-base-dev-tools qt6-wayland-dev -y
sudo apt install \
    qtbase5-dev \
    qtbase5-dev-tools \
    qtchooser \
    qt5-qmake \
    qttools5-dev \
    qtdeclarative5-dev \
    libqt5opengl5-dev \
    qml-module-qtquick-controls \
    libgles2-mesa-dev \
    qml-module-qtquick2 -y
编译安装 libcamera
radxa@dragon-q6a$
git clone https://git.linuxtv.org/libcamera.git
cd libcamera
git checkout 02277d4c1a5ae7fee582f635936877435a12db64 # Optional. The following test steps are based on this version of libcamera.
meson setup build --wipe \
    -Dpipelines=simple \
    -Dcam=enabled \
    -Dgstreamer=disabled \
    -Dv4l2=enabled \
    -Dlc-compliance=disabled \
    -Dqcam=enabled
ninja -C build -j$(nproc)
sudo ninja -C build install
sudo ldconfig
修改配置文件
进入 libcamera 目录,修改 libcamera/src/ipa/simple/data/imx219.yaml文件。
radxa@dragon-q6a$
cd libcamera
sudo nano src/ipa/simple/data/imx219.yaml
将下面内容复制到 src/ipa/simple/data/imx219.yaml文件。
# SPDX-License-Identifier: CC0-1.0
%YAML 1.1
---
version: 1
algorithms:
  - BlackLevel:
  - Awb:
      # 手动引导白平衡(非常重要)
      gains:
        red: 1.8
        green: 1.0
        blue: 1.4
  - Ccm:
      ccms:
        - ct: 6500
          ccm: [
            1.35, -0.25, -0.10,
           -0.10,  0.80, -0.10,
           -0.05, -0.30,  1.35
          ]
  - Agc:
      # 防止自动曝光拉灰
      target: 0.55
      speed: 0.2
...
设置权限
radxa@dragon-q6a$
sudo chmod 666 /dev/dma_heap/*
启动摄像头
打开系统桌面终端,进入 libcamera 的 build 目录,启动 qcam。
radxa@dragon-q6a$
cd libcamera/build/src/apps/qcam/
./qcam --stream pixelformat=YUYV,width=1920,height=1080
排查指南
检查摄像头是否被识别
使用以下命令检查摄像头是否被系统识别:
radxa@dragon-q6a$
sudo dmesg | grep imx
若终端输出以下信息,说明摄像头被正常识别:
[    5.949209] imx219 18-0010: supply VANA not found, using dummy regulator
[    5.951349] imx219 18-0010: supply VDIG not found, using dummy regulator
[    5.951506] imx219 18-0010: supply VDDL not found, using dummy regulator
若终端输出以下信息,说明摄像头未被系统识别,需要检查摄像头排线是否安装到位:
[    5.949209] imx219 18-0010: supply VANA not found, using dummy regulator
[    5.951349] imx219 18-0010: supply VDIG not found, using dummy regulator
[    5.951506] imx219 18-0010: supply VDDL not found, using dummy regulator
[    5.958515] imx219 18-0010: Error reading reg 0x0000: -6
[    5.958522] imx219 18-0010: error -ENXIO: failed to read chip id 219