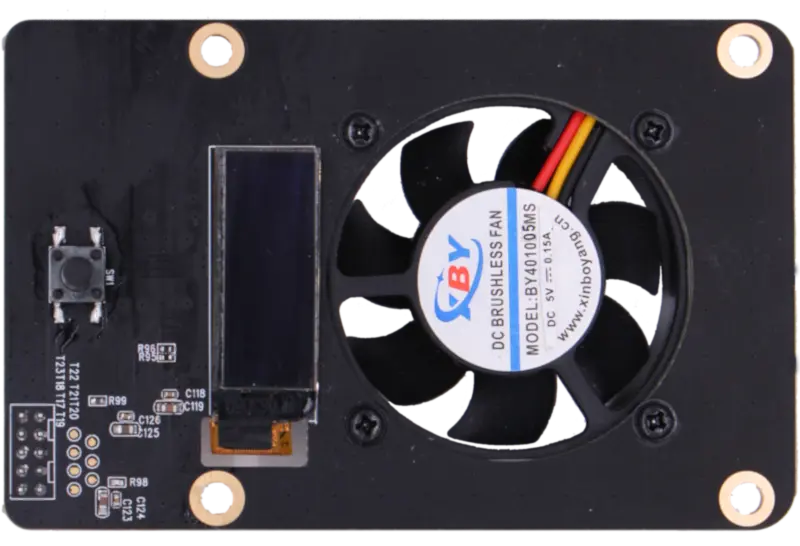
Penta SATA HAT top board
The Radxa Penta SATA HAT has a 2x5 seat with the following signal:
| Pin | Signal | Pin | Signal |
|---|---|---|---|
| 1 | I2C_SDA | 2 | VCC3V3_SYS |
| 3 | I2C_SCL | 4 | VCC5V0_SYS |
| 5 | GPIO4_D2 | 6 | GPIO4_C2 |
| 7 | GND | 8 | PWM_33 |
| 9 | GND | 10 | NC |
Technical Specifications:
- Connector Type: 2x5 pin header
- Pitch: 2.0mm
- Compatible Connectors: Standard 2.0mm pitch 2x5 pin header (2x5 pin header, 2.0mm pitch)
This seat can be used to link to the top plate, which has a 0.91 inch OLED display and a 4010 fan, which can display IP address and storage information, etc., and the fan is used for cooling.
Software support
In order to get the top panel OLED display and fan working properly, we provide the rockpi-penta package, which can be installed with the following command.
sudo apt update
sudo apt install wget
wget https://github.com/radxa/rockpi-penta/releases/download/v0.2.2/rockpi-penta-0.2.2.deb
sudo apt install -y ./rockpi-penta-0.2.2.deb
Software configuration
Notes for latest Raspberry Pi OS (Debian trixie) users
The rockpi-penta package may not install cleanly on a fresh Raspberry Pi OS (Debian trixie / Debian 13) system. Systems that upgrade from Debian 12 to trixie usually install the package without issues, but a fresh trixie install may fail. After installing or running on trixie, you may also encounter the following issues:
- OLED display only shows static message "RADXA SATA HAT Loading..."
- Fan stuck at 100% power
- Service startup error
FileNotFoundError: No such file or directory
Additional fixes may be required. Please refer to the solutions reported by users in GitHub issue #1792 and #1540: https://github.com/HabiRabbu/rockpi-penta-pi5-fix
After installing the package, if you need to modify the configuration, you can edit the configuration file /etc/rockpi-penta.conf, the following is the default value of the configuration file.
[fan]
# When the temperature is above lv0 (35'C), the fan at 25% power,
# and lv1 at 50% power, lv2 at 75% power, and lv3 at 100% power.
# When the temperature is below lv0, the fan is turned off.
# You can change these values if necessary.
lv0 = 35
lv1 = 40
lv2 = 45
lv3 = 50

[key]
# You can customize the function of the key, currently available functions are
# slider: oled display next page
# switch: fan turn on/off switch
# reboot, poweroff
# If you have any good suggestions for key functions,
# please add an issue on https://rock.sh/rockpi-sata
click = slider
twice = switch
press = none

[time]
# twice: maximum time between double clicking (seconds)
# press: long press time (seconds)
twice = 0.7
press = 1.8

[slider]
# Whether the oled auto display next page and the time interval (seconds)
auto = true
time = 10

[oled]
# Whether rotate the text of oled 180 degrees, whether use Fahrenheit
rotate = false
f-temp = false
After modifying the configuration, run the sudo systemctl restart rockpi-penta.service command to restart the service for the configuration to take effect.
FAQ
The top board OLED stays on "ROCKPI SATA HAT loading...", or the fan does not spin / always runs at full speed?
Different product models use different I2C buses for the top board (see the table below). On newer Radxa OS (Debian Bookworm) images, the corresponding I2C overlay is not enabled by default on some models. After installing rockpi-penta, if you see any of the following symptoms, the corresponding I2C overlay is likely not enabled (using ROCK 4 series as an example):
- The OLED stays on "ROCKPI SATA HAT loading..."
- The fan does not spin, or always runs at full speed
- Service logs show errors like
FileNotFoundError: /sys/class/pwm/pwmchip1/pwm0/periodorDevice or resource busy
To enable it:
sudo rsetup
Select the I2C overlay for your model in the Overlays menu (using ROCK 4 series as an example: select I2C7; also select PWM1 if the fan still misbehaves), save and reboot.
| Model | I2C used by the top board | Overlay to enable |
|---|---|---|
| ROCK 4 series (incl. ROCK Pi 4) | I2C7 | I2C7 (fan: PWM1) |
| ROCK 5A | I2C8 (M4) | I2C8 |
| ROCK 3A | I2C3 (M0) | I2C3 |
| ROCK 3C | Software I2C via GPIO (GPIO1_A0/A1) | No overlay needed |
| Raspberry Pi 4 / 5 | I2C1 (GPIO pins 3/5) | Enabled by default, no extra config needed |
Note: The table above shows the default configuration in the rockpi-penta package for each model. Always check the actual bus number with
sudo i2cdetect -linstead of assuming a fixed number.
How to check which I2C bus the Penta SATA HAT top board is attached to?
The top board OLED (SSD1306) uses I2C address 0x3c. Use the following commands to check whether the top board is detected and which bus it is on:
# List all I2C buses
sudo i2cdetect -l

# Scan each bus; the one showing 0x3c is where the top board is connected
sudo i2cdetect -y <bus_number>
Using ROCK 4 series as an example, after enabling the I2C7 overlay, scanning the corresponding bus should show the OLED device:
# ROCK 4 series example: usually i2c-7 after enabling the I2C7 overlay
sudo i2cdetect -y 7
Note: The bus number differs between models (e.g. usually i2c-8 on ROCK 5A and i2c-3 on ROCK 3A). Always check the
sudo i2cdetect -loutput; the number in the example is for reference only.
Seeing 3c in the output means the top board OLED is detected.