Install System to eMMC
This guide introduces how to install the system to the eMMC of the Raspberry Pi CM5 using the Taco.
Prerequisites
- Raspberry Pi CM5 (with onboard eMMC)
- Radxa Taco
- Host computer (Linux or macOS)
- USB-A to USB-C data cable
Note: Linux recommended to be Debian or Ubuntu.
RPIBOOT
RPIBOOT is a USB boot and device flashing tool provided by Raspberry Pi. It can deploy system images to the target device's storage medium via USB without relying on an SD card for system flashing or updating.
Install RPIBOOT
- Debian/Ubuntu
- macOS
- Install dependencies
Use the following command to install the tools required to compile RPIBOOT.
sudo apt update
sudo apt install git libusb-1.0-0-dev pkg-config build-essential -y
- Pull / Compile
Use the following command to pull and compile the usbboot source code.
git clone --recurse-submodules --shallow-submodules --depth=1 https://github.com/raspberrypi/usbboot
cd usbboot
sudo make install
git clone --recurse-submodules --shallow-submodules --depth=1 https://github.com/raspberrypi/usbboot
cd usbboot
sudo make install
RPIBOOT Mode
When the target device enters USB boot mode, the host can recognize and access the target storage via USB, allowing the system image to be written to the onboard eMMC.
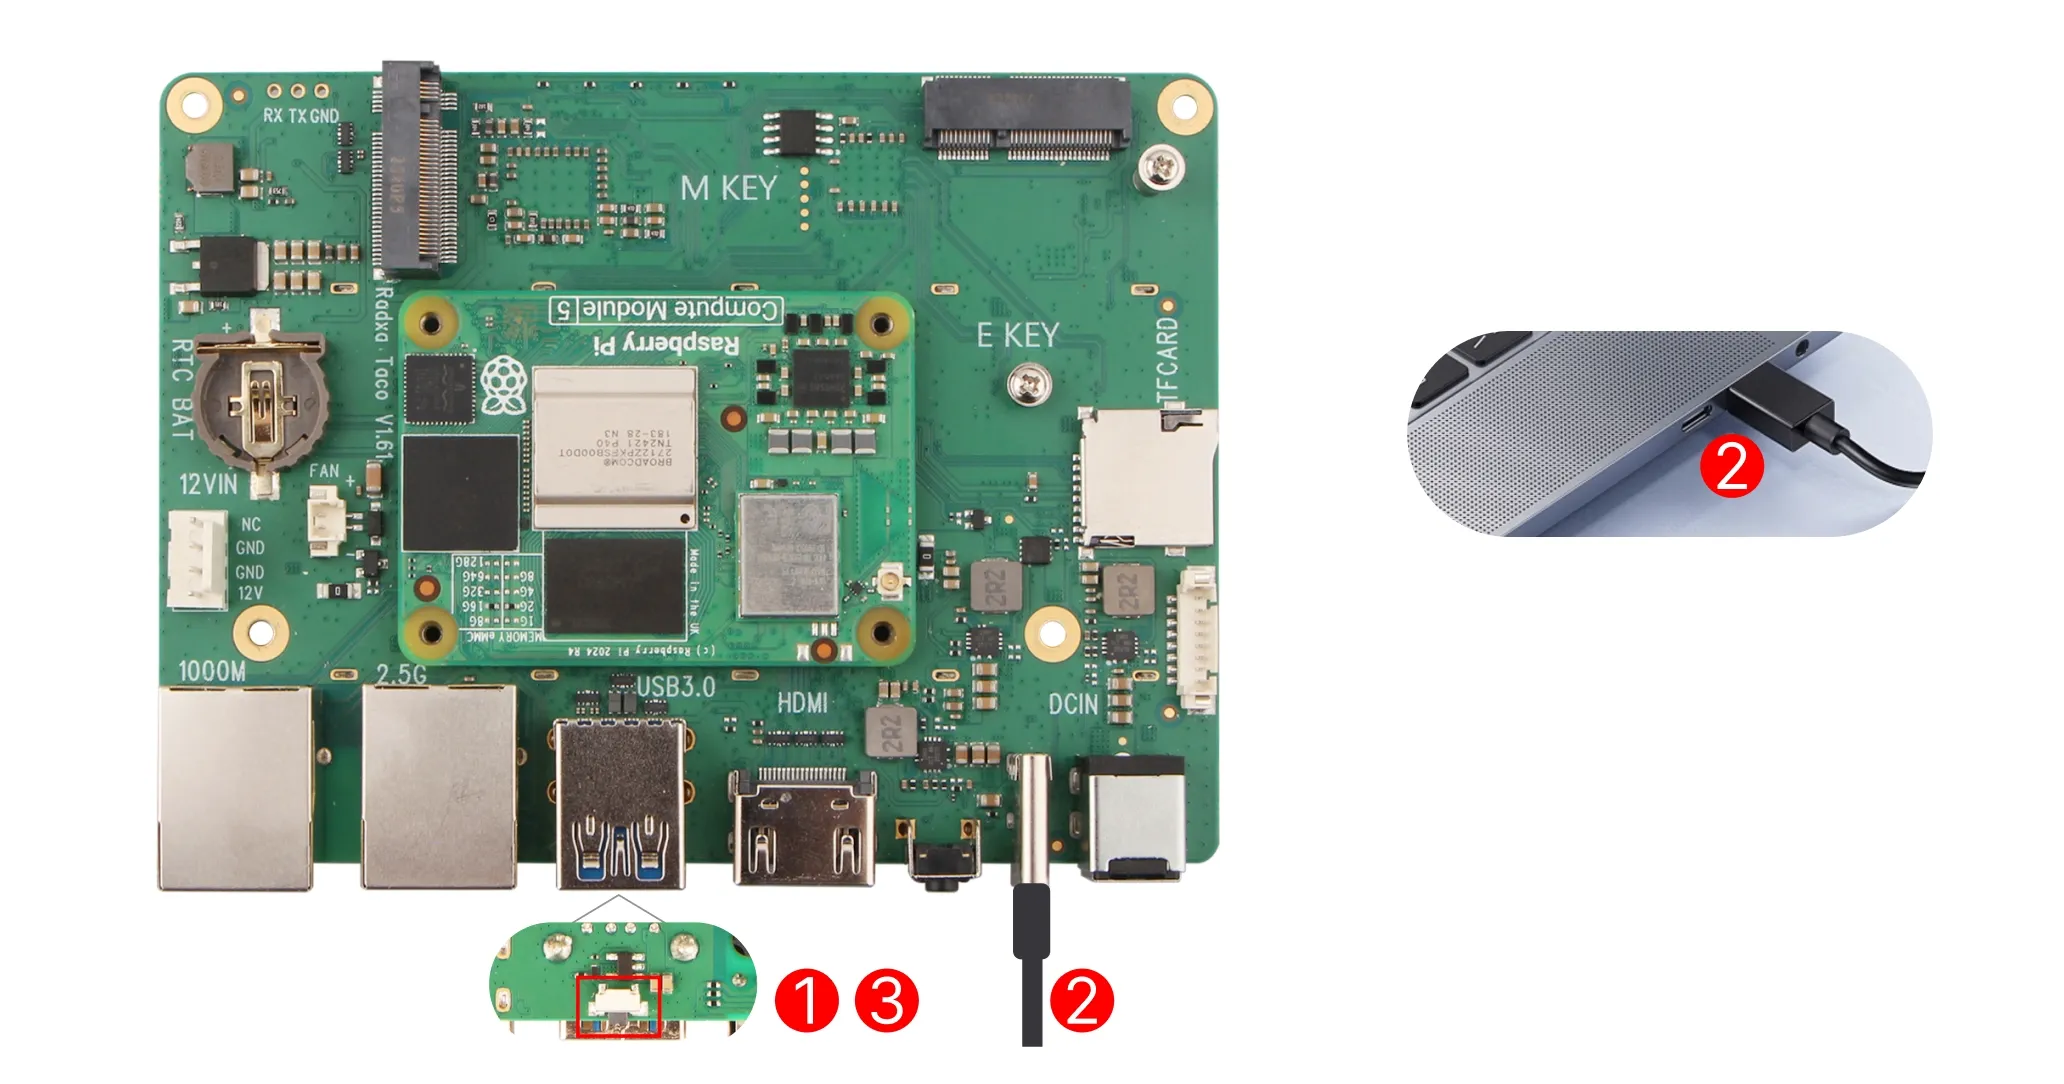
Steps to enter RPIBOOT mode:
- Press and hold the RPIBOOT button on the Taco.
- Connect to the host using a data cable. USB-C to Taco, USB-A to host.
- Release the RPIBOOT button.
Connect the Taco and host using the data cable alone. Do not connect SATA hard drives or high-power consumption peripherals to avoid affecting power supply stability.
If the board is connected to SATA hard drives or high-power consumption peripherals, please follow these steps to enter RPIBOOT mode:
- Press and hold the RPIBOOT button on the Taco.
- Power the board with the 12V power adapter.
- Release the RPIBOOT button.
- Connect to the host using a data cable. USB-C to Taco, USB-A to host.
Using RPIBOOT
sudo rpiboot -d mass-storage-gadget
The system will automatically recognize the device and start the boot process. The terminal will normally display similar information:
RPIBOOT: build-date 2026/03/27 pkg-version local 101f2d00

Please fit the EMMC_DISABLE / nRPIBOOT jumper before connecting the power and USB cables to the target device.
If the device fails to connect then please see https://rpltd.co/rpiboot for debugging tips.

Loading: mass-storage-gadget/bootfiles.bin
Using mass-storage-gadget/bootfiles.bin
Waiting for BCM2835/6/7/2711/2712...

Sending bootcode.bin
Successful read 4 bytes
Waiting for BCM2835/6/7/2711/2712...

Second stage boot server
File read: mcb.bin
File read: memsys00.bin
File read: memsys01.bin
File read: rp1c0fw1.bin
File read: memsys02.bin
File read: memsys03.bin
File read: bootmain
Loading: mass-storage-gadget/config.txt
File read: config.txt
Loading: mass-storage-gadget/boot.img
File read: boot.img
Second stage boot server done
The system will appear as a removable device. At this point, you can use Raspberry Pi Imager to install the system image to the eMMC of the Raspberry Pi CM5.
Install System
Use Raspberry Pi Imager to install the system image to the storage device.
Install Raspberry Pi Imager
- Debian/Ubuntu
- macOS
Use the following command in the terminal to install Raspberry Pi Imager.
sudo apt update
sudo apt install rpi-imager -y
Visit the Raspberry Pi Imager download page to download and install Raspberry Pi Imager.
Using Raspberry Pi Imager
Use Raspberry Pi Imager to install the system image to the storage device.
Open Raspberry Pi Imager
Different versions of Raspberry Pi Imager may have slightly different interfaces. Please operate according to the actual situation.
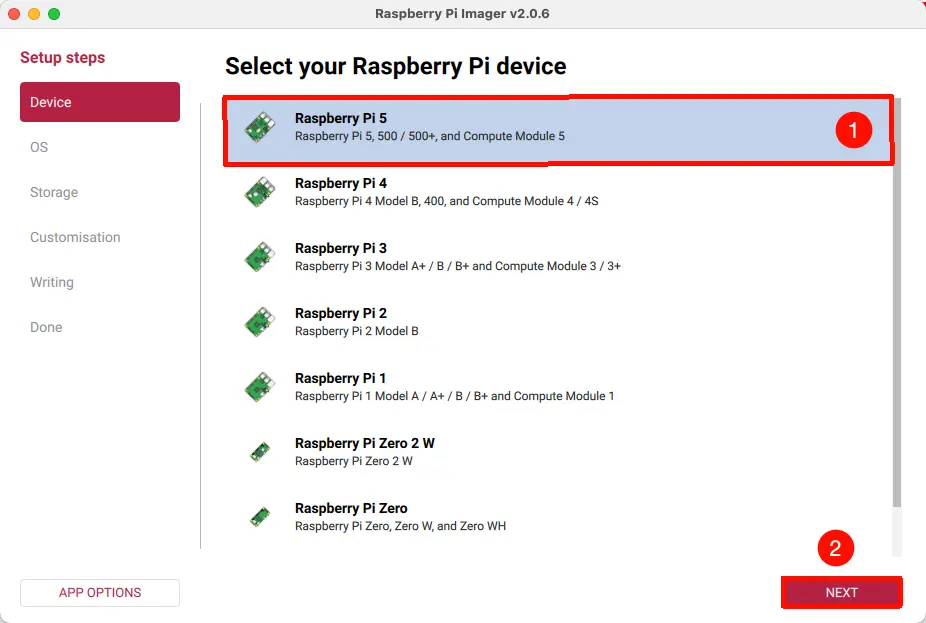
Select Device
Open Raspberry Pi Imager, select the Device option, and choose Raspberry Pi CM5. This option includes the Raspberry Pi CM5 device.
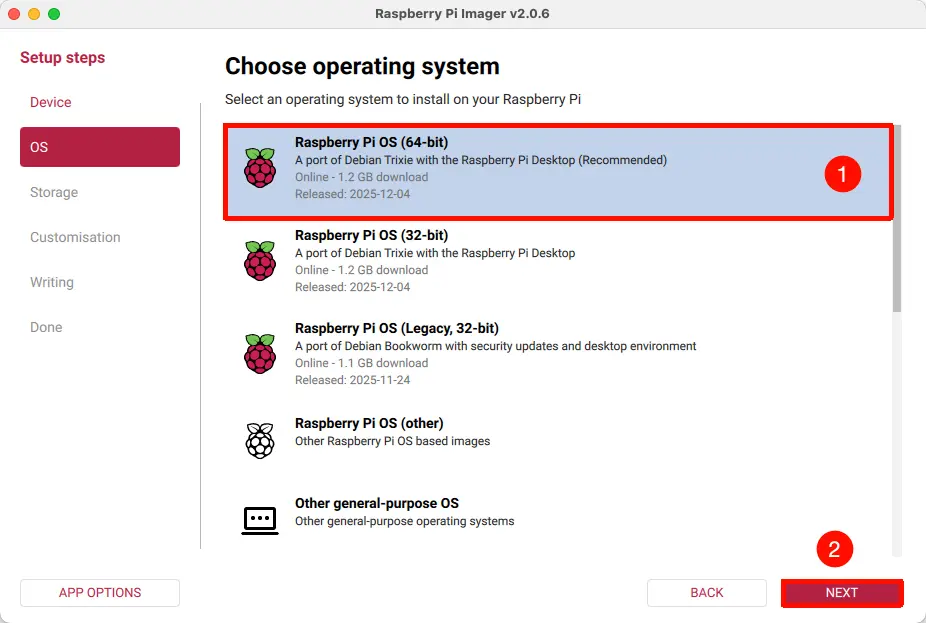
Select Operating System
Open Raspberry Pi Imager, select the Operating System option, and choose the system image you want to install.
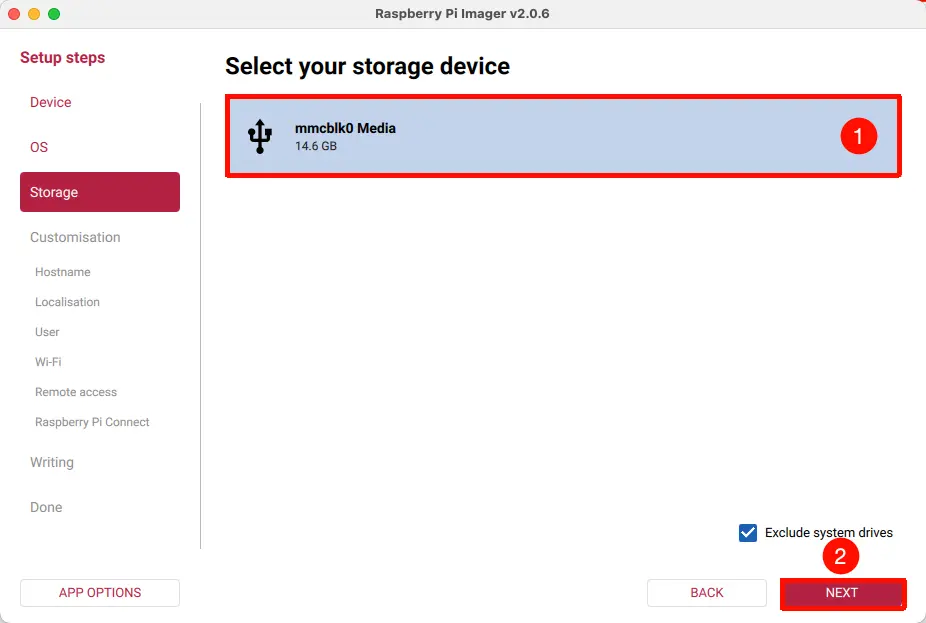
Select Storage Device
Open Raspberry Pi Imager, select the Storage option, and choose the storage device for the Raspberry Pi CM5.
You can determine if the correct storage device is selected based on its capacity or by safely ejecting the storage device. Selecting the wrong storage device will result in data loss.
Configure System Information
System information can be configured according to your needs. Here we will skip the system information settings.

Start Installation
Click Write and confirm with I Understand ... to start installing the system image to the storage device.
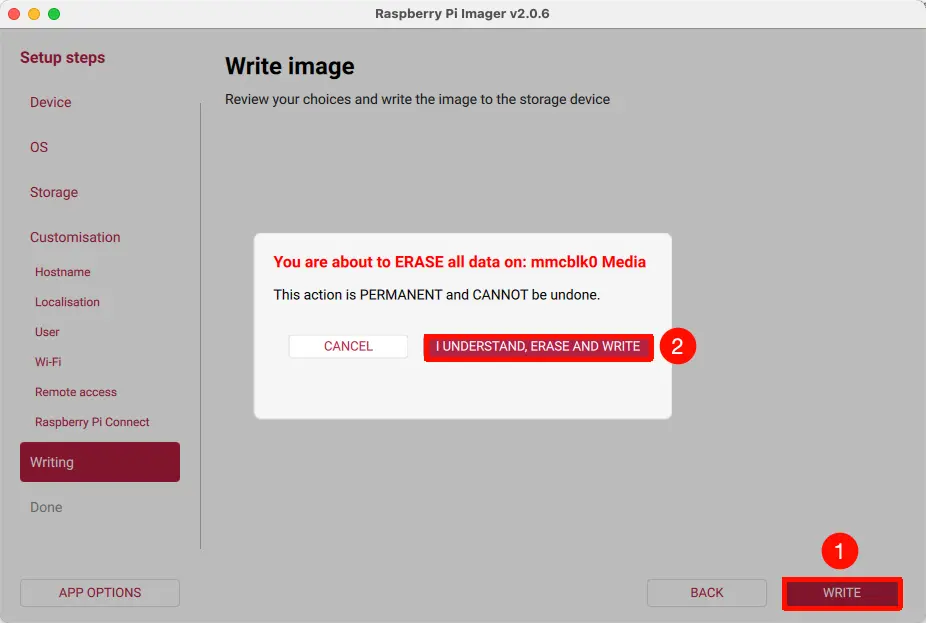
The entire installation process will write and verify the system image. Please wait patiently until the installation is complete.
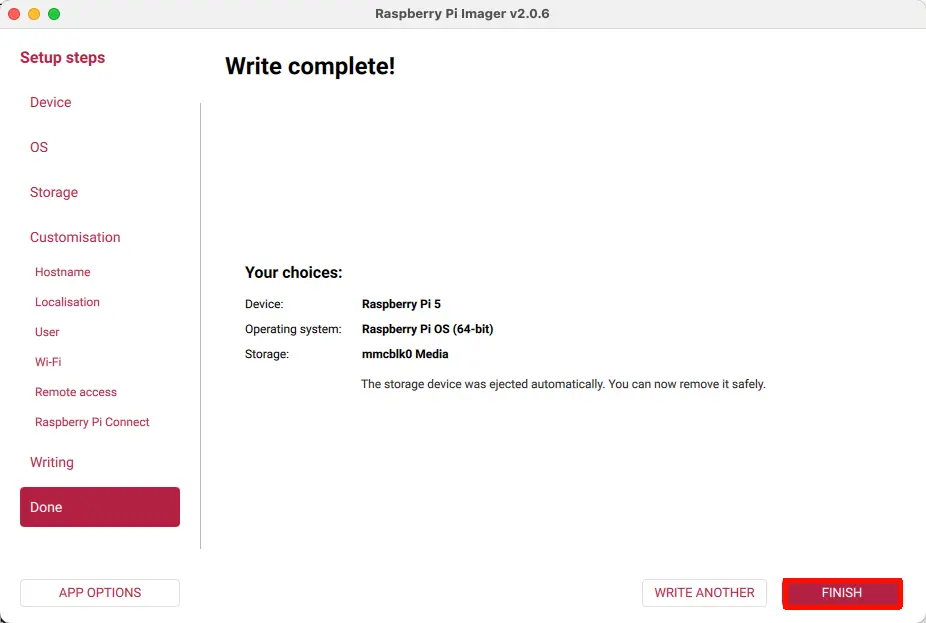
Installation Complete
After the installation is complete, click FINISH to complete the installation.