DX-COM model compiler
Introduction
DX-COM (model compiler) generates an NPU instruction set based on the provided ONNX model and configuration file, compiling the ONNX model into the DXNN model format executable on the NPU. A DXNN file contains the generated instruction set and weight information.
System requirements
| CPU | x86(x64) |
|---|---|
| Memory (RAM) | ≥ 16GB |
| Storage | ≥ 8GB |
| OS | Ubuntu 18.04, 20.04, 22.04 (x64) |
| LDD version | ≥ 2.28 |
Installation
Install required libraries
- libgl1-mesa-glx
- libglib2.0-0
Use the following command to install the required libraries.
sudo apt-get install -y --no-install-recommends libgl1-mesa-glx libglib2.0-0 make
Download the DX-COM package
Download the DX-COM package from the DX-M1 / DX-M1M SDK Downloads page and extract it.
DEEPX Developers is open for public registration. After registering and logging in, you can download all SDK software from S/W Download.
tar -xvf dx_com_M1_v2.1.0.tar.gz
Usage
Model configuration
Parameters used for model compilation must be configured in a JSON file.
Model input configuration
Specify the ONNX model input names and input shapes.
inputs : ONNX input name shape info
Example:
{
  "inputs": {
    "input.1": [ # ONNX input's name
      1,        # Batch Size(MUST BE SET AS 1)
      3,        # ONNX input's shape
      512,
      512
    ]
  }
Model calibration configuration
Configure the calibration method parameters.
calibration_num: Number of images used for calibration.
To minimize accuracy degradation, try different values of calibration_num. You can compile the model with different settings (such as calibration_num=1, 5, 10, 100, or 1000), measure the accuracy for each setting, and choose the value that yields the best accuracy.
calibration_method: Calibration method.
Options: ["ema", "minmax"]
In most cases, "ema" provides better accuracy, but in some cases "minmax" may work better.
Example:
...
"calibration_num": 100,
"calibration_method": "ema",
...
Data loader configuration
Configure calibration dataset parameters. It is recommended to use the same dataset that will be used for training or inference for calibration.
-
dataset_path: Root directory path of the calibration dataset (files will be searched recursively).
-
file_extensions: File extensions of target images.
-
preprocessings: Image preprocessing methods.
Example:
...
"default_loader": {
    "dataset_path": "/datasets/ILSVRC2012/",
    "file_extensions": [
      "jpeg",
      "jpg",
      "png",
      "JPEG"
    ],
    "preprocessings":
    [
      ...continued in next step...
    ]
  }
...
Input image preprocessing configuration
The preprocessing pipeline required before feeding images into the ONNX model. These configurations are used to preprocess the calibration dataset during model compilation. Items marked with (*) will be executed on the NPU side to reduce CPU workload. Therefore, preprocessing operations offloaded to the NPU should be omitted in the runtime software. If preprocessing is not needed, you can skip this section.
| Preprocessing item | Parameter/sub-option | Description | Example |
|---|---|---|---|
convertColor | RGB2BGR, BGR2RGB, BGR2GRAY, BGR2YCrCb | Convert color channel order | "RGB2BGR" |
resize | mode | default (opencv) or torchvision | "default" / "torchvision" |
width, height | Target image size (default mode only) | width: 224, height: 224 | |
size | Target short-side length (torchvision mode only) | size: 256 | |
interpolation | Interpolation method (optional)default mode: "NEAREST", "LINEAR"(default), "AREA", "CUBIC", "LANCZOS4" torchviion mode: "NEAREST", "LANCZOS", "BILINEAR"(default), "BICUBIC", "BOX", "HAMMING" | LINEAR, BILINEAR | |
centercrop | width, height | Crop the image from the center to the specified size | width: 224, height: 224 |
transpose | axis | Dimension transpose order | [2, 0, 1] |
normalize (*) | mean, std | Normalization; supports scalar or arrays | [0.5,0.5,0.5] |
mul (*) | x | Multiply all pixels by a value | x: 255 |
add (*) | x | Add a value to all pixels | x: 0.1 |
subtract (*) | x | Subtract a value from all pixels | x: 0.1 |
div (*) | x | Divide all pixels by a value | x: 255.0 |
expandDim | axis | Expand a dimension at the specified position | axis: 0 |
Items marked with (*) will be executed on the NPU side.
Model configuration example
"preprocessings": [               # Set pre-processings for Inference in order.
  {
      "convertColor": {
          "form": "BGR2RGB"     # Color Converter Format
      }
  },
  {
      "resize": {               # Resize Size
          "mode": "default",  # can be omitted (default)
          "width": 380,
          "height": 380        # this resize makes image shape into (380, 380, 3)
      }
  },
  {
      "centercrop": {         # Center crop the image
        "width": 320,
        "height": 320        # this centercrop makes image shape into (320, 320, 3)
        }
  },
  {
      "div": {                  # Division parameter
          "x": 255
      }
  },
  {
      "normalize": {            # mean, std for Normalization.
          "mean": [             # Dimension: 3D or single Value
              0.486,            # 3D: [0.486, 0.456, 0.406]
              0.456,            # single Value: [0.456] or 0.456
              0.406
          ],
          "std": [
              0.229,
              0.224,
              0.225
          ]
      }
  },
  {
      "transpose": {            # Transpose(permute) Axis Parameter
          "axis": [             # ex) HWC -> CHW : [2,0,1]
              2,
              0,
              1
          ]
      }
  },
  {
      "expandDim": {            # Expand Dimension
          "axis": 0
      }
  }
]
Accuracy enhancement scheme configuration
To further improve model accuracy, you can choose to use an Enhanced Scheme named DXQ-P0 ~ DXQ-P5.
- Each scheme is independent, so you can enable multiple schemes at the same time.
- These schemes do not necessarily improve accuracy in every case. Evaluate the effect based on your actual workload.
- Enabling these schemes in a CPU-only environment can significantly increase compilation time.
| Scheme | Name | Parameter description |
|---|---|---|
| DXQ-P0 | Fusing operations | alpha: fusion ratio, range 0 < alpha < 1.0, recommended: 0.5 |
| DXQ-P1 | Search optimal parameters | true/false. Enabling this will significantly increase CPU compilation time |
| DXQ-P2 | Relax calibration range to search optimal parameters | alpha: min ratio of calibration range, 0 < alpha < beta, recommended: 0.1; beta: max ratio of calibration range, alpha < beta < ∞, recommended: 1.0 |
| DXQ-P3 | Parameter fine-tuning (method 1) | num_samples: number of samples used for calibration, 0 < num_samples < ∞, recommended: 1024 |
| DXQ-P4 | Parameter fine-tuning (method 2) | Same as DXQ-P3 |
| DXQ-P5 | Parameter fine-tuning (method 3) | Same as DXQ-P3 |
DXQ-P3, DXQ-P4, and DXQ-P5 use the same parameters, but apply different fine-tuning methods.
Enhanced scheme configuration example
  "enhanced_scheme": {
    "DXQ-P0": {
        "alpha": 0.5
    },
    "DXQ-P1": true,
    "DXQ-P2": {
        "alpha": 0.1,
        "beta": 1,
        "cosim_num": 2
    },
    "DXQ-P3": {
        "num_samples": 1024
    },
    "DXQ-P4": {
        "num_samples": 1024
    },
    "DXQ-P5": {
        "num_samples": 1024
    }
  },
Enhanced scheme single-switch configuration example
  "enhanced_scheme": {
    "DXQ-P0": false,      # this line can be remove for not using 'DXQ-P0' scheme
    "DXQ-P1": false,
    "DXQ-P2": false,
    "DXQ-P3": true,        # only 'DXQ-P3' scheme works
    "DXQ-P4": false,
    "DXQ-P5": false
  },
| Name | Compile speed | Likelihood of accuracy improvement |
|---|---|---|
| DXQ-P0 | Very fast | Low |
| DXQ-P1 | Fast | Low-Medium |
| DXQ-P2 | Slow | Medium-High |
| DXQ-P3 | Very slow | High |
| DXQ-P4 | Very slow | High |
| DXQ-P5 | Very slow | High |
PPU post-processing acceleration
PPU (Post-Processing Unit) provides hardware-accelerated post-processing for object detection models. If your model uses a YOLO-family architecture, you can add PPU configuration parameters to the model compilation config file.
Supported PPU types
There are two object detection model architectures that support PPU.
-
Type 0 (Anchor-Based YOLO)
Designed for anchor-based models such as YOLOv3, YOLOv4, YOLOv5, and YOLOv7.
-
Type 1 (Anchor-Free YOLO)
Designed for anchor-free models such as YOLOX.
Identify ONNX nodes that can use PPU
- Type 0
- Type 1
Trace back from the model outputs and locate the output heads where the Conv output shape is [1, num_anchors*(5+num_classes), H, W]. After these conv layers, reshape, permute, and other post-processing operations are typically applied.
Take yolo5s.onnx as an example. For yolov5s, num_anchors is 3 and num_classes is 80, so you should find Conv nodes with a [1, 255, H, W] output feature. By tracing back from the model outputs, you can identify the three Conv nodes: Conv_196, Conv_308, and Conv_420, and configure these node names in the PPU section of the compilation config file.
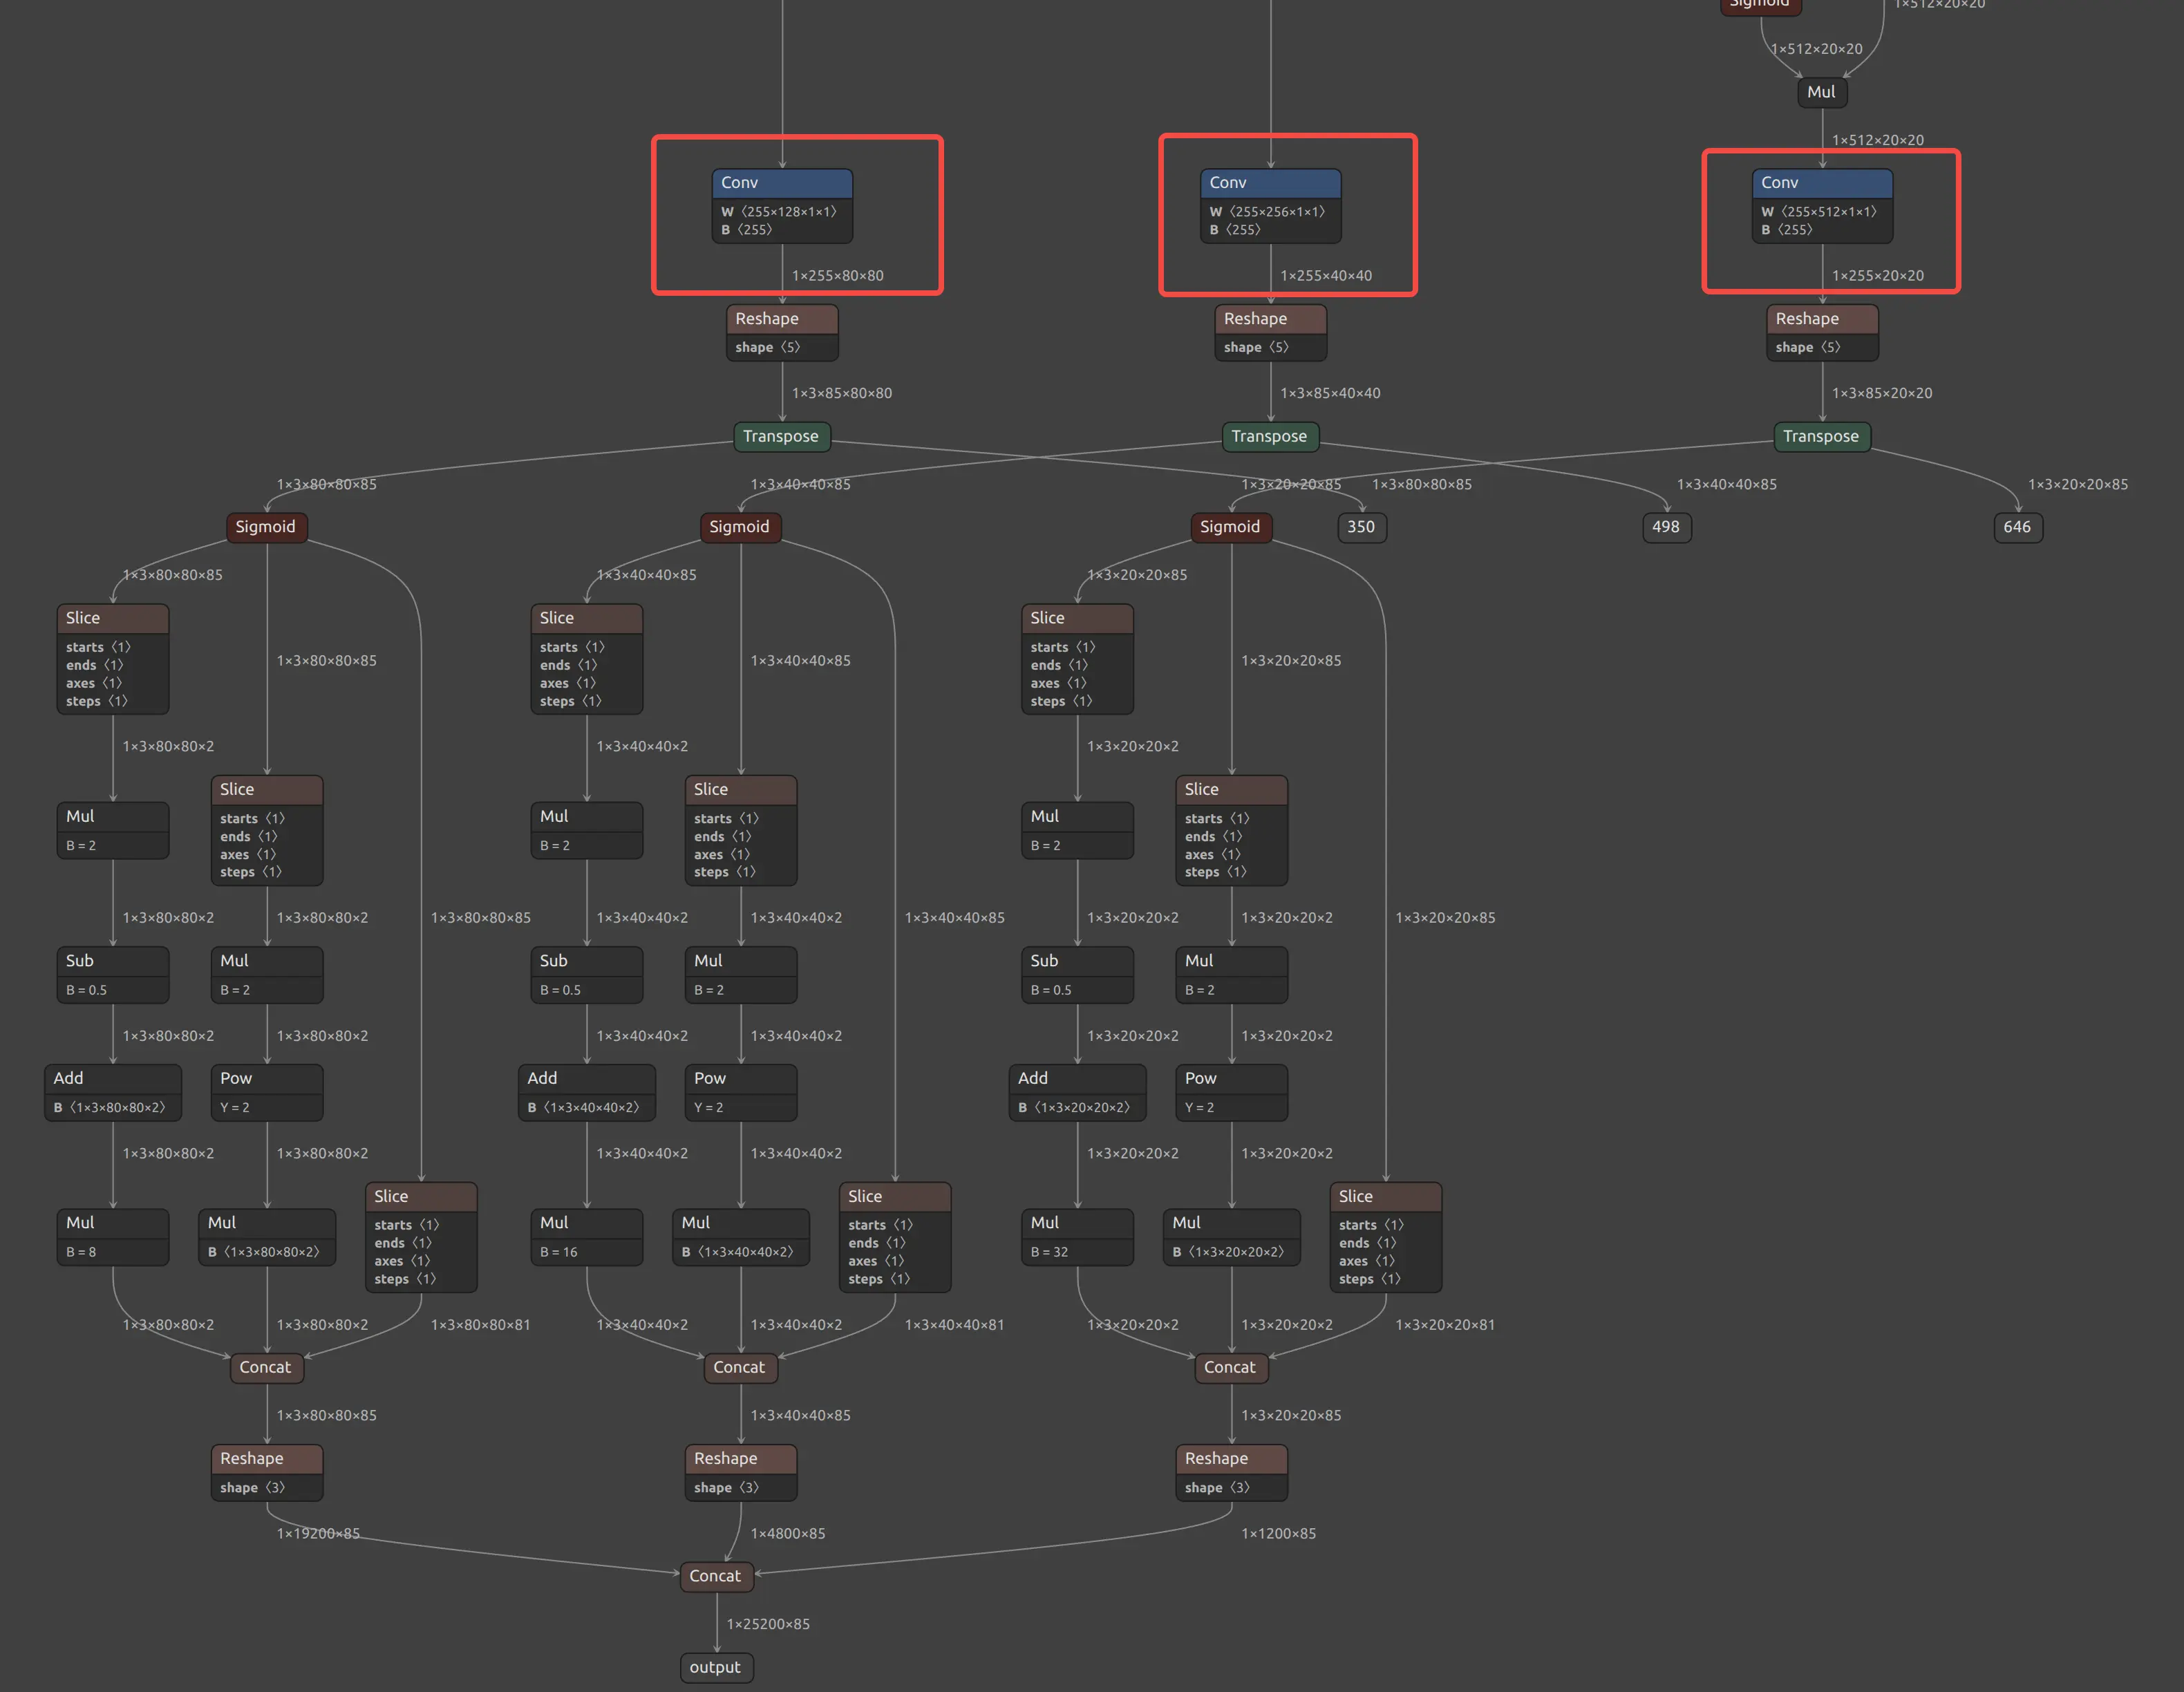
Yolov5s PPU Conv node
"ppu": {
    "type":0,
    "conf_thres":0.25,
    "activation": "Sigmoid",
    "num_classes": 80,
    "layer": {
      "Conv_196": {
        "num_anchors": 3
      },
      "Conv_308": {
        "num_anchors": 3
      },
      "Conv_420": {
        "num_anchors": 3
      }
    }
  },
Trace back from the model outputs. For each detection scale, find three types of Conv nodes: bbox, obj_conf, and cls_conf.
-
bbox: conv layer that outputs bounding box regression values [1,4,H,W] -
obj_conf: conv layer that outputs object confidence scores [1,1,H,W] -
cls_conf: conv layer that outputs class prediction scores [1,80,HW]
Take YOLOXS-1.onnx as an example. YOLOXS has three scales. You need to locate a total of nine Conv nodes for bbox, obj_conf, and cls_conf. By tracing back from the outputs, you can identify these 9 Conv nodes and configure them in the PPU section of the compilation config file.
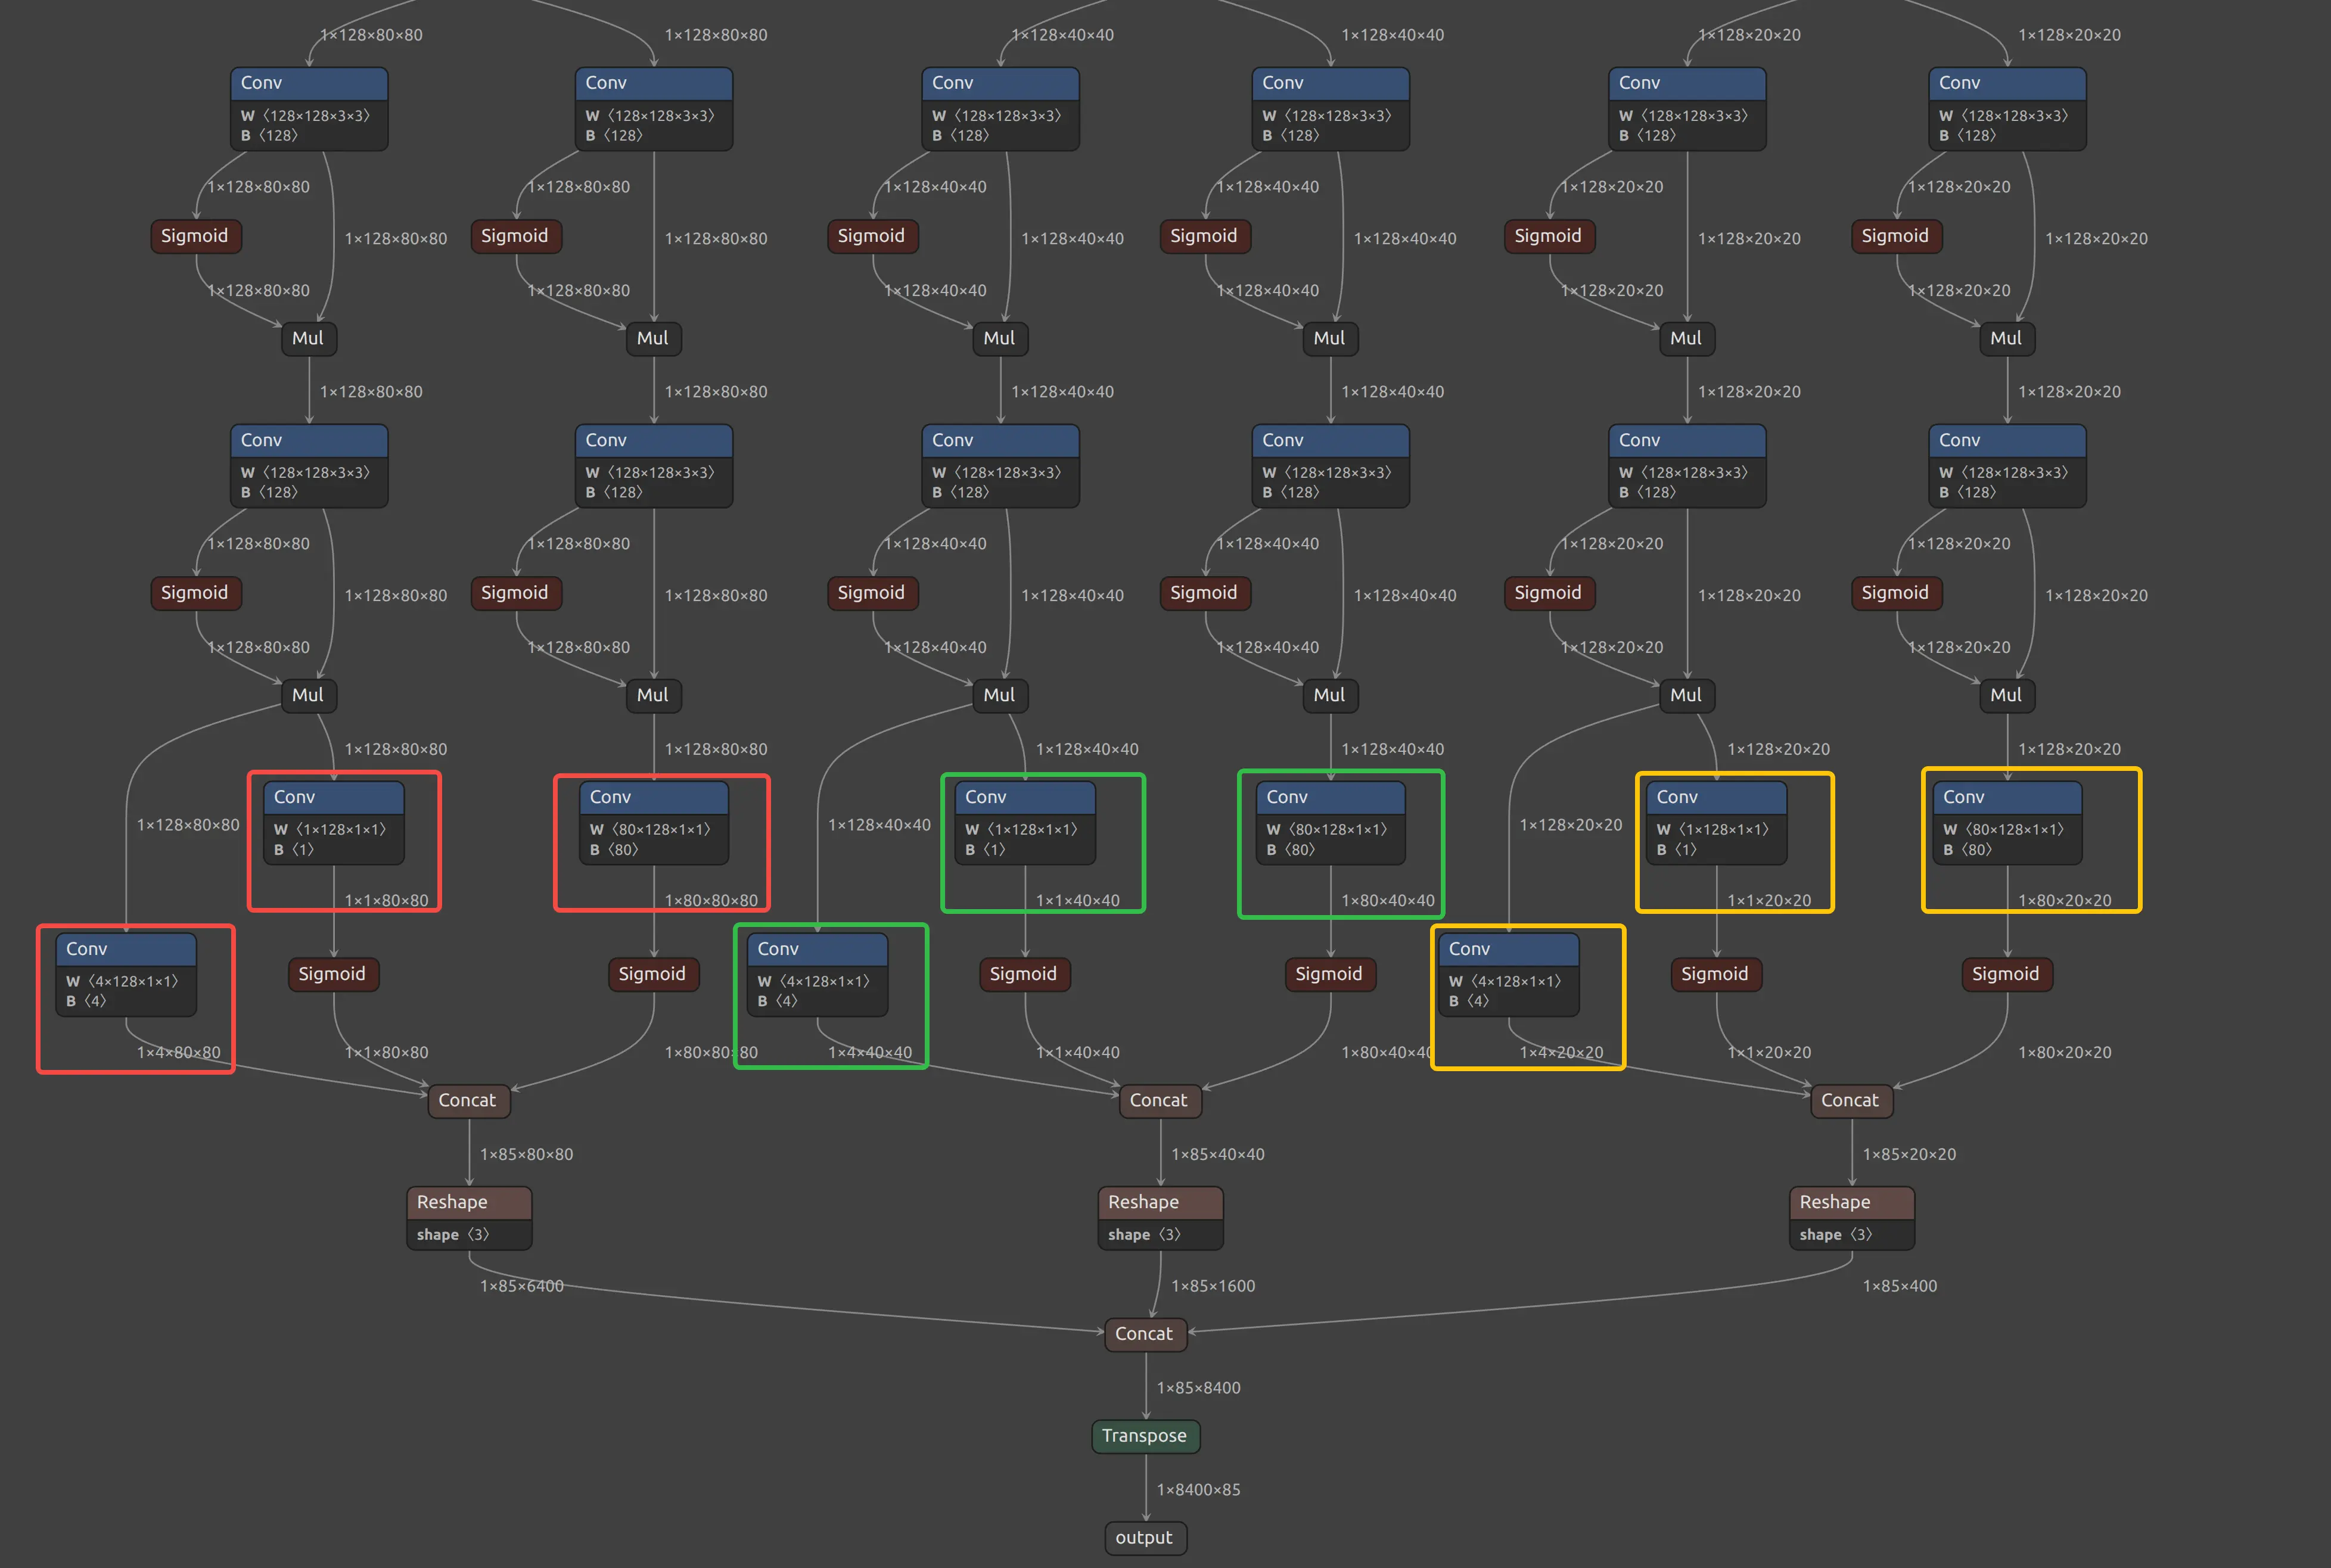
Yolov5s PPU Conv node
"ppu": {
    "type":1,
    "conf_thres":0.25,
    "num_classes": 80,
    "layer": [
    {
    "bbox": "Conv_261",
    "obj_conf": "Conv_262",
    "cls_conf": "Conv_254"
    },
    {
    "bbox": "Conv_282",
    "obj_conf": "Conv_283",
    "cls_conf": "Conv_275"
    },
    {
    "bbox": "Conv_303",
    "obj_conf": "Conv_304",
    "cls_conf": "Conv_296"
    }
    ]
  },
Parameter description
| Parameter | Type | Description |
|---|---|---|
type | int | Model type identifier. Set to 1 for Anchor-Free YOLO models |
conf_thres | float | Confidence threshold for filtering detection results. Note: This value is fixed at compile time and cannot be changed at runtime. |
num_classes | int | Number of object categories supported by the model |
layer | list | Detection layer configuration list. Each element corresponds to one detection head and contains the following fields: |
layer.bbox | string | Layer name that outputs bounding box coordinates (Bounding Box) |
layer.obj_conf | string | Layer name that outputs object confidence (Object Confidence) |
layer.cls_conf | string | Layer name that outputs class confidence (Class Confidence) |
Run model compilation
After completing the model configuration file, use the following command to compile the model.
dx_com  -m <MODEL_PATH> -c <CONFIG_PATH> -o <OUTPUT_DIR>
        -m or --model_path <MODEL_PATH>: Path to Onnx Model[*.onnx]
        -c or --config_path <CONFIG_PATH>: Path to Model Config[*.json]
        -o or –output_dir <OUTPUT_PATH>: Path to Output Data Save Directory
        (optional) --shrink : only including compiled model to run NPU
Compilation example
The sample directory under dx-com contains multiple example compilation configuration files.
$./dx_com/dx_com    \
    -m sample/MobilenetV1.onnx \
    -c sample/MobilenetV1.json \
    -o output/mobilenetv1

# shrink option
$./dx_com/dx_com    \
    -m sample/MobilenetV1.onnx \
    -c sample/MobilenetV1.json \
    -o output/mobilenetv1 \
    --shrink
DX-COM only supports models with batch size 1. If your model input shape is (batchsize,C,H,W) or (batchsize,H,W,C), make sure batchsize is 1.
After successful compilation, the DXNN model will be saved under the output/mobilenetv1 directory.
Build DX-COM documentation
For more details on how to use DX-COM, build the full documentation and refer to it.
Clone the DX-ALL-SUITE repository
Follow DX-ALL-SUITE to clone the specified version of the DX-ALL-SUITE repository.
Install MkDocs
pip install mkdocs mkdocs-material mkdocs-video pymdown-extensions mkdocs-with-pdf markdown-grid-tables
Build the docs
cd dx-all-suite/dx-compiler
mkdocs build
After the build finishes, DEEPX_DX-COM_UM_v2.1.0_Nov_2025.pdf will be generated in the current directory.
Serve the docs
You can access the documentation website in a browser.
mkdocs serve