Install OS to eMMC
Loader file and system image files can be downloaded from Resource Download.
This guide explains how to use the RKDevTool to flash a system image to an eMMC module.
Note: Ensure the motherboard is in Maskrom mode and properly recognized by the system.
- Windows
- Linux / MacOS
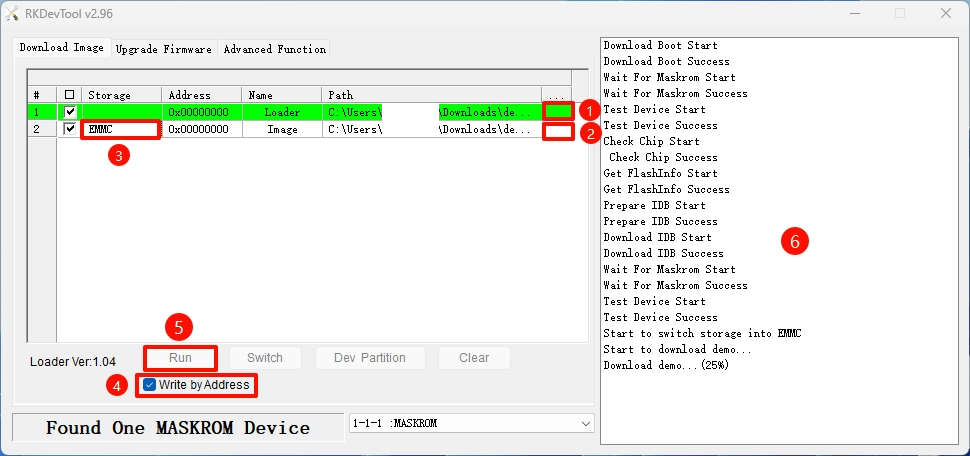
On Windows, open the RKDevTool and follow these steps to install the system to the eMMC module.
① : Select the corresponding Loader file for your motherboard
② : Select the corresponding system image for your motherboard
③ : Choose the eMMC option as the system storage medium
④ : Check the Write by Address option
⑤ : Click the RUN button to execute all operations
⑥ : Monitor the operation progress through this interface
Disconnect the motherboard from the PC, then power cycle the device. The system will automatically boot from the eMMC module.
On Linux/MacOS, use the terminal command line to install the system to the eMMC module.
- Run the Loader file
Replace demo.bin with the Loader file corresponding to your motherboard.
sudo rkdeveloptool db demo.bin
- Install the system image
Replace demo.img with the system image corresponding to your motherboard.
sudo rkdeveloptool wl 0 demo.img
- Reboot the system
Disconnect the motherboard from the PC, then power cycle the device. The system will automatically boot from the eMMC module.
sudo rkdeveloptool rd