MediaPipe Examples
This document provides examples of MediaPipe's face detection, hand detection, pose detection, holistic detection, background segmentation, and 3D object detection features.
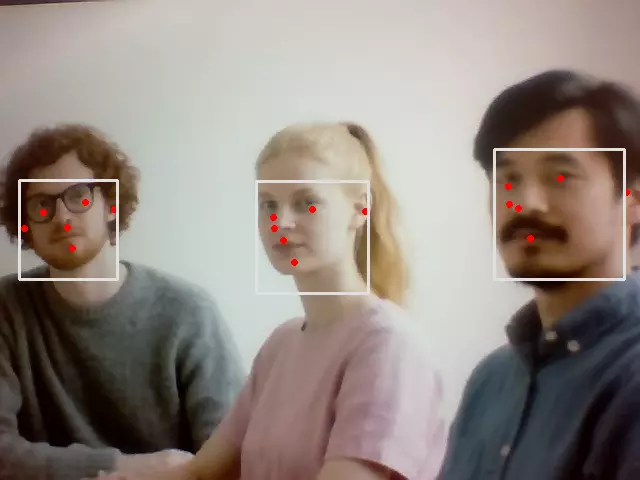
Face Detection
This example captures video from the camera, detects faces, and draws bounding boxes around them.
To run this example:
- Create a new file named
face_detection.py - Copy the following code into
face_detection.py - Run the example with
python3 face_detection.py - Click on the preview window and press 'q' to quit
face_detection.py
#!/usr/bin/env python3
# -_- encoding: utf-8 -_-

import cv2
import mediapipe as mp
mp_face_detection = mp.solutions.face_detection
mp_drawing = mp.solutions.drawing_utils

cap = cv2.VideoCapture(0)
with mp_face_detection.FaceDetection(
model_selection=0, min_detection_confidence=0.5) as face_detection:
while cap.isOpened():
success, image = cap.read()
if not success:
print("Ignoring empty camera frame.") # If loading a video, use 'break' instead of 'continue'.
continue

    # To improve performance, optionally mark the image as not writeable to
    # pass by reference.
    image.flags.writeable = False
    image = cv2.cvtColor(image, cv2.COLOR_BGR2RGB)
    results = face_detection.process(image)

    # Draw the face detection annotations on the image.
    image.flags.writeable = True
    image = cv2.cvtColor(image, cv2.COLOR_RGB2BGR)
    if results.detections:
      for detection in results.detections:
        mp_drawing.draw_detection(image, detection)
    # Flip the image horizontally for a selfie-view display.
    cv2.imshow('MediaPipe Face Detection', cv2.flip(image, 1))
    if cv2.waitKey(1) & 0xFF == ord('q'):
      break

cap.release()
cv2.destroyAllWindows()
Preview:
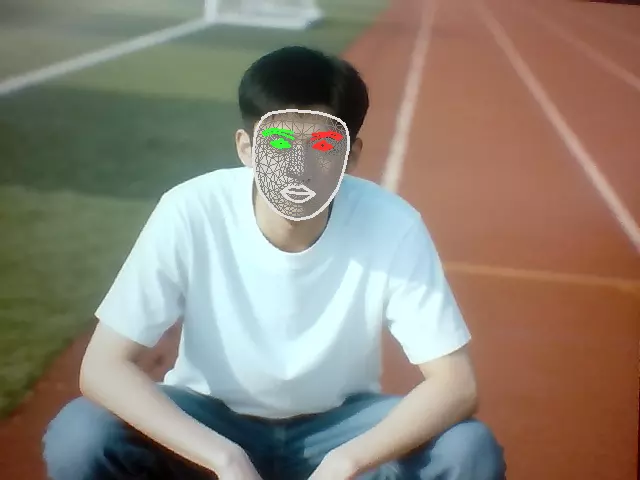
Face Mesh
This example captures video from the camera, detects faces, and applies a mesh overlay on detected faces.
To run this example:
- Create a new file named
face_mesh.py - Copy the following code into
face_mesh.py - Run the example with
python3 face_mesh.py - Click on the preview window and press 'q' to quit
face_mesh.py
#!/usr/bin/env python3

# -_- encoding: utf-8 -_-

import cv2
import mediapipe as mp
mp_drawing = mp.solutions.drawing_utils
mp_drawing_styles = mp.solutions.drawing_styles
mp_face_mesh = mp.solutions.face_mesh

drawing_spec = mp_drawing.DrawingSpec(thickness=1, circle_radius=1)
cap = cv2.VideoCapture(0)
with mp_face_mesh.FaceMesh(
max_num_faces=1,
refine_landmarks=True,
min_detection_confidence=0.5,
min_tracking_confidence=0.5) as face_mesh:
while cap.isOpened():
success, image = cap.read()
if not success:
print("Ignoring empty camera frame.") # If loading a video, use 'break' instead of 'continue'.
continue

    # To improve performance, optionally mark the image as not writeable to
    # pass by reference.
    image.flags.writeable = False
    image = cv2.cvtColor(image, cv2.COLOR_BGR2RGB)
    results = face_mesh.process(image)

    # Draw the face mesh annotations on the image.
    image.flags.writeable = True
    image = cv2.cvtColor(image, cv2.COLOR_RGB2BGR)
    if results.multi_face_landmarks:
      for face_landmarks in results.multi_face_landmarks:
        mp_drawing.draw_landmarks(
            image=image,
            landmark_list=face_landmarks,
            connections=mp_face_mesh.FACEMESH_TESSELLATION,
            landmark_drawing_spec=None,
            connection_drawing_spec=mp_drawing_styles
            .get_default_face_mesh_tessellation_style())
        mp_drawing.draw_landmarks(
            image=image,
            landmark_list=face_landmarks,
            connections=mp_face_mesh.FACEMESH_CONTOURS,
            landmark_drawing_spec=None,
            connection_drawing_spec=mp_drawing_styles
            .get_default_face_mesh_contours_style())
        mp_drawing.draw_landmarks(
            image=image,
            landmark_list=face_landmarks,
            connections=mp_face_mesh.FACEMESH_IRISES,
            landmark_drawing_spec=None,
            connection_drawing_spec=mp_drawing_styles
            .get_default_face_mesh_iris_connections_style())
    # Flip the image horizontally for a selfie-view display.
    cv2.imshow('MediaPipe Face Mesh', cv2.flip(image, 1))
    if cv2.waitKey(1) & 0xFF == ord('q'):
      break

cap.release()
cv2.destroyAllWindows()
Preview:
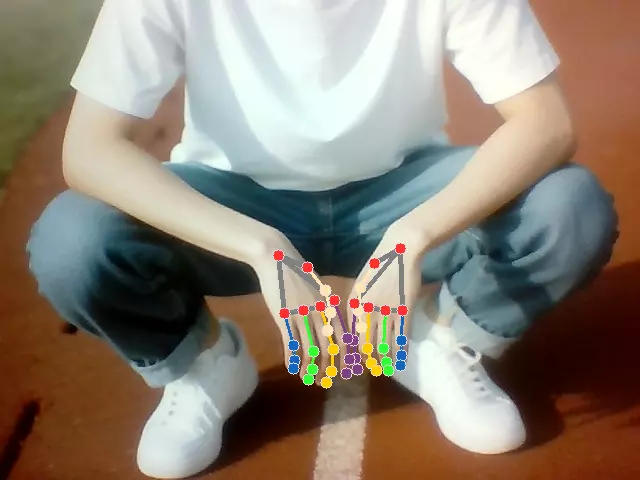
Hand Detection
Read the camera image and perform hand detection, drawing the skeleton on the detected hand.
Run the example steps:
- Create a new file named
hand_detection.py - Copy the code into
hand_detection.py - Run the example with
python3 hand_detection.py - Click on the preview window and press 'q' to quit
hand_detection.py
#!/usr/bin/env python3

# -_- encoding: utf-8 -_-

import cv2
import mediapipe as mp
mp_drawing = mp.solutions.drawing_utils
mp_drawing_styles = mp.solutions.drawing_styles
mp_hands = mp.solutions.hands

cap = cv2.VideoCapture(0)
with mp_hands.Hands(
model_complexity=0,
min_detection_confidence=0.5,
min_tracking_confidence=0.5) as hands:
while cap.isOpened():
success, image = cap.read()
if not success:
print("Ignoring empty camera frame.") # If loading a video, use 'break' instead of 'continue'.
continue

    # To improve performance, optionally mark the image as not writeable to
    # pass by reference.
    image.flags.writeable = False
    image = cv2.cvtColor(image, cv2.COLOR_BGR2RGB)
    results = hands.process(image)

    # Draw the hand annotations on the image.
    image.flags.writeable = True
    image = cv2.cvtColor(image, cv2.COLOR_RGB2BGR)
    if results.multi_hand_landmarks:
      for hand_landmarks in results.multi_hand_landmarks:
        mp_drawing.draw_landmarks(
            image,
            hand_landmarks,
            mp_hands.HAND_CONNECTIONS,
            mp_drawing_styles.get_default_hand_landmarks_style(),
            mp_drawing_styles.get_default_hand_connections_style())
    # Flip the image horizontally for a selfie-view display.
    cv2.imshow('MediaPipe Hands', cv2.flip(image, 1))
    if cv2.waitKey(1) & 0xFF == ord('q'):
      break

cap.release()
cv2.destroyAllWindows()
Preview:
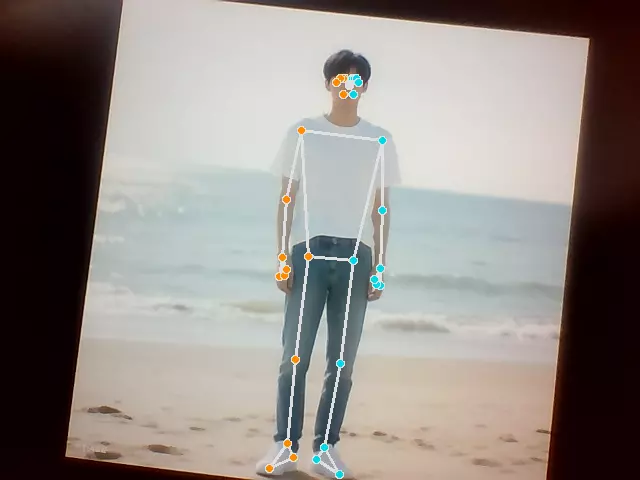
Pose Detection
Read the camera feed and perform human pose detection, drawing the skeleton on the detected body.
To run this example:
- Create a new file named
pose_detection.py - Copy the following code into
pose_detection.py - Run the example with
python3 pose_detection.py - Click on the preview window and press 'q' to quit
pose_detection.py
#!/usr/bin/env python3

# -_- encoding: utf-8 -_-

import cv2
import mediapipe as mp
mp_drawing = mp.solutions.drawing_utils
mp_drawing_styles = mp.solutions.drawing_styles
mp_pose = mp.solutions.pose

cap = cv2.VideoCapture(0)
with mp_pose.Pose(
min_detection_confidence=0.5,
min_tracking_confidence=0.5) as pose:
while cap.isOpened():
success, image = cap.read()
if not success:
print("Ignoring empty camera frame.") # If loading a video, use 'break' instead of 'continue'.
continue

    # To improve performance, optionally mark the image as not writeable to
    # pass by reference.
    image.flags.writeable = False
    image = cv2.cvtColor(image, cv2.COLOR_BGR2RGB)
    results = pose.process(image)

    # Draw the pose annotation on the image.
    image.flags.writeable = True
    image = cv2.cvtColor(image, cv2.COLOR_RGB2BGR)
    mp_drawing.draw_landmarks(
        image,
        results.pose_landmarks,
        mp_pose.POSE_CONNECTIONS,
        landmark_drawing_spec=mp_drawing_styles.get_default_pose_landmarks_style())
    # Flip the image horizontally for a selfie-view display.
    cv2.imshow('MediaPipe Pose', cv2.flip(image, 1))
    if cv2.waitKey(1) & 0xFF == ord('q'):
      break

cap.release()
cv2.destroyAllWindows()
Preview:
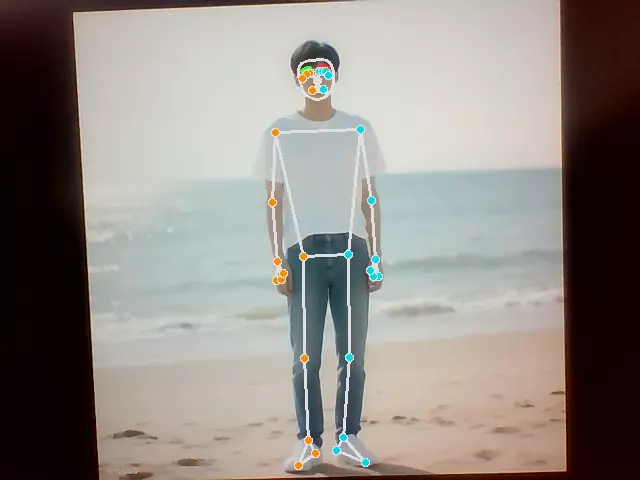
Holistic Detection
Read the camera image and perform holistic detection, drawing the skeleton and mask on the detected human body.
Run the example steps:
- Create a new file named
holistic_detection.py - Copy the code into
holistic_detection.py - Run the example with
python3 holistic_detection.py - Click on the preview window and press 'q' to quit
holistic_detection.py
#!/usr/bin/env python3

# -_- encoding: utf-8 -_-

import cv2
import mediapipe as mp
mp_drawing = mp.solutions.drawing_utils
mp_drawing_styles = mp.solutions.drawing_styles
mp_holistic = mp.solutions.holistic

cap = cv2.VideoCapture(0)
with mp_holistic.Holistic(
min_detection_confidence=0.5,
min_tracking_confidence=0.5) as holistic:
while cap.isOpened():
success, image = cap.read()
if not success:
print("Ignoring empty camera frame.") # If loading a video, use 'break' instead of 'continue'.
continue

    # To improve performance, optionally mark the image as not writeable to
    # pass by reference.
    image.flags.writeable = False
    image = cv2.cvtColor(image, cv2.COLOR_BGR2RGB)
    results = holistic.process(image)

    # Draw landmark annotation on the image.
    image.flags.writeable = True
    image = cv2.cvtColor(image, cv2.COLOR_RGB2BGR)
    mp_drawing.draw_landmarks(
        image,
        results.face_landmarks,
        mp_holistic.FACEMESH_CONTOURS,
        landmark_drawing_spec=None,
        connection_drawing_spec=mp_drawing_styles
        .get_default_face_mesh_contours_style())
    mp_drawing.draw_landmarks(
        image,
        results.pose_landmarks,
        mp_holistic.POSE_CONNECTIONS,
        landmark_drawing_spec=mp_drawing_styles
        .get_default_pose_landmarks_style())
    # Flip the image horizontally for a selfie-view display.
    cv2.imshow('MediaPipe Holistic', cv2.flip(image, 1))
    if cv2.waitKey(1) & 0xFF == ord('q'):
      break

cap.release()
cv2.destroyAllWindows()
Preview:
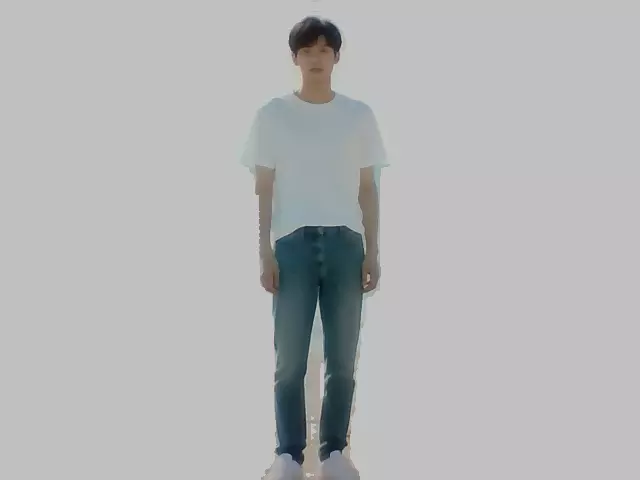
Background Segmentation
Read the camera image and perform background segmentation, replacing the background with a solid color.
Run the example steps:
- Create a new file named
back_seg.py - Copy the code into
back_seg.py - Run the example with
python3 back_seg.py - Click on the preview window and press 'q' to quit
back_seg.py
#!/usr/bin/env python3

# -_- encoding: utf-8 -_-

import cv2
import mediapipe as mp
import numpy as np
mp_drawing = mp.solutions.drawing_utils
mp_selfie_segmentation = mp.solutions.selfie_segmentation

BG_COLOR = (192, 192, 192) # gray
cap = cv2.VideoCapture(0)
with mp_selfie_segmentation.SelfieSegmentation(
model_selection=1) as selfie_segmentation:
bg_image = None
while cap.isOpened():
success, image = cap.read()
if not success:
print("Ignoring empty camera frame.") # If loading a video, use 'break' instead of 'continue'.
continue

    # Flip the image horizontally for a later selfie-view display, and convert
    # the BGR image to RGB.
    image = cv2.cvtColor(cv2.flip(image, 1), cv2.COLOR_BGR2RGB)
    # To improve performance, optionally mark the image as not writeable to
    # pass by reference.
    image.flags.writeable = False
    results = selfie_segmentation.process(image)

    image.flags.writeable = True
    image = cv2.cvtColor(image, cv2.COLOR_RGB2BGR)

    # Draw selfie segmentation on the background image.
    # To improve segmentation around boundaries, consider applying a joint
    # bilateral filter to "results.segmentation_mask" with "image".
    condition = np.stack(
      (results.segmentation_mask,) * 3, axis=-1) > 0.1
    # The background can be customized.
    #   a) Load an image (with the same width and height of the input image) to
    #      be the background, e.g., bg_image = cv2.imread('/path/to/image/file')
    #   b) Blur the input image by applying image filtering, e.g.,
    #      bg_image = cv2.GaussianBlur(image,(55,55),0)
    if bg_image is None:
      bg_image = np.zeros(image.shape, dtype=np.uint8)
      bg_image[:] = BG_COLOR
    output_image = np.where(condition, image, bg_image)

    cv2.imshow('MediaPipe Selfie Segmentation', output_image)
    if cv2.waitKey(1) & 0xFF == ord('q'):
      break

cap.release()
cv2.destroyAllWindows()
Preview:
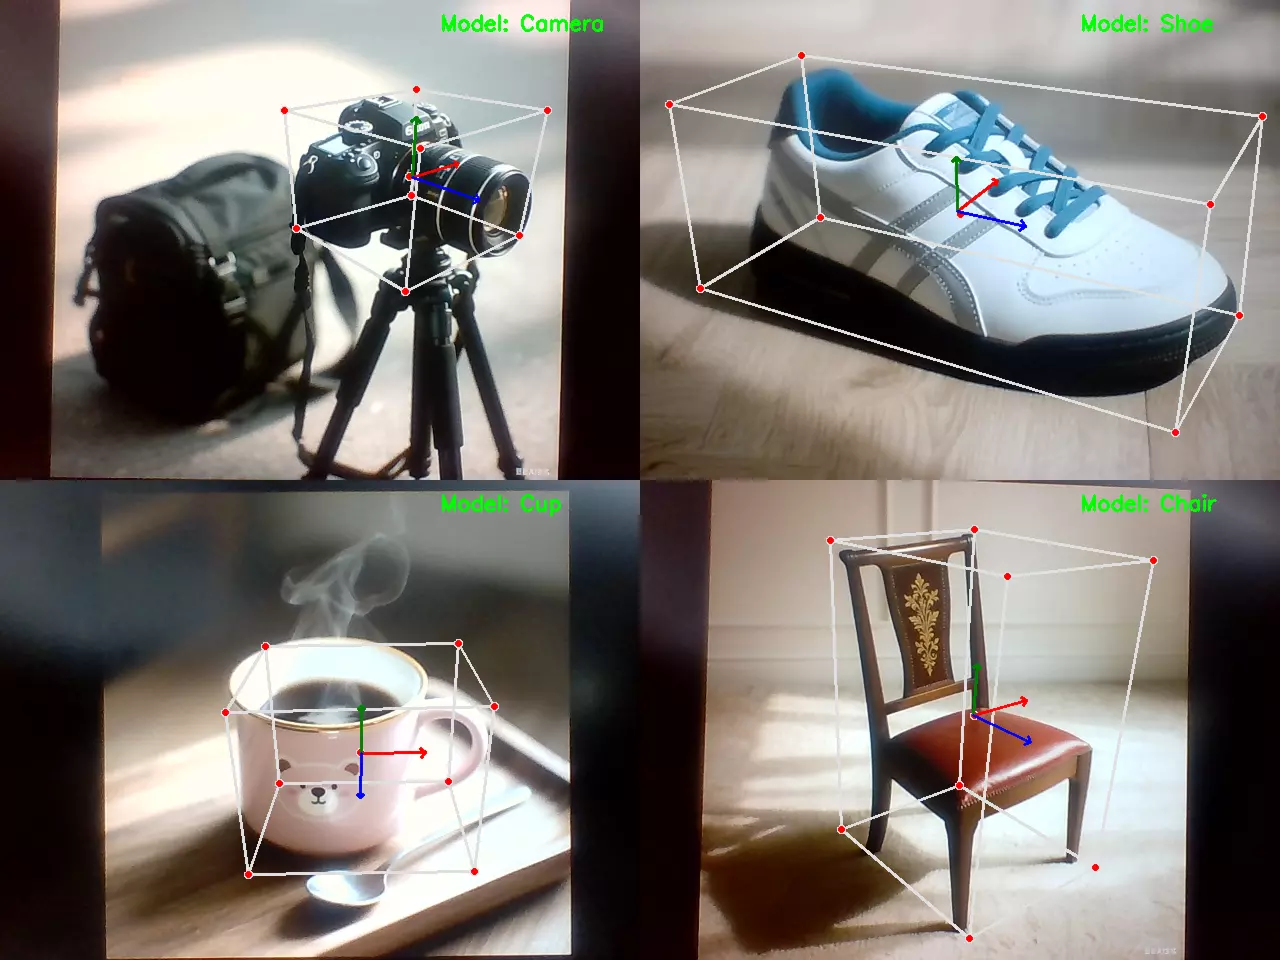
3D Object Detection
Read the camera feed and perform 3D object detection (supports four models: shoe, chair, cup, and camera), then draw 3D bounding boxes around the detected objects.
To run this example:
- Create a new file named
3d_object_detection.py - Copy the following code into
3d_object_detection.py - Run the example with
python3 3d_object_detection.py - Click on the preview window and press 'q' to quit
3d_object_detection.py
#!/usr/bin/env python3

# -_- coding: utf-8 -_-

import cv2
import mediapipe as mp

# Initialize MediaPipe components

mp_drawing = mp.solutions.drawing_utils
mp_objectron = mp.solutions.objectron

# Available models

MODELS = ['Shoe', 'Chair', 'Cup', 'Camera']
current_model = 0 # Start with first model

# Initialize video capture

cap = cv2.VideoCapture(0)

# Create initial Objectron instance

objectron = mp_objectron.Objectron(
static_image_mode=False,
max_num_objects=5,
min_detection_confidence=0.5,
min_tracking_confidence=0.99,
model_name=MODELS[current_model]
)

while cap.isOpened():
success, image = cap.read()
if not success:
print("Ignoring empty camera frame.")
continue

    # Process image
    image.flags.writeable = False
    image = cv2.cvtColor(image, cv2.COLOR_BGR2RGB)
    results = objectron.process(image)

    # Draw results
    image.flags.writeable = True
    image = cv2.cvtColor(image, cv2.COLOR_RGB2BGR)

    if results.detected_objects:
        for detected_object in results.detected_objects:
            mp_drawing.draw_landmarks(
                image, detected_object.landmarks_2d, mp_objectron.BOX_CONNECTIONS)
            mp_drawing.draw_axis(image, detected_object.rotation,
                               detected_object.translation)

    # # First flip the image for display
    # image = cv2.flip(image, 1)

    # Then add text to the already-mirrored image
    # Note: We adjust the x-position to account for mirroring
    text_x = image.shape[1] - 200  # Right side position
    cv2.putText(image, f"Model: {MODELS[current_model]}", (text_x, 30),
               cv2.FONT_HERSHEY_SIMPLEX, 0.7, (0, 255, 0), 2)

    # Show final view
    cv2.imshow('MediaPipe Objectron', image)

    # Key handling
    key = cv2.waitKey(5) & 0xFF
    if key == 27 or key == ord('q'):  # ESC or 'q' to quit
        break
    elif key == ord('f'):  # 'f' for next model
        current_model = (current_model + 1) % len(MODELS)
        objectron = mp_objectron.Objectron(
            static_image_mode=False,
            max_num_objects=5,
            min_detection_confidence=0.5,
            min_tracking_confidence=0.99,
            model_name=MODELS[current_model]
        )
        print(f"Switched to model: {MODELS[current_model]}")

cap.release()
cv2.destroyAllWindows()
Preview: