Install Windows on ARM on Radxa Dragon Q6A
- Currently, the system lacks a wireless NIC driver. Please use a wired network or other methods to get online for further updates.
- The installation process may require multiple reboots. Make sure the power supply is stable and avoid cutting power during critical steps.
- Back up all important data before installation and driver deployment.
- Using SD storage is not recommended. Please use UFS or NVMe storage instead.
Feature Overview (Brief)
Before installing the dedicated drivers, Dragon Q6A can already boot from a generic Windows ARM64 installation image, with the following basic features available:
- HDMI output (via UEFI GOP);
- PCIe (you can use NVMe as the system drive; the default image may not include network card drivers);
- eMMC and UFS storage;
- USB2 and USB3 (in some cases, devices must be connected before booting into the system).
After installing the official drivers, you can further get:
- Hardware video codec acceleration (up to 4K@60fps 10-bit decode via D3D11VA / MediaFoundation, etc.);
- GPU features (Direct3D 12, OpenCL 3.0, Vulkan 1.3, OpenGL 4.1, etc. — OpenGL/OpenCL/Vulkan compatibility packs must be installed from Microsoft Store);
- MIPI CSI camera (Qualcomm Spectra 570L ISP, supporting 4K@30fps 10-bit recording);
- 40-pin GPIO and other expansion capabilities (see the GPIO demo).
Prerequisites
Before installing Windows on ARM, make sure:
- You have a Radxa Dragon Q6A board and a suitable power adapter;
- You have an HDMI display, USB keyboard and mouse available;
- You have a Windows PC to create the Windows installation USB drive;
- Dragon Q6A has been flashed with a UEFI firmware that supports booting Windows (see spi-fw).
Prepare the Windows Installation USB Drive
The recommended way to install Windows is to follow the standard Windows setup flow: first create a Windows ARM64 installation USB drive on a PC, then boot the installer from USB on Q6A.
Download the Windows ARM64 ISO Image
You need a Windows 11 ARM64 ISO image. Recommended sources include:
It is recommended to use Windows 11 24H2 or later to get better application compatibility (Prism emulator, AVX/AVX2 support, etc.).
The ISO image is large. Please choose a suitable mirror/download source and, after the download completes, verify file integrity using checksum tools such as MD5 or SHA256.
Create the Installation USB with Rufus
-
Prepare a USB drive with at least 16 GB of capacity (all data on it will be erased);
-
Download the latest Rufus from https://rufus.ie/ and run it on the Windows PC;
-
In Rufus, configure:
- Device: your USB drive;
- Boot selection: the Windows ARM64 ISO you downloaded;
- Partition scheme / Target system: keep the defaults (typically GPT + UEFI);
- Configure remaining options following the example below:
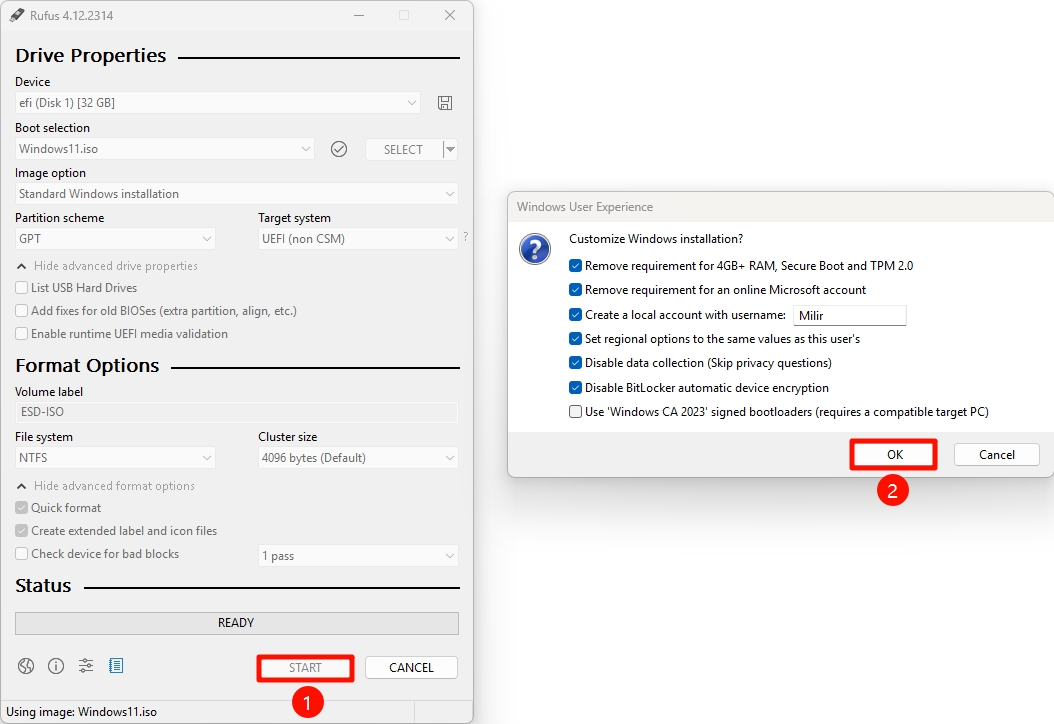
-
Click Start and follow Rufus prompts to write the image;
-
When finished, safely eject the USB drive from the PC.
2. Boot the Installer from USB
- Plug the Windows installation USB drive into any USB port on the Dragon Q6A;
- Connect HDMI display, keyboard and mouse, then power on the board;
- When the splash/boot screen appears, press F12 to enter the boot menu;
- In the boot menu, select the USB boot entry (for example,
UEFI: USB ...) and press Enter; - The system will boot the standard Windows installer from the USB drive. Then follow the normal Windows installation steps:
- Choose language, time and keyboard layout;
- Choose Custom installation, select the target disk (NVMe/UFS/eMMC, etc.);
- Delete/create partitions as needed, then select the target partition to install to;
- Wait for file copying and several automatic reboots to complete.
After entering the desktop for the first time, it is strongly recommended to disable automatic sleep in Settings, because without proper drivers the device may fail to wake up from sleep.
3. Install Drivers
After Windows installation, the system still lacks specific drivers (network, GPU, audio, etc.). You need to install the Radxa Dragon Q6A Windows driver package.
3.1 Prepare the Driver Package
- On another computer, download the Dragon Q6A Windows driver package (download link);
- Extract the archive and copy the extracted folder to the Q6A Windows system via USB drive or network (if available);
- Assume the extracted directory contains the following key files:
1-testsigning.batradxa_wos_test_cert.reg2-DriverSetInst.bat- Plus various
.infand driver binary files.
3.2 Enable Test Signing and Import Certificate
- In the extracted folder, locate
1-testsigning.bat; - Right-click it and select Run as administrator, then follow the on-screen instructions;
- Double-click
radxa_wos_test_cert.regand confirm to import it into the registry in order to install the test certificate; - Reboot the system after this step.
Enabling test signing mode and importing the certificate is required to allow installation of Radxa-provided test-signed drivers, otherwise Windows may block them.
3.3 Install the Driver Set
- After reboot, log back into the desktop and open the driver package folder again;
- Right-click
2-DriverSetInst.batand select Run as administrator; - Wait for the script to install all related drivers (you may see one or more command windows and device refresh events);
- Reboot the system again after installation completes.
At this point, most hardware including networking, GPU, multimedia and audio should work properly under Windows.
3.4 Wi-Fi and Bluetooth Driver
The default Dragon Q6A driver package does not include Wi-Fi and Bluetooth drivers. To use Wi-Fi and Bluetooth on Windows, follow the steps below.
- Download the driver package aicwlan_arm64_0935761.zip
- Extract the downloaded archive, right-click
aicwlan.infin the extracted folder, and select Install to install the driver. - Check that Wi-Fi and Bluetooth work as expected.
This driver is a test-signed build maintained by the community (Mario in worproject/dldserv-mirror). It currently covers most client-mode Wi-Fi functionality. If you encounter connectivity, throughput, or stability issues, please report back in the original forum thread:
4. Next Steps
- Use Windows Update to check for and install the latest system updates;
- Install OpenCL/OpenGL/Vulkan compatibility packs from Microsoft Store for full GPU capabilities;
- Install commonly used tools and apps as needed (prefer native ARM64 or x64 builds when available).
For advanced use cases such as GStreamer pipelines, multimedia transcoding, OBS, 40-pin GPIO demos, or firmware update from Windows (e.g. using edl-ng --radxa-wos-platform to update SPI Flash), please refer to future official Radxa documentation and upstream resources.