Install Windows 11
This guide explains how to perform a clean installation of Windows 11 ARM64 on the Radxa Dragon Q8B and install the Q8B Windows drivers.
This tutorial covers installing Windows to an NVMe SSD or a UFS module. The installation process will erase all data on the selected target storage device. Please back up your data in advance.
Before You Begin
Supported Windows Versions
- Recommended: Windows 11 25H2 (build family: 26200) ARM64.
- Minimum supported: Windows 11 24H2 (build family: 26100) ARM64.
- You must use an ARM64 ISO; an x64 ISO will not work.
We recommend downloading the ISO from the Microsoft Windows 11 ARM64 download page. UUP dump is an alternative source, but the official Microsoft image is preferred.
Windows Driver Feature Overview
The features below assume the Q8B drivers from Section 6 have been installed; availability also depends on the connected display, storage, wireless card, and other peripherals.
Supported features:
- Display output: HDMI and USB-C DP Alt Mode, up to 4K@60 Hz or 2K@120 Hz at 10 bpc; supports triple-display and DP MST.
- System boot: NVMe SSD or UFS module can be used as the Windows system and boot drive.
- GPU: Direct3D 12 is supported. OpenCL, Vulkan, and OpenGL capabilities require the compatibility pack from the Microsoft Store.
- Video hardware decoding: D3D11VA, AVC, HEVC, VP9, and 10-bit video, up to 4096 × 2160@120 fps.
- Video hardware encoding: AVC and HEVC encoding via Media Foundation.
- Networking and wireless: 2.5GbE Ethernet, plus the M.2 E-Key wireless cards listed in Section 8.
- Other hardware: fan control (see Section 7.1), audio output via HDMI/USB-C DP Alt Mode/3.5 mm headphone jack, USB 3.2 Gen 2, and microSD card.
USB-C DP Alt Mode displays only work after the drivers are installed; the current BIOS does not support USB-C display output. Use an HDMI display when installing Windows, entering the BIOS, or using the F12 boot menu.
Currently unsupported features:
- 40-Pin GPIO.
- Wake-on-LAN on the 2.5GbE Ethernet interface.
Check the BIOS Version
Installing Windows requires Q8B BIOS version 260825 or newer. If this condition is not met, upgrade the BIOS first before continuing.
- Connect an HDMI display to the Q8B, power on, and press F2 to enter the BIOS.
- Check the BIOS version at the top of the BIOS screen. The six-digit date portion should be
260825or higher, e.g.6.0.260825.BOOT.... - If the current version is 260825 or newer, continue to Section 1.4.
- If the current version is older than 260825, follow the official instructions in Check BIOS Version and Flash BIOS Firmware to upgrade the BIOS; verify the version again after the upgrade.
Keep the power supply stable during the BIOS upgrade and do not interrupt the process. Only enter EDL mode and upgrade the BIOS firmware via the official procedure when the BIOS version is older than 260825.
Hardware and Files You Will Need
| Item | Requirement |
|---|---|
| Motherboard | Radxa Dragon Q8B |
| BIOS | 260825 or newer; verify per Section 1.3 |
| Power supply | 20 V USB PD or fixed 20 V Type-C power adapter; at least 3 A recommended, using a Type-C to Type-C cable |
| System drive | Installed NVMe SSD or UFS module; Windows will be installed to one of them |
| Installation USB drive | A blank USB drive of at least 16 GB |
| PC for creating the installer | A Windows PC with internet access and administrator privileges |
| Display and input devices | HDMI display and USB keyboard/mouse for installation; a USB-C display with DP Alt Mode can be used after driver installation |
| Software and files | Windows 11 ARM64 ISO, Rufus 4.15 or newer, Q8B Windows driver pack v1.0.0 (also available from the download page) |
The Q8B provides HDMI and USB-C display output with DisplayPort Alt Mode; the power Type-C port is for 20 V power input only — do not connect power to the USB-C data/display port. For port locations, refer to the Q8B official interface description.
Display limitation: The current BIOS does not support USB-C display output, and USB-C DP Alt Mode displays only work after the Q8B drivers are installed. Therefore, use an HDMI display from power-on and the F12 boot menu until the driver installation in Section 6 is complete.
The Q8B's onboard microSD slot cannot boot the Windows ISO installer. Use the USB installation drive created in this guide to boot the Windows installer.
Important Notes
- Only delete and format the NVMe SSD or UFS module where Windows will be installed; do not delete partitions on the installation USB drive or any other storage device.
- This guide does not require manually injecting manufacturer drivers into the Windows ISO.
- The Q8B is a development board. The current driver package is not WHQL signed, so you must disable "Smart App Control" before installing the drivers. Only use the Q8B driver package provided by Radxa.
- If the BIOS is already 260825 or newer, there is no need to enter EDL mode or update the BIOS firmware; only upgrade via the official procedure in Section 1.3 when the BIOS version is older than required.
Create the Windows Installation USB Drive
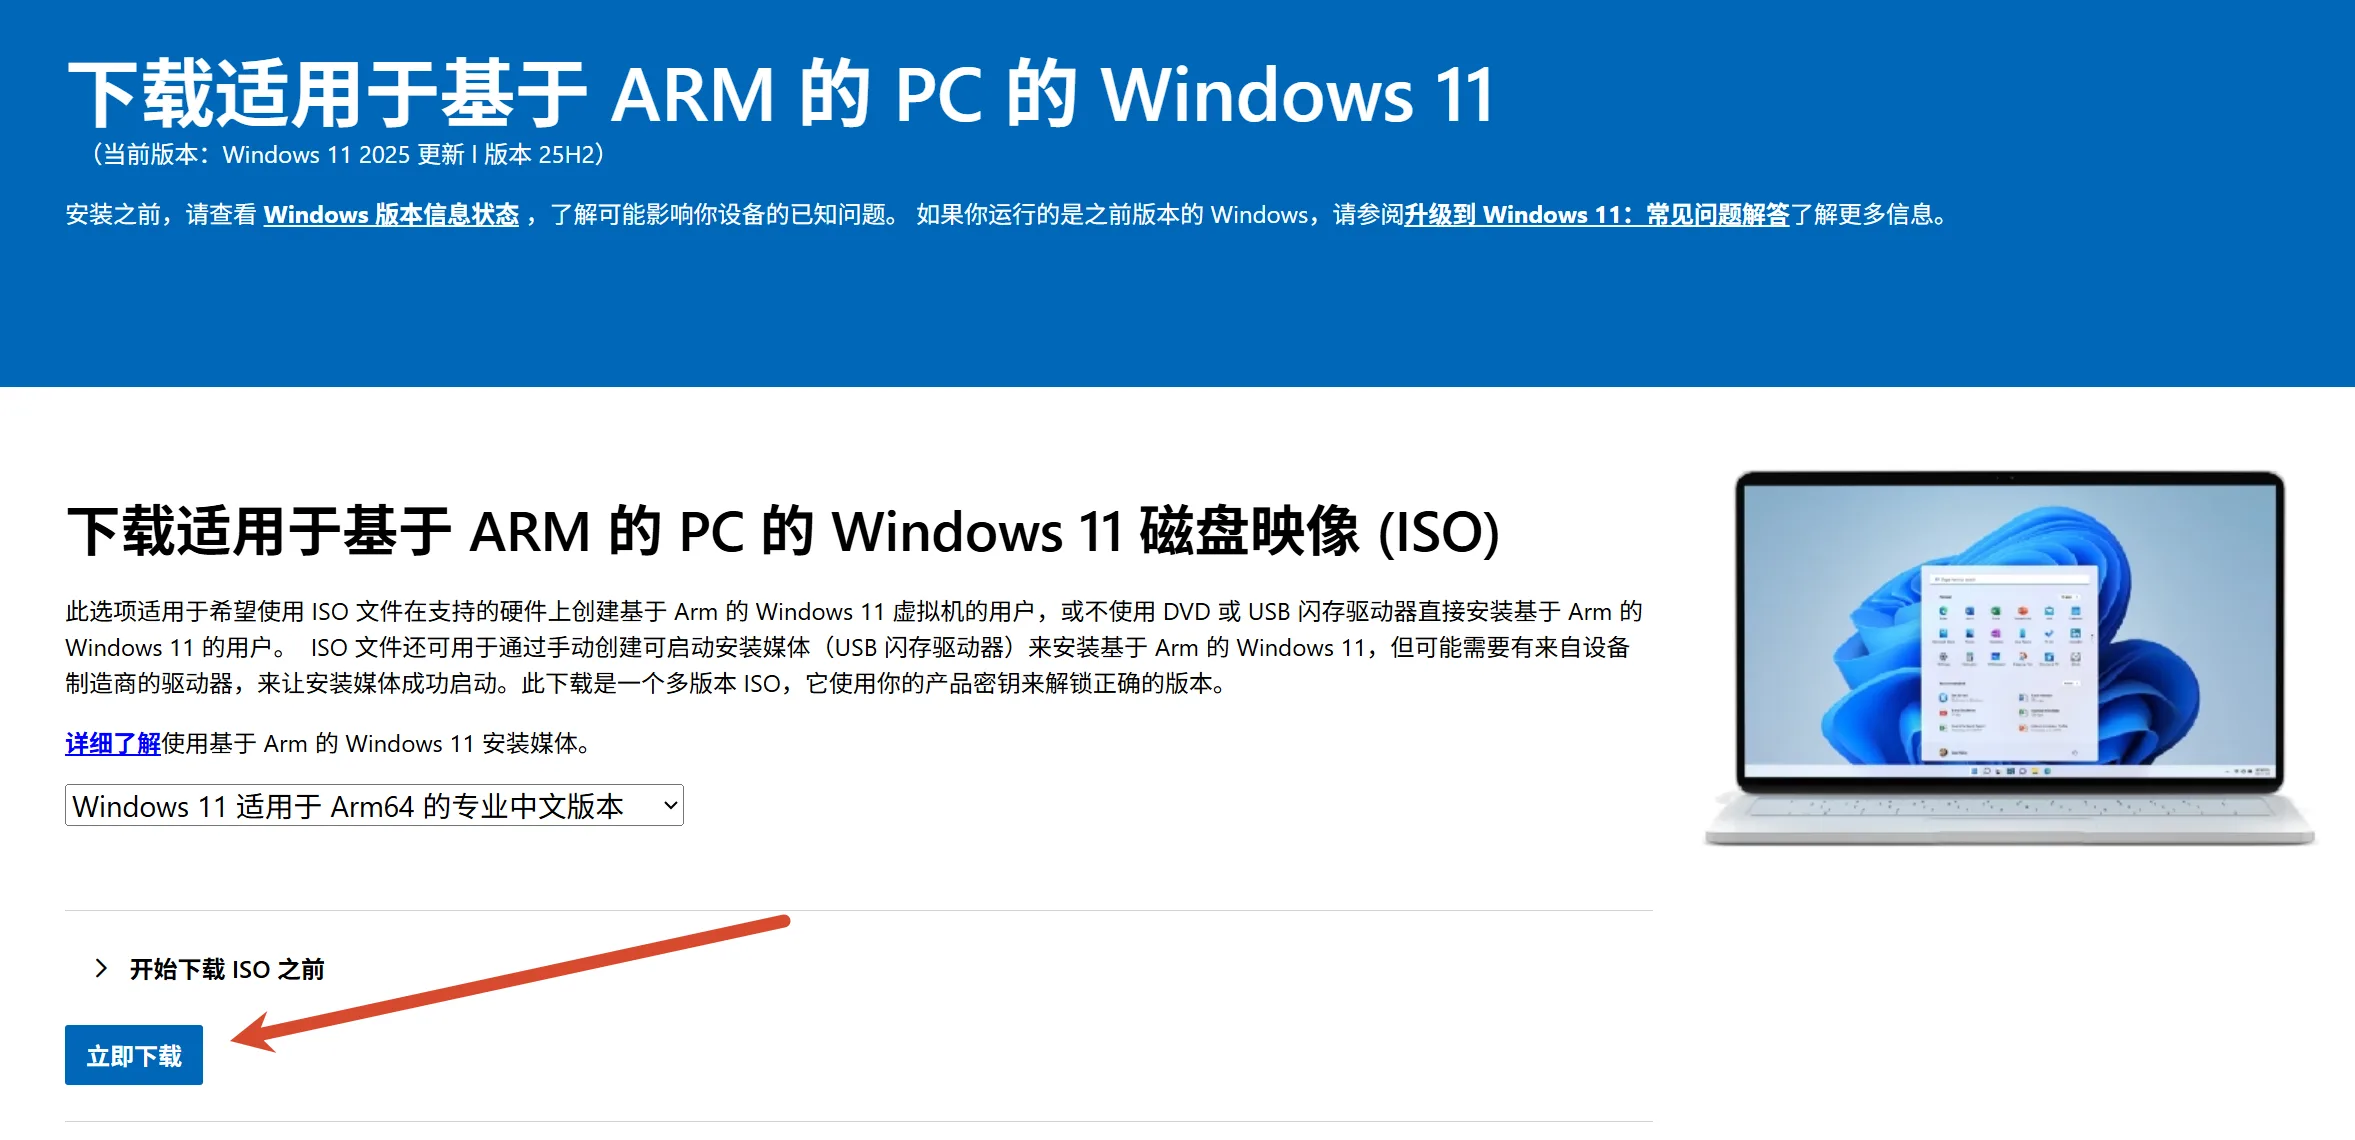
Download the Windows 11 ARM64 ISO
Download the Windows 11 ARM64 ISO from the Microsoft Windows 11 ARM64 download page and save it to the PC used to create the installation drive.
Make sure the file name or download page contains ARM64. The x64 image is for Intel/AMD PCs and cannot be used on the Q8B.
Write the Installation USB Drive with Rufus
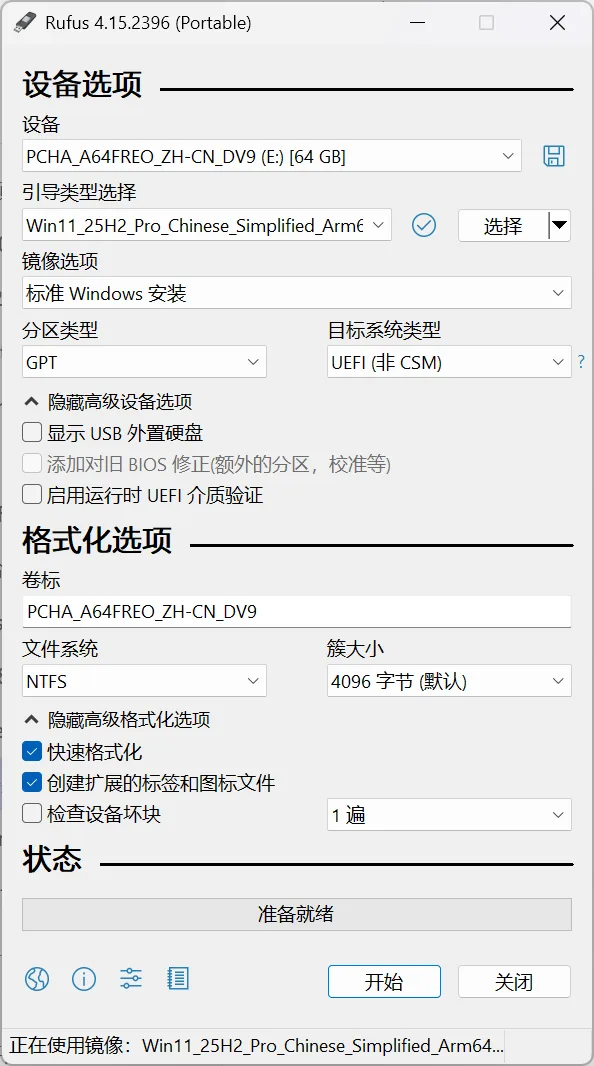
- Download and open Rufus 4.15 or newer from the Rufus website.
- Insert a blank USB drive and confirm it is selected under "Device". The write process will erase all data on the USB drive.
- Under "Boot selection", choose the downloaded Windows 11 ARM64 ISO.
- Confirm the following options:
- Image option:
Standard Windows installation - Partition scheme:
GPT - Target system:
UEFI (non CSM)
- Image option:
- Click "Start".
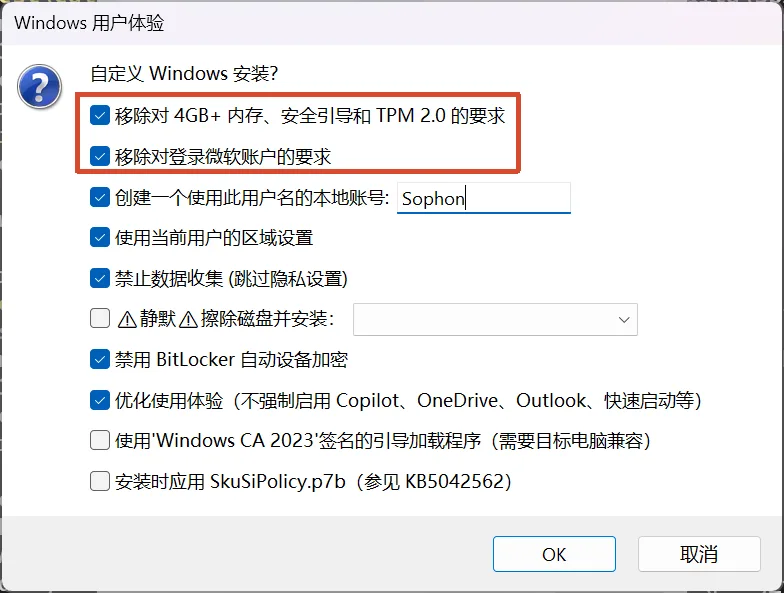
- In the "Windows User Experience" dialog, check the following two options:
Remove requirement for 4GB+ RAM, Secure Boot and TPM 2.0Remove requirement for an online Microsoft account
- Click "OK" and wait for Rufus to finish writing, then safely eject the USB drive.
Connect the Q8B and Boot from the USB Drive
- Make sure the NVMe SSD or UFS module is installed on the Q8B.
- Connect a keyboard, mouse, and an HDMI display to the Q8B. USB-C display output is not supported in the current BIOS or before Windows drivers are installed.
- Connect the Windows installation USB drive to a USB data port on the Q8B.
- Connect a 20 V Type-C power supply to the dedicated power port on the Q8B and power on.
- After the splash screen appears, press F12 to enter the boot menu.
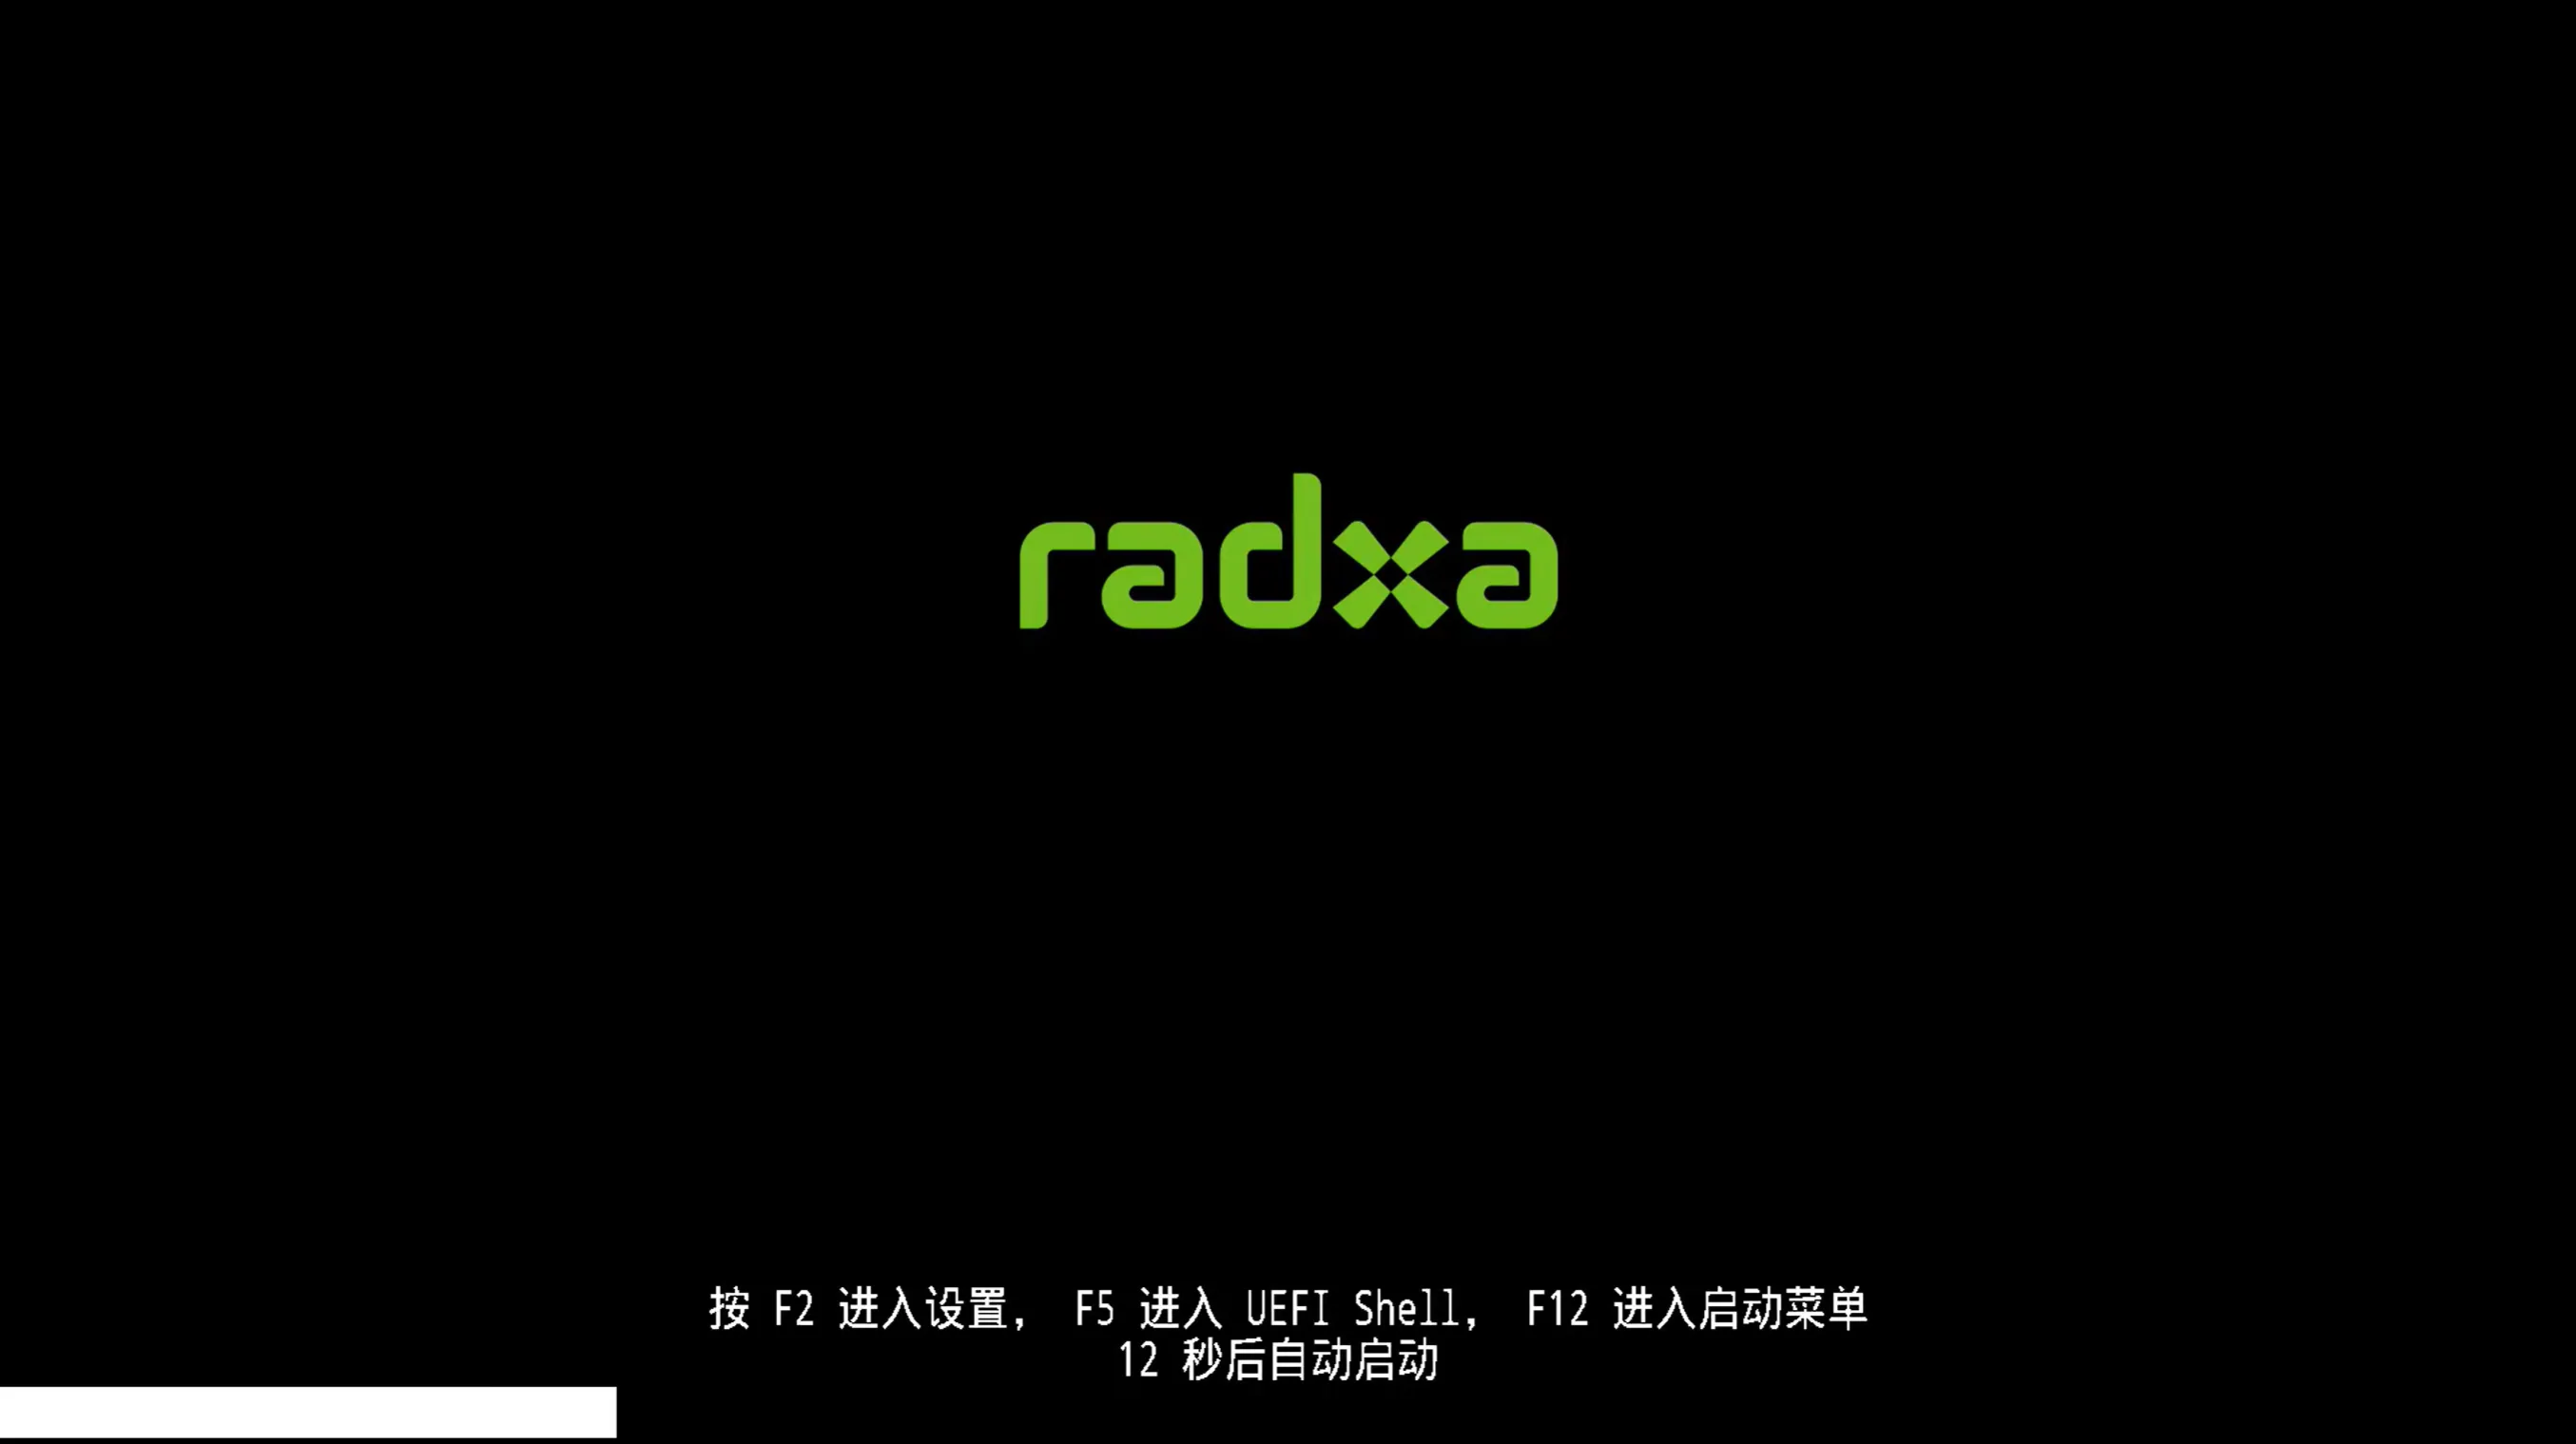
- Select the USB boot entry corresponding to the Windows installation USB drive.
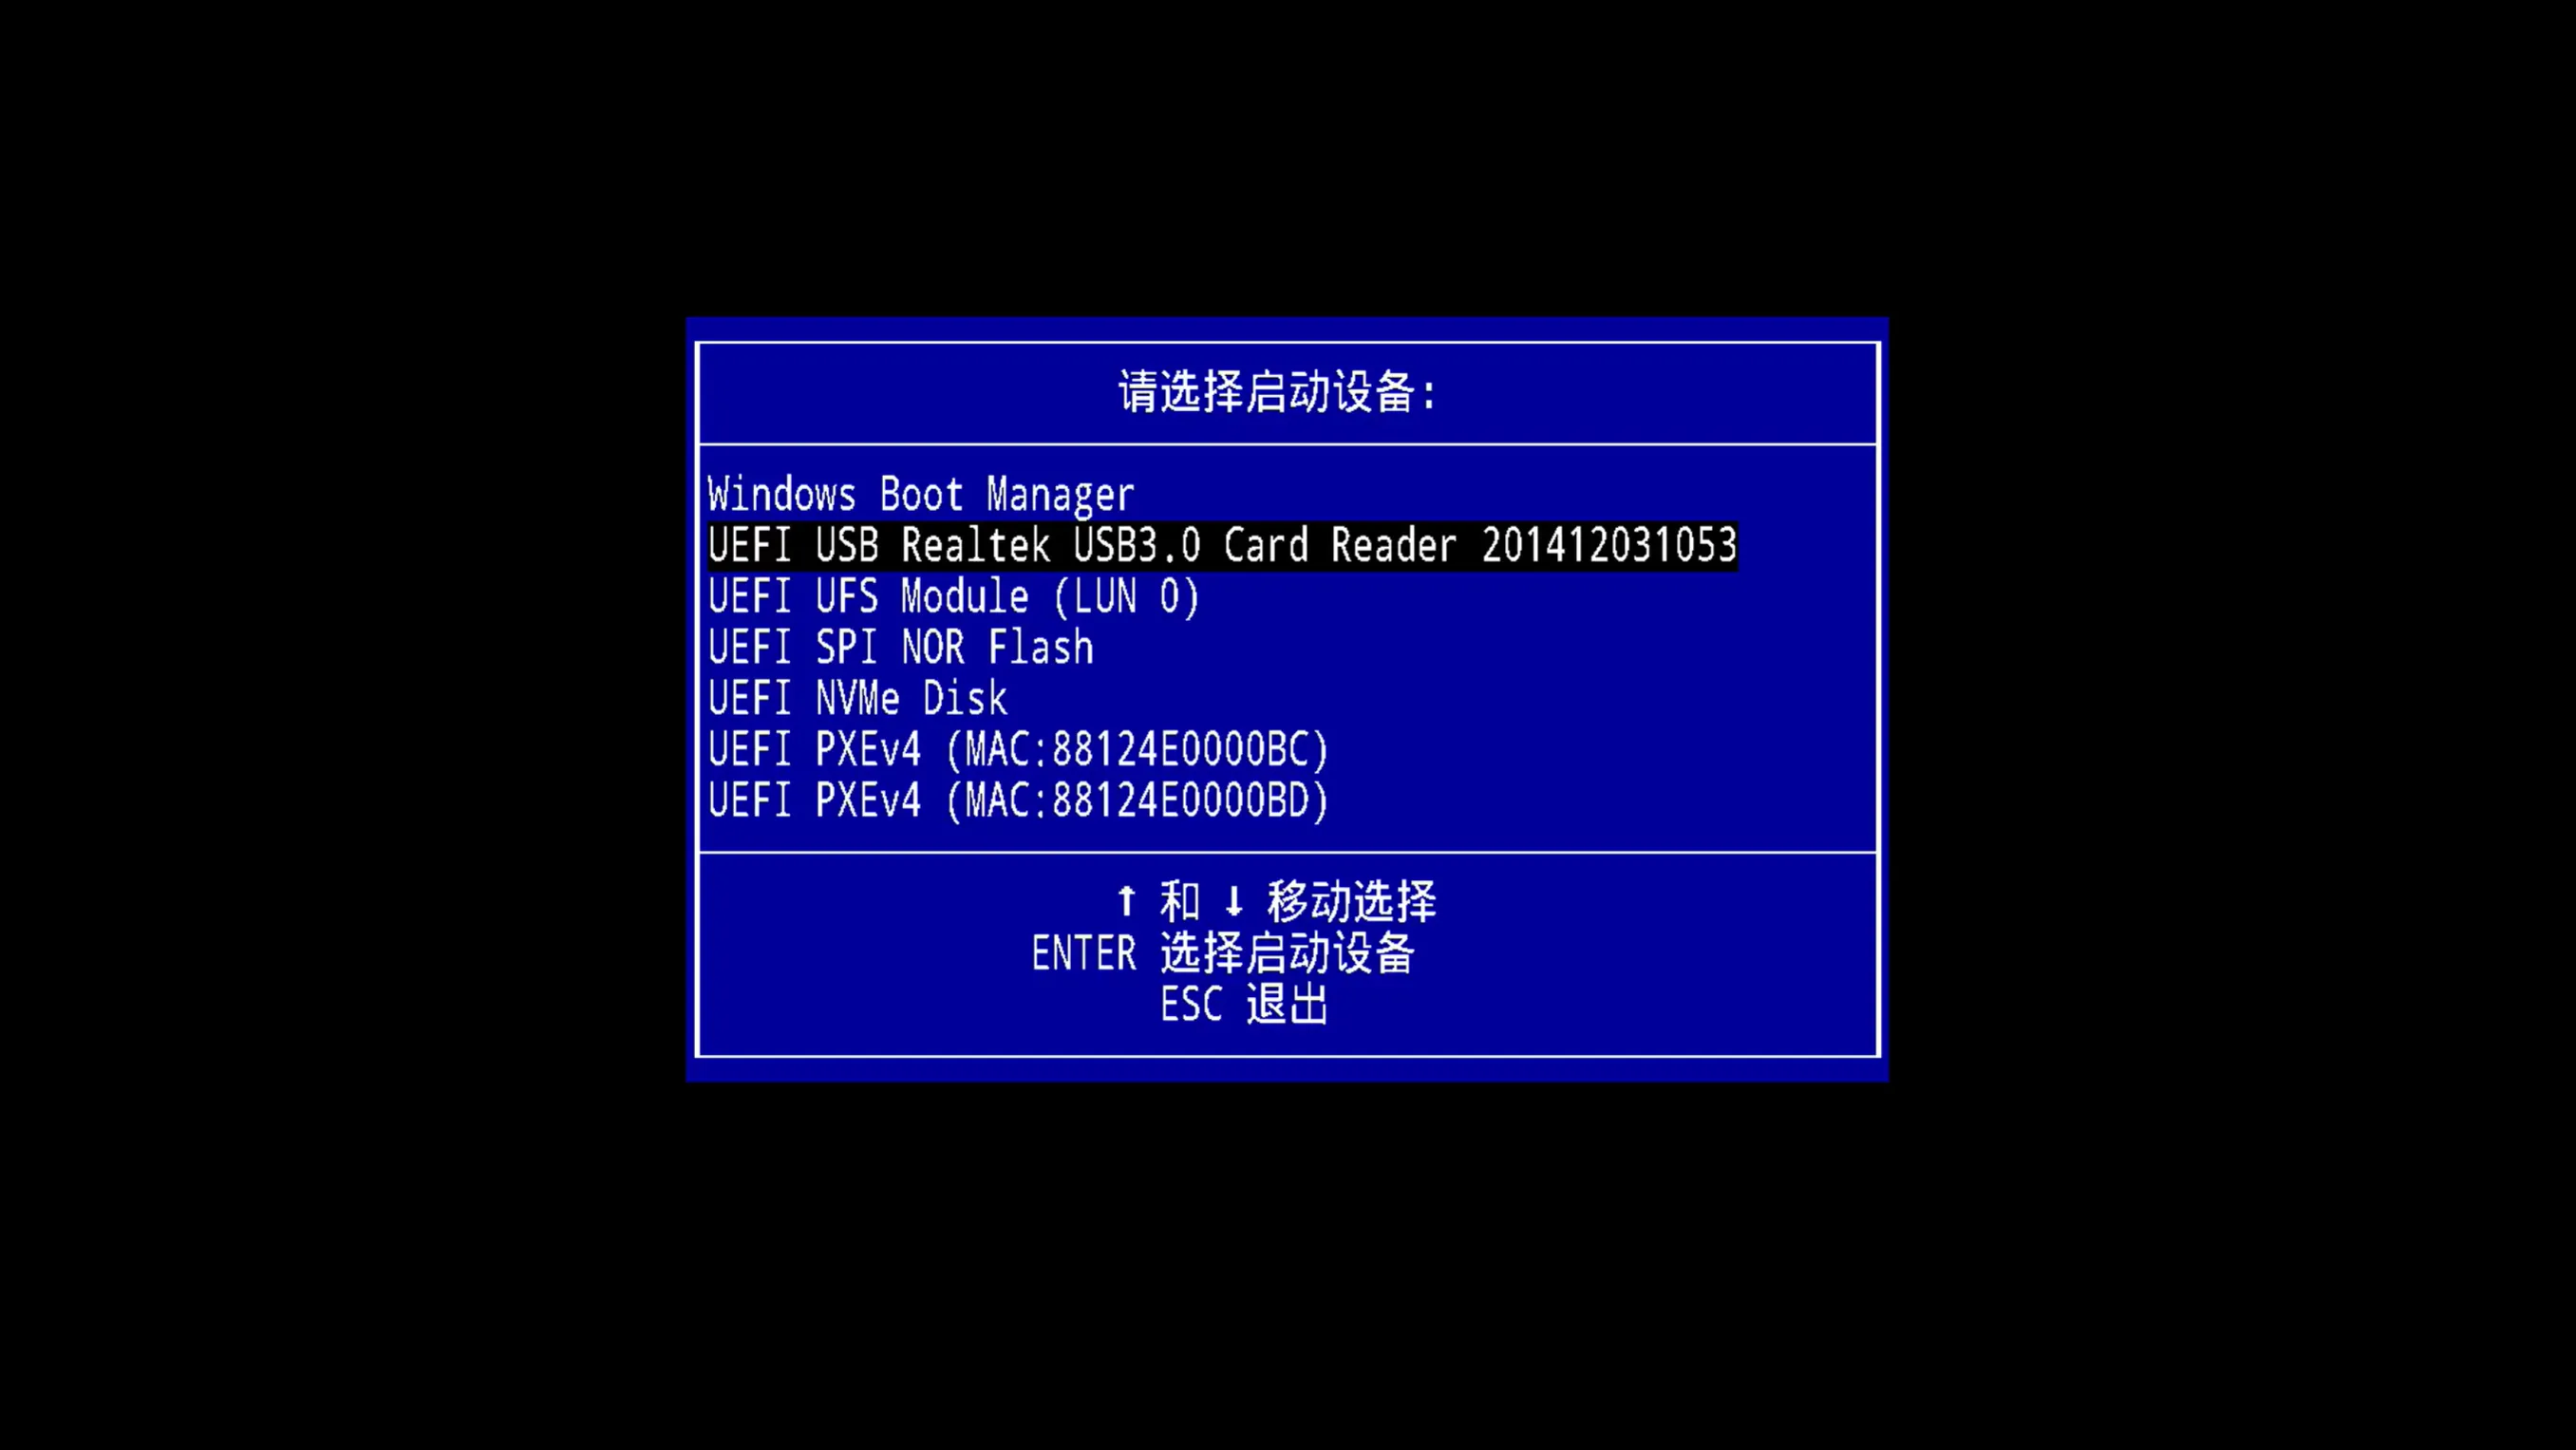
If the USB drive does not appear in the boot menu, power off, reinsert the USB drive, make sure it was created per Section 2 with an ARM64 ISO, GPT, and UEFI, then power on and press F12 again.
Install Windows to the NVMe SSD or UFS
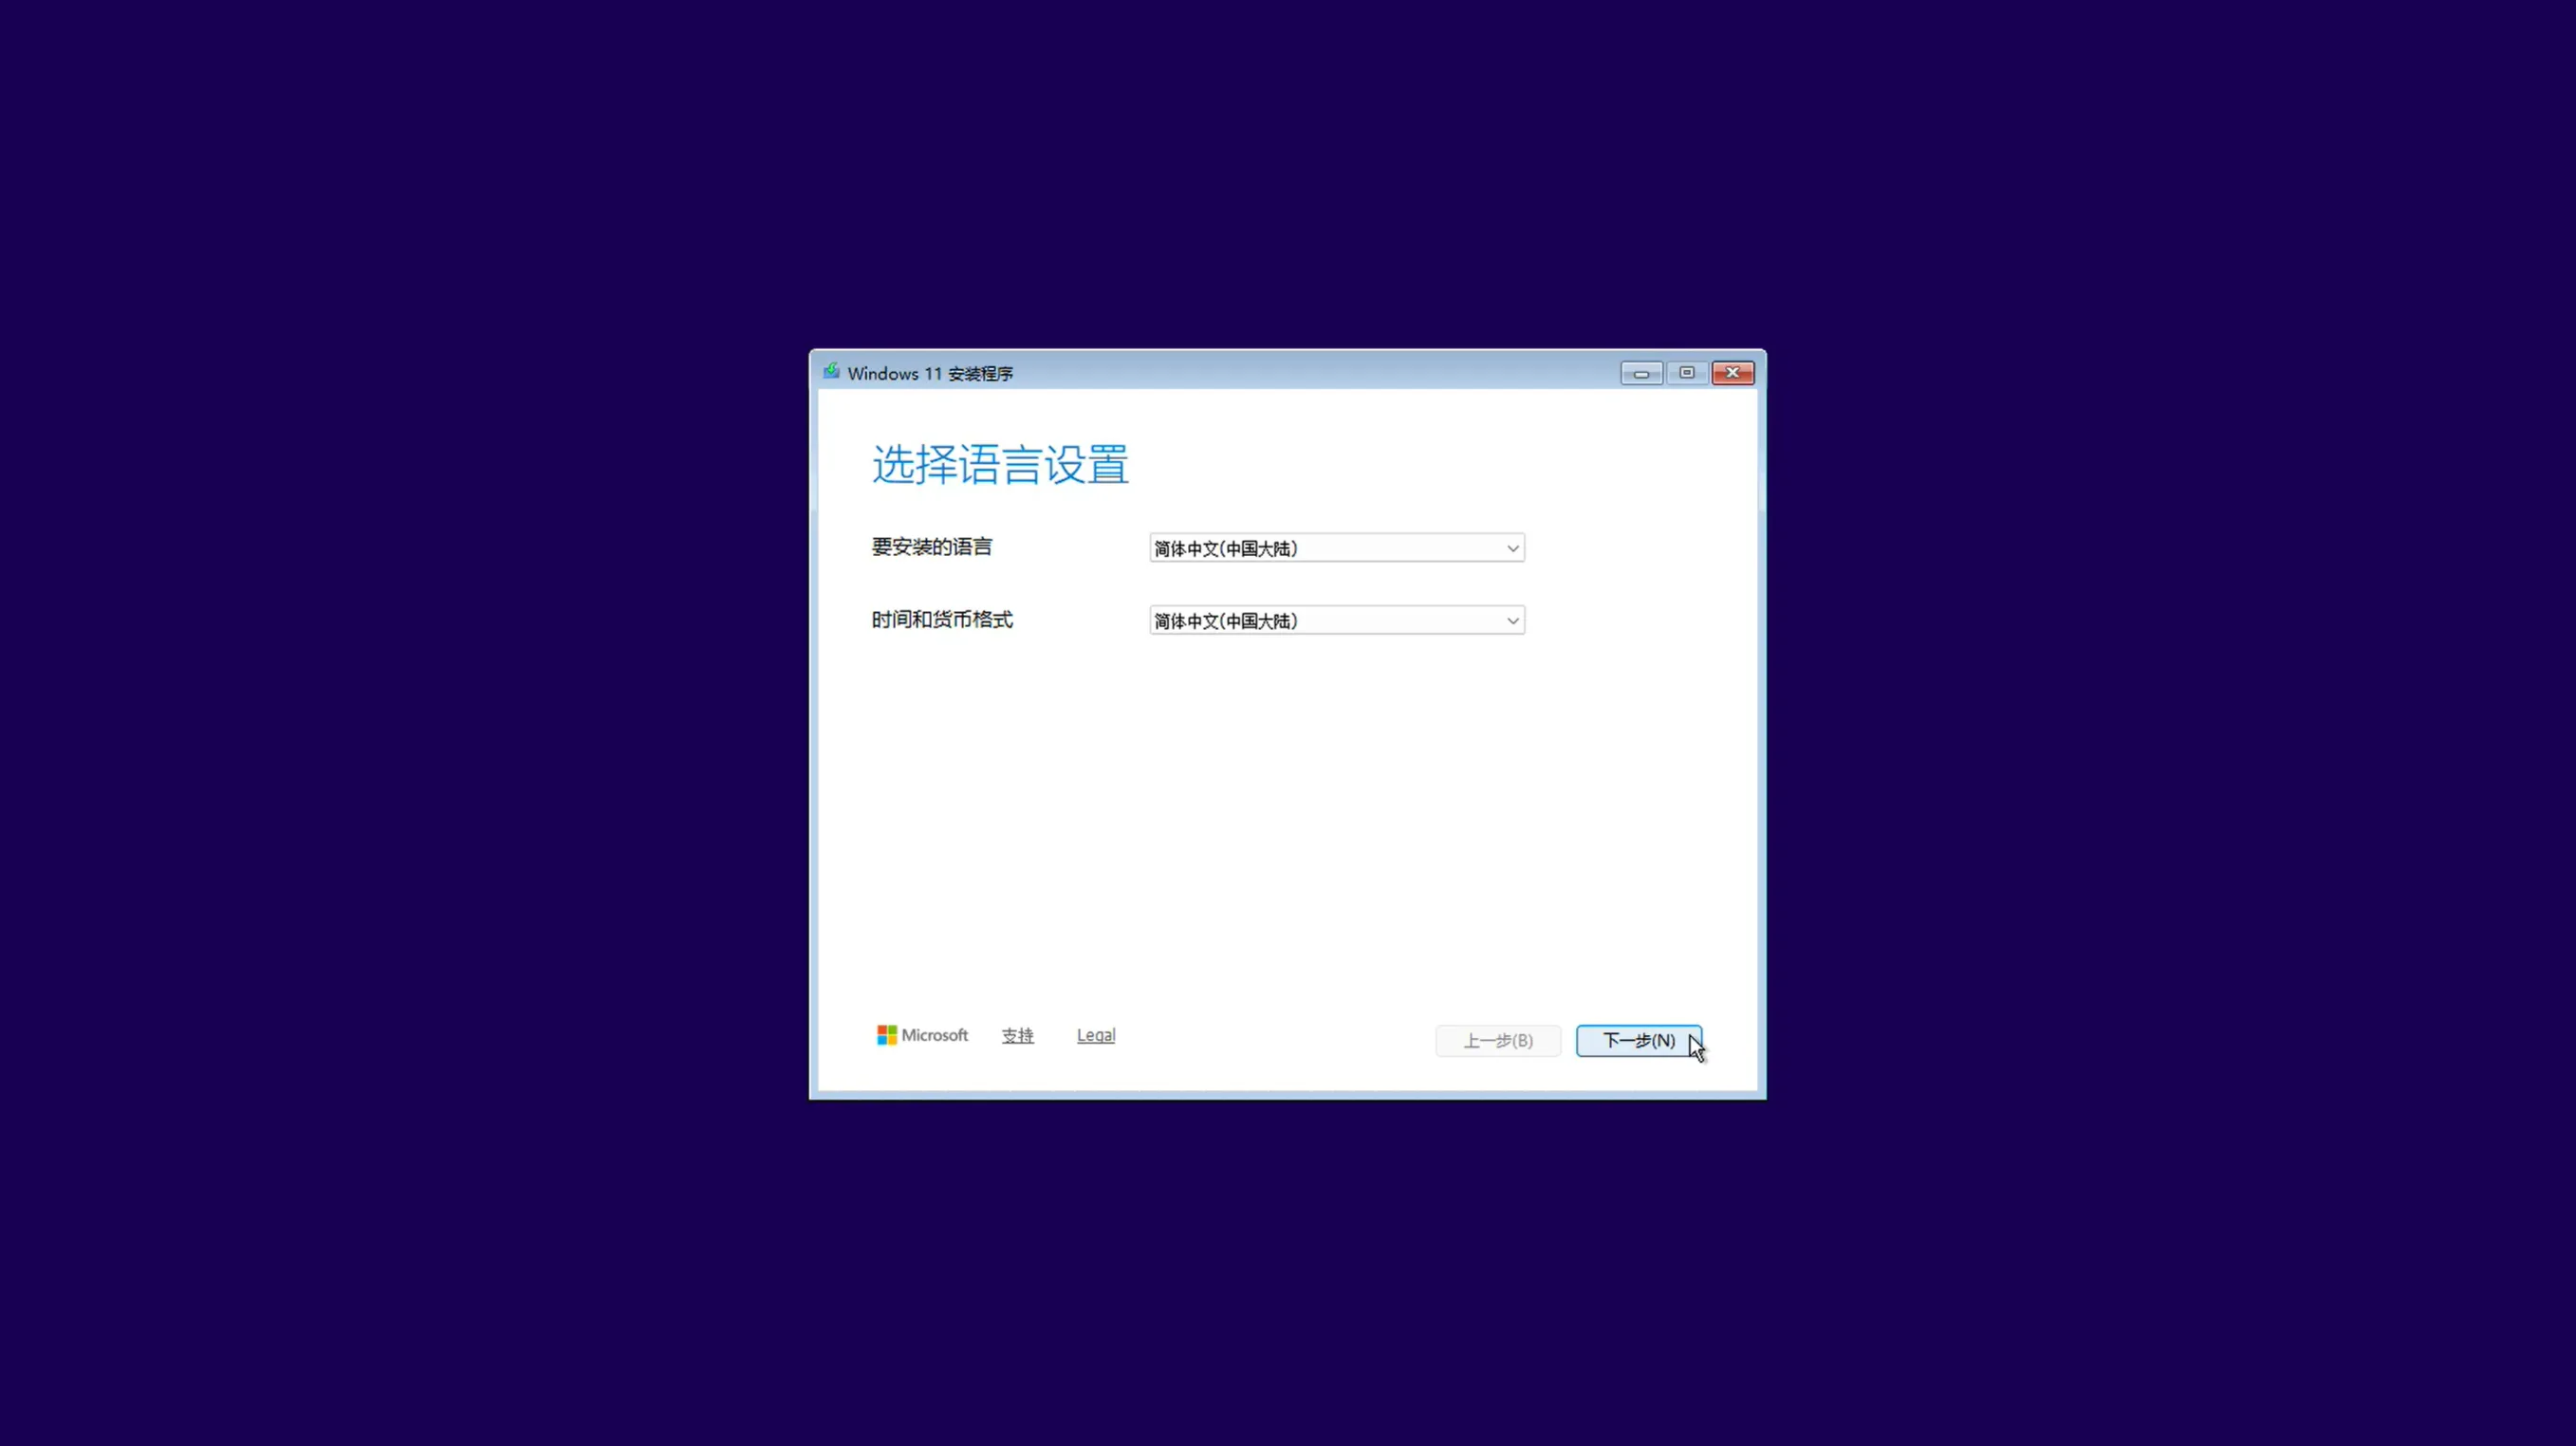
- Once the Windows installer starts, select your language, time, and keyboard layout as prompted.
- Click "Install now". If prompted for a product key, enter a valid key, or choose "I don't have a product key" and activate Windows later.
- Select the Windows edition that matches your license.
- On the "Which type of installation do you want?" screen, choose Custom: Install Windows only (advanced).
- On the "Where do you want to install Windows?" screen, locate the NVMe SSD or UFS module where you want to install Windows.
- Identify the target by disk capacity and name; do not rely solely on "Drive 0", since numbering changes with connected devices.
- If the target drive already has partitions, select each partition on the target drive and click "Delete" until it shows "Unallocated space".
- Do not delete any partitions on the installation USB drive or any non-target storage device.
- Select the "Unallocated space" on the target drive and click "Next". Windows will create the required partitions and start the installation.
- The device will restart several times during installation. After the first restart, if it returns to the USB installer, remove the installation USB drive or select the target drive with Windows installed from the boot menu.
If the installer does not show the NVMe SSD or UFS module, power off and check that the storage device is seated properly. Do not delete partitions on other disks before confirming the cause.
Complete the First Boot Setup
After Windows installation completes and the device reboots, follow the on-screen prompts to complete OOBE (Out-of-Box Experience).
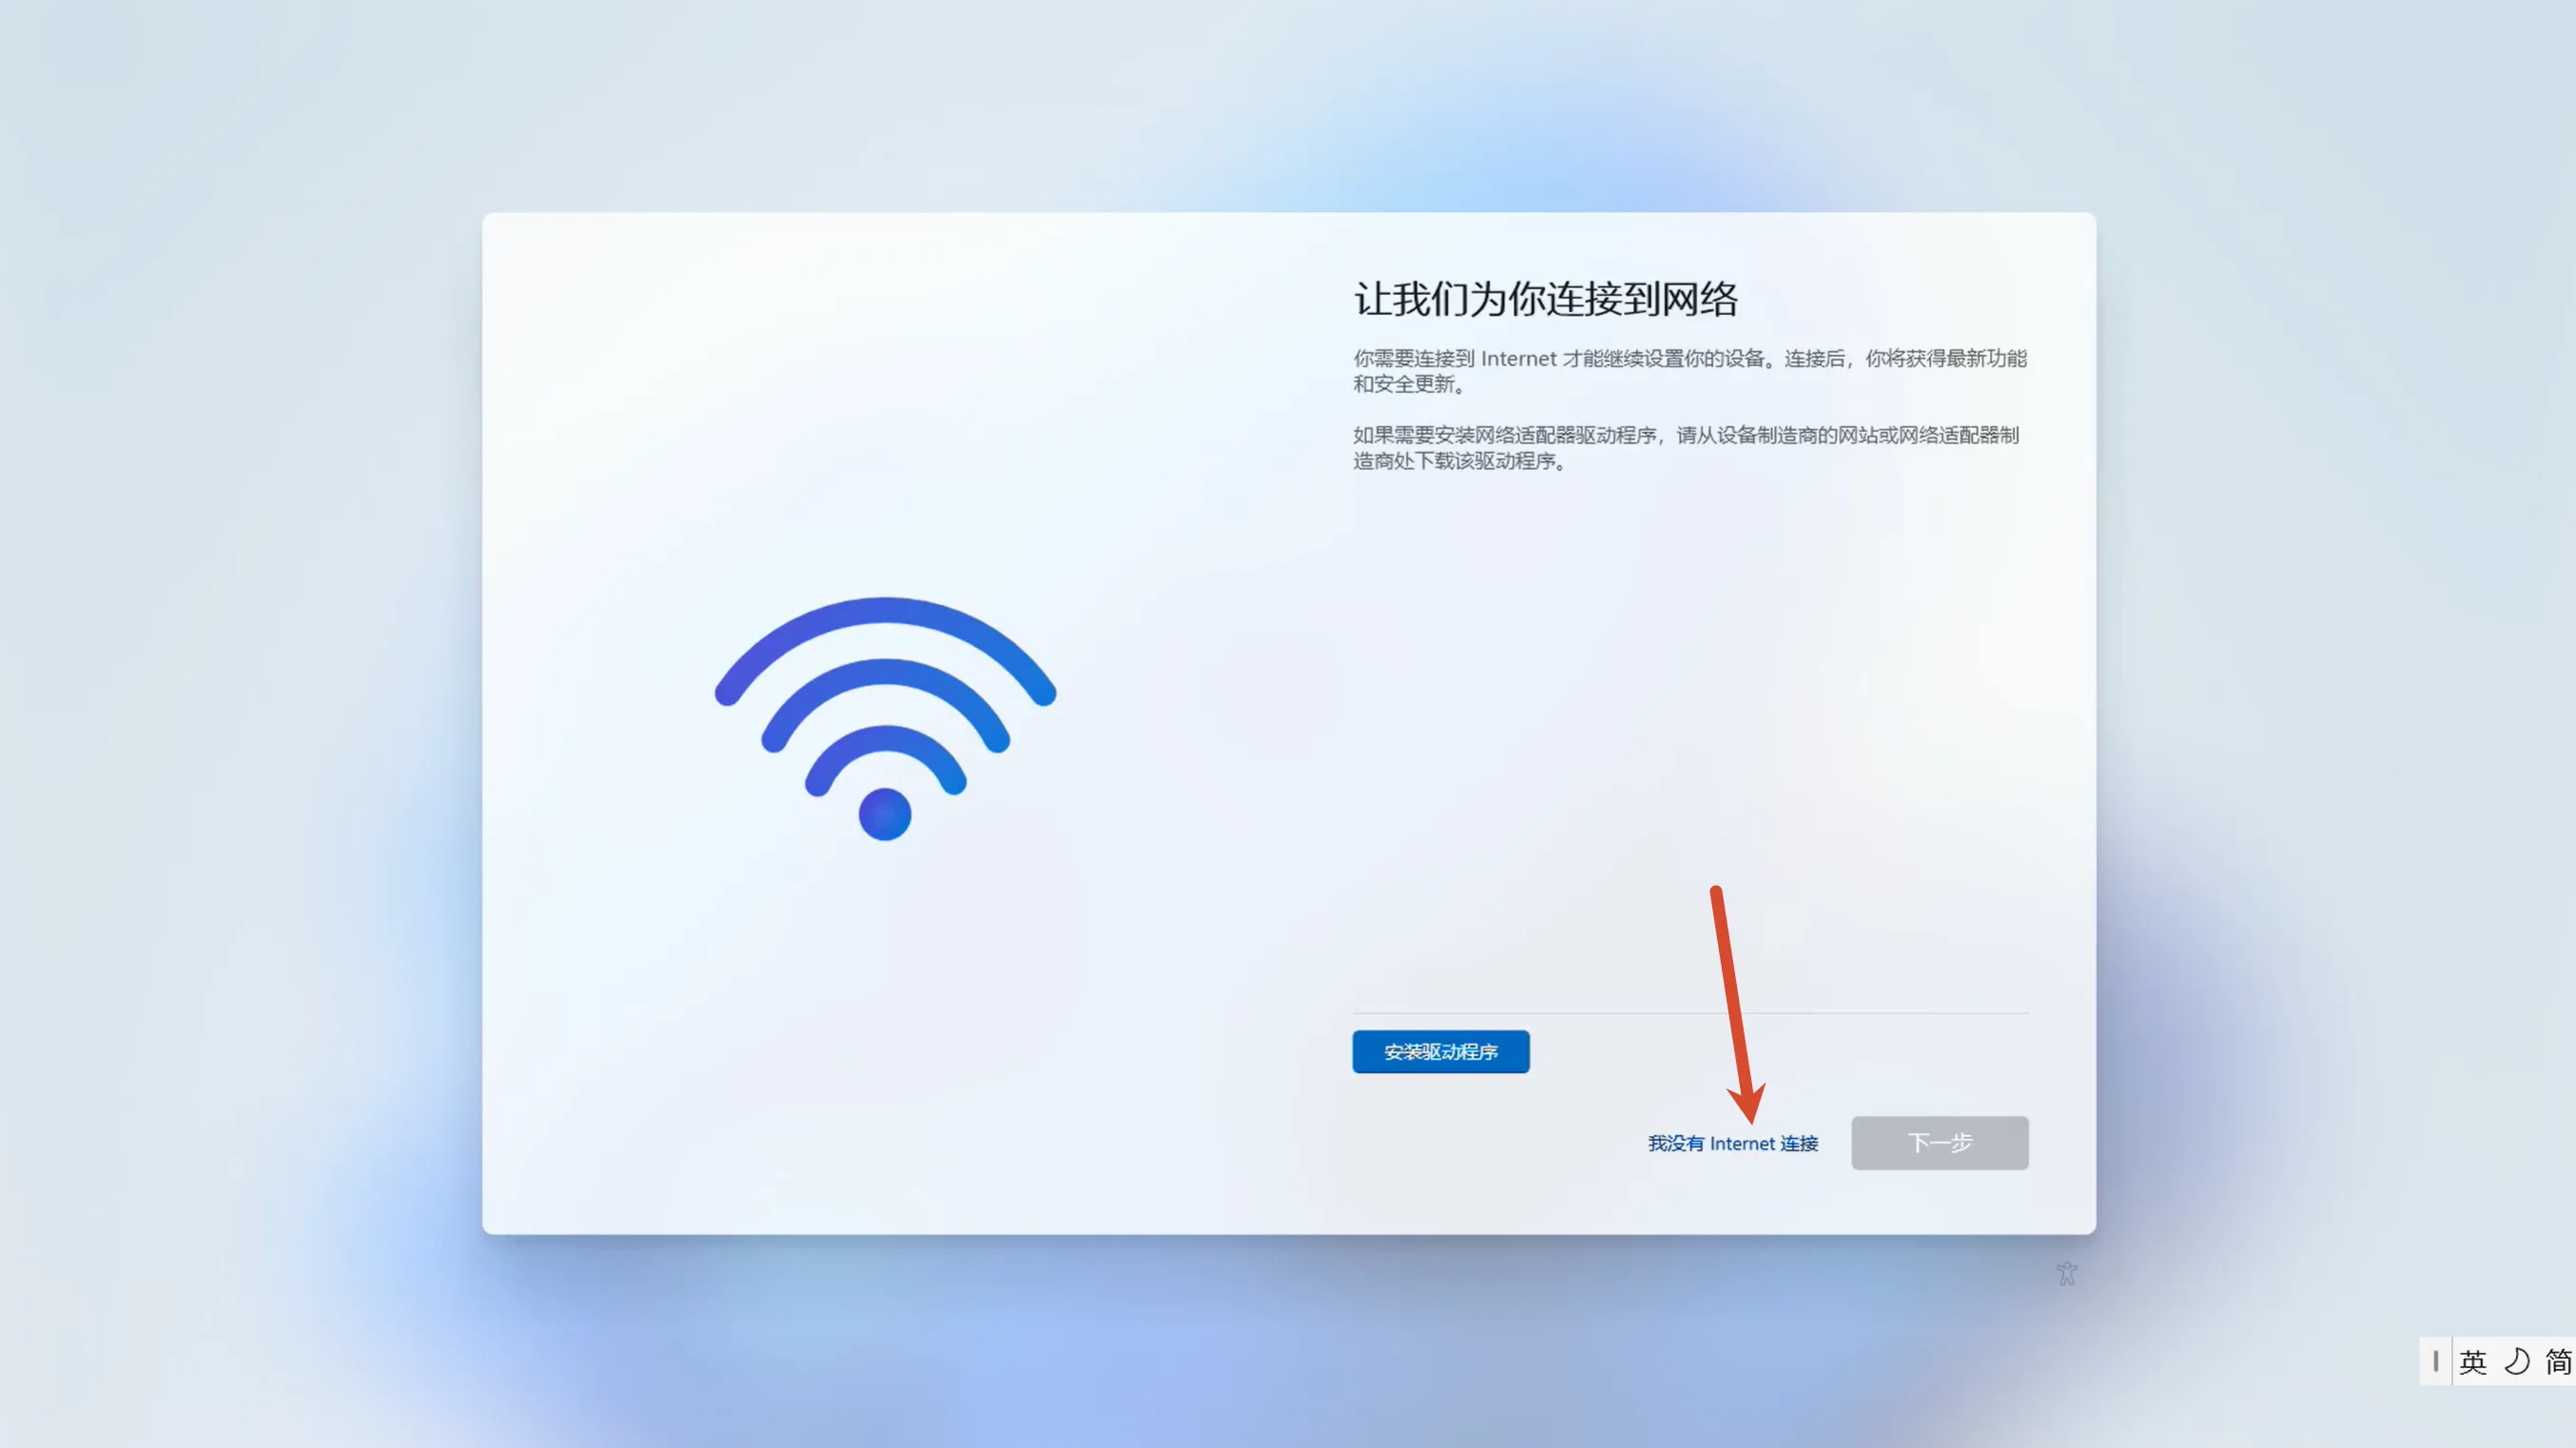
When the network connection page appears, choose I don't have internet and create a local account as prompted. It is normal that the network is unavailable at this point, because the network card driver is not installed yet.
The OOBE wording and layout may differ slightly between Windows versions. After checking "Remove requirement for an online Microsoft account" in Section 2.2, you should be able to complete the first-time setup with a local account.
Install the Q8B Drivers
Extract the Driver Package
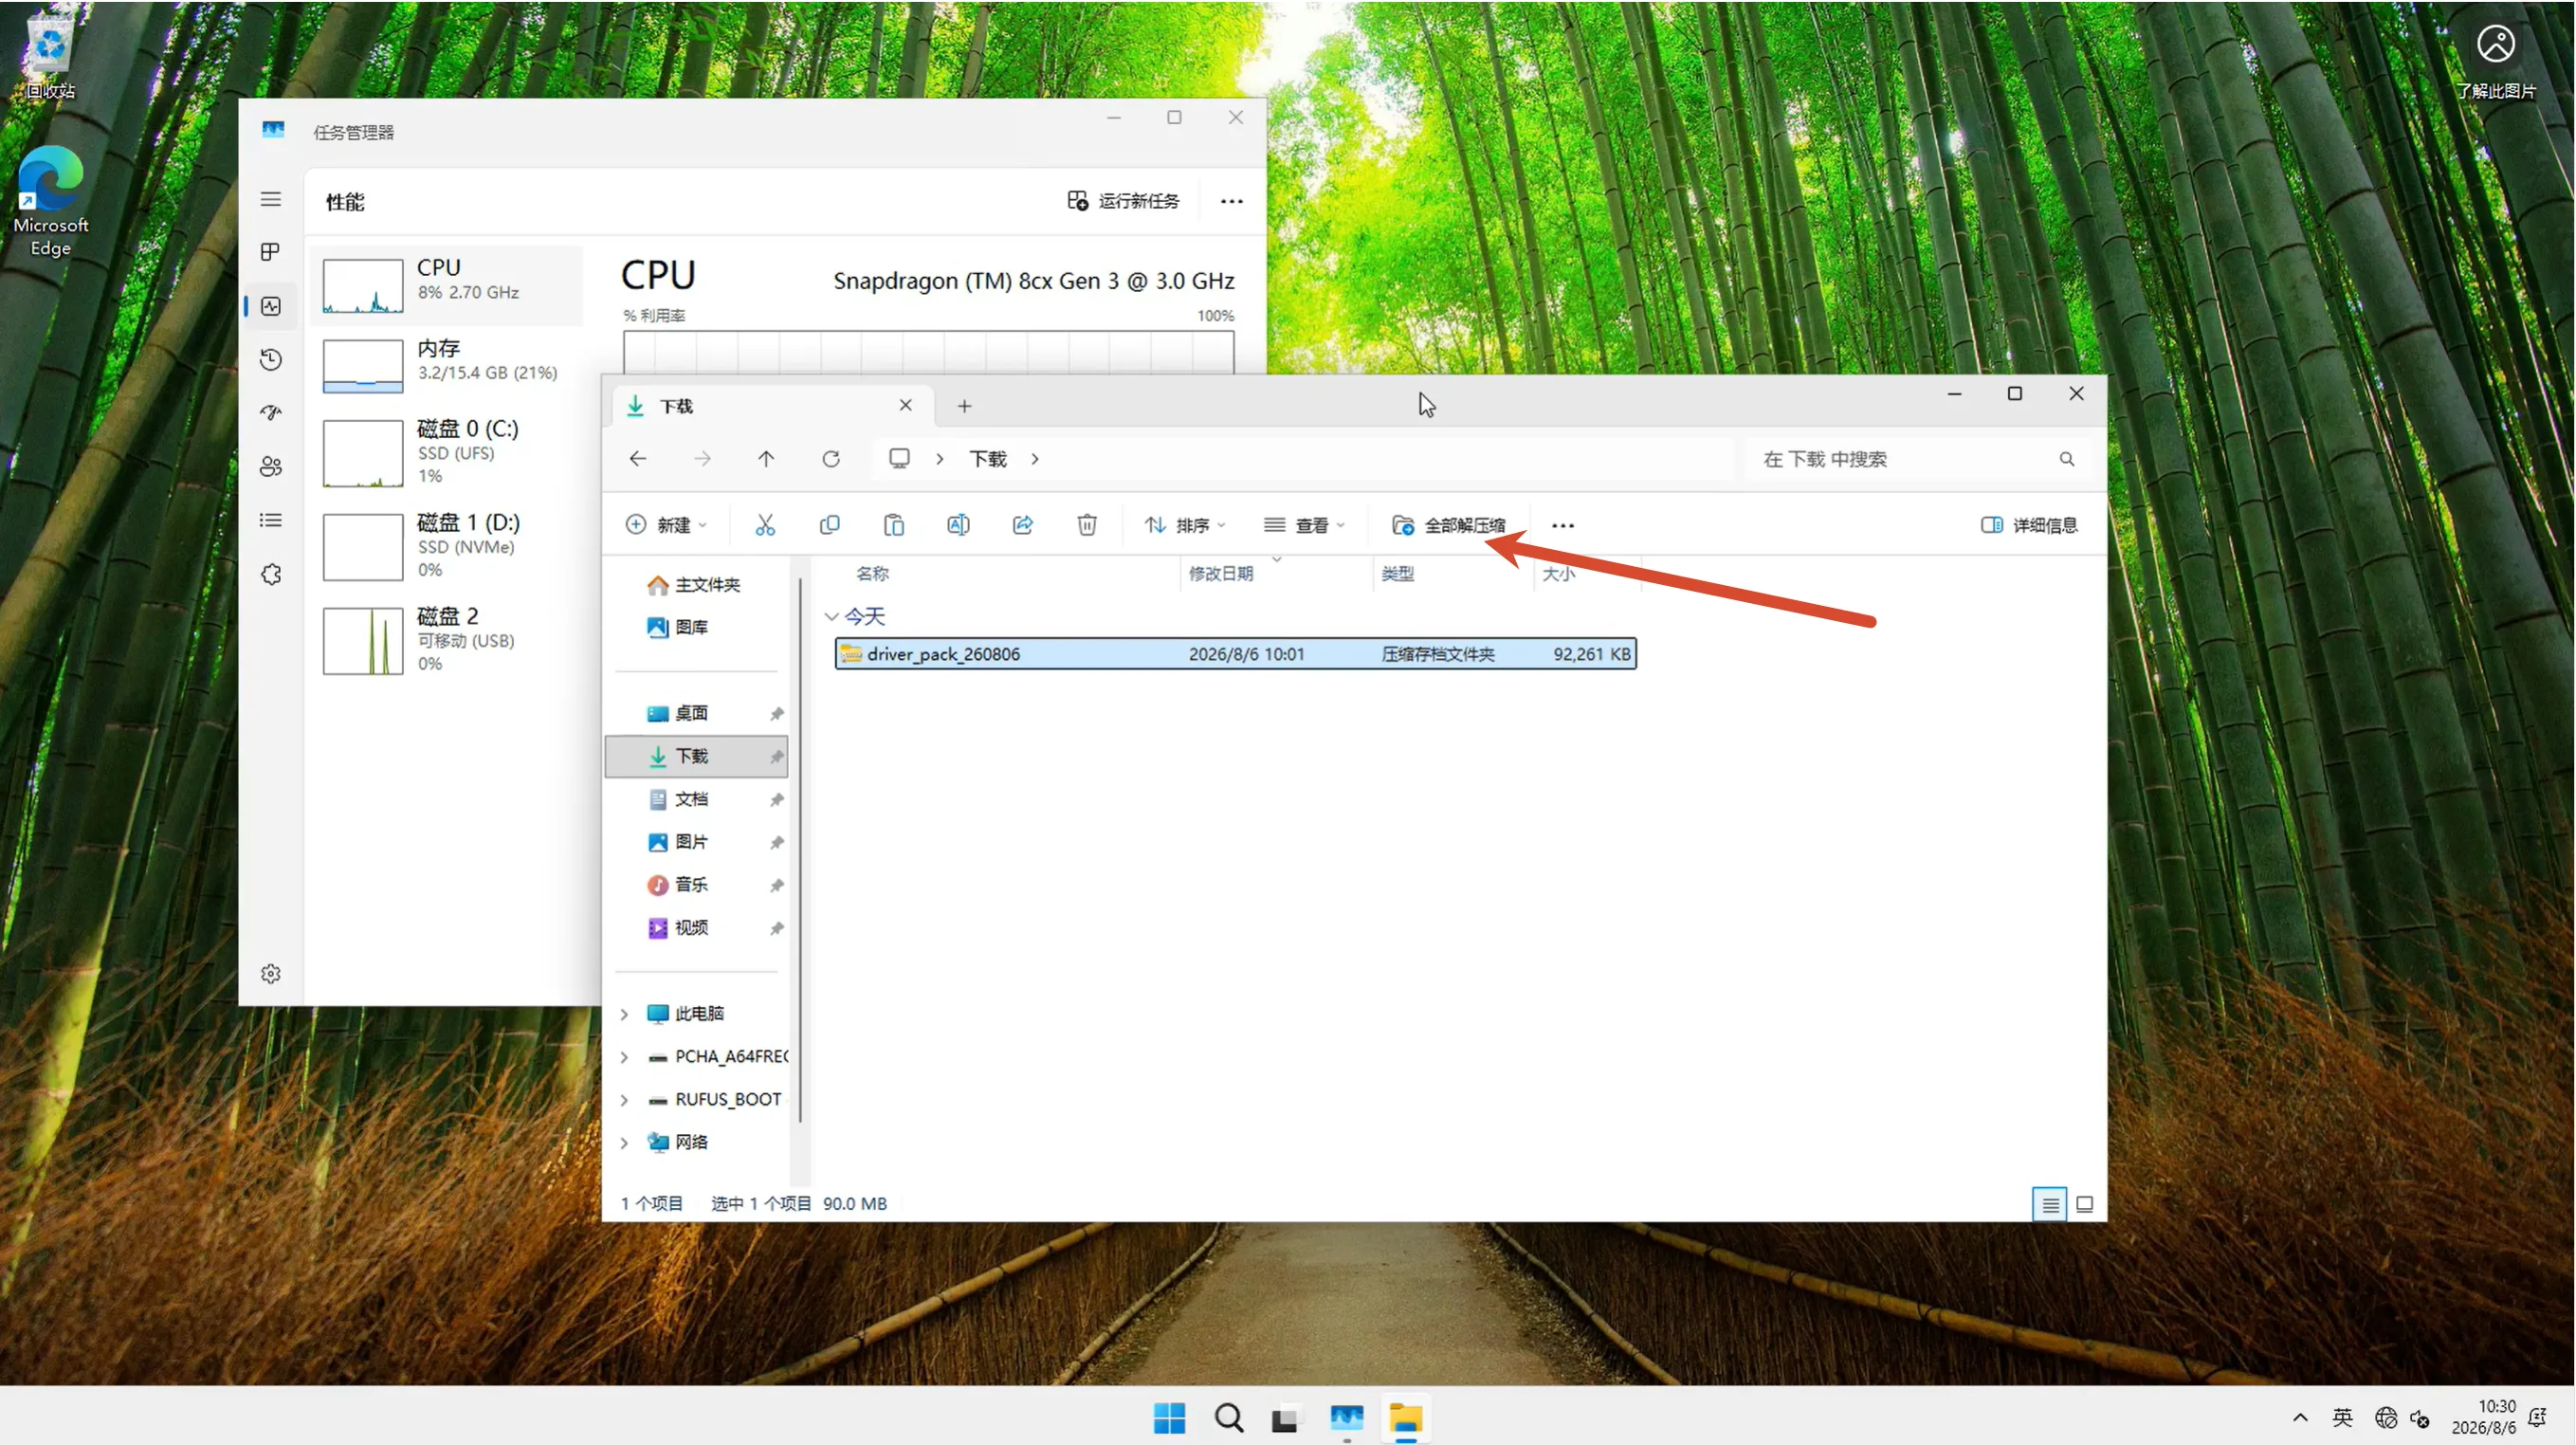
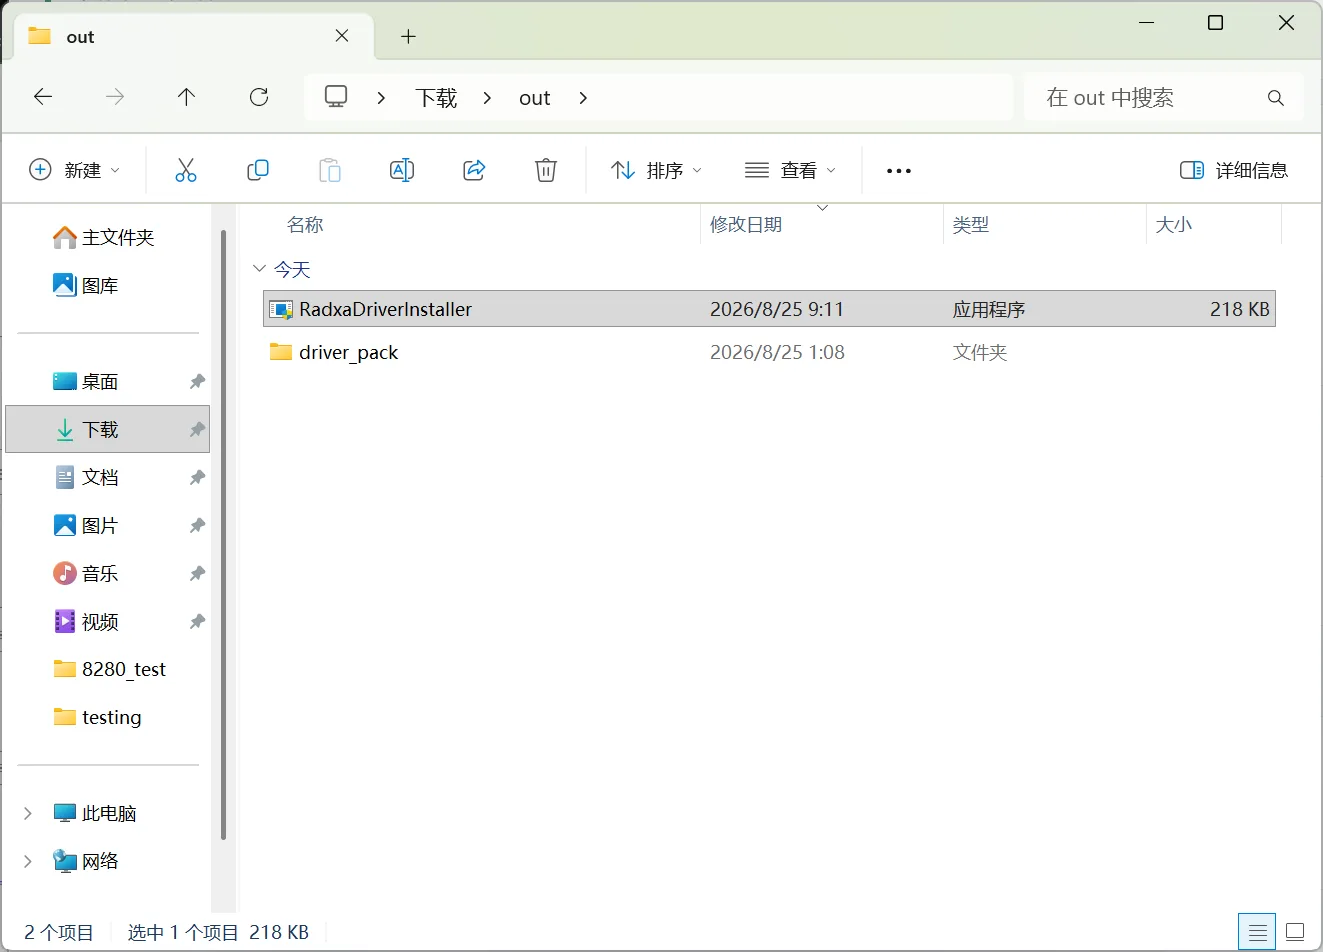
Download the Q8B Windows driver package from the Q8B download page (or directly download the Q8B Windows driver pack v1.0.0), copy it to local storage on the Q8B, and extract it with Windows File Explorer.
Disable Smart App Control
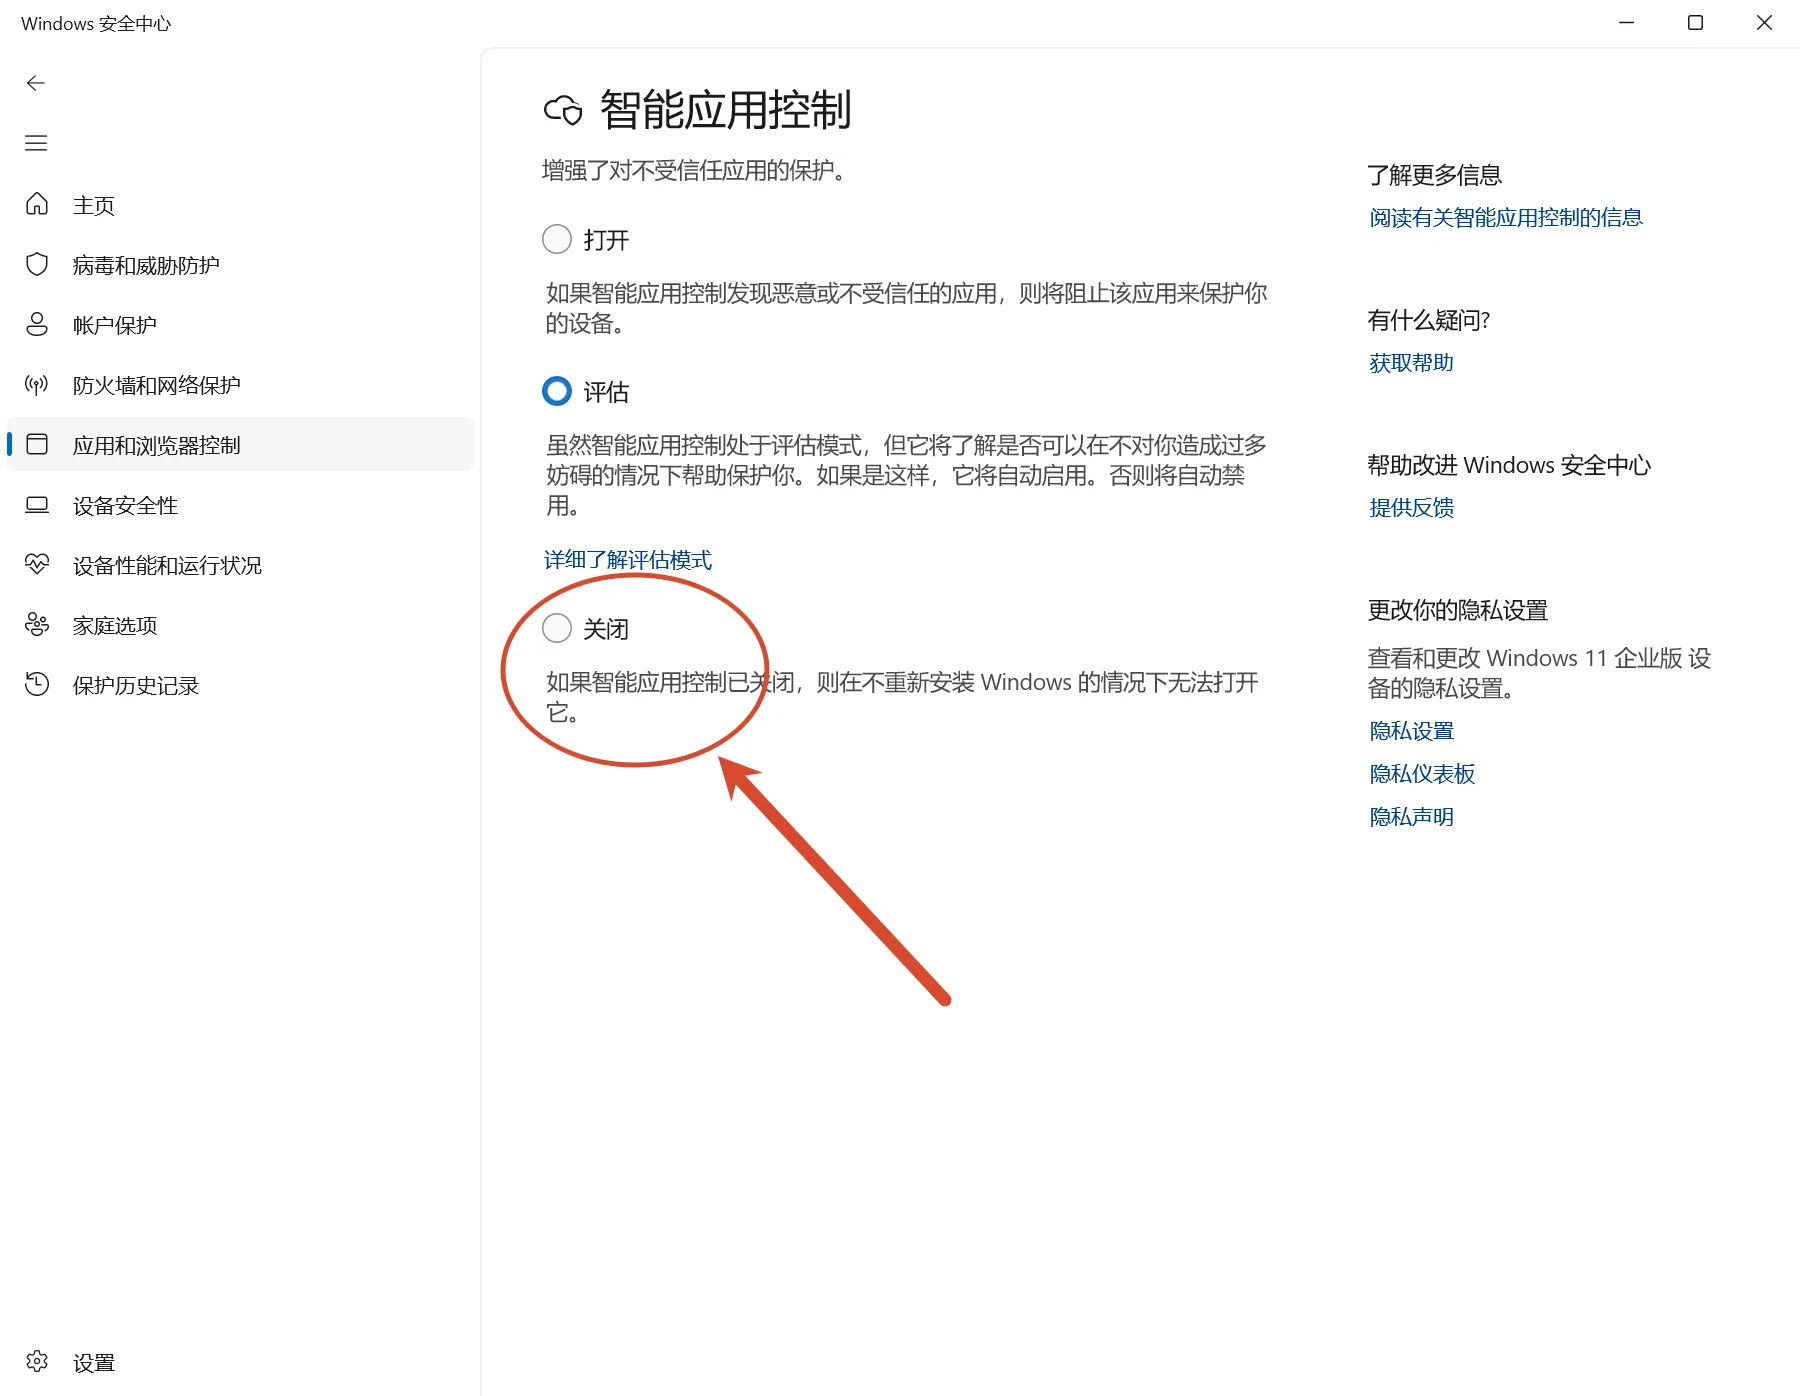
The current Q8B driver package is not WHQL signed; you must disable Windows "Smart App Control" so the driver installer can run.
- In the extracted driver directory, double-click
RadxaDriverInstallerto open the driver installer.
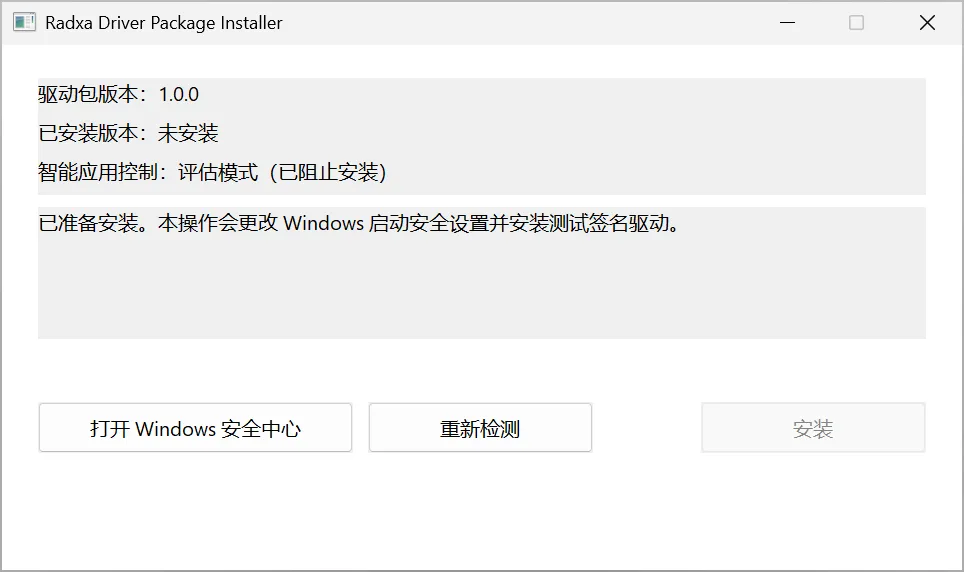
- In the installer, click "Open Windows Security".
- Open "Smart App Control settings", select "Off", and confirm as prompted by Windows.
Run the Driver Installer
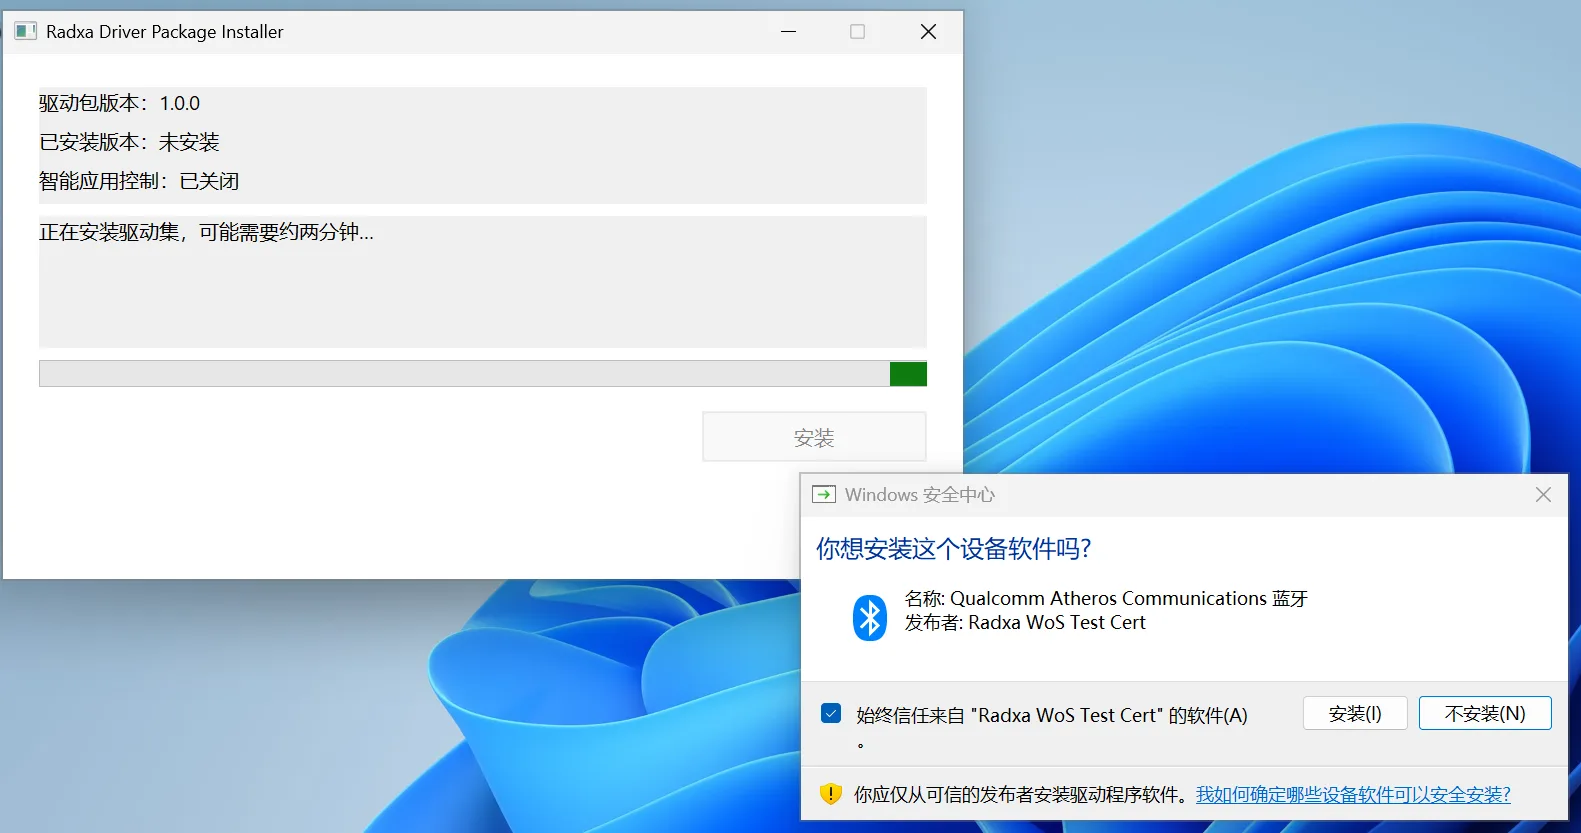
Return to the driver installer, click "Install", and wait for the installer to finish the current stage.
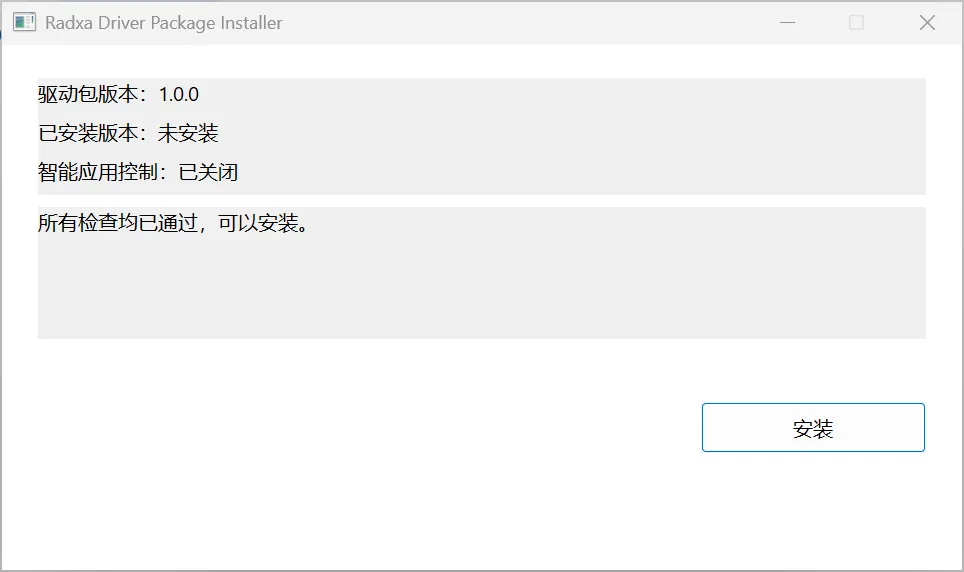
The system will restart automatically. Do not disconnect the power. After rebooting to the desktop, the installer will start again automatically to finish the remaining driver installation. After the installer reports completion, restart the system once more.
Post-Installation Checks
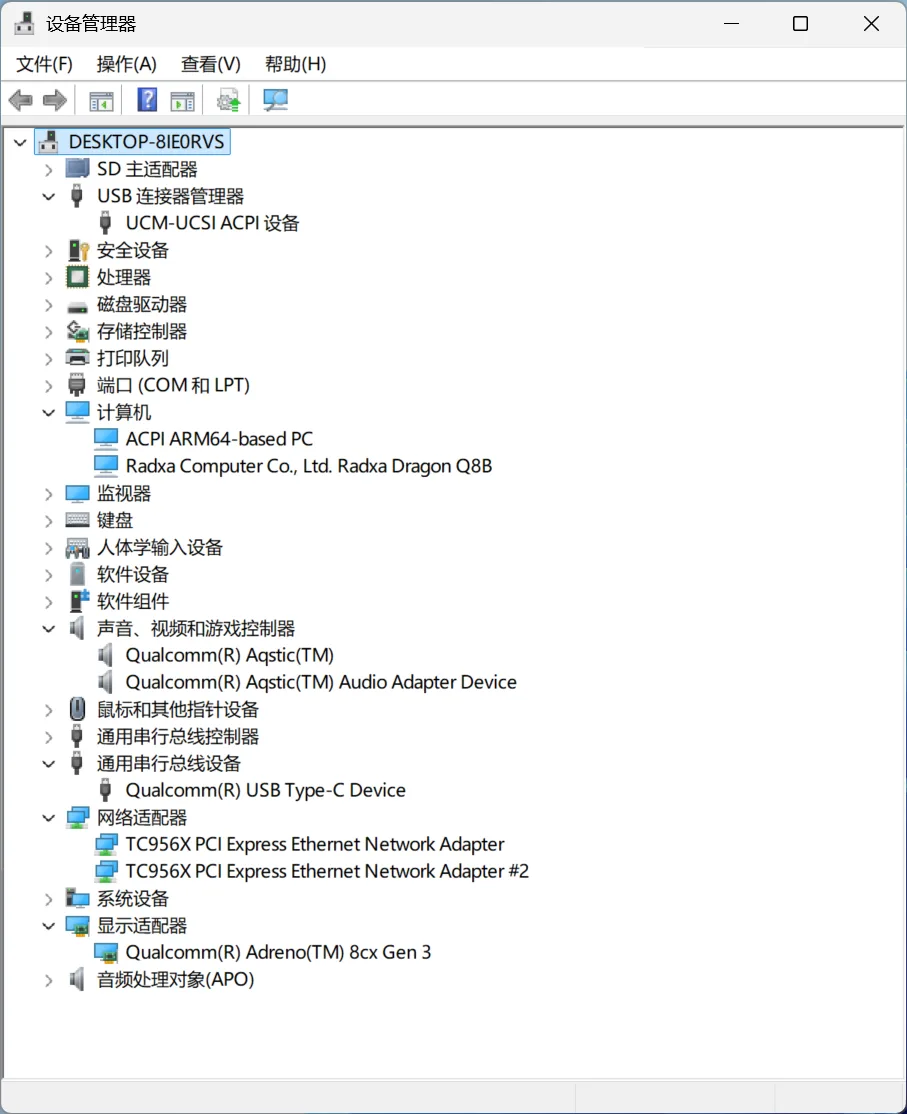
After driver installation and reboot, check the following:
- Open "Device Manager" and confirm there are no "Unknown devices" or devices with a yellow exclamation mark.
- Connect Ethernet and confirm the network works normally.
- Check that the HDMI display, USB keyboard/mouse, and audio devices work; after driver installation, you can connect and check a USB-C display with DP Alt Mode as needed.
- Open "Settings" > "System" > "Activation" and activate Windows with a valid license.
- Once the network is connected, run Windows Update, complete the updates, and restart as prompted. Check Device Manager and the network again after updating.
The Radxa Dragon Q8B uses Windows on ARM. Peripherals that require additional drivers should provide ARM64 versions of Windows drivers; confirm compatibility before purchasing or installing third-party peripherals.
Fan Control and Hardware Monitoring
Radxa Control Center
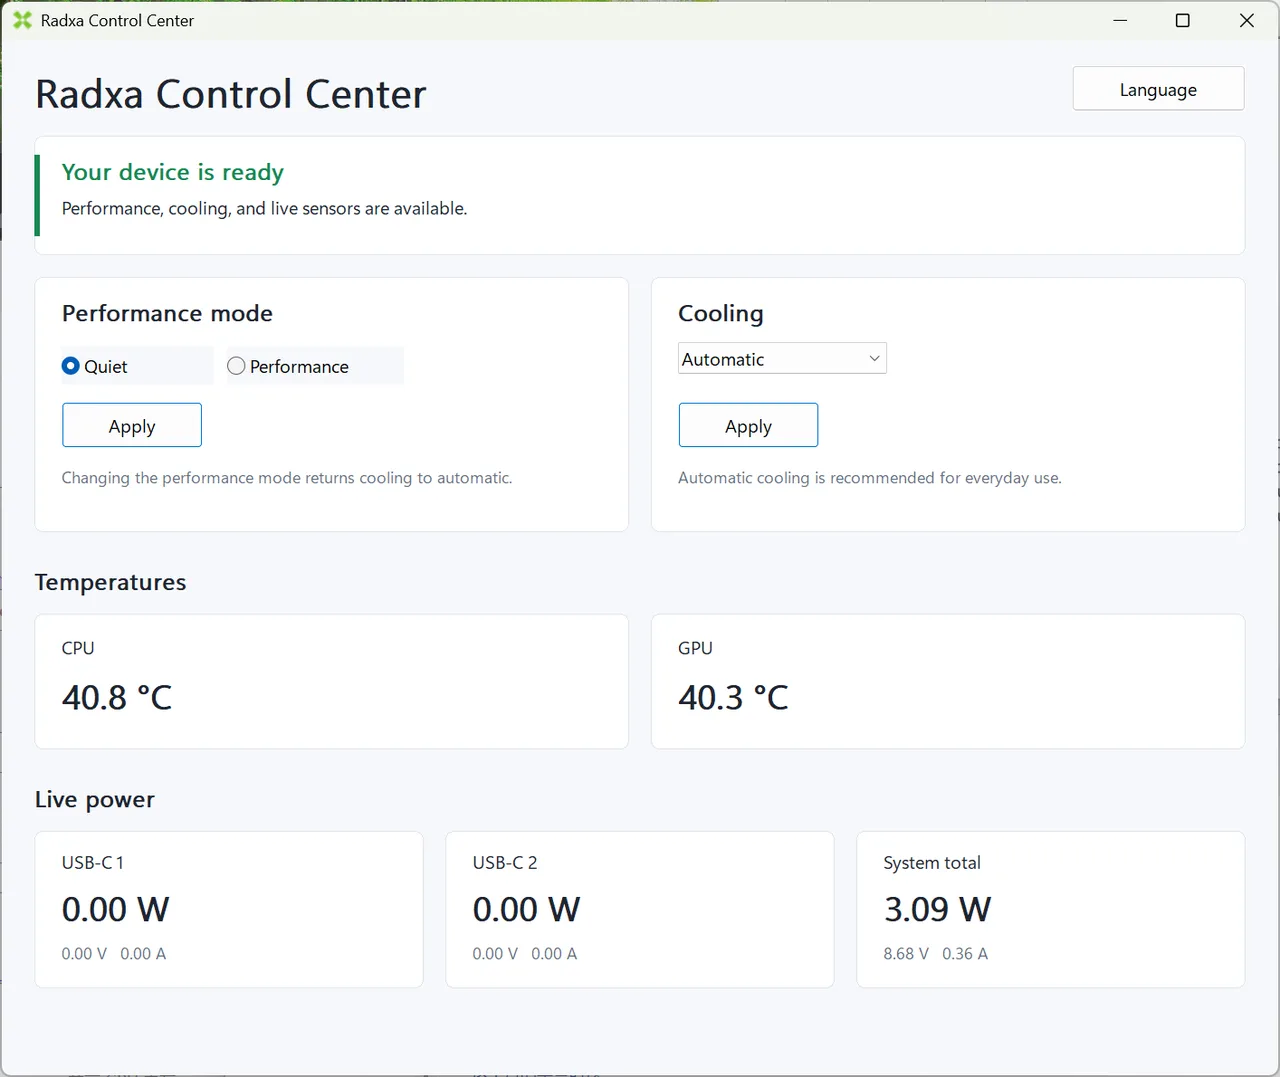
Radxa Control Center can manage the Q8B fan and show basic hardware status. Download the latest version for your system from the releases page and follow the on-screen instructions to install it.
- Fan modes: Auto, Full speed, Manual.
- Hardware status: temperature and power consumption data.
View Detailed Temperatures with HWiNFO
For more detailed temperature sensor data, download the ARM64 version from the HWiNFO download page. If using the portable version, extract it and open HWiNFO_ARM64.exe, then view sensor data in HWiNFO.
Using an M.2 E-Key Wireless Card (Optional)
The Q8B's M.2 E-Key slot supports the wireless cards listed below. Confirm Wi-Fi and Bluetooth functionality after installing Windows and the Q8B drivers.
| Wireless card | Wi-Fi spec | Bluetooth spec | Bluetooth connection |
|---|---|---|---|
| Qualcomm NCM865 | Wi-Fi 7 | Bluetooth 5.4 | USB |
| Qualcomm NCM865A | Wi-Fi 7 | Bluetooth 5.4 | UART |
| Qualcomm NFA765 | Wi-Fi 6E | Bluetooth 5.2 | USB |
Set Bluetooth Mode When Using the NCM865A
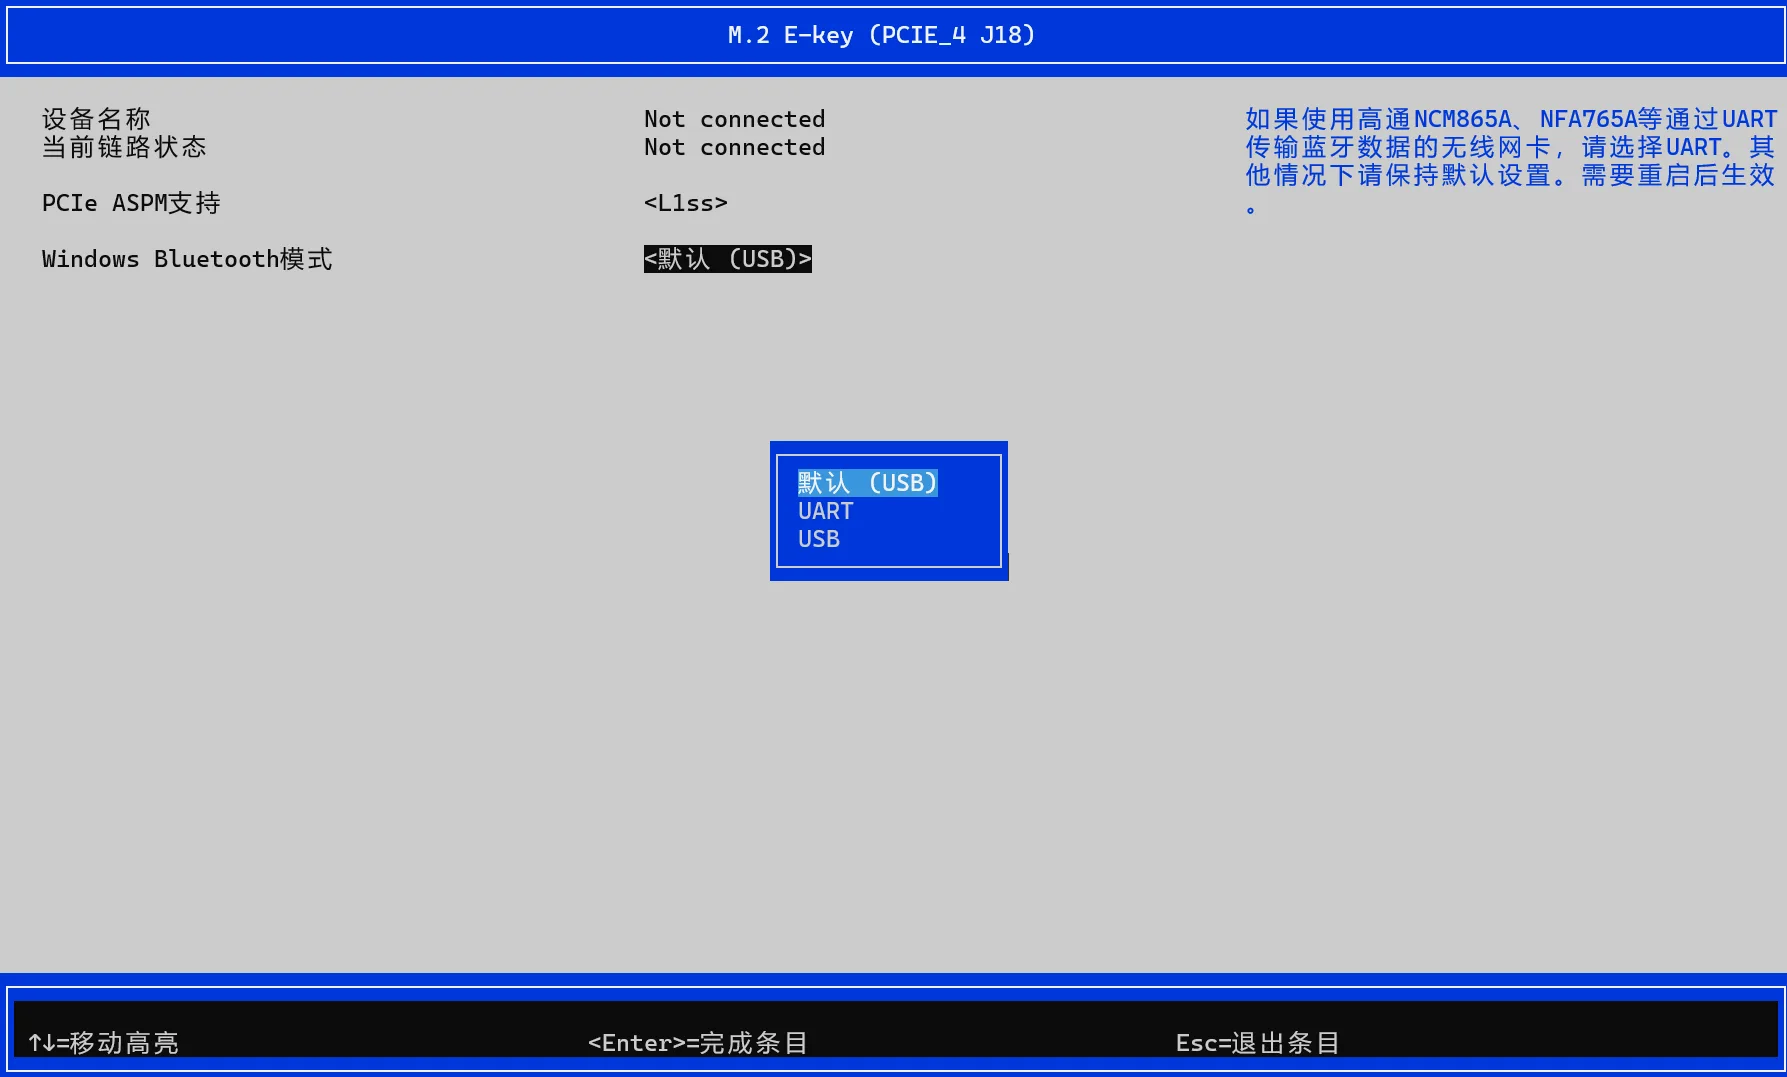
The NCM865A's Bluetooth connects via UART. When using this module, you must set the Windows Bluetooth mode to UART in the BIOS; the other two USB Bluetooth modules do not require this change.
- Connect an HDMI display to the Q8B. The current BIOS does not support USB-C display output.
- Power on and press F2 to enter the BIOS.
- Navigate to:
Radxa Platform Configuration>PCI Express Settings>M.2 E-key (PCIE_4 J18)>Windows Bluetooth Mode. - Set this option to
UART. - Save changes and exit the BIOS, then boot into Windows.
If the NCM865A's Bluetooth is not recognized, first confirm this BIOS setting is saved as UART, then check that the Q8B drivers are installed.
Troubleshooting
Cannot Boot the Windows Installer from the USB Drive
- Confirm you are using a Windows 11 ARM64 ISO, not an x64 ISO.
- Recreate the USB drive with Rufus per Section 2, confirming GPT, UEFI (non CSM), and Standard Windows installation.
- Press F12 at boot and select the USB boot entry from the boot menu.
The Windows Installer Cannot Find the NVMe SSD or UFS Module
- Power off and check that the NVMe SSD or UFS module is seated properly.
- Make sure you are identifying the storage device where Windows will actually be installed; do not delete partitions on other disks.
- If the problem persists, record the installer screen and storage device model, and contact the product support channel.
No Network on First Boot
Before installing the Q8B drivers, the network devices may not be available. Complete OOBE with a local account per Section 5, then install the Q8B driver package from Section 6.
No Display on USB-C Monitor During BIOS or Installation
This is expected behavior for the current version. The BIOS does not support USB-C display output, and USB-C DP Alt Mode displays only work after the Q8B drivers are installed. Use an HDMI display during installation and driver installation.