RKNN Stable Diffusion LCM
Stable Diffusion is a text-to-image generation model based on latent diffusion. It gradually adds and removes noise in latent space to turn random noise into images that match a text prompt. In recent years, Stable Diffusion has evolved rapidly, with many community-optimized variants that improve quality, speed, and efficiency. This guide uses Stable Diffusion LCM Dreamshaper V7, a lightweight variant that applies Latent Consistency Model (LCM) acceleration to generate high-quality images with very few steps (as few as 4 steps). This document shows how to deploy the model to the NPU on Rockchip SoCs using the RKNN toolchain for efficient, low-latency on-device generation.
This document uses RK3588 and Dreamshaper V7 as an example. You need to set up the RKNN environment on your PC first. See RKNN Installation.
Model Download
Radxa provides pre-converted RKNN models and runnable files (output resolution: 256×256). You can download and use them directly:
-
Download the model files using
modelscope- Create a directory for the model files
mkdir sd-lcm-rknn && cd sd-lcm-rknn
- Install
modelscopevia pip
# Use a recent Python version to avoid compatibility issues.
pip3 install modelscope
- Download the
Stable-Diffusion-LCM_RKNNpackage
modelscope download --model radxa/Stable-Diffusion-LCM_RKNN
Model Conversion (Optional)
If you want a different output resolution, you can convert the model yourself:
-
Download the ONNX model from Hugging Face and convert it to RKNN
- Create a directory for the model files
mkdir sd-lcm-rknn && cd sd-lcm-rknn
- Clone the model repository
# Requires git lfs. Install it first if needed.
git lfs install
git clone https://huggingface.co/thanhtantran/Stable-Diffusion-1.5-LCM-ONNX-RKNN2
- Activate the virtual environment
conda activate your_rknn_env
- Optionally run
run_onnx-lcm.pyto verify the ONNX model
# Use -h to view help.
python run_onnx-lcm.py -i ./model -o ./images --prompt "Majestic mountain landscape with snow-capped peaks, autumn foliage in vibrant reds and oranges, a turquoise river winding through a valley, crisp and serene atmosphere, ultra-realistic style."
- Run
convert-onnx-to-rknn.pyto convert the model
# Use -h to view help. Replace N with your desired resolution.
# The converted model will only output at that resolution.
python convert-onnx-to-rknn.py -i ./model -r NxN
- Arrange files in the following directory layout
---sd-lcm-rknn
     ---model
         ---scheduler
         ---scheduler_config.json
     ---text_encoder
         ---config.json
         ---model.rknn
     ---unet
         ---config.json
         ---model.rknn
     ---vae_decoder
         ---config.json
         ---model.rknn
     ---run_rknn-lcm.py
On-device Deployment
-
Copy the RKNN models and runtime files to the device
- Enter the directory on the device
cd sd-lcm-rknn
- Create a Python virtual environment
python -m venv .venv
- Activate the virtual environment
source .venv/bin/activate
- Install dependencies
pip3 install diffusers pillow "numpy<2.0" torch transformers rknn-toolkit-lite2
- Run the script
# Use -h to view help. If you converted the model yourself, adjust the resolution accordingly.
python ./run_rknn-lcm.py -i ./model -o ./images -s 256x256 --prompt "Majestic mountain landscape with snow-capped peaks, autumn foliage in vibrant reds and oranges, a turquoise river winding through a valley, crisp and serene atmosphere, ultra-realistic style."
Results and Performance
- Example output (256×256 on-device)
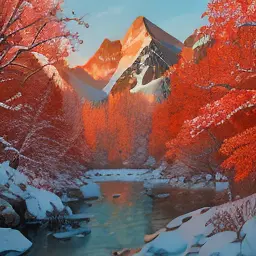
- Single-run timing (for reference only):
text_encoder load time: Took 0.7 seconds.
unet load time: Took 2.8 seconds.
vae_decoder load time: Took 0.4 seconds.
Prompt encoding time: 0.08s
Inference time: 4.55s
Decode time: 3.15s
Total time: 7.78s