Erase/Flash SPI Boot Firmware
This guide explains how to use the RKDevTool to erase and flash the SPI boot firmware.
Radxa E54C comes with SPI boot firmware pre-flashed to the SPI Flash by default.
For users experiencing system boot issues, you can try erasing the SPI Flash and then re-flashing the SPI boot firmware.
About SPI Boot Firmware
The core function of the SPI boot firmware (BootROM + bootloader) is to initialize hardware in stages (CPU → Memory → Storage) and ultimately load the operating system kernel from the storage device.
Prerequisites
We will use the RKDevTool for SPI Flash erasure and flashing operations.
RKDevTool is a software developed by Rockchip for USB flashing on Windows/Linux/macOS platforms.
Installing RKDevTool
- Windows
- Linux
- macOS
- Install Drivers
Download and extract the DriverAssitant file.
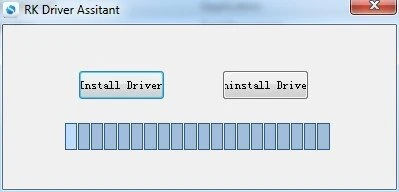
Locate the DriverInstall.exe file and run it as administrator:
To install driver: Click the Install Driver option
To uninstall driver: Click the Uninstall Driver option
If you have previously installed other versions of the driver, please uninstall them before installing the new one.
- Download RKDevTool
Download the RKDevTool utility, then extract the downloaded file. The RKDevTool.exe is the executable program - simply double-click it to launch the software.
- Install rkdeveloptool
Open your system terminal or command line and run the following commands to install:
sudo apt-get update
sudo apt-get install -y libudev-dev libusb-1.0-0-dev dh-autoreconf pkg-config libusb-1.0 build-essential git wget
git clone https://github.com/rockchip-linux/rkdeveloptool
cd rkdeveloptool
autoreconf -i
./configure
make -j $(nproc)
sudo cp rkdeveloptool /usr/local/sbin/
- Verify Installation
After installing RKDevTool, you can check the version with the following command:
rkdeveloptool -V
- Install HomeBrew
HomeBrew is a free and open-source package manager that simplifies software installation for macOS users.
If you don't have HomeBrew installed, follow these instructions:
/bin/bash -c "$(curl -fsSL https://raw.githubusercontent.com/Homebrew/install/HEAD/install.sh)"
- Install rkdeveloptool
Open your system terminal or command line and run the following commands to install:
brew install automake autoconf libusb pkg-config git wget
git clone https://github.com/rockchip-linux/rkdeveloptool
cd rkdeveloptool
autoreconf -i
./configure
make -j $(nproc)
cp rkdeveloptool /opt/homebrew/bin/
- Verify Installation
After installing RKDevTool, you can check the version with the following command:
rkdeveloptool -V
Entering Maskrom Mode
Radxa E54C features a dedicated Maskrom button. When this button is detected as pressed during system boot, the system will automatically enter Maskrom mode!
Required Equipment
- One USB Type-A to Type-C cable
- One pin or toothpick
- 12V/2A DC power adapter (DC5525)
Entering Maskrom Mode
-
Connect Radxa E54C to your PC using a USB Type-C to Type-A cable
-
Press and hold the Maskrom button using a pin or toothpick
-
Connect the 12V/2A DC power adapter
-
Release the Maskrom button
Normally, the power indicator will stay lit when entering Maskrom mode. If the behavior is different, you can repeat the steps to try again!

Erasing SPI Boot Firmware
Erasing the SPI boot firmware will completely wipe the SPI Flash, including all data stored within. After this operation, the system will be unable to boot.
Make sure the E54C is in Maskrom mode, then use RKDevTool to perform the SPI Flash erasure.
- Windows
- Linux / MacOS
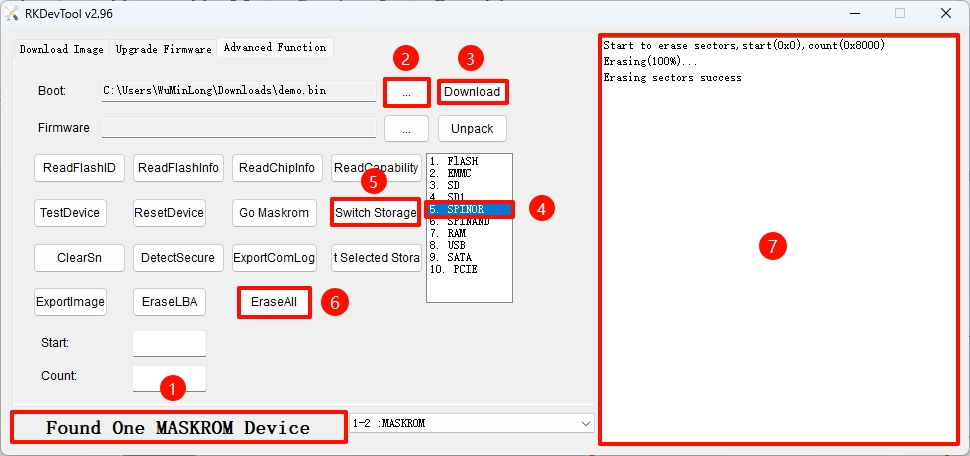
① : Ensure the E54C is in Maskrom mode.
② : Select the appropriate Loader file for E54C. You can download the Loader file from the Resource Download page.
③ : Click the Download option to run the Loader file.
④ : Select the SPINOR option.
⑤ : Choose Switch Storage to switch storage.
⑥ : Select Erase ALL to erase the SPI Flash.
⑦ : You can monitor the operation progress in this interface.
Reboot the system for the SPI Flash erasure to take effect.
-
Ensure the E54C is in Maskrom mode.
-
Verify Maskrom Mode
Use the rkdeveloptool ld command to check the recognized device information:
rkdeveloptool ld
Output similar to the following indicates a Maskrom device is recognized:
DevNo=1 Vid=0x2207,Pid=0x350e,LocationID=109 Maskrom
- Run the Loader File
Replace demo.bin with the appropriate Loader file for E54C. You can download the Loader file from the Resource Download page.
sudo rkdeveloptool db demo.bin
- Erase SPI Flash
sudo rkdeveloptool ef
- Reboot the System
Reboot for the SPI Flash erasure to take effect:
sudo rkdeveloptool rd
Flashing SPI Boot Firmware
Use the RKDevTool to flash the SPI boot firmware.
- Windows
- Linux / MacOS
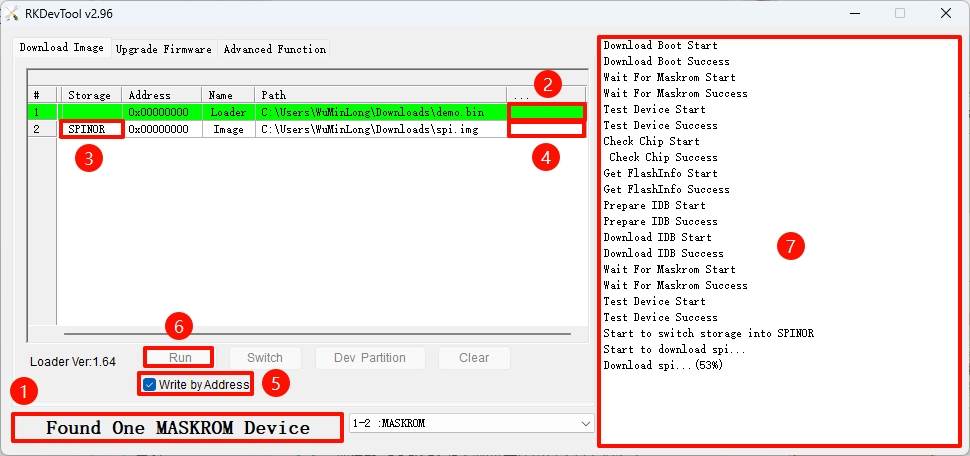
① Confirm the E54C is in Maskrom mode.
② Select the appropriate Loader file for E54C. You can download the Loader file from the Resource Download page.
③ Select the corresponding storage device. Here we choose the SPINOR option.
④ Select the spi.img file you want to flash to the SPI Flash. You can download the SPI boot firmware from the Resource Download page.
⑤ Check the Write by Address option.
⑥ Click the RUN button to execute all operations.
-
Ensure the E54C is in Maskrom mode.
-
Verify Maskrom Mode
Use the rkdeveloptool ld command to check the recognized device information:
rkdeveloptool ld
Output similar to the following indicates a Maskrom device is recognized:
DevNo=1 Vid=0x2207,Pid=0x350e,LocationID=109 Maskrom
- Run the Loader File
Replace demo.bin with the appropriate Loader file for E54C. You can download the Loader file from the Resource Download page.
sudo rkdeveloptool db demo.bin
- Flash SPI Boot Firmware
Replace spi.img with the appropriate SPI boot firmware for E54C. You can download the SPI boot firmware from the Resource Download page.
sudo rkdeveloptool wl 0 spi.img
- Reboot the System
Reboot for the changes to take effect:
sudo rkdeveloptool rd