Getting Started Guide
This guide helps you complete the initial wiring of your Linkr KVM, access the management interface, configure the account, and view the remote desktop of the target computer within 10 to 15 minutes.
For a more complete interface description, see the Linkr Web User Guide. For hardware details, see Product Overview.
What You Need
| Item | Description |
|---|---|
| Linkr KVM device | Includes an HDMI cable and a USB Type-C data cable |
| Target computer | Has an HDMI output and a USB port (used for power and keyboard/mouse) |
| Management computer / phone | Install Chrome or Edge browser (latest version recommended) |
| Network | The same LAN, or connect via the device's hotspot first |
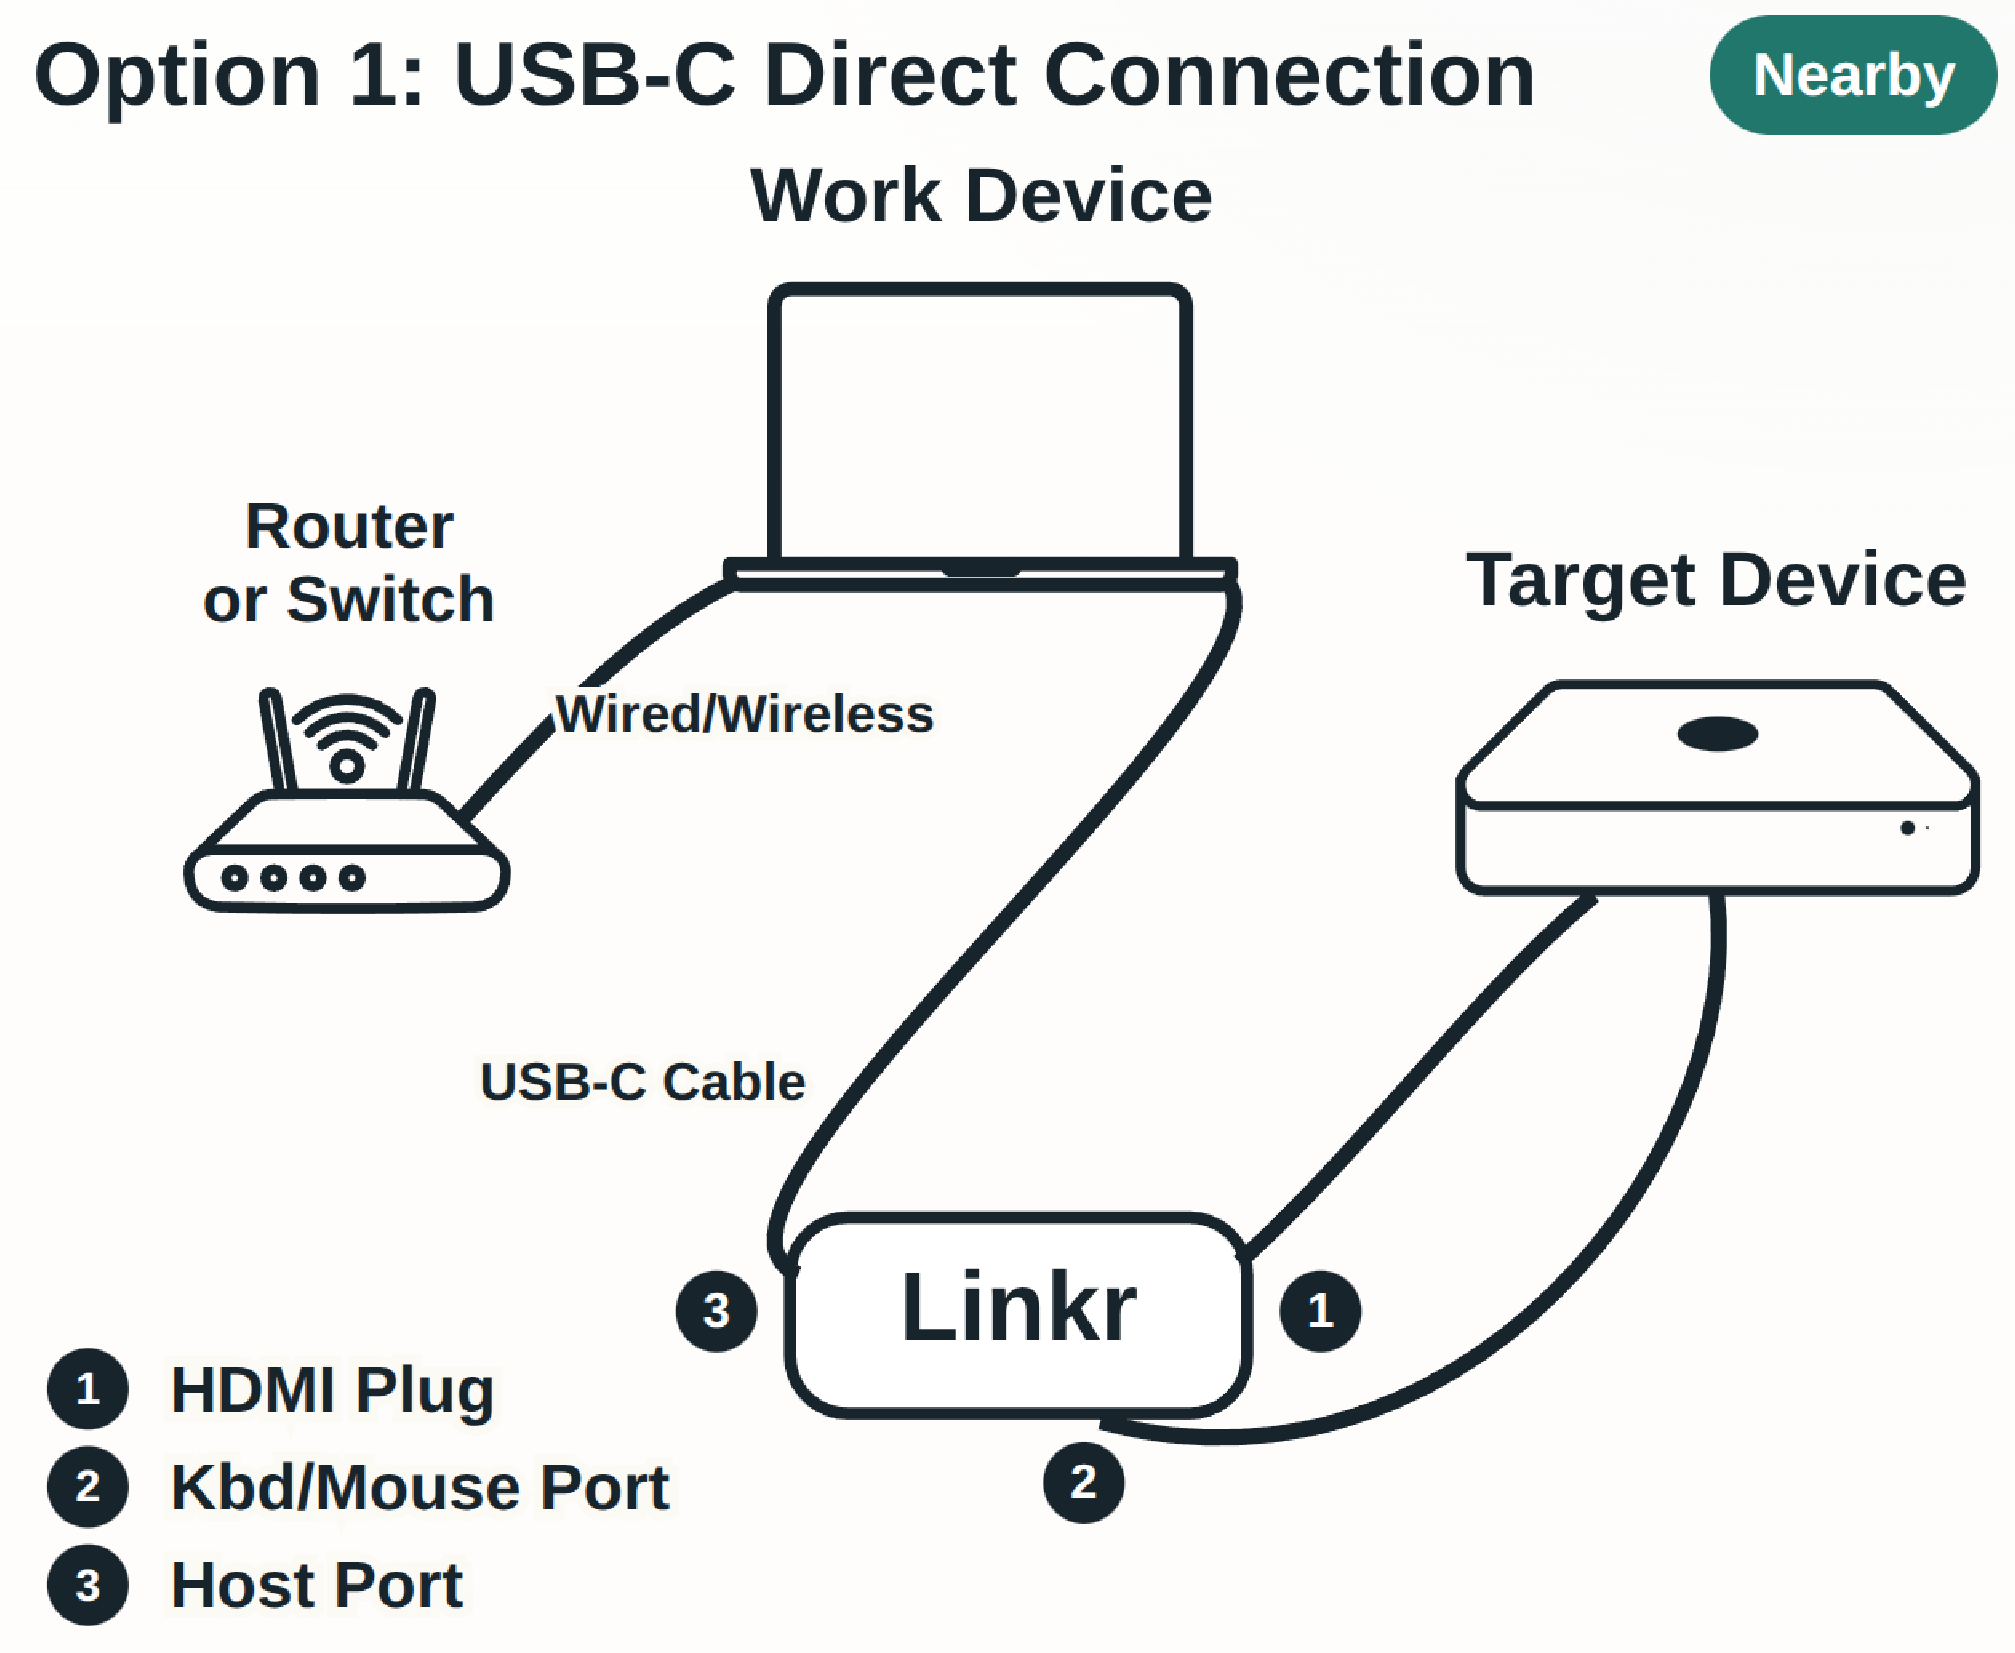
Step 1: Connect the Hardware
Method 1 (USB direct connection, short distance):
Method 2 (USB to RJ45, long distance):
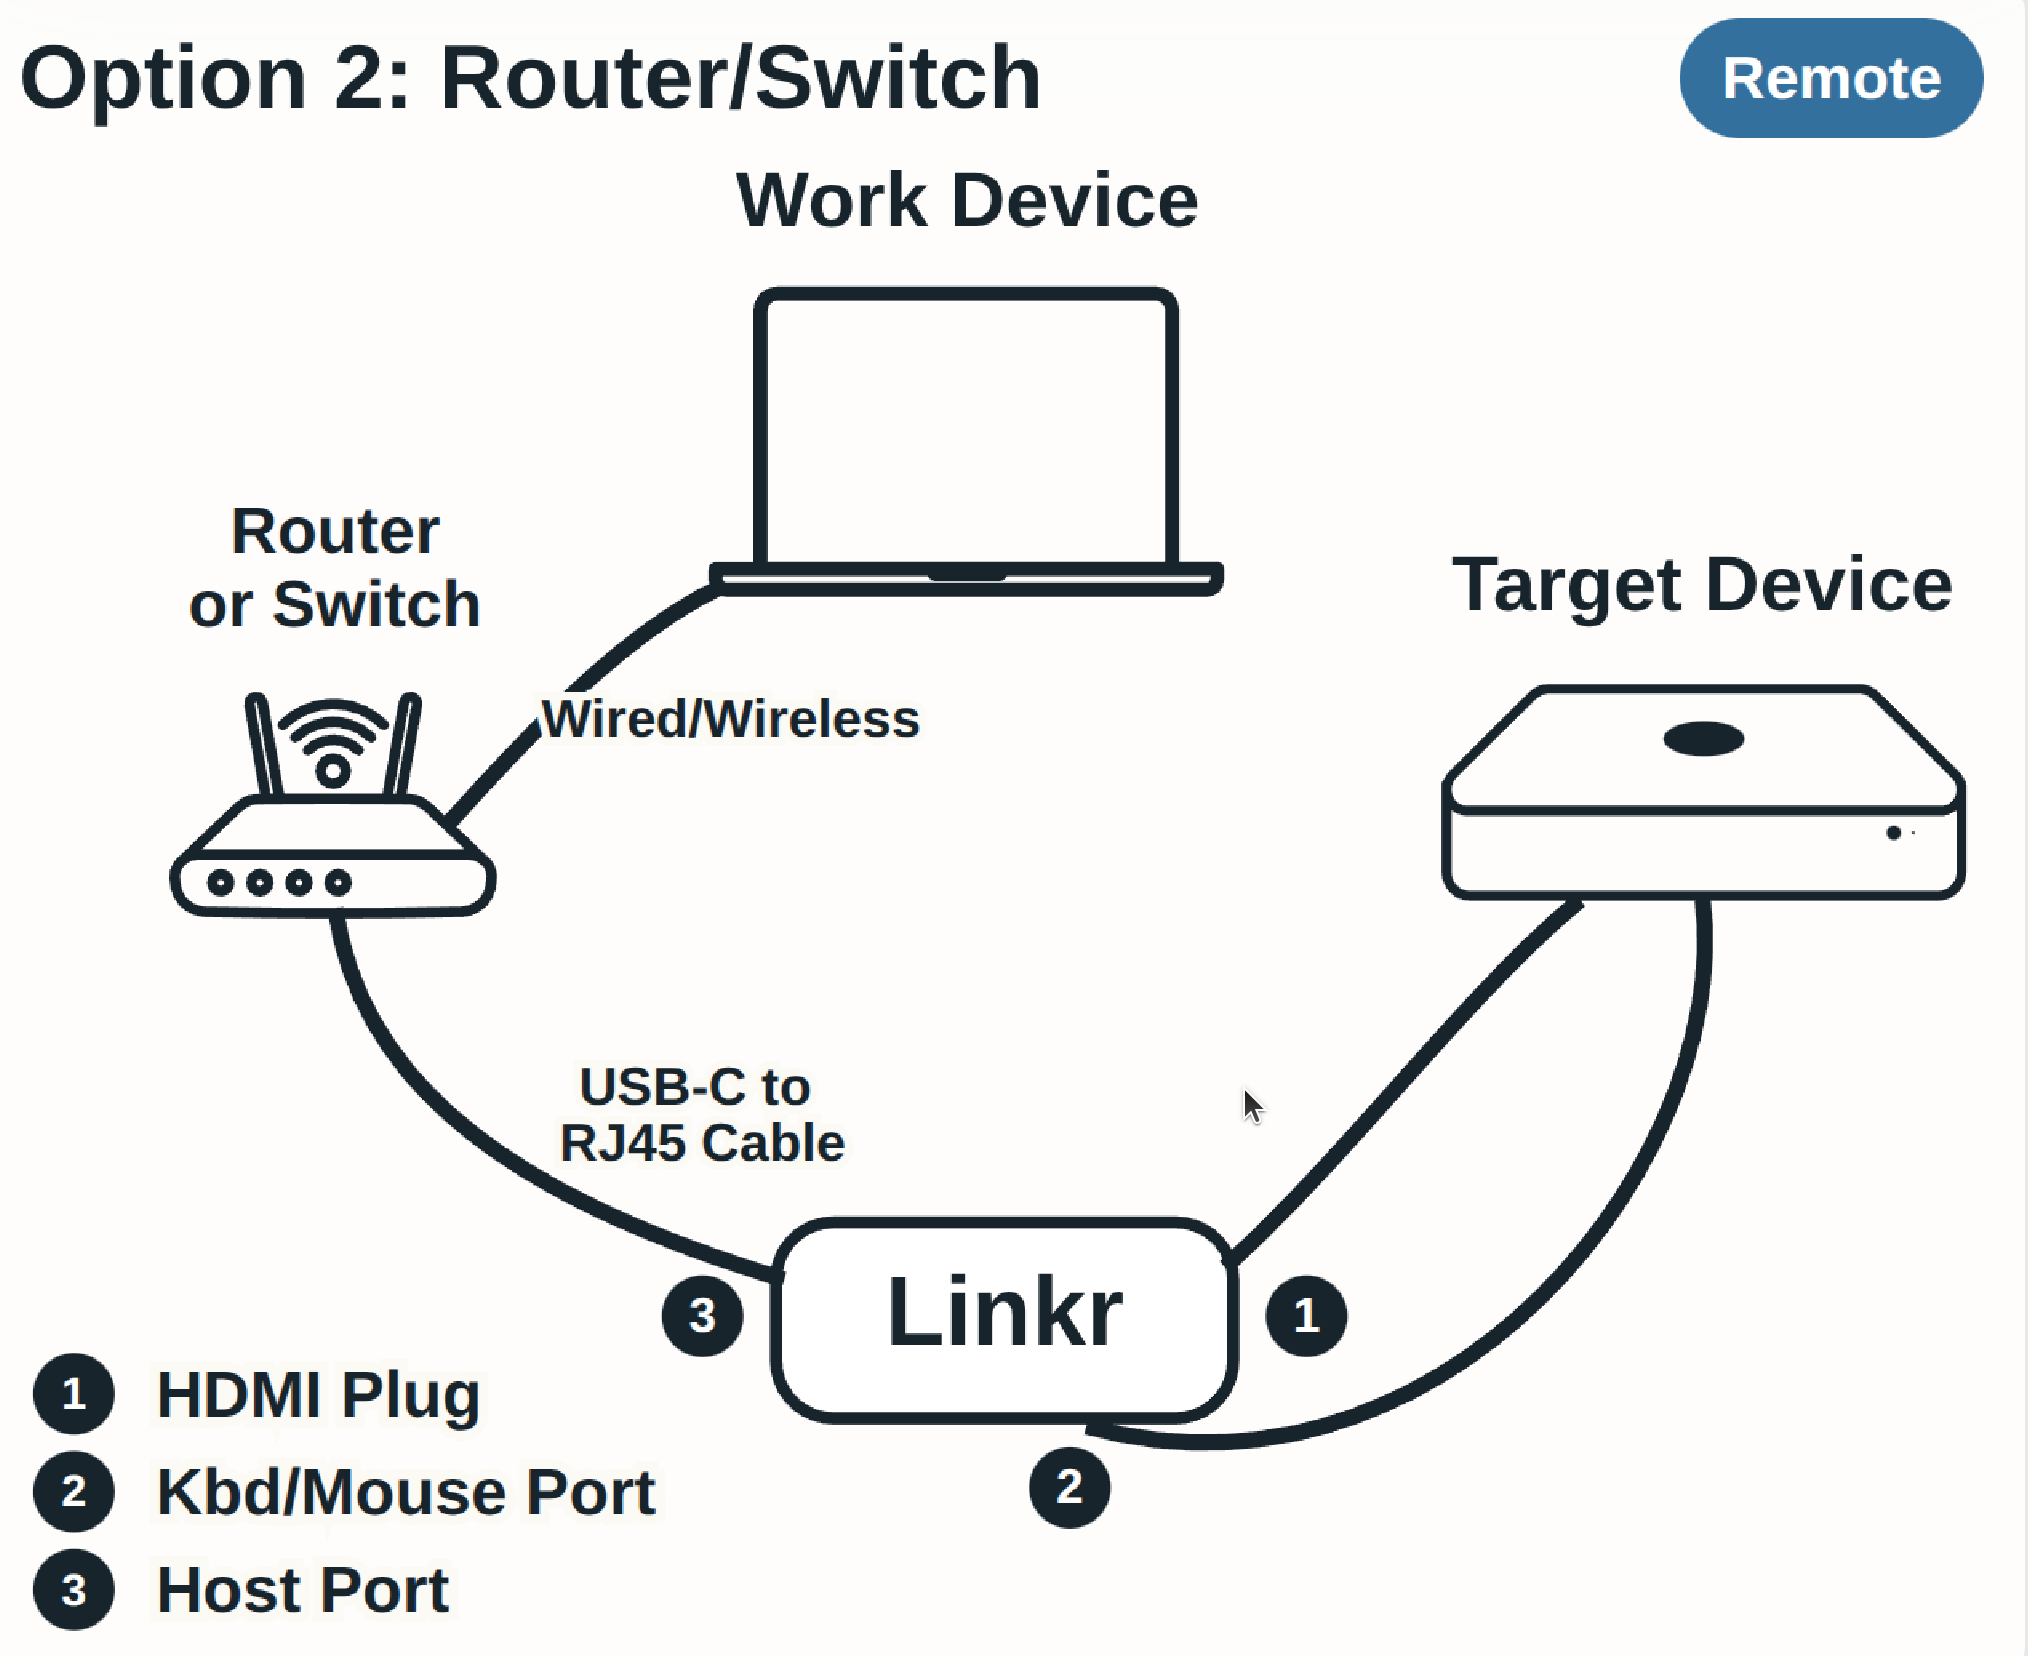
Wire everything up as follows:
- HDMI: KVM's HDMI male port → target computer's HDMI output port (capture the video).
- USB Type-C (OTG): KVM's tail OTG port → target computer's USB port (power + emulate keyboard/mouse).
- Network (choose one of the following):
- USB Type-C (network) → management computer (direct connection, no router needed); or
- USB Type-C (network) → router / switch (wired LAN); or
- Configure Wi-Fi later through the web interface; or
- Use the device's hotspot to let the management computer connect to the KVM first.
The OTG port is responsible for both powering the KVM and injecting keyboard/mouse signals into the target machine, so please use a reliable data cable. The network Type-C port is used for communication between the KVM and the management computer or router. When directly connected to a management computer, it can be accessed via linkr-usb.local (see below).
Step 2: Confirm the Device Is Ready
After powering on, observe the system status LED next to the FN key:
| Indicator | Meaning |
|---|---|
| Solid red | Starting up, please wait |
| Solid blue | System is normal, you can access it |
| Solid green | Someone is remotely using it |
You can also observe the HDMI-side video LED: it lights up to indicate that a video signal from the target machine has been detected.
For a complete description of the indicator LEDs, see Product Overview - LED Indicators.
Step 3: Open the Management Interface
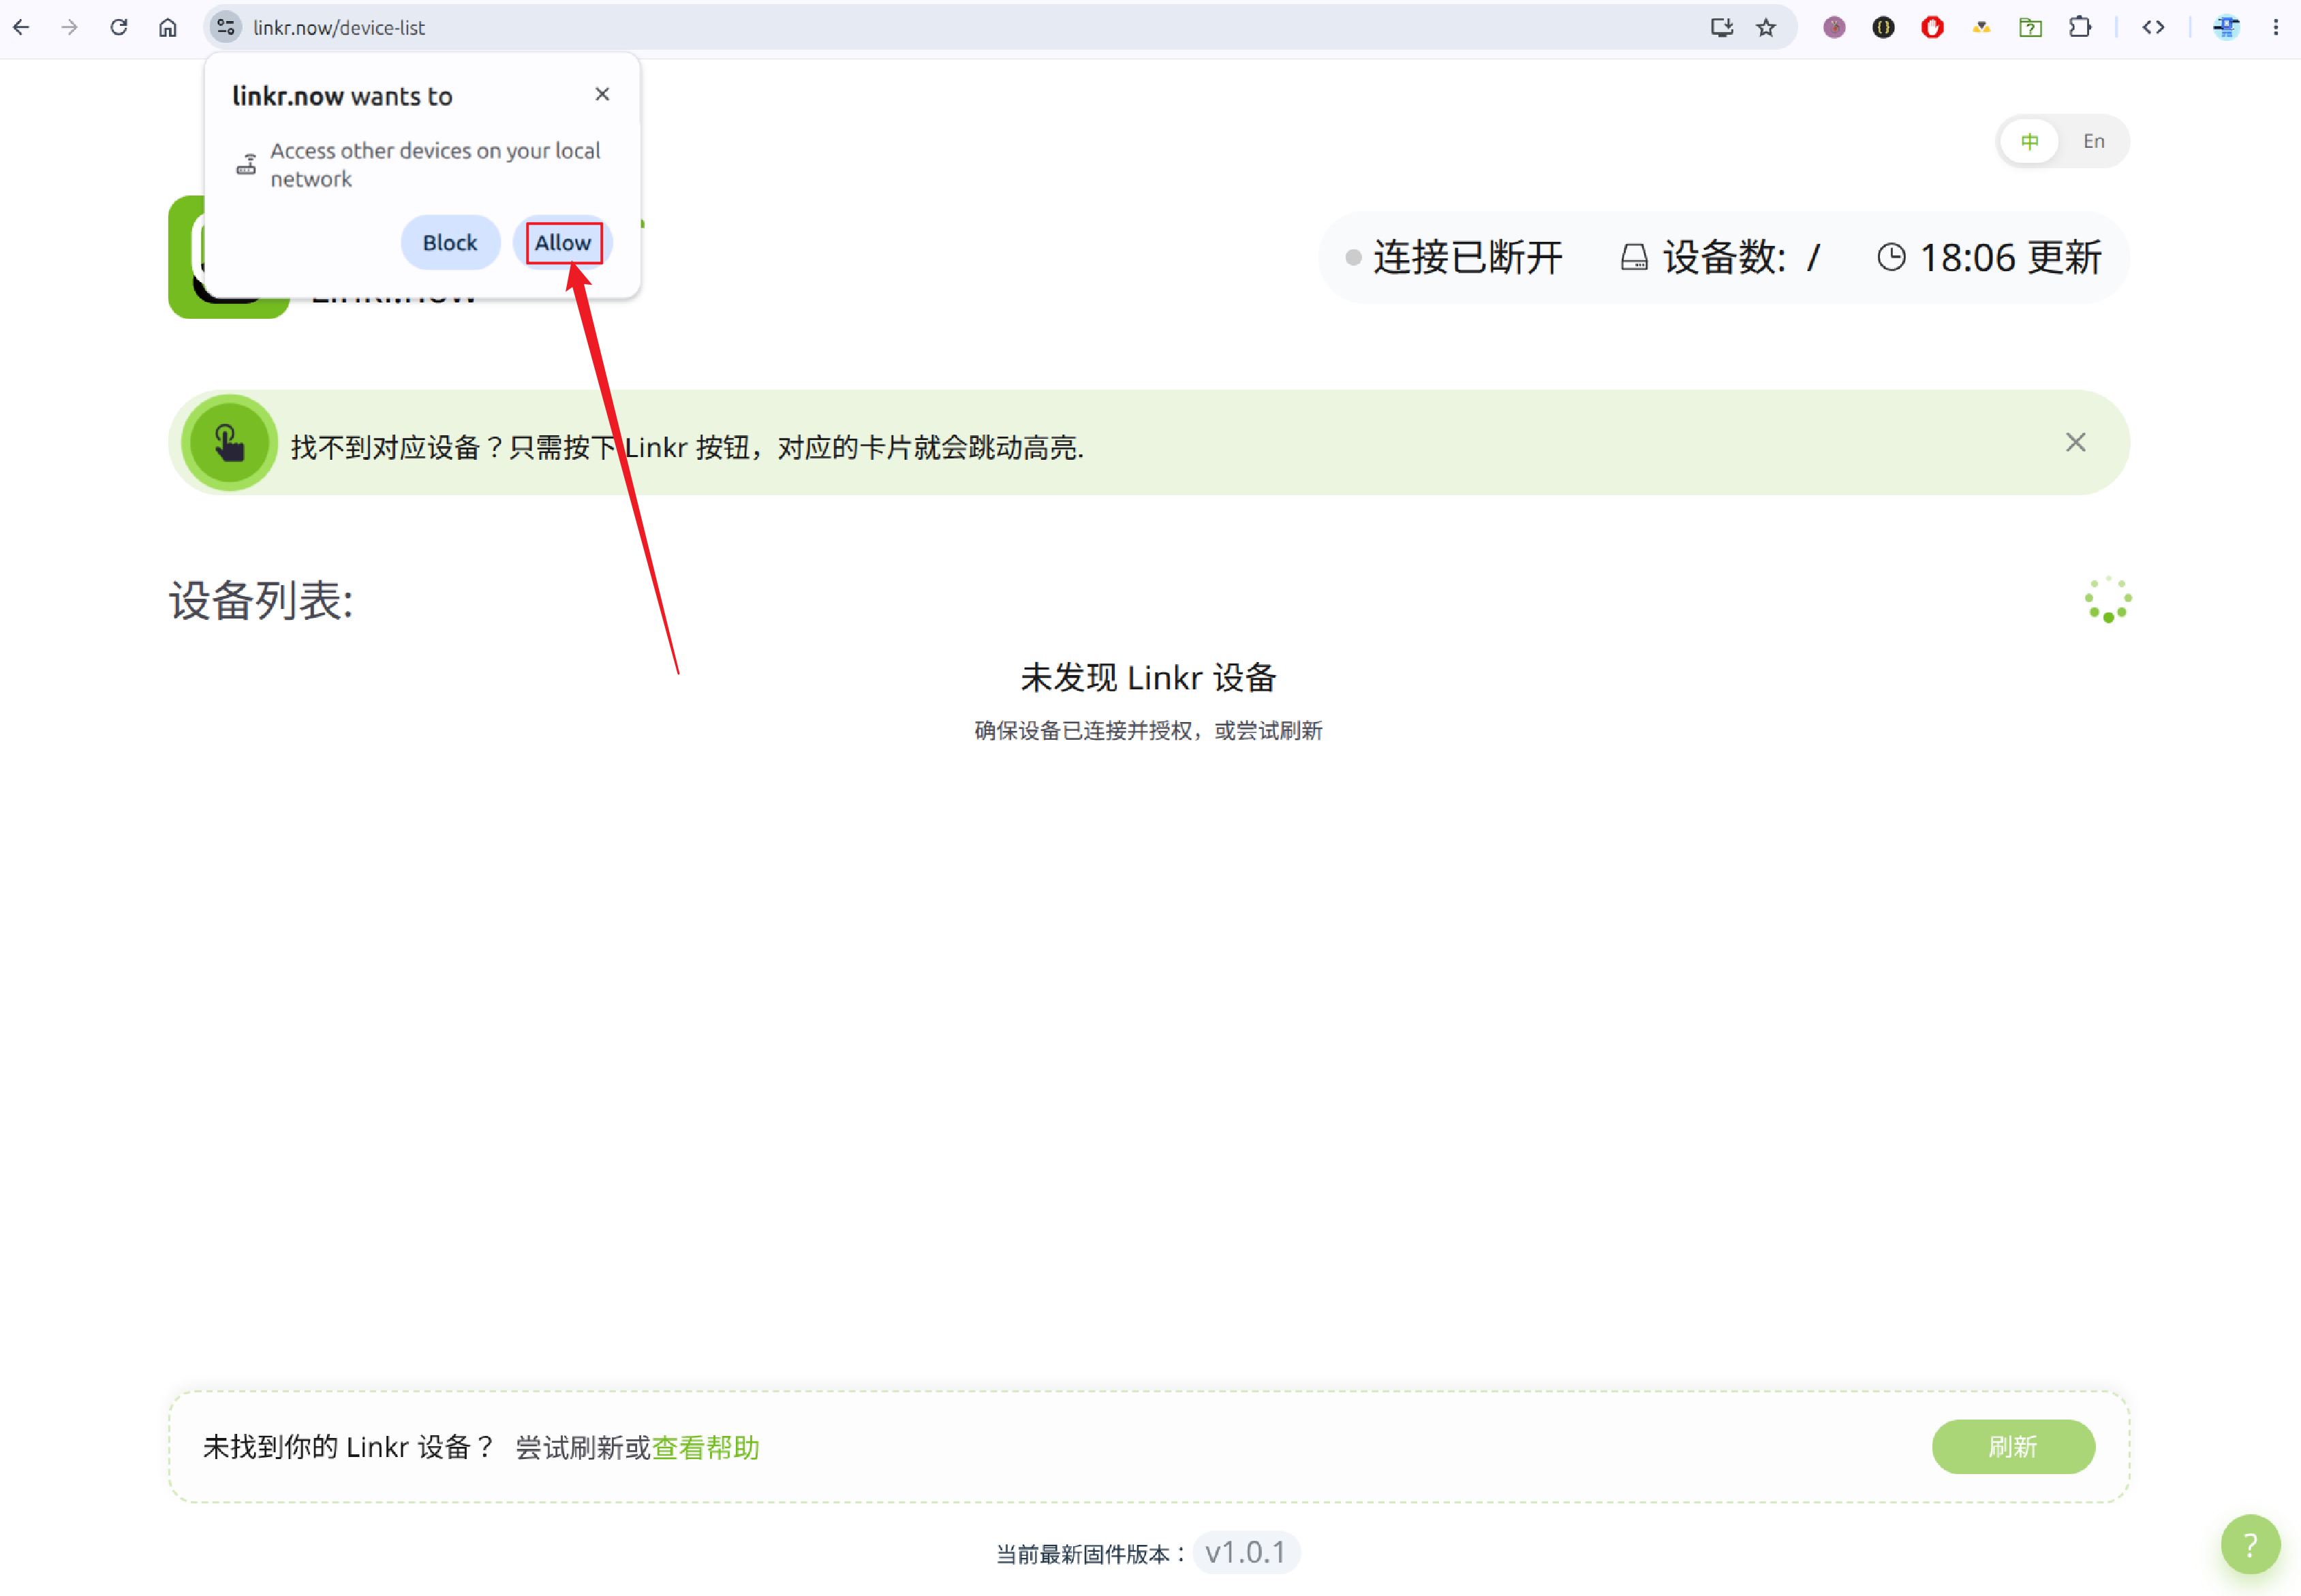
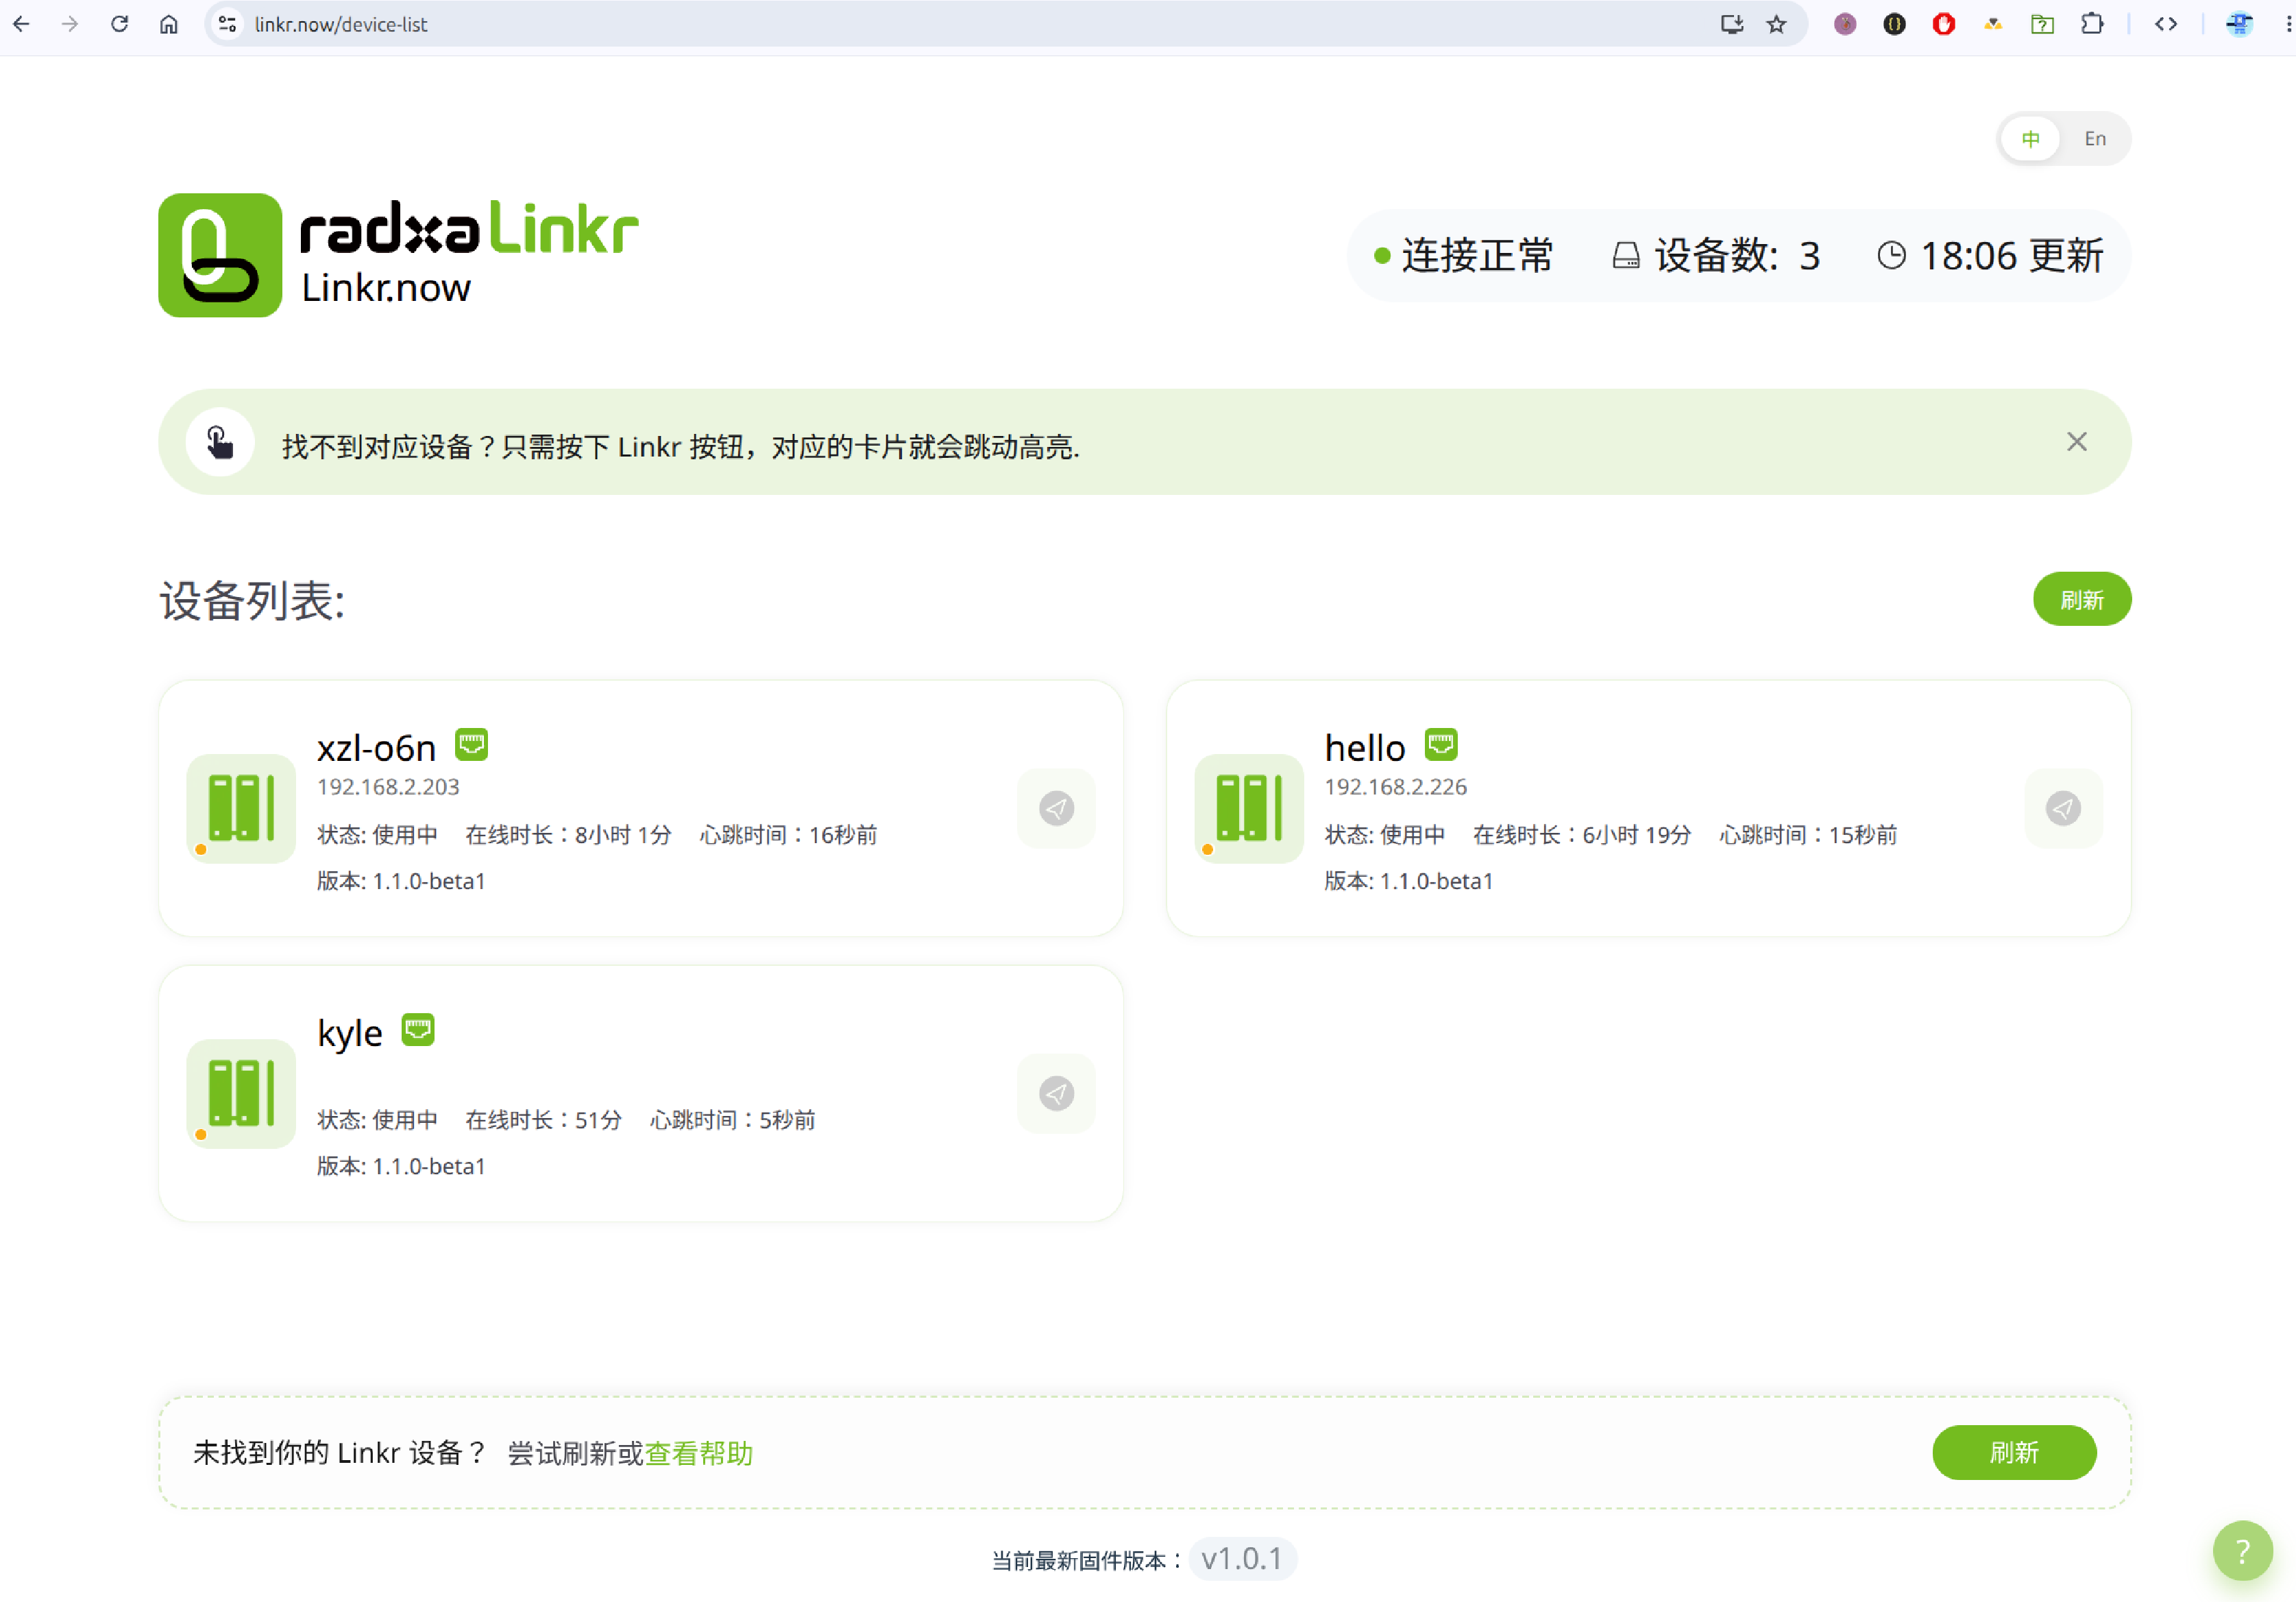
We recommend using linkr.now to discover the device on the LAN:
- Open https://linkr.now in the browser on the management computer.
- Follow the on-page prompts to grant local network access (the browser needs to allow mDNS / local network discovery).
- (Optional) Short-press the FN key once on the KVM to help the page identify your device.
- Select your KVM in the device list and enter the management interface.
Other Access Methods
If linkr.now cannot discover the device, try the following:
| Method | Address | Applicable Scenario |
|---|---|---|
| mDNS (LAN) | https://linkr.local | The network Type-C is connected to a router, or already connected to the same LAN via Wi-Fi |
| mDNS (USB direct) | https://linkr-usb.local | The network Type-C is directly connected to a management computer, no router required |
| mDNS (initialized) | https://linkr-<username>.local | After the initial configuration is complete, this address can also be used in LAN mode |
| Device IP | https://<KVM's IP address> | Direct access when the IP is known |
| Hotspot | Connect to the Wi-Fi linkr-<device ID> and then use the address above | Initial configuration when no router network is available |
mDNS Domain Name Description
The KVM automatically switches the mDNS hostname according to how the network Type-C is connected:
- Connected to a router / switch, or joined the LAN via Wi-Fi: Uses
linkr.local(factory default); after the initial configuration is complete,linkr-<username>.localis also available. - Directly connected to a management computer: The KVM communicates with the management computer over the USB network, and the mDNS domain name is
linkr-usb.local, which is suitable for out-of-the-box use without a router.
After plugging the network Type-C into a management computer, enter https://linkr-usb.local in the browser address bar to open the management interface (no need to go through linkr.now).
When accessing over HTTPS, the browser may warn that the certificate is not trusted (self-signed certificate). Just choose to continue.
If the page shows "Connection Lost", please check: whether the KVM's blue LED is solid on, whether the management computer and the KVM are on the same network, and whether the network cable / Wi-Fi is working. See FAQ below for details.
Step 4: Initial Configuration (New Device)
A factory-uninitialized device will enter the Initial Configuration page. Please set:
| Item | Required | Description |
|---|---|---|
| Username | Required | 1-20 characters, only letters, numbers, -; cannot start or end with -; cannot be usb |
| Login password | Required | At least 6 characters; the page shows password strength |
| Device name | Optional | Used to distinguish devices; the page validates domain name uniqueness after entry |
Submit the form to complete initialization. In LAN mode, the device's mDNS name will become linkr-<username>.local; for direct USB connection to a management computer, linkr-usb.local is still used.
Step 5: Log In
An initialized device shows the login page:
- Enter the username and password.
- Click Log In to enter the remote console (
/home).
If the device is being used by another user, you will be prompted whether to continue before logging in (continuing will log the other session out).
Forgot Password
Click Reset Password on the login page and follow the prompt to long-press the FN key for 10 seconds to restore the device to factory settings (all configuration will be cleared). You can also see Product Overview - FN Button.
Step 6: Start Remote Control
After a successful login you will enter the main control page, which consists of three parts:
- Middle: Real-time video of the target computer
- Left: Settings and tools (network, display, keyboard/mouse, system settings, etc.)
- Bottom: Connection status, fullscreen, screenshot, recording, virtual keyboard, etc.
Quick verification that everything is working:
- Confirm that the middle area shows the target computer's desktop (if "no signal" is displayed, check the HDMI connection and whether the target machine is powered on).
- Click and move on the screen to confirm that the mouse can control the target computer.
- Type on the keyboard to confirm that the input takes effect.
For a detailed description of the functions, see the User Interface Guide.
Recommended Initial Settings
After completing the first connection, we recommend configuring the following as needed:
| Setting | Entry | Documentation |
|---|---|---|
| Connect to Wi-Fi | Left sidebar → Network Settings | User Interface Guide |
| Change device name | System Settings → Device Name | User Interface Guide |
| Remote access (external network) | Advanced Settings → Tailscale | Tailscale Remote Access |
| Firmware upgrade | System Settings → System Update | Firmware Update |
Full Process Overview
Wiring (HDMI + OTG + Network)
        ↓
Solid blue system LED + video LED on
        ↓
Open linkr.now in the browser → grant local network access → select device
        ↓
Initial configuration (username / password) or log in
        ↓
Main page shows the video → keyboard/mouse operation
        ↓
Configure network, Tailscale, firmware, etc. as needed
FAQ
linkr.now Cannot Find the Device
- Confirm the KVM system LED is solid blue.
- Confirm the management computer and the KVM are on the same LAN (or connected via hotspot).
- The browser needs to allow local network access. Try a short press of the FN key and then refresh the page.
- LAN mode: Use
https://linkr.localorhttps://linkr-<username>.localinstead. - USB direct mode: Use
https://linkr-usb.localinstead. - Or enter the KVM's IP address directly.
Page Shows "Connection Lost"
- Check that the KVM's power and network are normal.
- Make sure the network cable is plugged in tightly, or Wi-Fi is properly configured.
- Click Refresh on the page to retry.
Cannot See the Target Computer's Screen
- Confirm the target computer is powered on and has HDMI output.
- Check that the HDMI cable is firmly connected.
- Observe whether the KVM's video status LED is on; flashing means the signal is abnormal.
Mouse and Keyboard Are Not Responding
- Confirm that the mouse / keyboard function is enabled in the bottom toolbar.
- Check that the OTG Type-C cable is connected to the target computer's USB port.
- The target computer needs to allow USB input devices (usually no extra setting is required).
Login Says Wrong Username or Password
- Double-check the username case and the password.
- If you forgot the password, long-press the FN key for 10 seconds to restore factory settings and reinitialize.
For more questions, see FAQ.
Next Steps
- User Interface Guide — Complete interface and feature description
- Product Overview — Interfaces, indicator LEDs, specifications
- Feature Details — Tailscale, WOL, access tokens, and other advanced features