Linkr Web User Guide
What Does It Do?
The Linkr Web is a web-based console for remotely managing target devices (computers, development boards, servers, ...). You can complete the following core tasks directly in the browser:
- Remotely view the target device's screen in
H.264 / MJPEG video mode - Send keyboard and mouse input remotely
- Take screenshots, record video, use quick-paste and shortcut keys
- Configure the network
Ethernet, USB network, Wi-Fi, hotspot - Manage virtual disk mounts
ISO/IMG - Perform system-level management
user, password, device name, upgrade, reset, API Key
In short: it combines a remote KVM client and a device management backend into a single web page.
Page Structure Overview
The project has three main routes:
/: Login page (initial setup or normal login)/home: Main control page (video view + sidebar settings + bottom toolbar)
Day-to-day usage is almost entirely on /home.
Login Page
The login page automatically branches based on whether the device has been initialized:
- Not initialized: enter initial setup
- Initialized: enter the username + password login
Initial Setup
You need to set:
- Username (required)
- Login password (required)
- Device name (optional)
What each item does:
- Username: used for subsequent login identity, and also affects domain-name-related features
- Password: system login credential
- Device name: used to generate a domain name to make it easy to distinguish the device on the network or in the management list; the username is used as the default device name
Key validation rules:
- The username has format restrictions and cannot be
usb - The password must meet the minimum length requirement; the page shows password strength
- If a device name is provided, domain-name uniqueness is validated first
Normal Login
- Enter the username and password to log in.
- The page supports "Reset Password" (long-press the device button for 10s, then release; the device will be reset).
Common Login Page Features
- Language switcher in the top-right corner (Chinese / English)
- Theme switcher in the top-right corner (dark / light)
Workbench Layout
The workbench consists of three parts:
- Left: collapsible sidebar (entries for all settings and tools)
- Middle: remote video area (the core control view)
- Bottom: quick control bar (connection status, fullscreen, screenshot, recording, mouse, virtual keyboard)
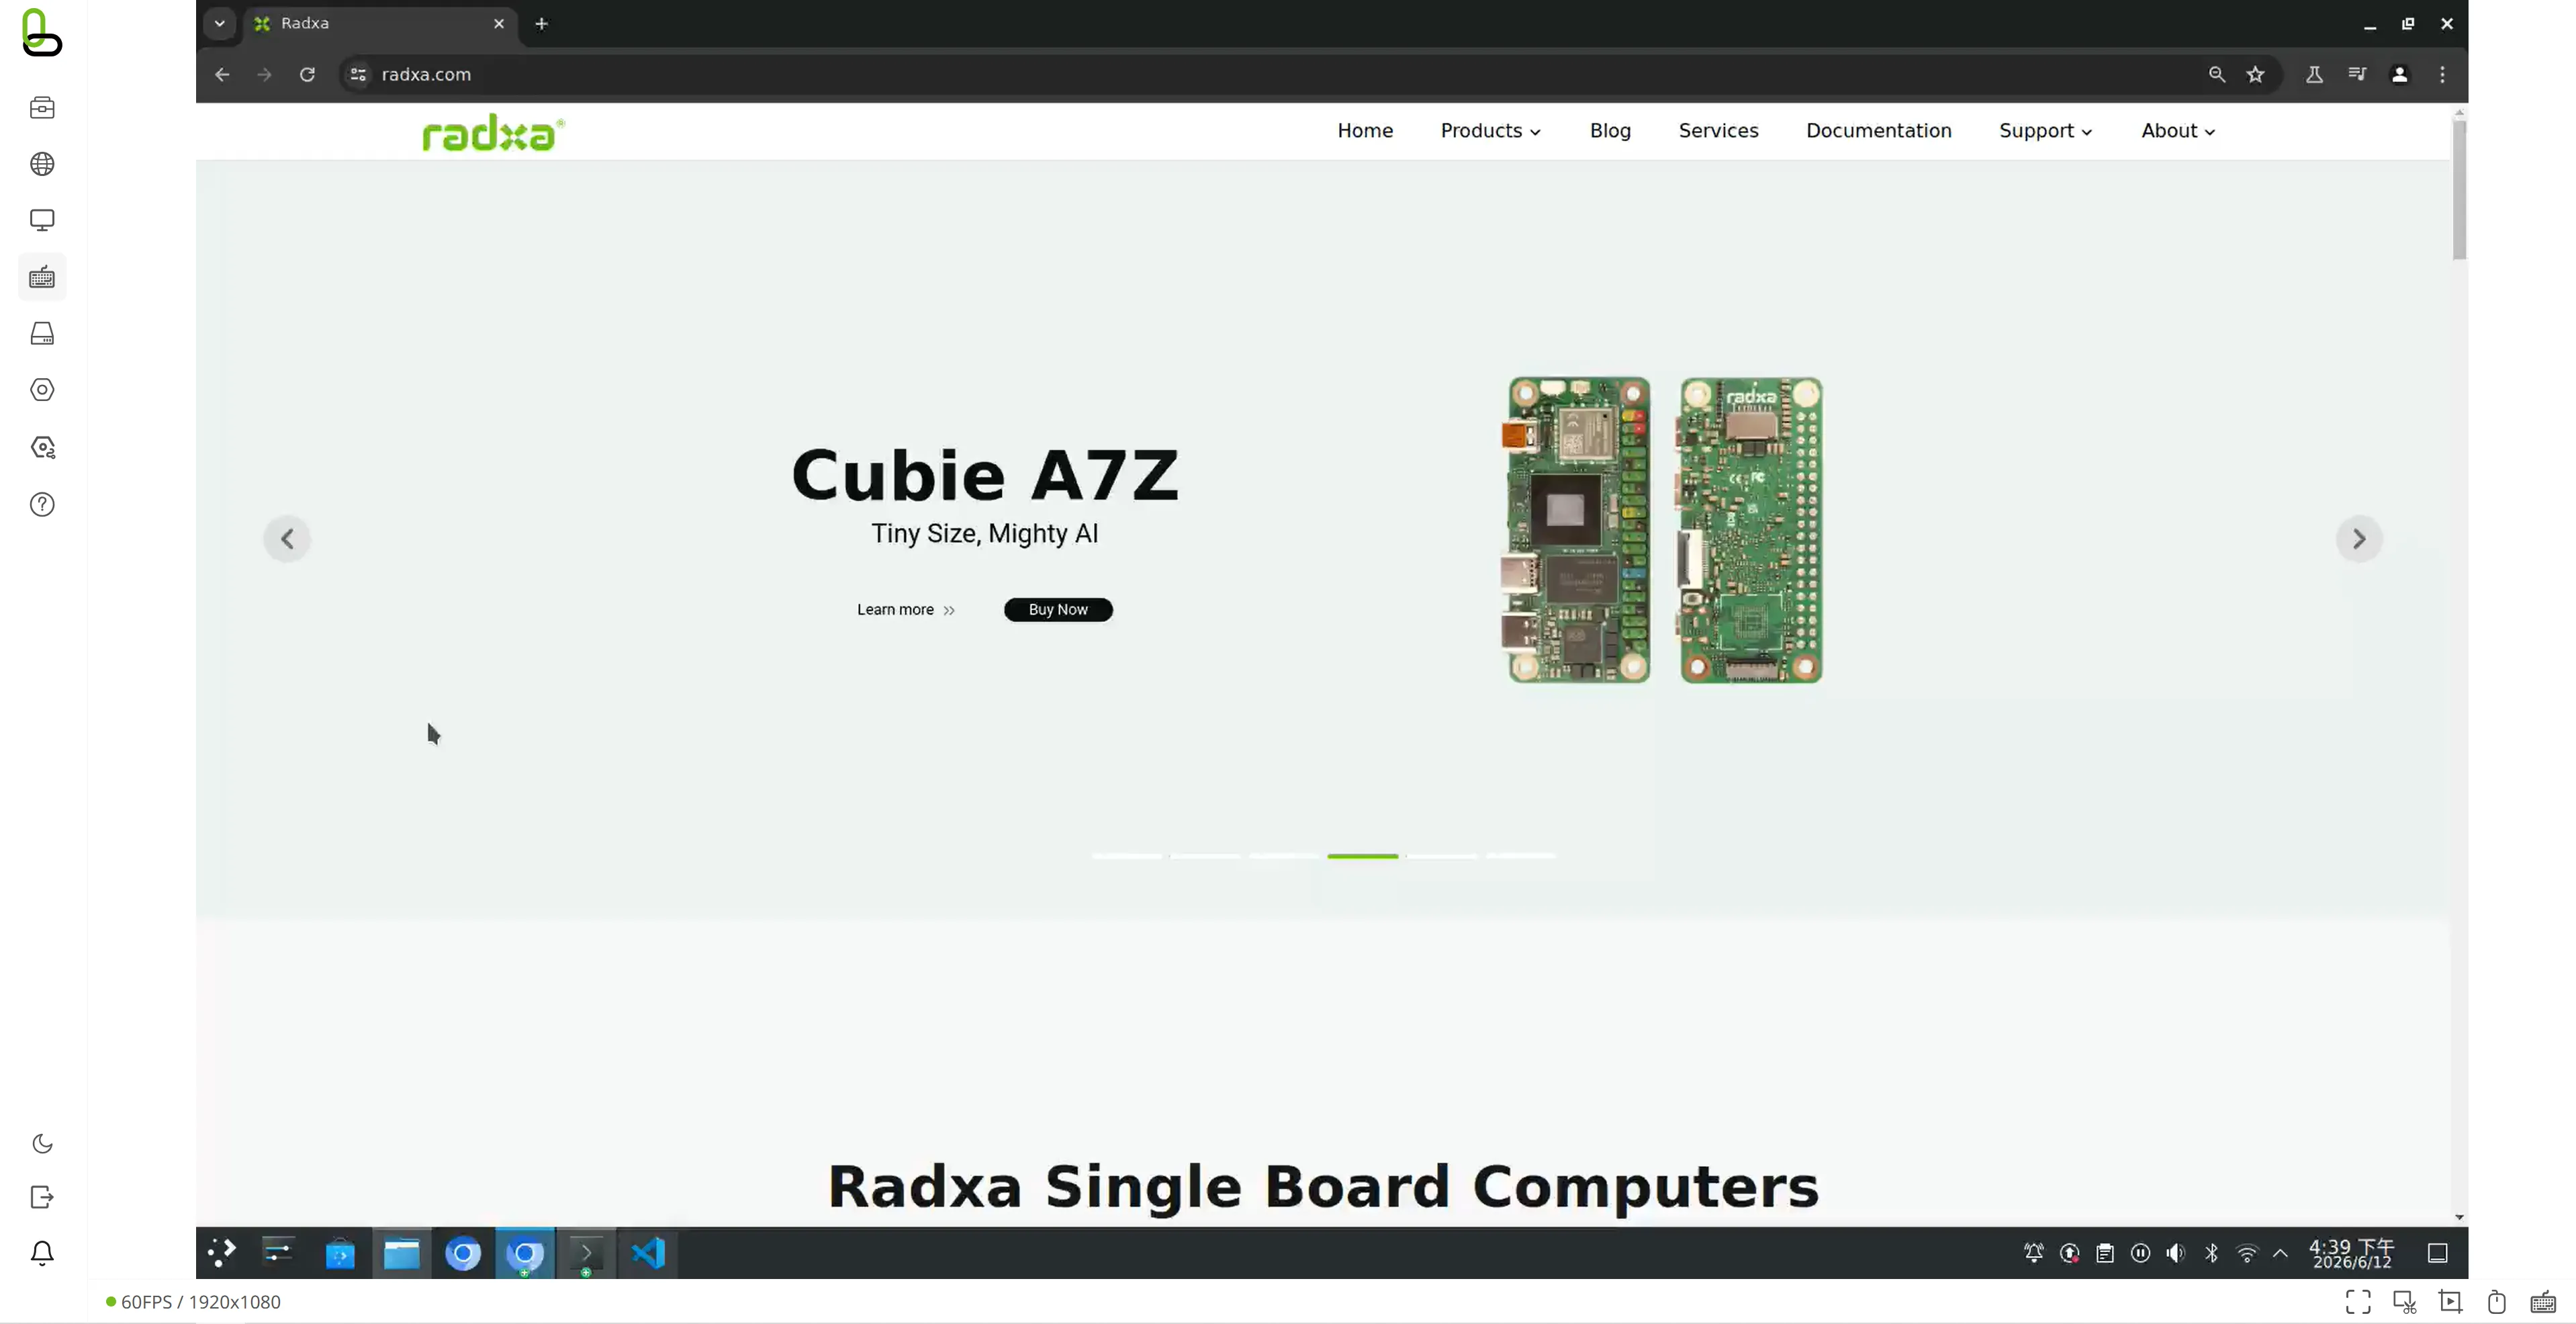
Middle Video Area States
Video connection states are:
- Playing normally
- Connecting...
- Error / interrupted (e.g. link abnormality, HDMI signal issue)
Bottom Toolbar Functions
- Connection status and statistics: shows FPS / resolution
- Fullscreen toggle: switch to an immersive remote control view
- Screenshot mode: enter the screenshot interaction
- Recording: start / stop recording, with preview and download of the result
- Mouse quick switch: quickly enable/disable mouse input, show the local mouse
- Keyboard switch: quickly enable/disable the on-screen keyboard

Left Sidebar
Left Sidebar Main Menu
The left sidebar main menu (top to bottom) usually includes:
- Common Tools
- Network Settings
- Display Settings
- Keyboard and Mouse
- Virtual Devices
- System Settings
- About
In addition, at the bottom of the left sidebar there are:
- Theme switcher
- Log out
- Notifications
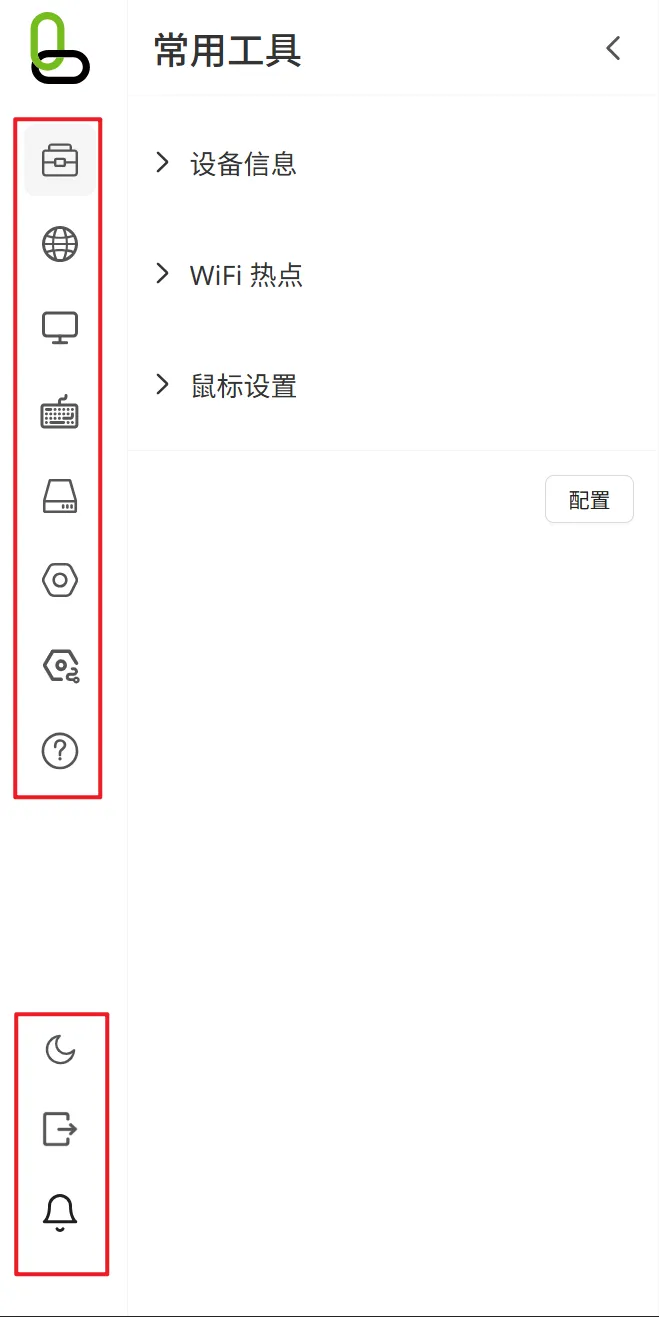
Each item is described below.
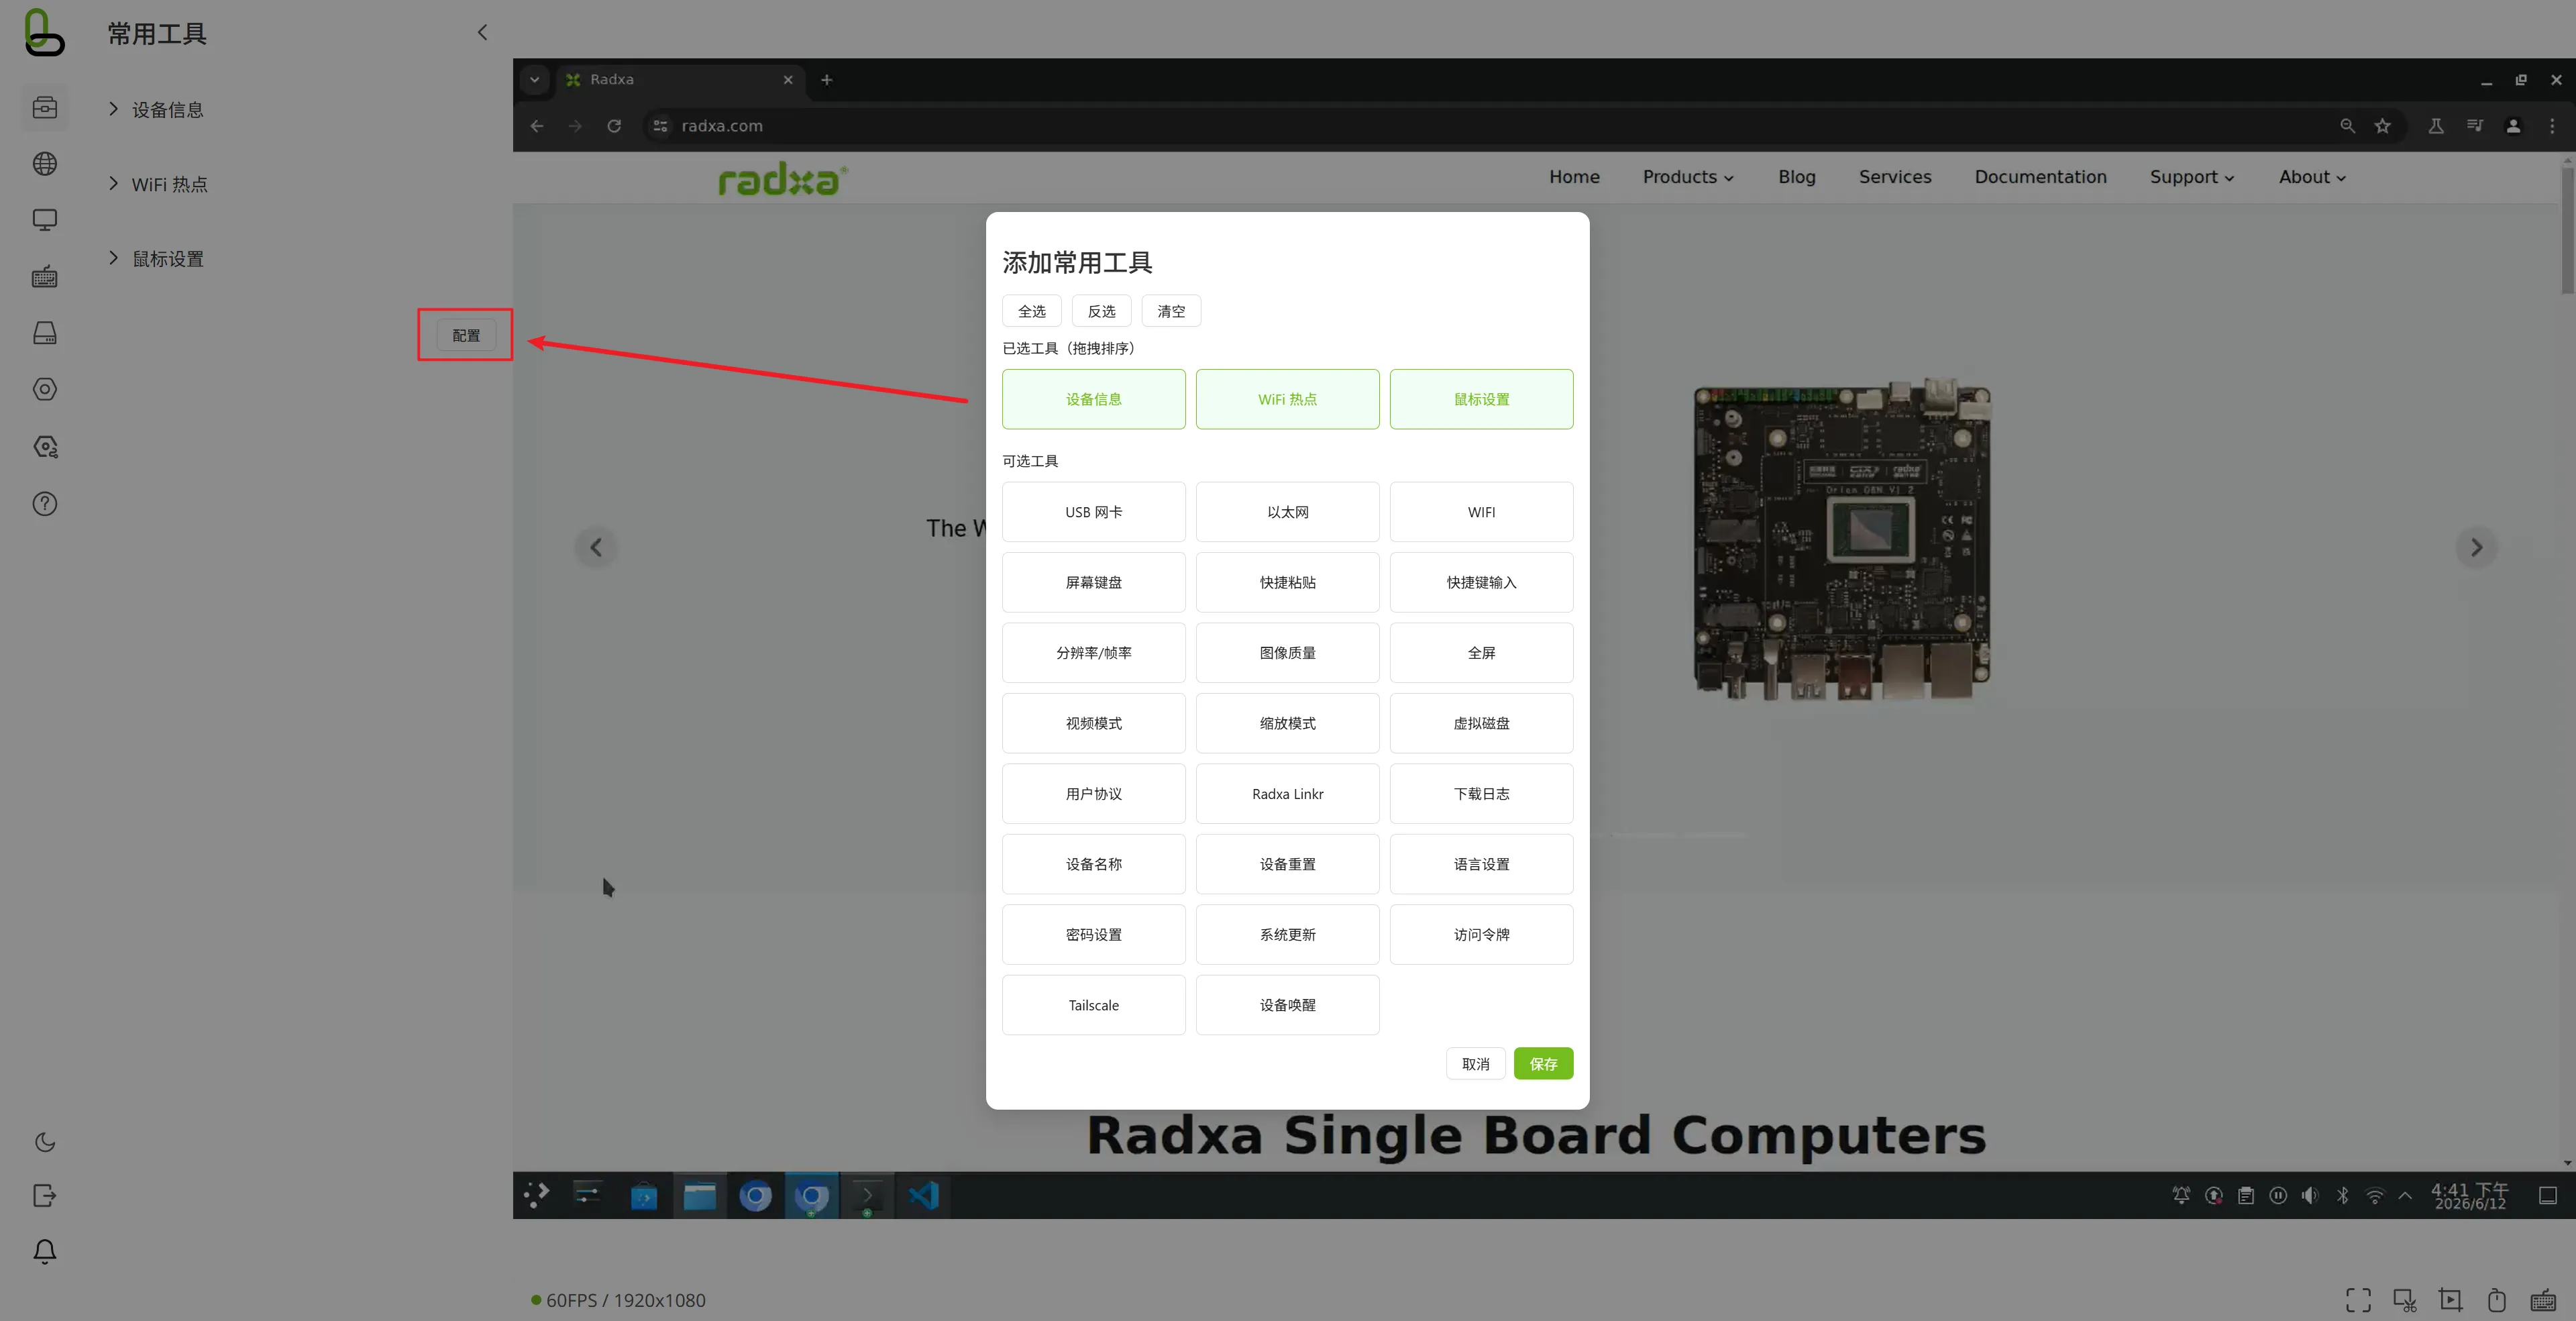
Common Tools
This is a customizable aggregation area. You can drag and reorder frequently used sub-functions and place them here to reduce the cost of switching menus.
Configurable capabilities:
- Choose which configuration items to use as common tools
- Drag and reorder the selected tools
- Select all / invert selection / clear
Network Settings
Includes four sections: Ethernet, USB network, Wi-Fi, and Wi-Fi hotspot.
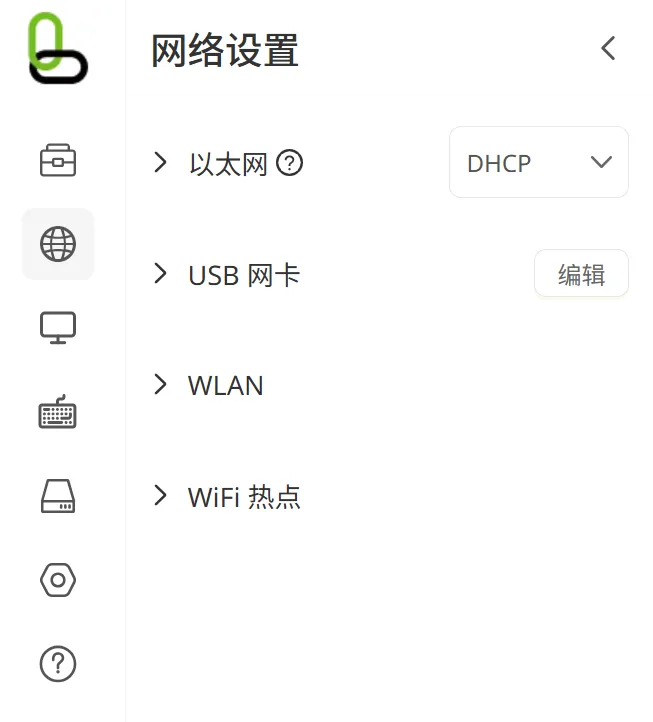
Ethernet
Main settings:
- DHCP / Manual IP mode switch
- IPv4 address
- Subnet mask
- Gateway
- DNS
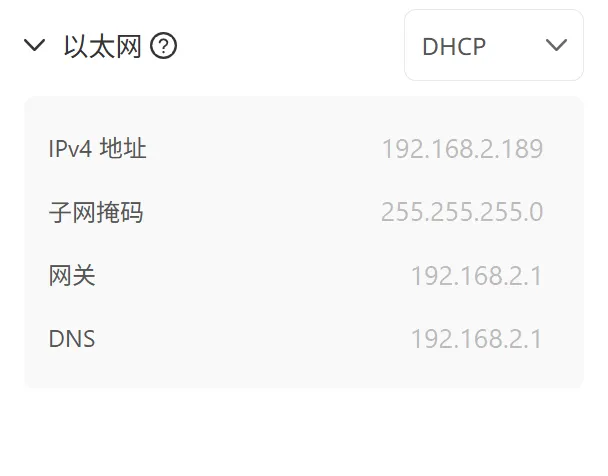
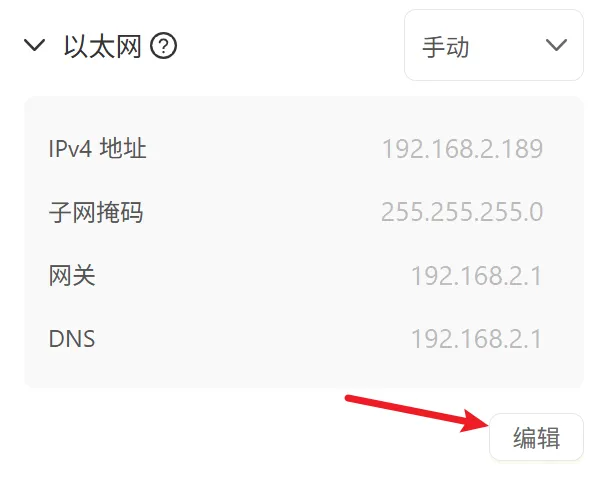
Purpose:
- Determines how the device obtains an address on the wired network
- Used for a fixed management address or joining an existing network
- After saving manual configuration, the access address may change; you need to log in again using the new IP
- The configuration is validated for IP / mask / gateway format
- Conflicts with the Wi-Fi and hotspot subnets are detected to avoid network exclusion
USB Network
Main settings:
- USB network subnet (CIDR, e.g.
192.168.x.0/24)
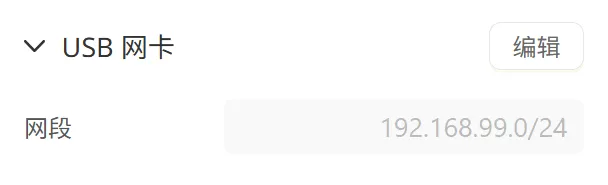
Purpose:
- Provides a network channel for accessing the device over a USB cable
- Commonly used for direct-connection debugging scenarios
- After saving, the page will try to jump to a new available IP
- The subnet format is validated, and conflicts with Wi-Fi / hotspot are checked
Wi-Fi
Main settings and operations:
- WLAN switch
- Known network list (connect / disconnect / ignore)
- Scan and refresh other networks
- Add network manually (SSID, security mode, password, auto-connect)
- Network advanced settings (DHCP / manual IP, DNS list)
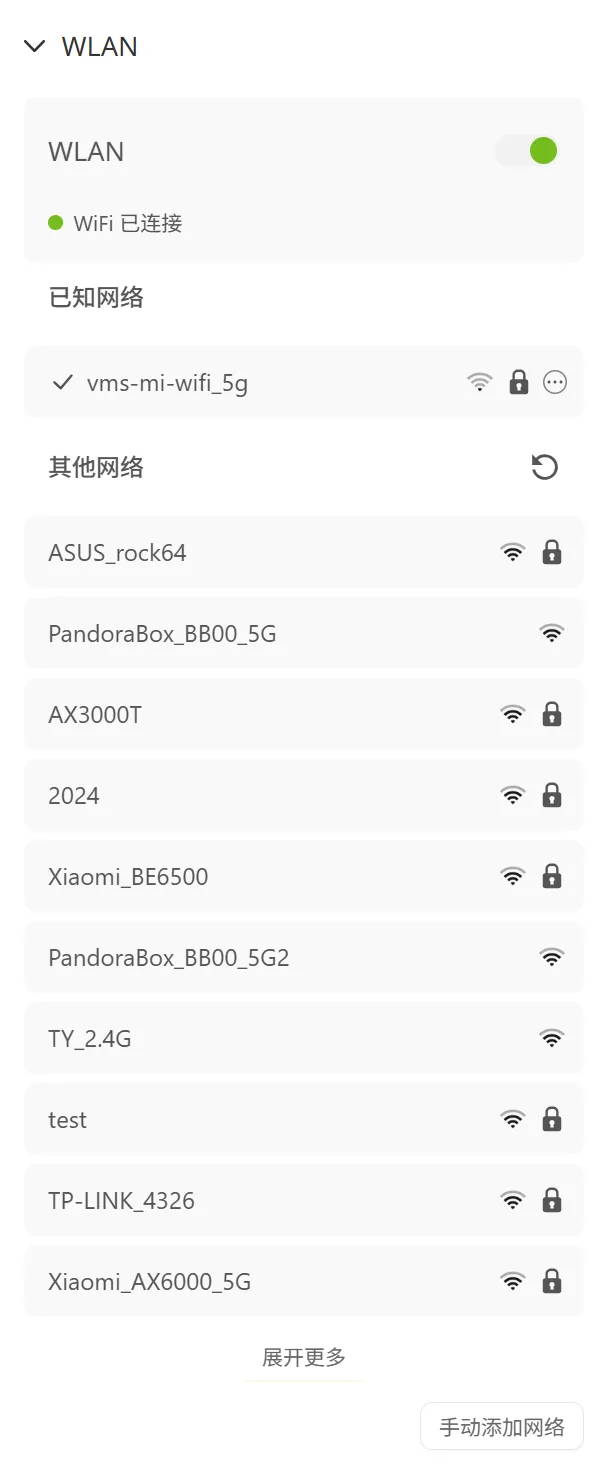
Purpose:
- Lets the device join the network wirelessly
- Manages saved Wi-Fi profiles
- In manual IP mode, key parameters must be filled in
- Subnet conflict checks are also performed (against USB / Ethernet / hotspot)
Wi-Fi Hotspot
Main settings:
- Hotspot switch
- Hotspot name (SSID)
- Security mode (Open / WPA2) and password
- Device identifier
- Hide hotspot
- Hotspot subnet
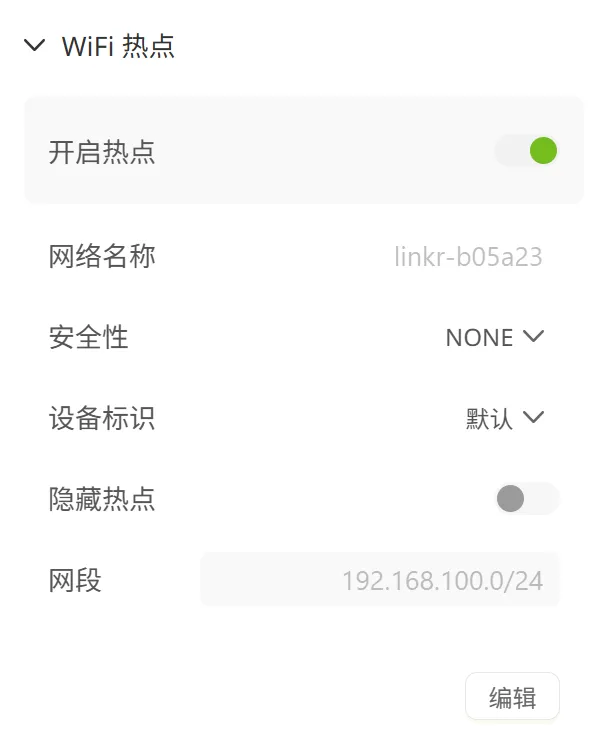
Purpose:
- Turns the device into an AP that other terminals can connect to
- Suitable for offline or temporary direct-connection maintenance
- WPA2 mode requires the password to meet the length requirement (length >= 8)
- After changing the subnet, the access address may also change
- Conflicts with other network interfaces are detected
Display Settings
Includes: Fullscreen, scaling mode, EDID, image quality, video mode.
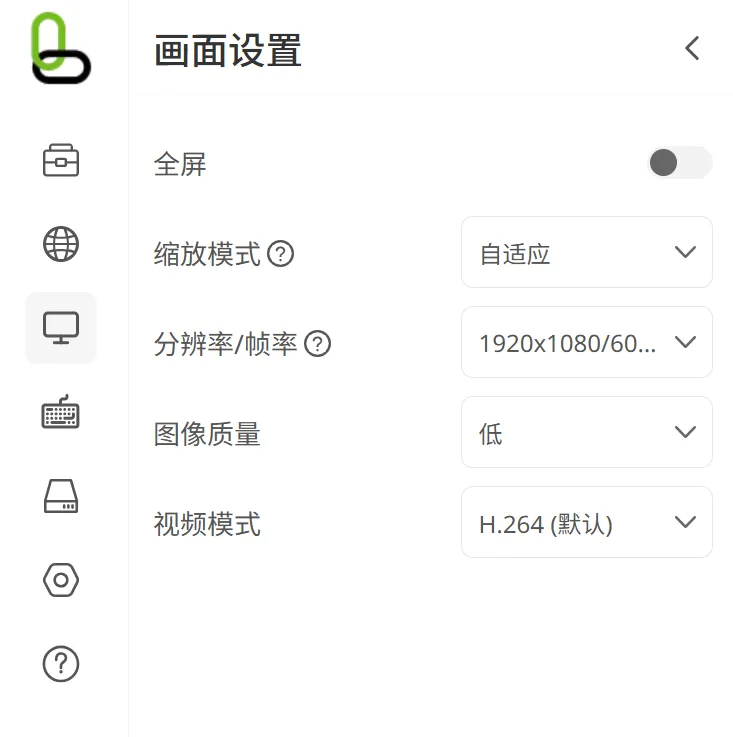
Fullscreen
Purpose:
- Toggle the in-browser fullscreen remote control view
- Suitable for long-time operations and maintenance, or BIOS / installation scenarios
Scaling Mode
Options:
- Adaptive
- Normal / original
Purpose:
- Controls how the video fits the current browser area
EDID (Resolution / Frame Rate)
Purpose:
- Controls the display capabilities presented to the signal source by the HDMI input
- Commonly used to adjust the available resolution and compatibility
Supported items:
- Preset EDID
Applicable scenarios:
- Some hosts have abnormal output
- A specific resolution / refresh-rate combination is required
Image Quality
Purpose:
- Adjusts the balance between clarity and bandwidth / smoothness of the remote video
Video Mode
Options:
- H.264 (default)
- MJPEG
Purpose:
- Trade-off between encoding efficiency / bandwidth usage / compatibility
Recommendation:
- Use H.264 first for regular remote control
- Switch to MJPEG for special compatibility scenarios
Keyboard and Mouse
Includes: on-screen keyboard, quick paste, shortcut keys, mouse settings.
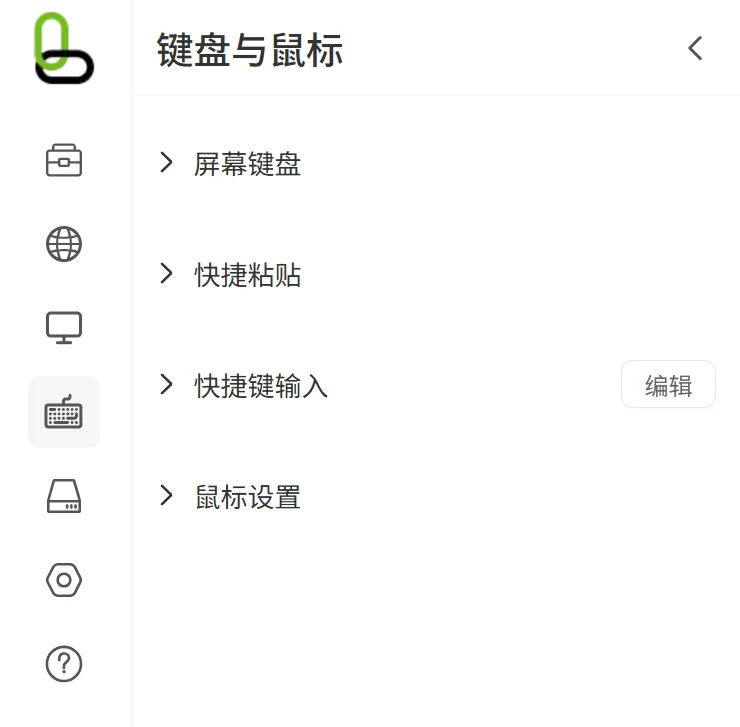
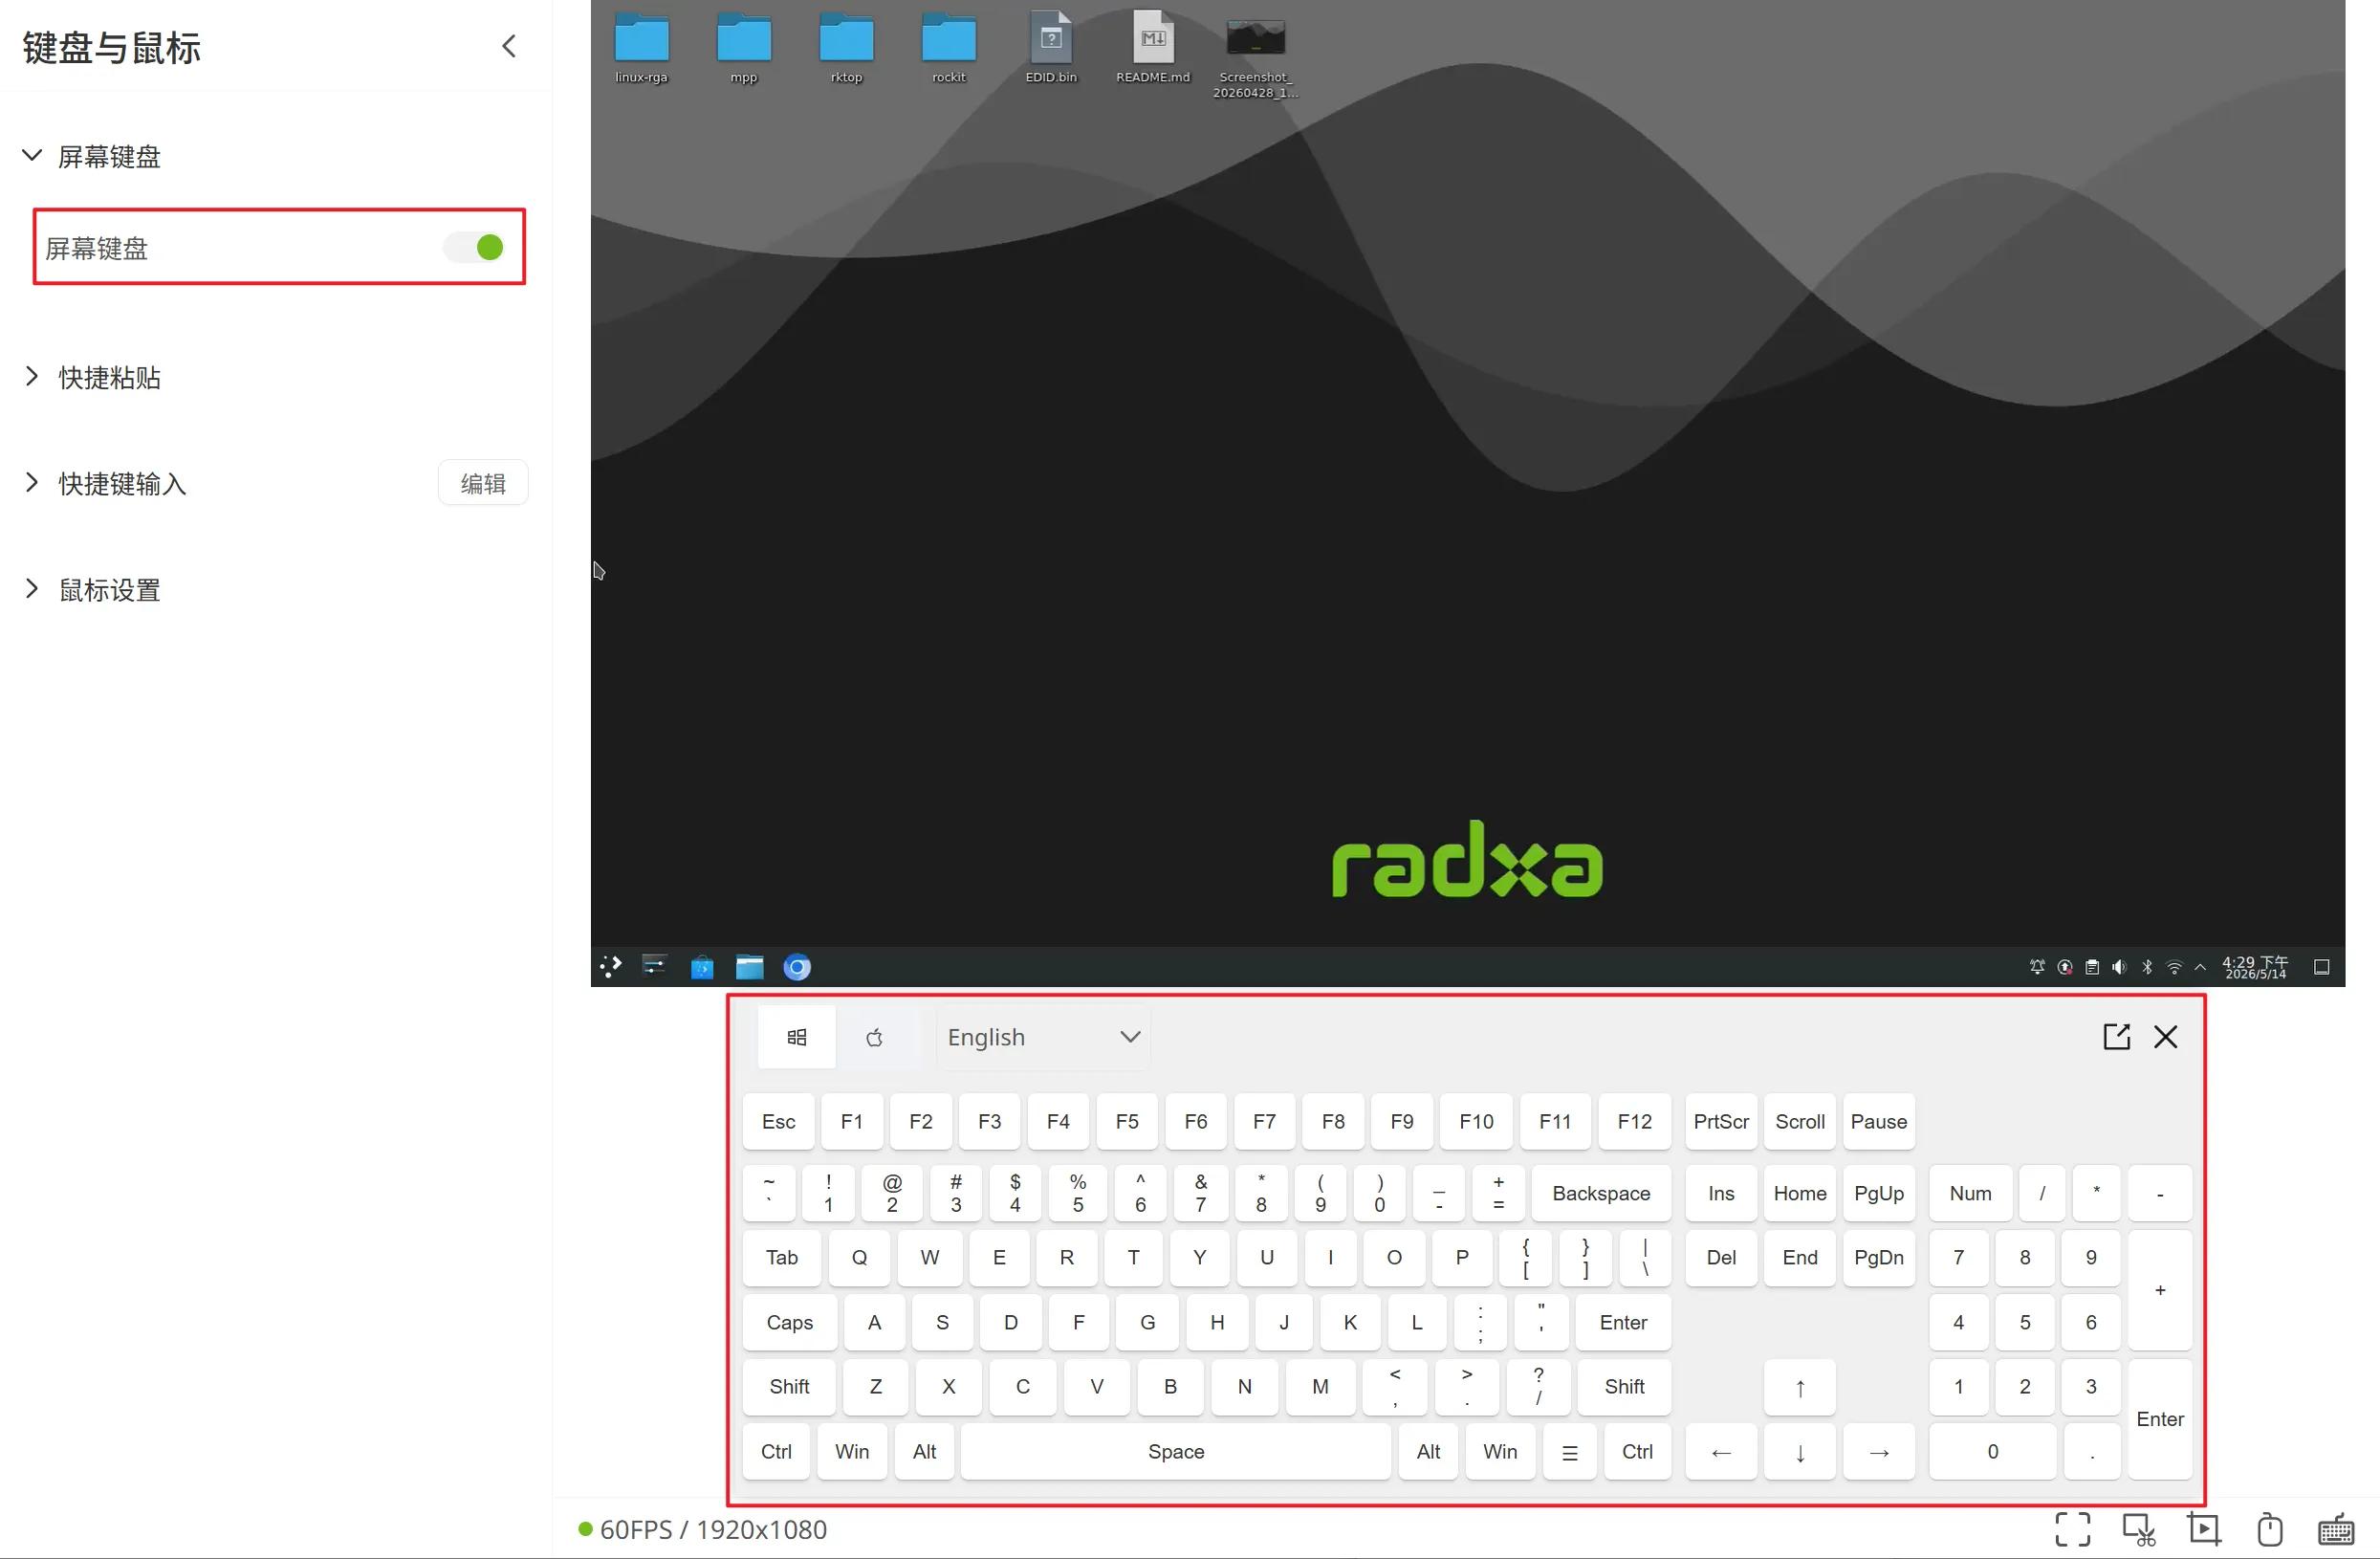
On-Screen Keyboard
Purpose:
- Show or hide the on-screen virtual keyboard
- Very useful for touch devices or when no physical keyboard is available
Quick Paste
Functions:
- Enter text and send it to the remote side with one click
- Reuse historical paste entries
- Support clearing history
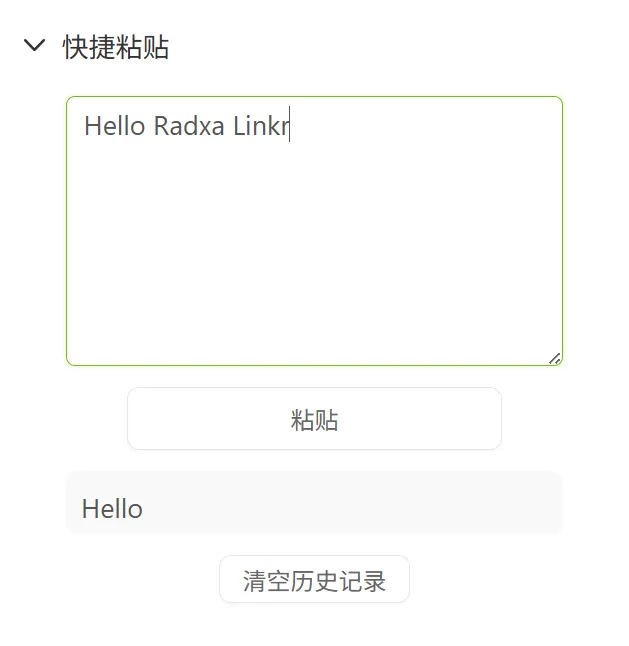
Purpose:
- Quickly enter repeated text such as commands, accounts, paths
- Reduce the cost of typing character by character
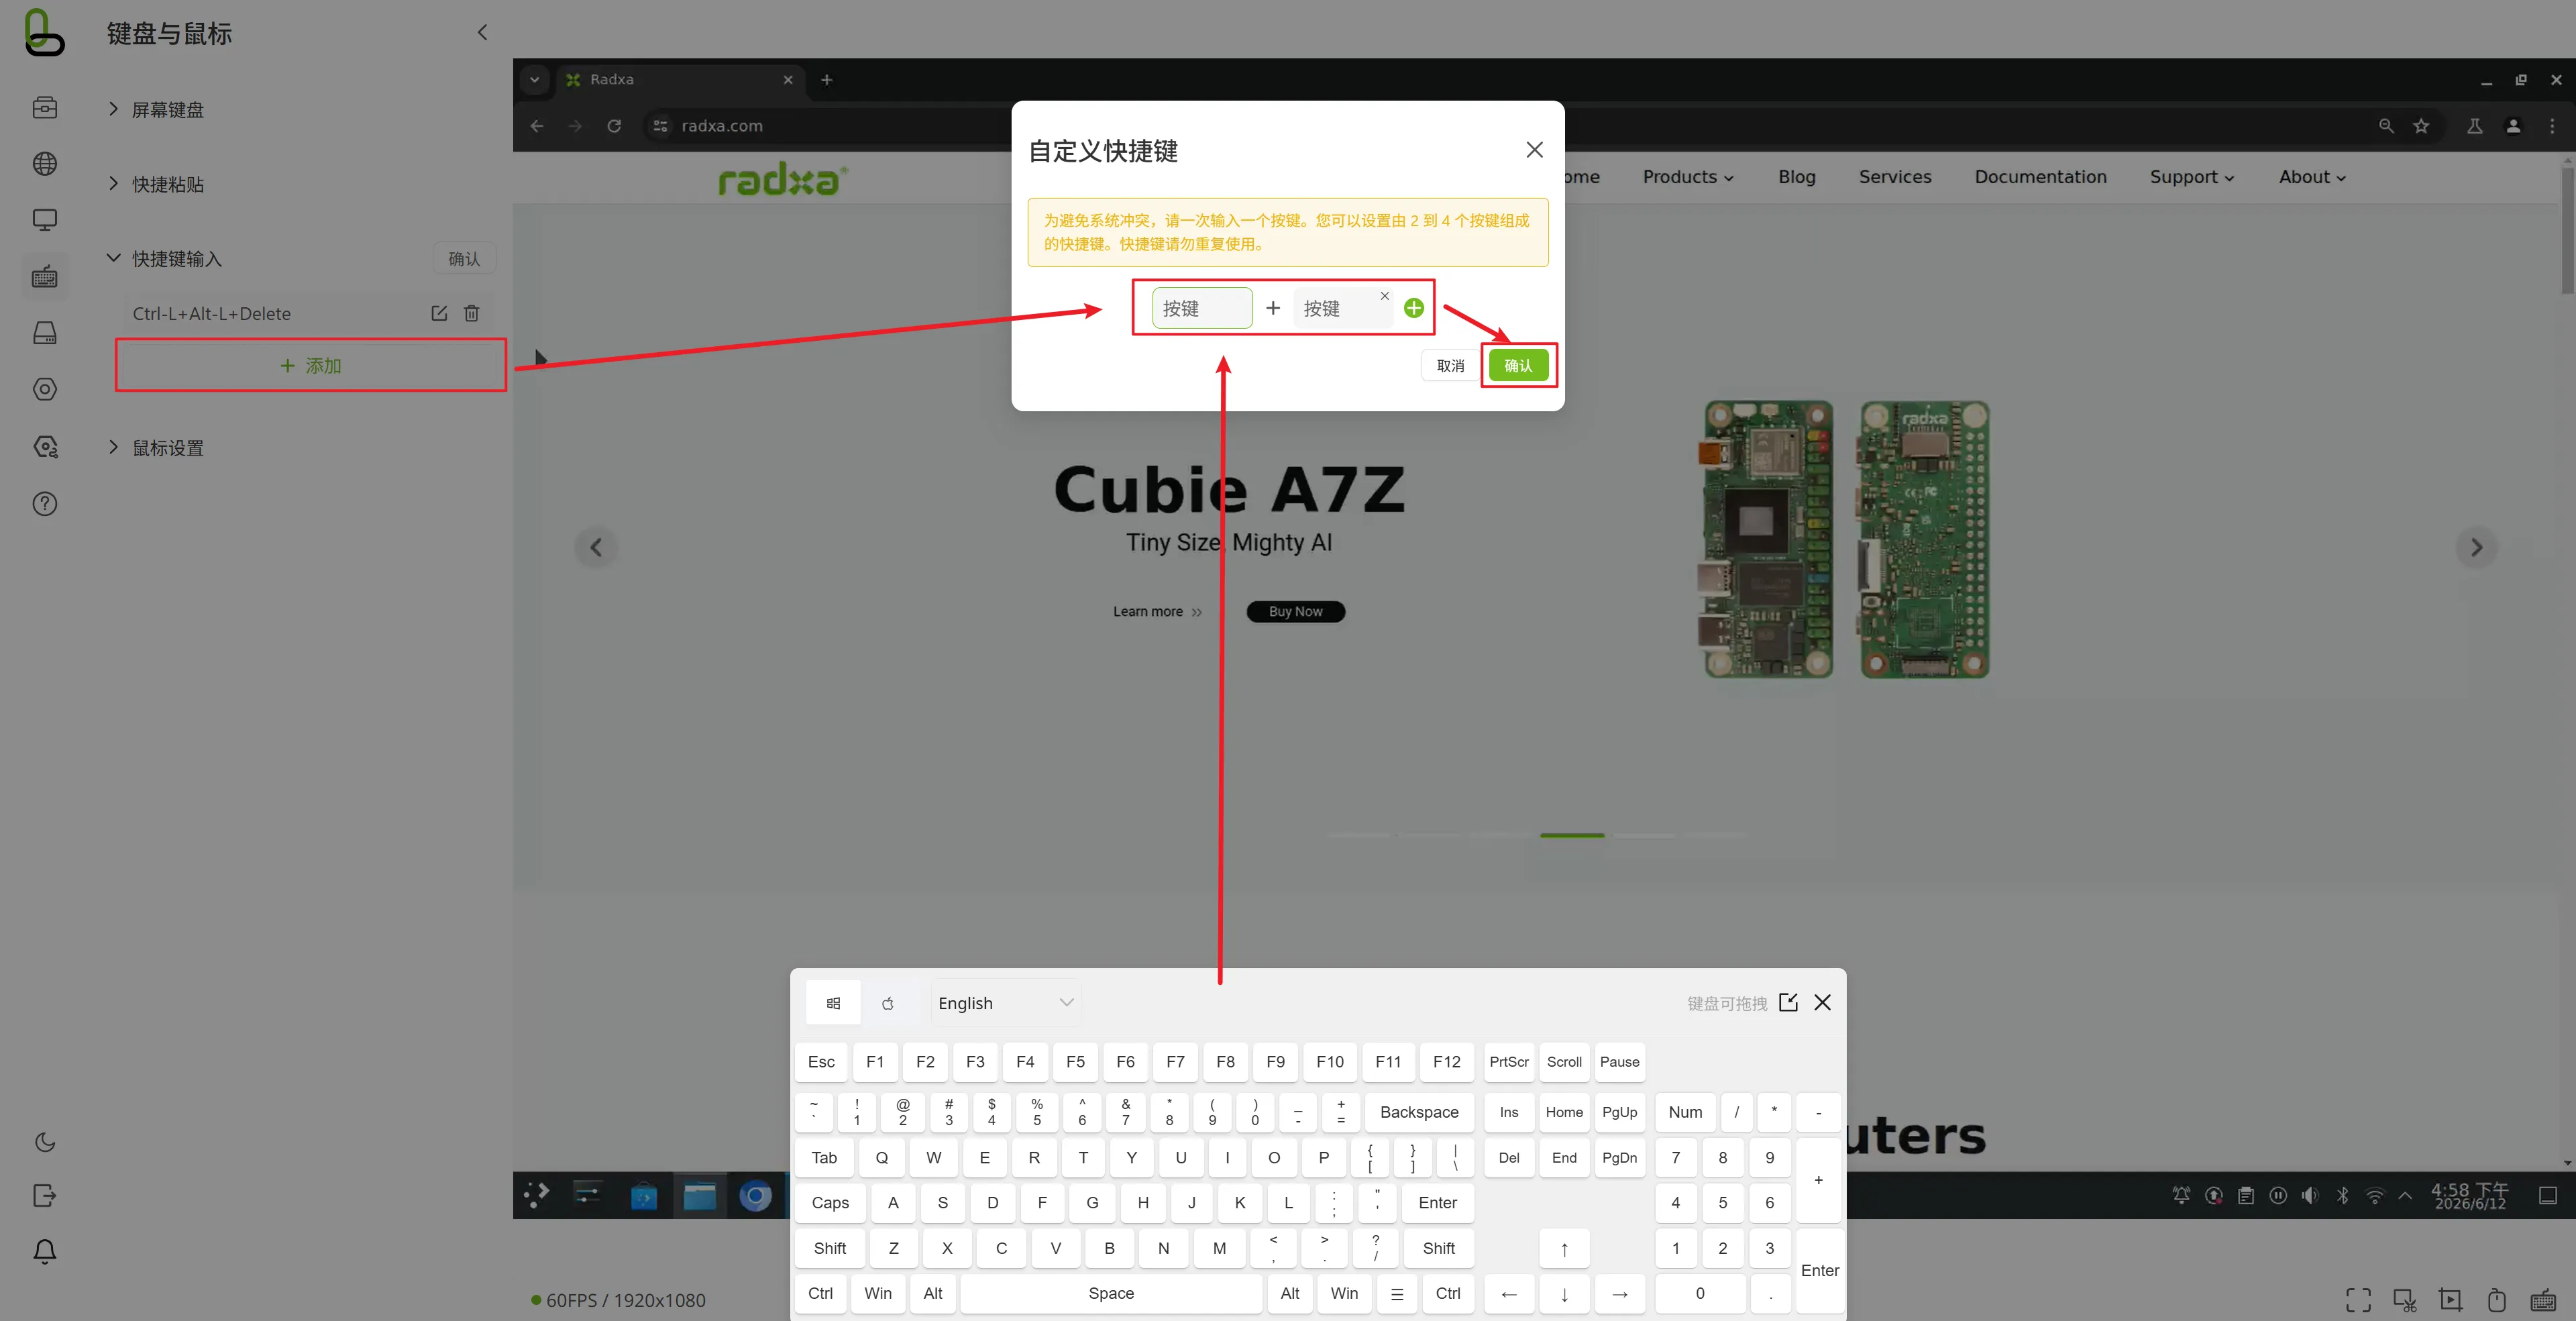
Send Shortcut Keys
Functions:
- Customize combination keys (add / delete / edit)
- Send configured shortcut keys with one click
Purpose:
- Quickly trigger common combinations (e.g. system shortcuts)
- Reduce the failure rate of complex key input
Mouse Settings
Main settings:
- Mouse master switch
- Show local mouse
- Mouse mode (absolute / relative)
- Mouse sensitivity (in relative mode)
- Scroll direction
- Scroll speed
- Prevent sleep (mouse jitter)
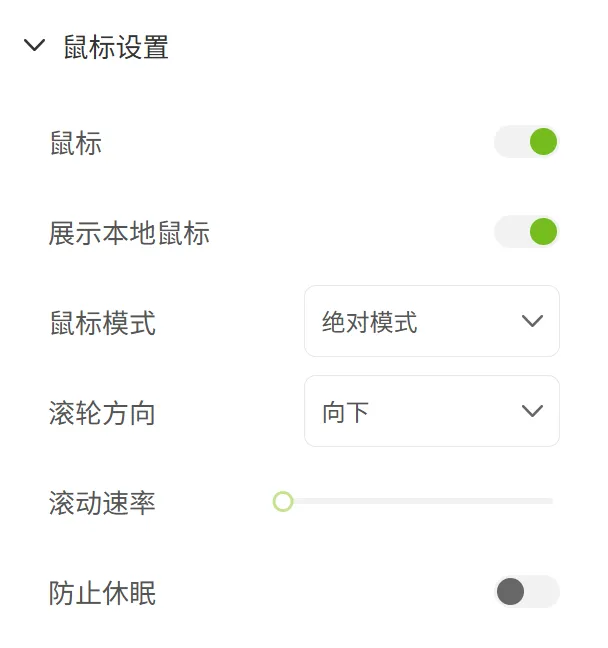
Purpose:
- Adapt the mouse feel and behavior for different remote-control scenarios
- Prevent the target device from sleeping due to long idle periods
Virtual Devices
Includes: virtual disks.
Virtual Disks
Functions:
- Upload
iso/imgfiles - View the disk file list
- Mount / unmount
- Delete files
- Show available storage space and upload progress
Purpose:
- Used for mounting OS installation media, driver disks, and offline maintenance images
- Only
.isoand.imgare supported - Free space is checked before upload
- Uploading a file with the same name will prompt an overwrite confirmation
System Settings
Includes: user information and password, API key, language, device name, device reset, system update.
User Information and Password
Contains two parts:
- Change the username
- Change the login password
Purpose:
- Maintain login security and account hygiene
- Username changes are validated for format and uniqueness
- After a successful password change, you need to log in again
Access Tokens
Functions:
- Create an API key (name + user password confirmation)
- Delete an API key
- Copy the newly generated key
Purpose:
- Used by scripts / automation tools to access the API. For detailed documentation, see here
- The API key is only visible at creation time and cannot be viewed later!
Language Settings
Purpose:
- Switch the interface language (Simplified Chinese / English)
Device Name
Purpose:
- Change the device display name (hostname)
- Makes it easier to identify the current device on the network
- The device name is used to generate the domain name and must conform to the domain name spec, for example
linkr-<device name> - If the device name is not set during device initialization, the username is used as the default domain name; the username is not validated for format or uniqueness
- After changing the device name, the domain name takes about 2 minutes to take effect. Try refreshing the page to update the domain name display
Device Reset
Purpose:
- Perform a system-level reset (requires password confirmation)
- After the reset, the device will restart and disconnect
- All configuration will be restored to defaults
- The IP may change; you need to rediscover and log in
- If a recording is in progress, the reset will interrupt it
System Update
The currently available upgrade method: local upgrade.
Functions:
- Upload the upgrade package
- Show upload / install progress
- Restart after the installation is complete
Notes:
- The page provides a link to the release page (GitHub Releases)
- Online upgrade code is reserved, but the main flow is local upgrade at the moment
About
Includes: device information, user agreement, Radxa Linkr introduction, log download.
Device Information
Displays:
- Current firmware version
- Device model, SN, MAC, and other hardware information
Purpose:
- Quickly verify device identity for after-sales, operations, and asset management
User Agreement
Purpose:
- View the End User License Agreement online
Radxa Linkr Introduction
Purpose:
- View the product introduction
Log Download
Purpose:
- Export a log archive (
linkr_log.tar.gz) - Used for troubleshooting and technical support
Advanced Settings
Includes: Tailscale, MAC device wakeup

Tailscale
Purpose:
- Configure the Tailscale network for secure cross-device communication. For detailed documentation, see here
- Used for remote access, file sharing, VPN, and other scenarios
Before using Tailscale, make sure Linkr can connect to the external network via a USB-C to RJ45 cable or via Wi-Fi to a router
MAC Device Wakeup
Purpose:
- Configure MAC device wakeup to start the device remotely. For detailed documentation, see here
- Used to wake the device when no power is available, keeping the connection alive
Sidebar Bottom Functions
Theme Switcher
- Switch between light and dark themes for better readability in different lighting environments
Log Out
- Log out and return to the login page
- If a recording is in progress, an interruption prompt will be shown
Notifications
- Open the notification list to view tasks and status messages
Recommended Onboarding Path for New Users
We recommend getting familiar with the system in this order:
- Log in and enter the home page. Confirm that the video works.
- In Display Settings, first confirm the video mode and scaling mode.
- In Keyboard and Mouse, adjust the mouse mode and sensitivity.
- Configure one of Ethernet / Wi-Fi / Hotspot based on the network environment on site.
- When installing an OS, use Virtual Disks to upload and mount the image.
- Finally, complete password, device name, and API key management in System Settings.
Important Notes
- After changing network parameters, the device IP may change. Please reconnect using the new address.
- Subnets of different network interfaces must not conflict (the system performs conflict checks).
- Upgrade, reset, and logging out may interrupt the current recording task.
- Virtual disks only support
iso/imgand are limited by the remaining space. - After changing the login password, you usually need to log in again.
- MJPEG has higher performance pressure at high resolutions; H.264 is generally preferred.
One-Sentence Summary
If you treat this system as a web-based remote KVM console and a device management center combined, you can quickly understand all the pages:
- Middle: view the screen
- Bottom: instant control
- Left: system configuration and maintenance