Frigate NVR for CIX
Frigate is an NVR project designed specifically for Home Assistant. It can fully leverage local hardware compute and use AI models for real-time object detection, recognition, and classification in surveillance video (for example, distinguishing pedestrians, vehicles, and pets).
Home Assistant is currently the world's most popular open-source smart home control center.
For more details, refer to the official documentation or the official Chinese documentation.
This document uses Frigate version 0.16.4. At the moment, Frigate does not officially support the CIX P1 platform. Let's see how to enable Frigate AI detection on unsupported hardware by adding custom plugin code.
Preparation
Directory structure
You can use O6/O6N either via SSH or with an external display, keyboard, and mouse. This guide uses SSH.
Create the initial directory structure.
mkdir frigate && cd frigate
mkdir storage config && touch docker-compose.yml
Model file
Here we use yolov8n.cix, converted from the official model repository, as the detection model.
If you are interested in model conversion and want to use your own model later, you can refer to the YOLOv8n model conversion guide.
Download the model file directly from the official repository on ModelScope.
wget https://www.modelscope.cn/models/cix/ai_model_hub_25_Q3/resolve/master/models/ComputeVision/Object_Detection/onnx_yolov8_n/yolov8n.cix
Inference library
To run inference correctly inside the container, you also need to mount the NPU API library into the container.
Find the libnoe library on the system:
find / -name "libnoe" 2>/dev/null
In this guide, the path is: /usr/local/lib/python3.11/dist-packages/libnoe/
Plugin code
You can directly use the code file we prepared. You can also read through its logic as a reference for your own implementation.
wget https://github.com/Ronin-1124/Frigate-NVR-for-CIX/blob/main/cix.py
Now all required materials are ready.
Start Frigate
Paste the following content into docker-compose.yml.
services:
  frigate:
    container_name: frigate
    restart: unless-stopped
    stop_grace_period: 30s
    image: docker.cnb.cool/frigate-cn/frigate:stable
    devices:
      - /dev/aipu:/dev/aipu
    volumes:
      - /usr/local/lib/python3.11/dist-packages/libnoe/:/usr/local/lib/python3.11/dist-packages/libnoe/
      - ./cix.py:/opt/frigate/frigate/detectors/plugins/cix.py
      - ./yolov8n.cix:/config/model_cache/yolov8n.cix
      - ./config:/config
      - ./storage:/media/frigate
      - type: tmpfs # Optional: 1 GB memory to reduce SSD/SD card wear
        target: /tmp/cache
        tmpfs:
          size: 1000000000
    ports:
      - "8971:8971"
      - "8555:8554" # RTSP stream. Host port 8555 is used instead of 8554 because port 8554 is needed later for simulated streaming. If you do not need simulation, you can use 8554 directly.
Then run the command below to start Frigate.
Make sure you run it in the directory that contains docker-compose.yml.
docker compose up -d
After Frigate is pulled and started successfully, the frontend service will be available at https://your_device_ip:8971.
Check the motherboard IP address:
hostname -I
Replace your_device_ip with the first IP address shown above, then open it in your browser.
View the login account and password with:
docker logs frigate
The logs may be long. If you cannot find the credentials, use Ctrl + F in the VSCode terminal and search for keywords such as admin.
Next, you can use the frontend Configuration Editor to modify related settings.
If you have not logged into Frigate for more than 24 hours, it may require a password again. It is recommended to update your password in the account menu at the bottom-left for long-term use.
Simulate streaming and enable the AI model
If you do not have an IP camera yet (if you do, that is even better), simulating a stream with FFmpeg + MediaMTX is a good way to validate the setup.
It is straightforward to use. Follow the steps below.
MediaMTX
mkdir mediamtx && cd mediamtx
wget https://github.com/bluenviron/mediamtx/releases/download/v1.16.0/mediamtx_v1.16.0_linux_arm64.tar.gz
tar -xvf mediamtx_v1.16.0_linux_arm64.tar.gz
./mediamtx
This starts an RTSP server in the current terminal and waits for incoming stream data.
Open a new terminal, then use FFmpeg to push a stream.
FFmpeg
sudo apt install ffmpeg
Next, prepare a video file. This guide uses one video from the public Hugging Face dataset KAI-KratosAI/Street-videos.
wget https://huggingface.co/datasets/KAI-KratosAI/Street-videos/resolve/0d33ede195de1fc061723d5dfa4623b30162af66/041896fb-20da-4625-9455-195172efc4d5.mp4_041896fb-20da-4625-9455-195172efc4d5.mp4#t=0.001
mv 041896fb-20da-4625-9455-195172efc4d5.mp4_041896fb-20da-4625-9455-195172efc4d5.mp4 test.mp4
ffmpeg -re -stream_loop -1 -i test.mp4 -c copy -f rtsp rtsp://localhost:8554/mystream
Parameter explanation:
-re: Read input at native frame rate. Without this, FFmpeg may push data too fast and the stream appears like fast-forward.-stream_loop -1: Loop the video indefinitely. This is useful for Frigate testing so the stream does not stop when the video ends.-i test.mp4: Specify the input video file.-c copy: Copy video/audio streams directly without re-encoding. This minimizes CPU usage.-f rtsp: Set output format to RTSP.rtsp://localhost:8554/mystream: Stream URL.mystreamis the stream ID.
Modify the configuration file
mqtt:
enabled: false
cameras:
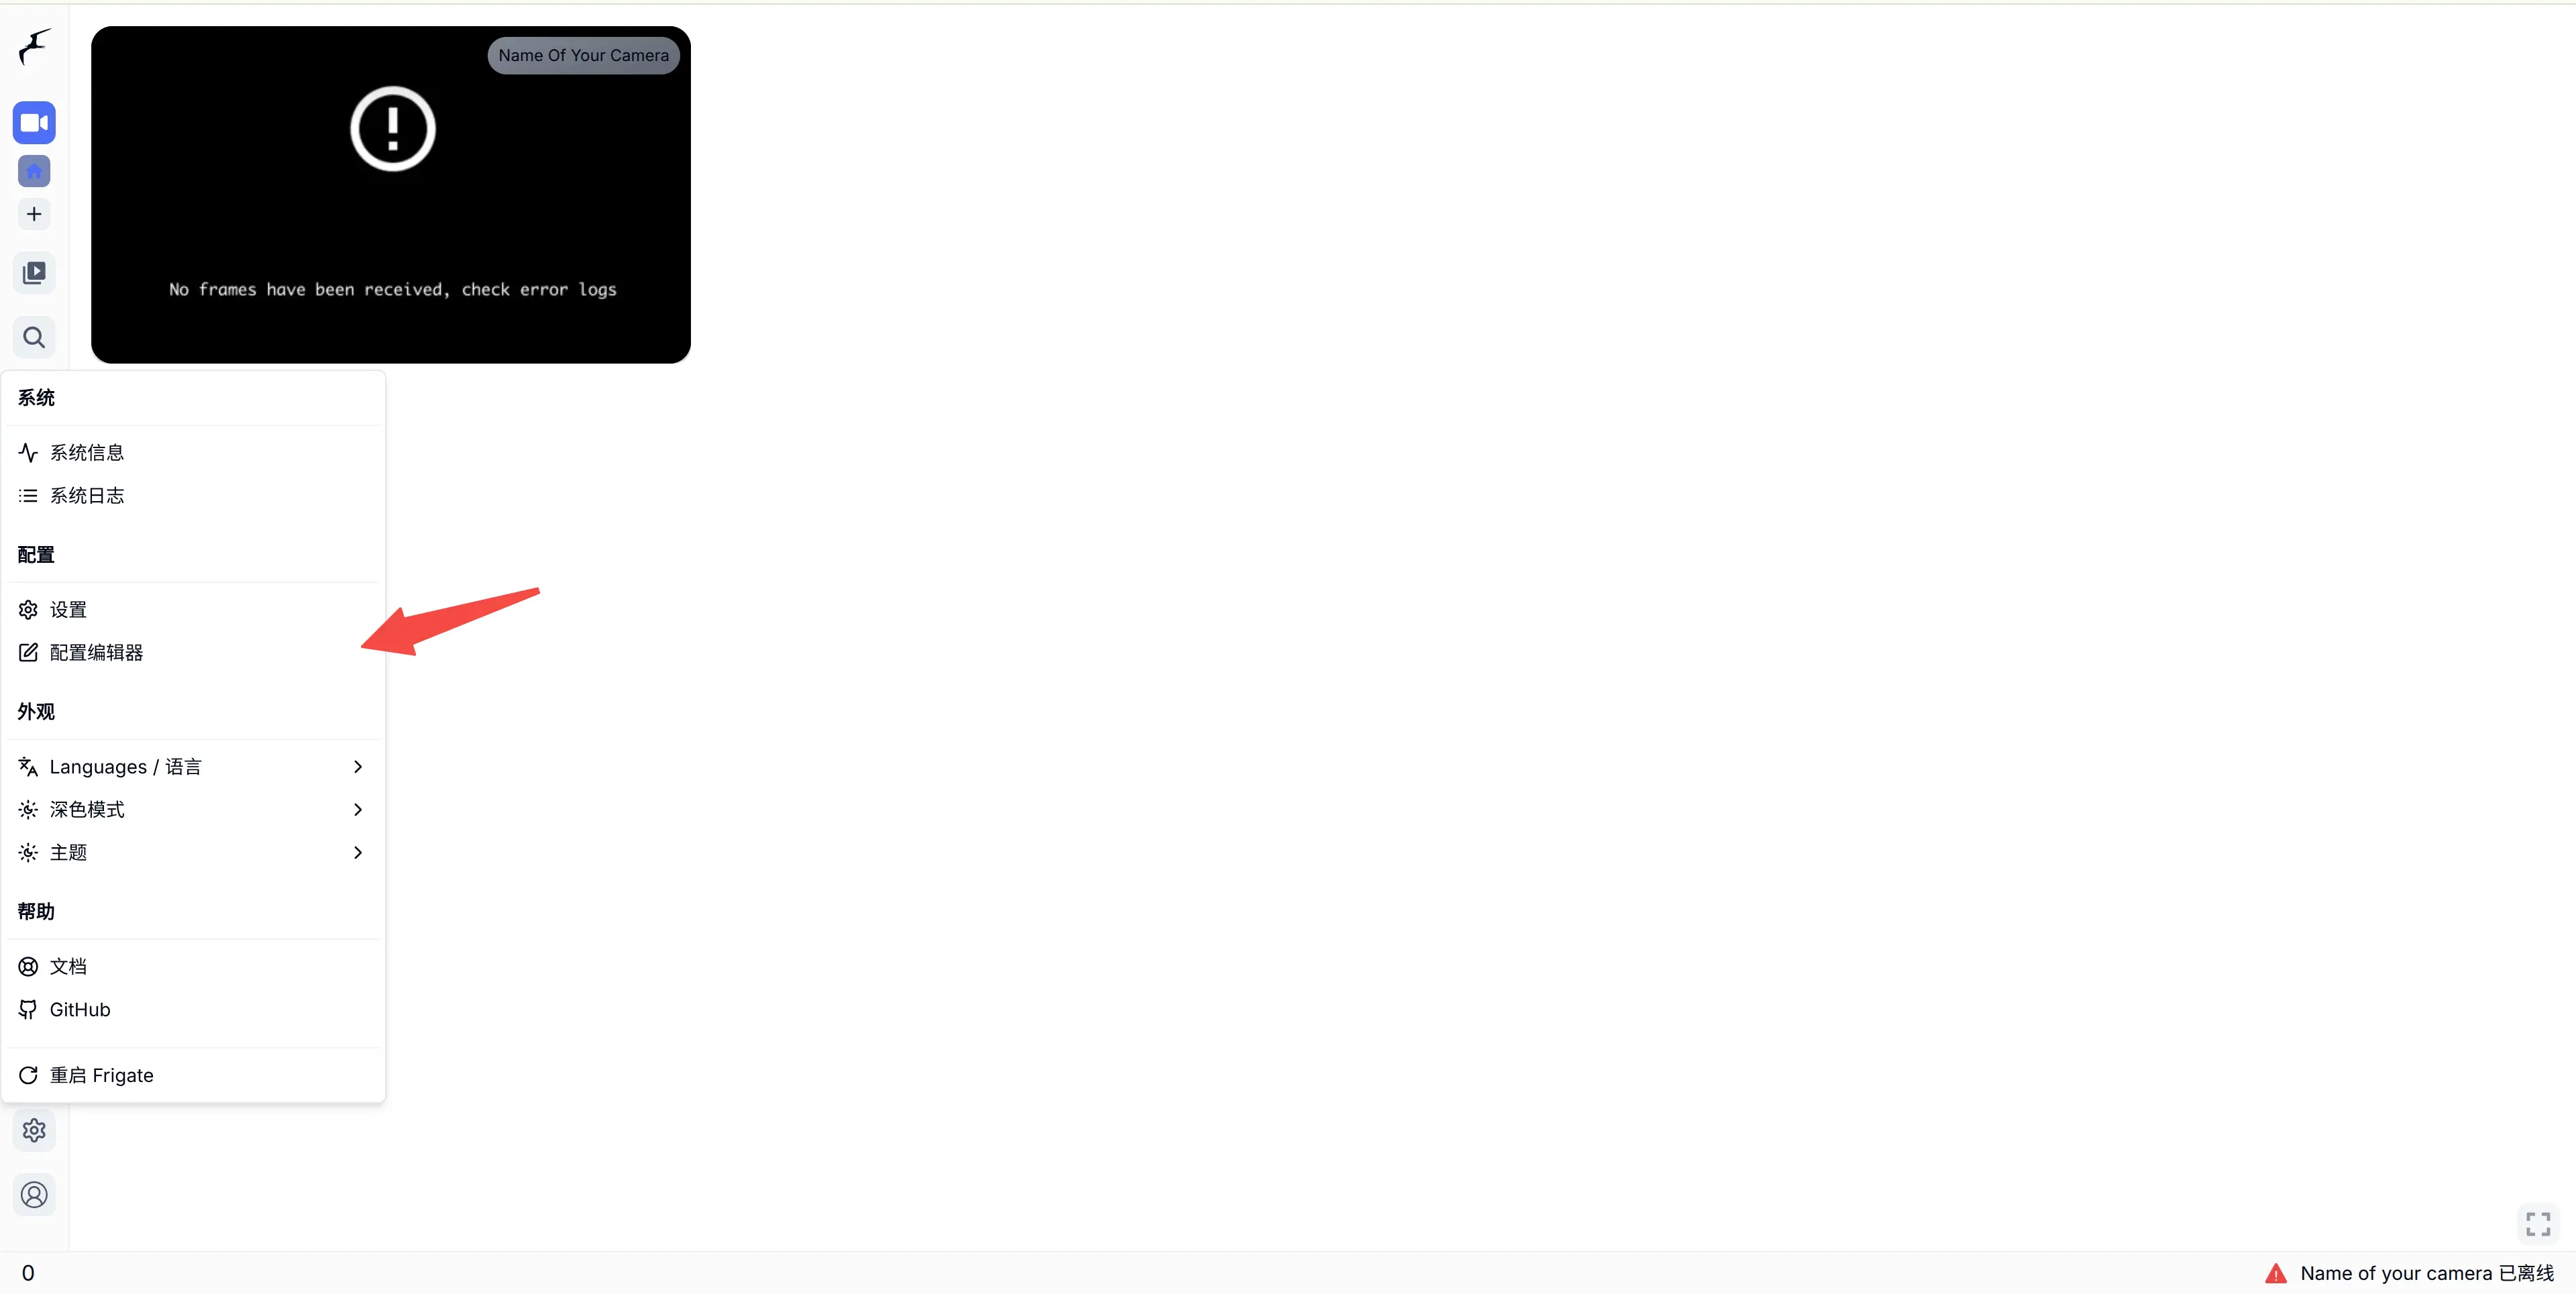
name_of_your_camera: # <------ Name the camera
enabled: true
ffmpeg:
inputs:
- path: rtsp://192.168.2.223:8554/mystream # <----- The stream you want to use for detection
roles:
- detect
detect:
enabled: true # <---- disable detection until you have a working camera feed
width: 1280
height: 720
detectors:
cix:
type: cix
model:
height: 640
width: 640
path: /config/model_cache/yolov8n.cix
detect:
enabled: true
version: 0.16-0
You should now see the live detection feed on the homepage.
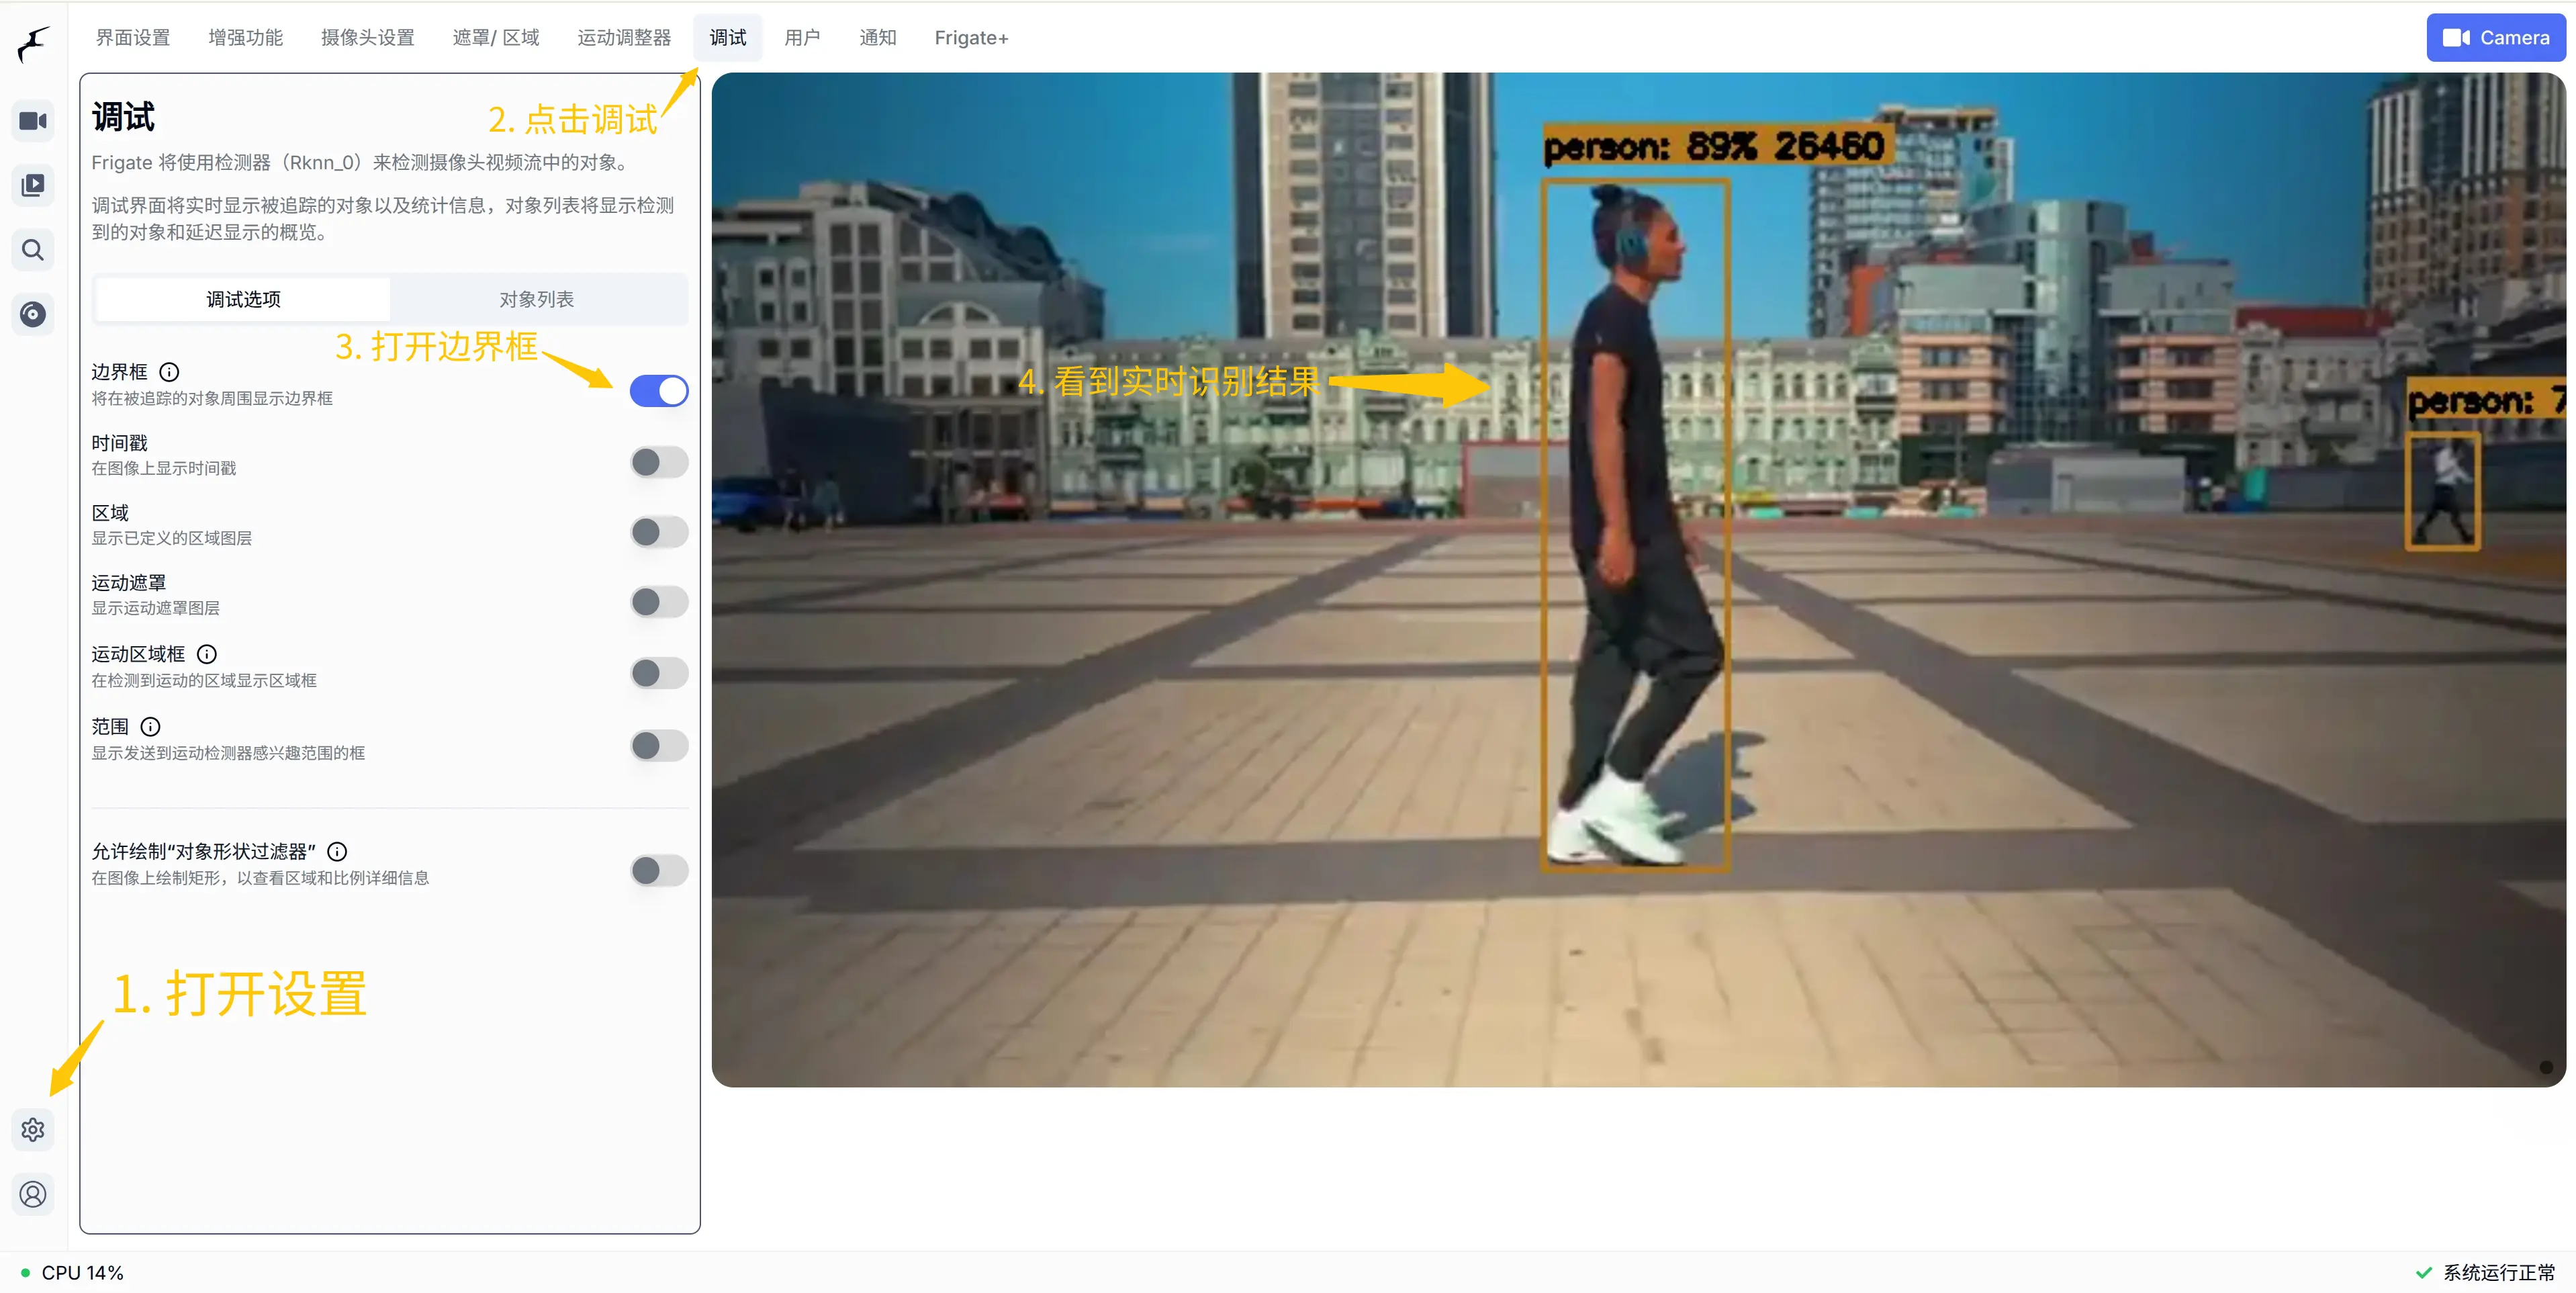
You can open the debug page to inspect real-time detection results.
You have now successfully deployed Frigate on O6/O6N.