Erase/Flash SPI Boot Firmware
This guide explains how to use the RKDevTool to erase and flash SPI boot firmware.
The Radxa ROCK 4D comes pre-loaded with SPI boot firmware for Linux systems. If you don't plan to use Android, you can skip the SPI Flash erase and flash operations.
About SPI Boot Firmware
SPI boot firmware (BootROM + bootloader) is responsible for initializing hardware in stages (CPU → Memory → Storage) and ultimately loading the operating system kernel from the storage device.
Erasing SPI Boot Firmware
Erasing the SPI boot firmware will clear all data in the SPI Flash, and the system will not be able to boot.
You need to put the ROCK 4D into Maskrom mode first, then use the RKDevTool to erase the SPI Flash. Please refer to the RKDevTool Usage guide for installation and usage instructions.
- Windows
- Linux / MacOS
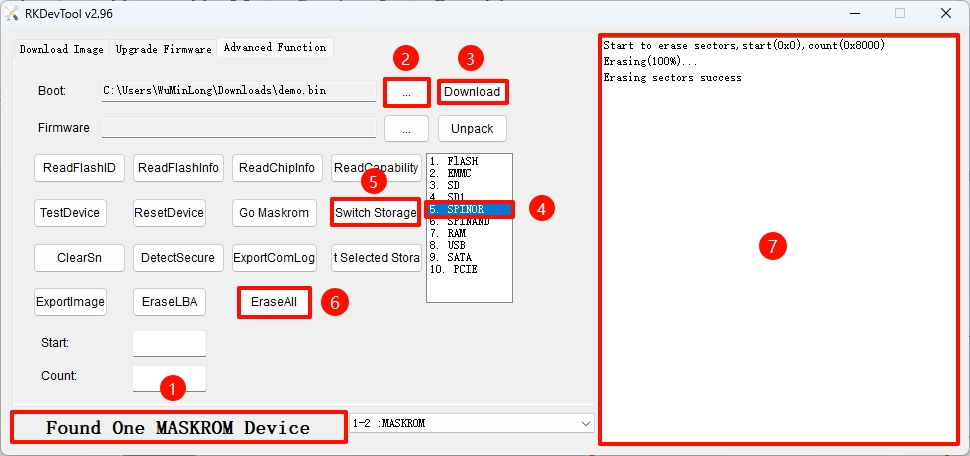
①. Ensure the ROCK 4D is in Maskrom mode. Refer to the Maskrom Button guide for instructions.
②. Select the appropriate Loader file for ROCK 4D. You can download the Loader file from the Resource Downloads page.
③. Click the Download option to run the Loader file.
④. Select the SPINOR option.
⑤. Choose the Switch Storage option to change the storage device.
⑥. Select the Erase ALL option to erase the SPI Flash.
⑦. You can monitor the operation progress in this interface.
Reboot the system for the SPI Flash erase operation to take effect.
-
Ensure the ROCK 4D is in Maskrom mode. Refer to the Maskrom Button guide for instructions.
-
Verify Maskrom Mode
Use the rkdeveloptool ld command to view the detected device information:
rkdeveloptool ld
Output similar to the following indicates a Maskrom device is detected:
DevNo=1 Vid=0x2207,Pid=0x350e,LocationID=109 Maskrom
- Run the Loader File
Replace demo.bin with the Loader file for ROCK 4D. You can download the Loader file from the Resource Downloads page.
sudo rkdeveloptool db demo.bin
- Erase SPI Flash
sudo rkdeveloptool ef
- Reboot the system for the SPI Flash erase operation to take effect
sudo rkdeveloptool rd
Flashing SPI Boot Firmware
Using RKDevTool to flash SPI boot firmware.
- Windows
- Linux / MacOS
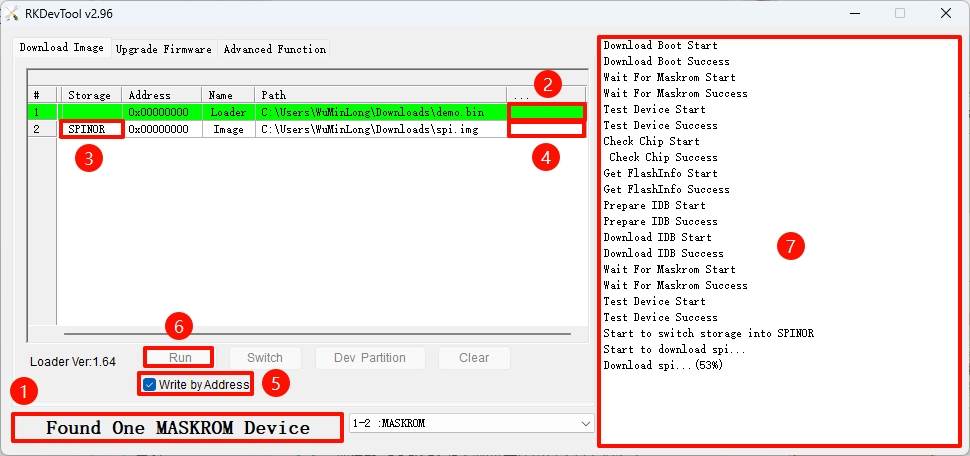
①. Confirm the ROCK 4D is in Maskrom mode. Refer to the Maskrom Button guide if needed.
②. Select the appropriate Loader file for ROCK 4D. You can download the Loader file from the Resource Downloads page.
③. Select the storage device. Choose the SPINOR option.
④. Select the spi.img file you want to flash to the SPI Flash.
⑤. Check the Write by Address option.
⑥. Click the RUN button to execute all operations.
-
Ensure the ROCK 4D is in Maskrom mode. Refer to the Maskrom Button guide for instructions.
-
Verify Maskrom Mode
Use the rkdeveloptool ld command to view the detected device information:
rkdeveloptool ld
Output similar to the following indicates a Maskrom device is detected:
DevNo=1 Vid=0x2207,Pid=0x350e,LocationID=109 Maskrom
- Run the Loader File
Replace demo.bin with the Loader file for ROCK 4D. You can download the Loader file from the Resource Downloads page.
sudo rkdeveloptool db demo.bin
- Flash SPI Boot Firmware
Replace spi.img with the SPI boot firmware for ROCK 4D. You can download the SPI boot firmware from the Resource Downloads page.
sudo rkdeveloptool wl 0x0 spi.img
- Reboot the system for the SPI Flash operation to take effect
sudo rkdeveloptool rd