Erase/Flash SPI Boot Firmware
You can download the Loader file and system image from the Downloads Summary page.
This section mainly describes how to use the RKDevTool tool to flash and erase SPI boot firmware.
SPI Boot Firmware Overview
For boards that cannot boot the system normally, you can try erasing and downloading the SPI boot firmware.
For users who need to boot from an NVMe SSD, you need to download the corresponding SPI boot firmware.
The core task of the SPI boot firmware (BootROM + bootloader) is to initialize the hardware in stages (CPU → memory → storage) and finally load the operating system kernel from the storage device.
Both downloading and erasing SPI boot firmware require that the board has already entered Maskrom mode.
Erase SPI Flash
Erasing SPI Flash will erase the SPI boot firmware stored in SPI Flash. The system will not be able to boot. Please proceed with caution.
You can download the Loader file required to erase SPI Flash from the Resources Download page.
- Windows
- Linux / MacOS
①: Make sure the board is in Maskrom mode
②: Select the Loader file corresponding to your board
③: Click the Download option to run the Loader file
④: Select the SPINOR option
⑤: Select the Switch Storage option to switch storage
⑥: Select the Erase ALL option to erase SPI Flash
⑦: You can monitor the operation progress on this interface
Restart the system for the SPI Flash erase operation to take effect.

-
Make sure the board is in Maskrom mode
-
Verify Maskrom mode
Use the rkdeveloptool ld command to view the detected devices.
rkdeveloptool ld
Output similar to the following indicates that a Maskrom device has been detected:
DevNo=1 Vid=0x2207,Pid=0x350e,LocationID=109 Maskrom
- Run the Loader file
You need to replace demo.bin with the Loader file for your board.
sudo rkdeveloptool db demo.bin
- Erase SPI Flash
sudo rkdeveloptool ef
- Restart the system for the SPI Flash erase operation to take effect
sudo rkdeveloptool rd
Flash SPI Boot Firmware
To flash the SPI boot firmware with RKDevTool, you can download the required Loader file and SPI boot firmware file from the Resources Download page.
- Windows
- Linux / MacOS
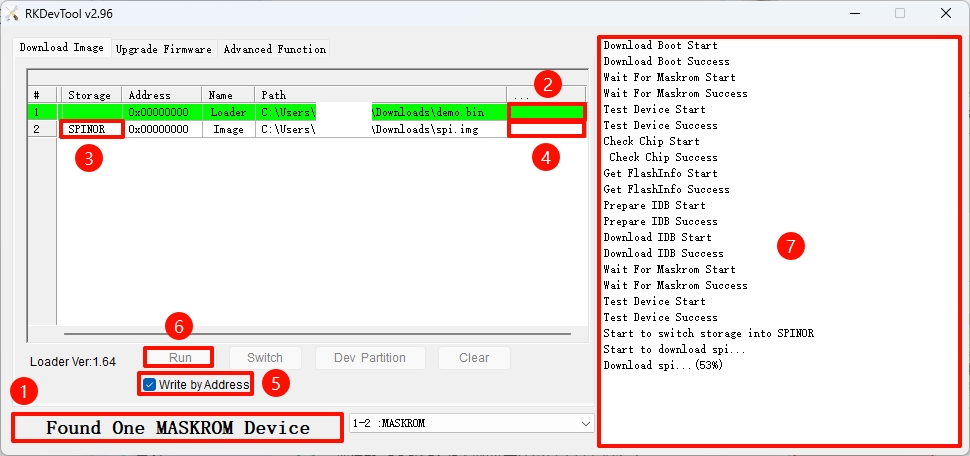
①: Make sure the board is in Maskrom mode
②: Select the Loader file corresponding to your board
③: Select the target storage device. Here we choose the SPINOR option
④: Select the spi.img file that you want to write into SPI Flash
⑤: Check the Write by Address option
⑥: Click the RUN option to execute all operations
⑦: You can monitor the operation progress on this interface
Restart the system for the SPI boot firmware to take effect.
-
Make sure the board is in Maskrom mode
-
Verify Maskrom mode
Use the rkdeveloptool ld command to view the detected devices:
rkdeveloptool ld
Output similar to the following indicates that a Maskrom device has been detected:
DevNo=1 Vid=0x2207,Pid=0x350e,LocationID=109 Maskrom
- Run the Loader file
You need to replace demo.bin with the Loader file for your board.
sudo rkdeveloptool db demo.bin
- Flash the SPI boot firmware
You need to replace spi.img with the SPI boot firmware corresponding to your board.
sudo rkdeveloptool wl 0 spi.img
- Restart the system for the flashed SPI boot firmware to take effect
sudo rkdeveloptool rd