Install System to eMMC (Applicable to V1.5)
This section tutorial mainly introduces how to install the system to the on-chip eMMC of the Radxa ROCK Pi S V1.5.
ROCK Pi S V1.5 is based on the V1.3 version, and it has added the on-chip eMMC, so you can directly boot the system through eMMC without using a microSD card.
Hardware Preparation
Prepare the following hardware to complete the system installation and boot process.
For Installation/Booting
- Radxa ROCK Pi S: Radxa ROCK Pi S V1.5
- Power Supply: Use a Type-C to Type-A data line to connect to the PC for power supply and data transmission
Installing the OS
Installing the OS will format the eMMC. Please back up any important data before proceeding.
File Downloads
Download Loader File
Visit the Downloads page to download the corresponding Loader file.
Download System Image
On your PC, go to the Downloads page and find the official OS image.
After downloading, extract the system image file. The resulting *.img file is the system image to be flashed to the eMMC.
Install RKDevTool
RKDevTool is a software developed by Rockchip for USB flashing on Windows/Linux/macOS platforms, designed to simplify and accelerate the development and debugging process for Rockchip series chips.
- Windows
- Linux
- macOS
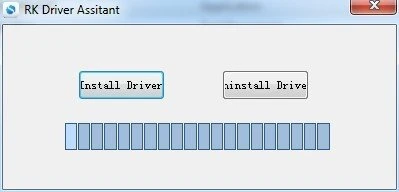
- Install Drivers
Download and extract the DriverAssitant file.
Find the DriverInstall.exe file and run it as an administrator:
Install Driver: Click the Install Driver option
Uninstall Driver: Click the Uninstall Driver option
If you have installed a different version of the driver before, please uninstall it first before installing the new one.
- Download RKDevTool
Download the RKDevTool tool, then extract the downloaded file. The RKDevTool.exe is the executable program - simply double-click to run the software.
- Install rkdeveloptool
Open your system terminal or command line and run the following commands to install:
sudo apt-get update
sudo apt-get install -y libudev-dev libusb-1.0-0-dev dh-autoreconf pkg-config libusb-1.0 build-essential git wget
git clone https://github.com/rockchip-linux/rkdeveloptool
cd rkdeveloptool
autoreconf -i
./configure
make -j $(nproc)
sudo cp rkdeveloptool /usr/local/sbin/
- Verify Version
After installation, check the RKDevTool version with the following command:
rkdeveloptool -V
- Install HomeBrew
HomeBrew is a free and open-source package manager that simplifies software installation for macOS users.
If you don't have HomeBrew installed, you can install it using the following command:
/bin/bash -c "$(curl -fsSL https://raw.githubusercontent.com/Homebrew/install/HEAD/install.sh)"
- Install rkdeveloptool
Open your system terminal or command line and run the following commands to install:
brew install automake autoconf libusb pkg-config git wget
git clone https://github.com/rockchip-linux/rkdeveloptool
cd rkdeveloptool
autoreconf -i
./configure
make -j $(nproc)
make -j $(nproc)
sudo cp rkdeveloptool /opt/local/sbin/
- Verify Version
After installing RKDevTool, check the version with the following command:
rkdeveloptool -V
Entering Maskrom Mode
We need to put the ROCK Pi S into Maskrom mode to install the system on the eMMC.
The microSD card must be removed for the ROCK Pi S to enter Maskrom mode. Otherwise, it will boot directly from the microSD card instead of entering Maskrom mode.
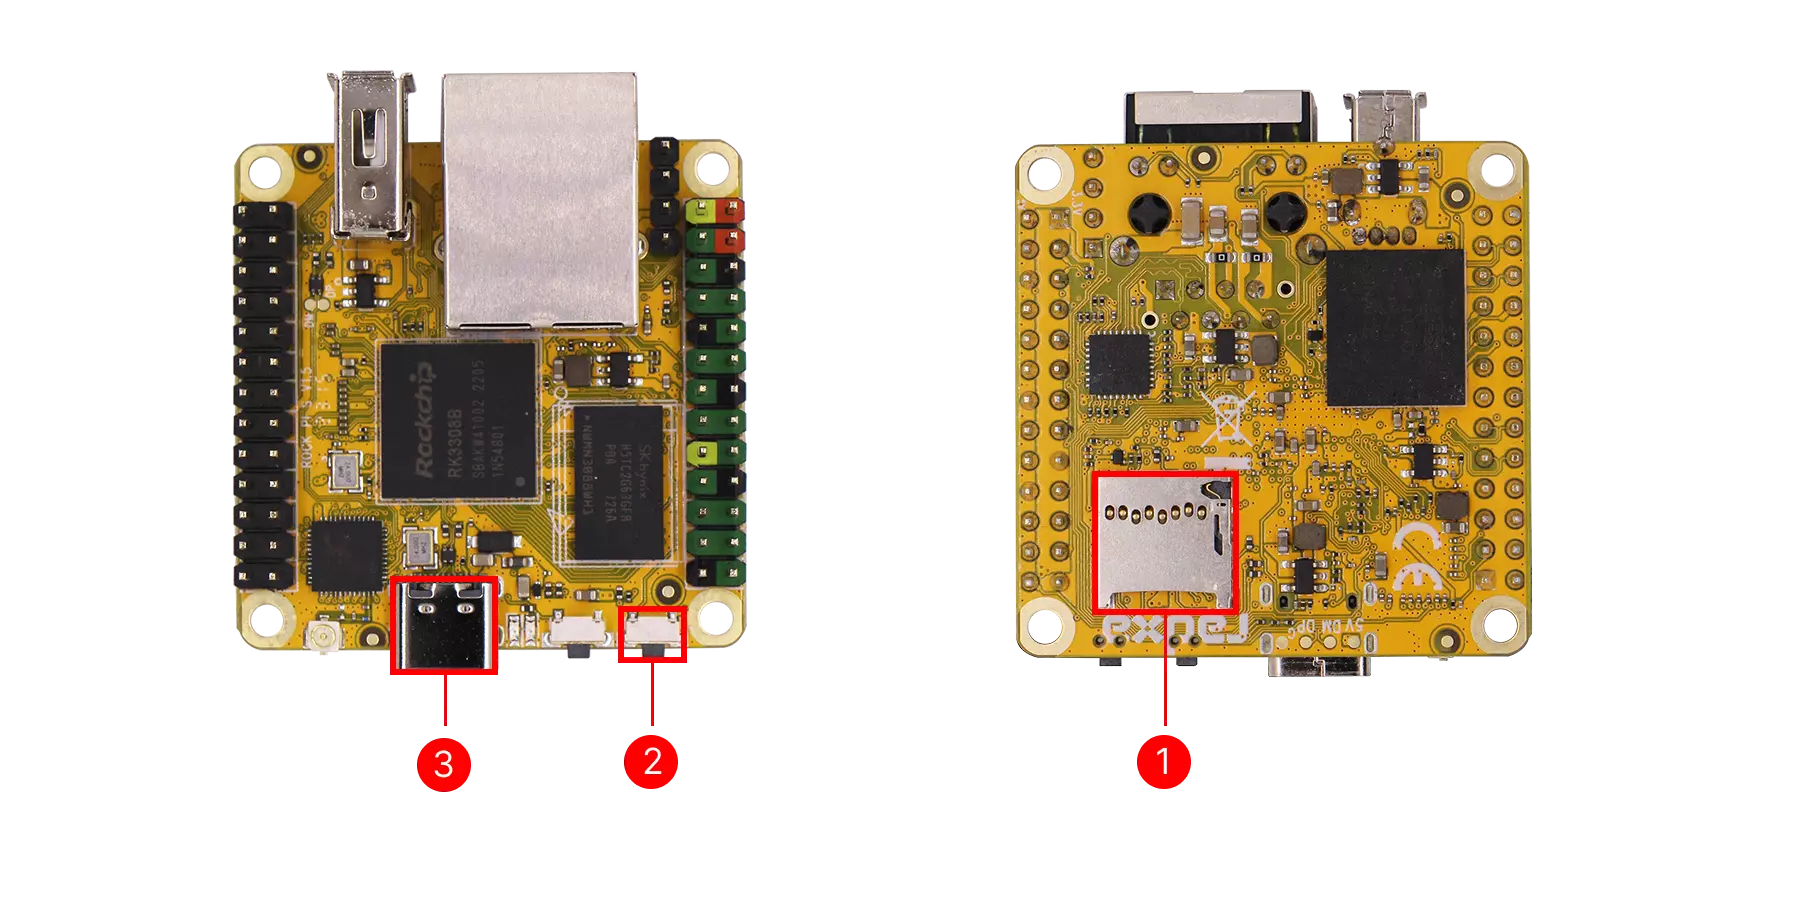
① : microSD card slot --> Ensure the microSD card is removed
② : Maskrom button
③ : Type-C port
Follow these steps:
- With the ROCK Pi S powered off, press and hold the Maskrom button
- Connect the Radxa ROCK Pi S to your PC using a Type-C to Type-A cable (Type-C end to the board, Type-A end to the PC)
- Release the Maskrom button
Using RKDevTool
Once the device is in Maskrom mode, RKDevTool should automatically detect it. If the device isn't recognized, please repeat the steps to enter Maskrom mode.
Checking Maskrom Device
- Windows
- Linux/MacOS
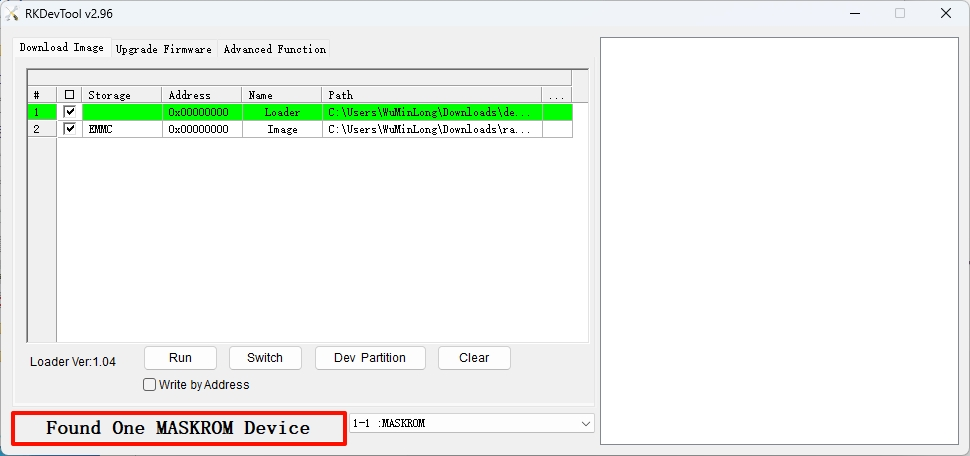
Open RKDevTool to view the recognized device information:
Use the rkdeveloptool ld command to view recognized device information:
sudo rkdeveloptool ld
Example output showing a Maskrom device is detected:
DevNo=1 Vid=0x2207,Pid=0x330e,LocationID=101 Maskrom
Installing System Image
- Windows
- Linux/MacOS
In the RKDevTool software, perform the following steps:
- ① : Select the Loader file
- ② : Select the system image
- ③ : Choose eMMC as the system storage medium
- ④ : Check the
Write by Addressoption - ⑤ : Start the operation (write Loader and system)
- ⑥ : Operation feedback information

Open your system terminal or command line and perform the following steps.
- Run Loader
Replace <loader-file>.bin with the actual Loader filename you downloaded.
sudo rkdeveloptool db <loader-file>.bin
On successful download, the terminal will display output similar to:
Downloading bootloader succeeded.
- Install System Image
Replace <system-image>.img with the actual system image filename you downloaded.
sudo rkdeveloptool wl 0 <system-image>.img
- Reboot the Device
sudo rkdeveloptool rd
System Information
When using our provided system image for the first time, log in with the following default credentials:
Debian Linux
Username: radxa
Password: radxa
Booting the System
After successfully booting the system, the power indicator will stay lit, and the status (user) LED will blink.