Install System to Onboard eMMC
System Image
You need to prepare in advance the image file built by the Yocto project: core-image-minimal-rockchip-rk3588s-radxa-cm5-io.rootfs.wic.
For the Yocto project build steps, refer to the Build System document.
Install System to Onboard eMMC
This section describes how to use the RKDevTool tool to flash the system image to the onboard eMMC.
Note: Make sure the board has entered Maskrom mode and is correctly recognized by the system.
To use the RKDevTool tool, you must ensure the board is already in Maskrom mode (during power-on, if the Maskrom button is detected as pressed, the board will automatically enter Maskrom mode).
On Windows, to use RKDevTool you need to download and install the Rockchip_DriverAssistant driver.
- Windows
- Linux / MacOS
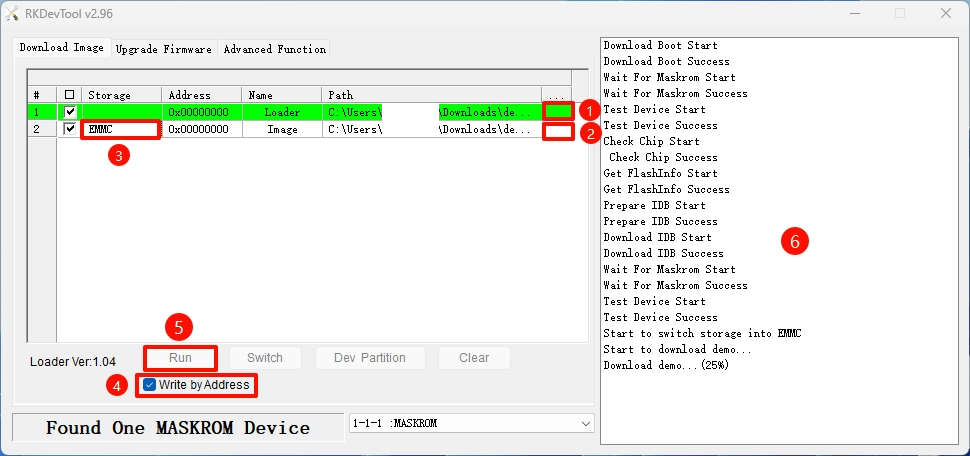
On Windows, open the RKDevTool tool, then follow the steps below to install the system to eMMC.
① : Select the Loader file corresponding to your board.
② : Select the system image built by the Yocto project.
③ : Select the eMMC option as the system storage media.
④ : Check the Write by Address option.
⑤ : Click the RUN button to perform all operations.
⑥ : You can monitor the operation progress in this interface.
Disconnect the board from the PC, then re-plug the power. The system will automatically boot from the eMMC module.
On Linux / MacOS, use the terminal and follow the steps below to install the system to eMMC.
- Run the Loader file
Replace demo.bin in the command below with the Loader file corresponding to your board.
sudo rkdeveloptool db demo.bin
- Flash the system image
Replace demo.img in the command below with the system image built by the Yocto project.
sudo rkdeveloptool wl 0 demo.img
- Reboot the system
Disconnect the board from the PC, then re-plug the power. The system will automatically boot from the eMMC.
sudo rkdeveloptool rd