UART Serial Console
Most of radxa's products define pins 8 (TX) and 10 (RX) on the GPIO pins as UART serial communication interfaces to make it easier to troubleshoot problems in the early startup phase of the system.
Preparation
- Radxa product with GPIO, compatible power supply
- PC
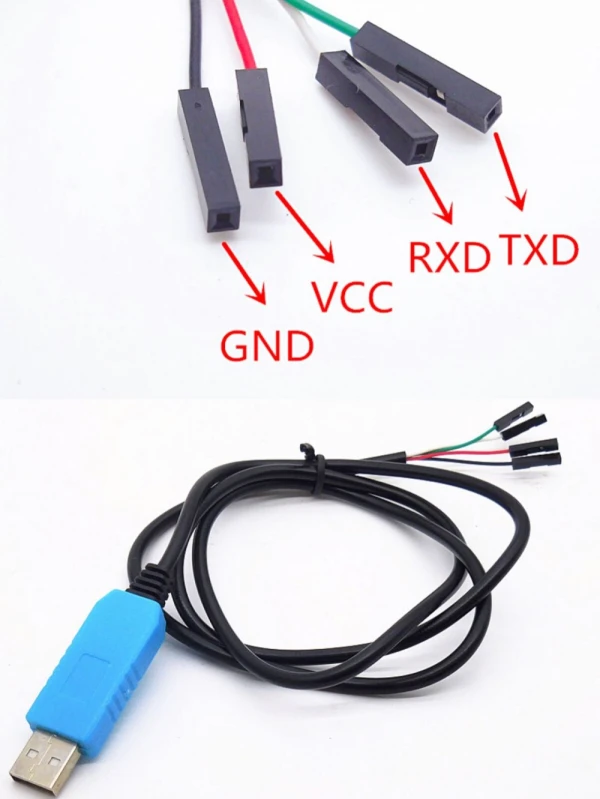
- USB to TTL Serial Cable

For Radxa products based on Amlogic chips, the default UART configuration is 115200n8 without flow control.
The Flowing text uses a serial cable based on CH340.
Serial Connection
As shown below, connect the USB to TTL serial cable:
| Radxa SBC | Connection | Serial Cable |
|---|---|---|
| GND (pin 6) | <---> | Black line |
| TX (pin 8) | <---> | White line |
| RX (pin 10) | <---> | Green line |

Please do not connect the red power line!
Using Serial Tools
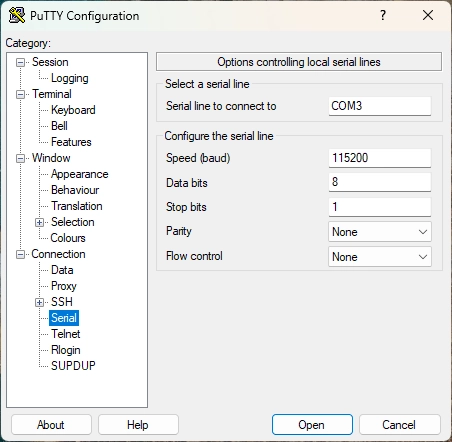
For Radxa products based on Amlogic chips, the default UART configuration is as follows:
baudrate: 115200
data bit: 8
stop bit: 1
parity  : none
flow control: none
- Windows
- Linux
- Mac
Windows
Putty is a serial tool that supports multiple baud rates on Windows. Here's how to use Putty to connect to the serial port.
-
Download Putty and install it.
-
Plug the USB to TTL serial cable into the PC, check the Device Manager to find the COM number. Here, assume it is COM3.
-
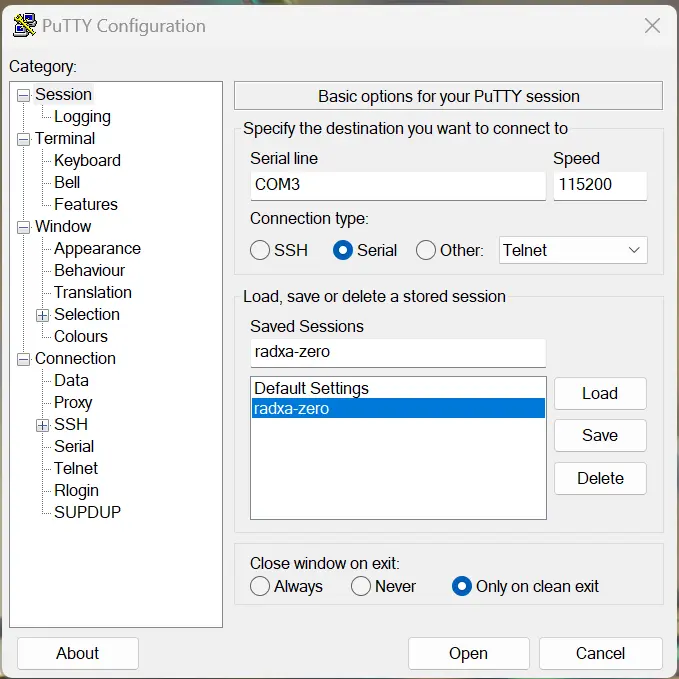
Open Putty and set it up as follows:
- Select Session in the left column, set the serial line to COM3, baud rate to 115200, and connection type to Serial.
- Write radxa-zero in the Saved Sessions column and click Save.

- Select Serial at the bottom of the left column and configure it as follows:

- After setting up, click Open to open the serial port. Make sure the TTL end is correctly connected, then turn on the power to the board.
Linux
Minicom is a serial tool that supports multiple baud rates on Linux. Here's how to use Minicom to connect to the serial port.
- Plug the USB end of the serial cable into the host PC, then find the serial device:
On the terminal, type dmesg | tail to get a printout similar to the following:
[10.654076] usb 1-6.4.3: new full-speed USB device number 103 using xhci_hcd
[10.755730] usb 1-6.4.3: New USB device found, idVendor=0403, idProduct=6001
[10.755732] usb 1-6.4.3: New USB device strings: Mfr=1, Product=2, SerialNumber=0
[10.755733] usb 1-6.4.3: Product: USB <-> Serial
[10.755734] usb 1-6.4.3: Manufacturer: FTDI
[10.756728] ftdi_sio 1-6.4.3:1.0: FTDI USB Serial Device converter detected
[10.756750] usb 1-6.4.3: Detected FT232BM
[10.757195] usb 1-6.4.3: FTDI USB Serial Device converter now attached to ttyUSB0
As shown in the last line, /dev/ttyUSB0 is the newly inserted serial device.
Maybe there is no permission to read and write the serial port.
Temporary solution: Change the permission with the chmod command
sudo chmod 777 /dev/ttyUSB0
Permanent solution: Add the current user to the dialout group
sudo usermod -aG dialout $USER
- Install minicom:
sudo apt-get update
sudo apt-get install minicom
- Set up minicom:
Please add the current non-root or non-sudo user to the plugdev group first.
sudo usermod -aG plugdev $USER
Edit ~/.bashrc and add the following parameters. After reopening a new terminal, it will take effect.
alias minicom='minicom -w -t xterm -l -R UTF-8'
Create and edit the file ~/.minirc.115200-usb0, add the following content:
pu port             /dev/ttyUSB0
pu baudrate         115200
pu bits             8
pu parity           N
pu stopbits         1
pu rtscts           No
- Run the following command to connect to the device, specifying the parameter 115200-usb0 to use the above configuration.
minicom 115200-usb0
Mac
Picocom is a serial tool that supports multiple baud rates on Mac. Here's how to use Picocom to connect to the serial port.
- Install picocom
% brew install --build-from-source radxa/picocom/picocom
- Open picocom
% picocom -b 115200 -d 8 /dev/tty.usbserial-2130
FAQs
- When using the debug console, the system startup information is displayed on the screen, but I cannot enter text using the keyboard?
It may be that
Hardware Flow Controlis enabled by default. After turning offHardware Flow Control, it should return to normal.