YOLOv8 目标检测
使用 Ultralytics 官方 bus.jpg 运行 YOLOv8-N 目标检测。示例通过 QNN HTP 后端在 DSP 上执行推理,发布结构化检测框和带检测框的结果图片。
本文仅介绍本地图片输入,未验证 QRB、Orbbec 或 USB 摄像头输入。
Q900 当前提供的 qrb_ros_nn_inference 1.1.1 和 qrb_ros_cv_tensor_common_process 0.0.0 无法直接运行当前 QAI Hub 导出的 version 3 context binary。需要将接口、推理、张量处理和示例源码放在同一个工作区构建,确保所有组件使用相同的 TensorList ABI。
管线
bus.jpg
  -> NV12 图片发布器 -> /image_raw
  -> 缩放、归一化和 NHWC float32 转换
  -> /qrb_inference_input_tensor
  -> QNN YOLOv8 推理
  -> /yolo_detect_tensor_output
  -> NMS 和 COCO 标签映射
  -> /yolo_detect_result
  -> 检测框叠加
  -> /yolo_detect_overlay
ROS 2 话题
| 话题 | 类型 | 发布节点 |
|---|---|---|
/image_raw | sensor_msgs/msg/Image | 本地 NV12 图片发布器 |
/qrb_inference_input_tensor | qrb_ros_tensor_list_msgs/msg/TensorList | yolo_preprocess_node |
/yolo_detect_tensor_output | qrb_ros_tensor_list_msgs/msg/TensorList | nn_inference_node |
/yolo_detect_result | vision_msgs/msg/Detection2DArray | yolo_detection_postprocess_node |
/yolo_detect_overlay | sensor_msgs/msg/Image | yolo_detection_overlay_node |
前提条件
- 已完成 QIR SDK 安装
- Q900 可以访问 GitHub 和 Ultralytics
- Q900 至少有 1 GB 可用空间
在主机上导出模型
通过 QAI Hub 生成 QCS9075 context binary。
步骤 1:安装 QAI Hub Models
python3 -m venv ~/venv_qaihub
source ~/venv_qaihub/bin/activate
pip install qai-hub-models
步骤 2:配置 QAI Hub
从 Qualcomm AI Hub 的账号设置页面获取 API token:
source ~/venv_qaihub/bin/activate
qai-hub configure --api_token <your-api-token>
步骤 3:导出 QCS9075 模型
使用 Dragonwing IQ-9075 EVK 作为目标设备:
source ~/venv_qaihub/bin/activate
python3 -m qai_hub_models.models.yolov8_det.export \
  --target-runtime qnn_context_binary \
  --device "Dragonwing IQ-9075 EVK" \
  --device-os 1.7 \
  --skip-profiling \
  --skip-inferencing \
  --output-dir ~/qai_hub_models/yolov8_det_qcs9075
该命令会下载 YOLOv8-N 权重,在 QAI Hub 上编译模型并下载 yolov8_det.bin。
步骤 4:传输模型和标签
查找导出的模型和 Ultralytics 提供的 coco8.yaml:
source ~/venv_qaihub/bin/activate
MODEL_PATH=$(find ~/qai_hub_models/yolov8_det_qcs9075 \
  -type f -name yolov8_det.bin -print -quit)
LABEL_PATH=$(python3 -c \
  'import pathlib, ultralytics; print(pathlib.Path(ultralytics.__file__).parent / "cfg/datasets/coco8.yaml")')
test -n "$MODEL_PATH" && test -f "$LABEL_PATH"

scp "$MODEL_PATH" <device-user>@<device-ip>:/tmp/yolov8_det_qcs9075.bin
scp "$LABEL_PATH" <device-user>@<device-ip>:/tmp/coco8.yaml
在 Q900 上安装两个文件:
sudo install -d -m 0755 /opt/model
sudo install -m 0644 /tmp/yolov8_det_qcs9075.bin \
  /opt/model/yolov8_det_qcs9075.bin
sudo install -m 0644 /tmp/coco8.yaml /opt/coco8.yaml
构建源码
步骤 1:安装依赖
sudo apt install -y \
  ros-dev-tools \
  ros-jazzy-sample-object-detection \
  ros-jazzy-qrb-ros-cv-tensor-common-process \
  ros-jazzy-image-publisher
步骤 2:克隆源码
创建工作区,并将相关仓库放在同一个 src 目录:
mkdir -p ~/qrb_ros_ws/src && cd ~/qrb_ros_ws/src
git clone https://github.com/qualcomm-qrb-ros/qrb_ros_interfaces.git
git clone https://github.com/qualcomm-qrb-ros/qrb_ros_nn_inference.git
git clone https://github.com/qualcomm-qrb-ros/qrb_ros_tensor_process.git
git clone https://github.com/qualcomm-qrb-ros/qrb_ros_samples.git
步骤 3:构建推理和示例包
cd ~/qrb_ros_ws
source /opt/ros/jazzy/setup.bash
colcon build \
  --packages-up-to sample_object_detection \
  --allow-overriding qrb_ros_tensor_list_msgs
步骤 4:构建图片预处理包
sample_object_detection 没有声明对图片预处理包的源码依赖,需要显式构建:
cd ~/qrb_ros_ws
source /opt/ros/jazzy/setup.bash
source install/setup.bash
colcon build \
  --packages-select qrb_ros_cv_tensor_common_process \
  --allow-overriding qrb_ros_tensor_list_msgs
准备测试图片
下载 Ultralytics 官方测试图片:
mkdir -p ~/qrb_ros_ws/input
wget https://ultralytics.com/images/bus.jpg \
  -O ~/qrb_ros_ws/input/bus.jpg
echo "c02019c4979c191eb739ddd944445ef408dad5679acab6fd520ef9d434bfbc63  $HOME/qrb_ros_ws/input/bus.jpg" | \
  sha256sum --check
创建静态图片发布器
创建 ~/qrb_ros_ws/nv12_image_publisher.py,将 JPEG 缩放为 640 x 640 并转换为 NV12 格式:
import sys

import cv2
import numpy as np
import rclpy
from rclpy.node import Node
from sensor_msgs.msg import Image


class Nv12ImagePublisher(Node):
    def __init__(self, image_path):
        super().__init__("nv12_image_publisher")
        image = cv2.imread(image_path, cv2.IMREAD_COLOR)
        if image is None:
            raise RuntimeError(f"Failed to load image: {image_path}")
        image = cv2.resize(image, (640, 640), interpolation=cv2.INTER_LINEAR)

        height, width = image.shape[:2]
        i420 = cv2.cvtColor(image, cv2.COLOR_BGR2YUV_I420).reshape(-1)
        y_size = width * height
        chroma_size = y_size // 4
        y = i420[:y_size]
        u = i420[y_size : y_size + chroma_size]
        v = i420[y_size + chroma_size : y_size + 2 * chroma_size]
        uv = np.empty(y_size // 2, dtype=np.uint8)
        uv[0::2] = u
        uv[1::2] = v

        self.message = Image()
        self.message.header.frame_id = "camera"
        self.message.height = height
        self.message.width = width
        self.message.encoding = "nv12"
        self.message.is_bigendian = False
        self.message.step = width
        self.message.data = np.concatenate((y, uv)).tobytes()

        self.publisher = self.create_publisher(Image, "/image_raw", 10)
        self.timer = self.create_timer(0.1, self.publish_image)
        self.get_logger().info(
            f"Publishing {image_path} as nv12 ({width}x{height})"
        )

    def publish_image(self):
        self.message.header.stamp = self.get_clock().now().to_msg()
        self.publisher.publish(self.message)


def main():
    if len(sys.argv) != 2:
        raise SystemExit("usage: nv12_image_publisher.py <image-path>")
    rclpy.init()
    node = Nv12ImagePublisher(sys.argv[1])
    try:
        rclpy.spin(node)
    except KeyboardInterrupt:
        pass
    finally:
        node.destroy_node()
        if rclpy.ok():
            rclpy.shutdown()


if __name__ == "__main__":
    main()
创建图片输入 launch
创建 ~/qrb_ros_ws/launch_with_image_publisher.py:
from launch import LaunchDescription
from launch.actions import DeclareLaunchArgument, ExecuteProcess
from launch.substitutions import LaunchConfiguration
from launch_ros.actions import ComposableNodeContainer
from launch_ros.descriptions import ComposableNode


def generate_launch_description():
    declared_args = [
        DeclareLaunchArgument("image_path"),
        DeclareLaunchArgument("publisher_script"),
        DeclareLaunchArgument("model"),
        DeclareLaunchArgument("label_file"),
        DeclareLaunchArgument("score_thres", default_value="0.7"),
        DeclareLaunchArgument("iou_thres", default_value="0.5"),
    ]

    image_publisher = ExecuteProcess(
        cmd=[
            "python3",
            LaunchConfiguration("publisher_script"),
            LaunchConfiguration("image_path"),
        ],
        output="screen",
    )

    preprocess = ComposableNode(
        package="qrb_ros_cv_tensor_common_process",
        plugin="qrb_ros::cv_tensor_common_process::CvTensorCommonProcessNode",
        name="yolo_preprocess_node",
        parameters=[
            {"target_res": "640x640"},
            {"normalize": True},
            {"tensor_fmt": "nhwc"},
            {"data_type": "float32"},
        ],
        remappings=[
            ("input_image", "/image_raw"),
            ("encoded_image", "qrb_inference_input_tensor"),
        ],
    )

    inference = ComposableNode(
        package="qrb_ros_nn_inference",
        plugin="qrb_ros::nn_inference::QrbRosInferenceNode",
        name="nn_inference_node",
        parameters=[
            {
                "backend_option": "/usr/lib/libQnnHtp.so",
                "model_path": LaunchConfiguration("model"),
            }
        ],
        remappings=[
            ("qrb_inference_output_tensor", "yolo_detect_tensor_output"),
        ],
    )

    postprocess = ComposableNode(
        package="qrb_ros_yolo_process",
        plugin="qrb_ros::yolo_process::YoloDetPostProcessNode",
        name="yolo_detection_postprocess_node",
        parameters=[
            {"label_file": LaunchConfiguration("label_file")},
            {"score_thres": LaunchConfiguration("score_thres")},
            {"iou_thres": LaunchConfiguration("iou_thres")},
        ],
    )

    overlay = ComposableNode(
        package="qrb_ros_yolo_process",
        plugin="qrb_ros::yolo_process::YoloDetOverlayNode",
        name="yolo_detection_overlay_node",
        parameters=[{"target_res": "640x640"}],
    )

    container = ComposableNodeContainer(
        name="yolo_node_container",
        namespace="",
        package="rclcpp_components",
        executable="component_container",
        composable_node_descriptions=[overlay, postprocess, inference, preprocess],
        output="screen",
    )

    return LaunchDescription(declared_args + [image_publisher, container])
运行
cd ~/qrb_ros_ws
source /opt/ros/jazzy/setup.bash
source install/setup.bash
export ROS_DOMAIN_ID=123
ros2 launch ~/qrb_ros_ws/launch_with_image_publisher.py \
  publisher_script:="$HOME/qrb_ros_ws/nv12_image_publisher.py" \
  image_path:="$HOME/qrb_ros_ws/input/bus.jpg" \
  model:=/opt/model/yolov8_det_qcs9075.bin \
  label_file:=/opt/coco8.yaml
预期输出
模型完成初始化,并持续执行推理:
Context binary info (V3/FCB)
Initialize Qnn graph from binary file successfully
Inference init successfully!
Got model input data, start executing inference...
Inference execute successfully!
Publish the inference result...
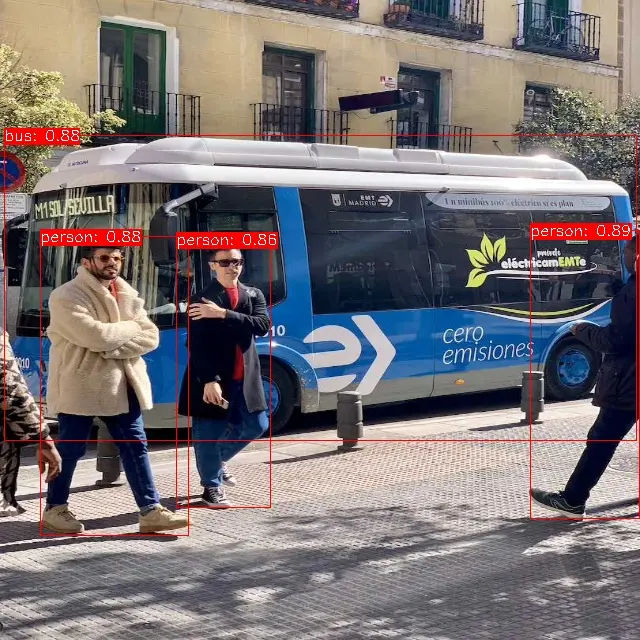
实机捕获的 /yolo_detect_overlay 如下:
验证
在另一个终端中检查检测结果和叠加图话题:
cd ~/qrb_ros_ws
source /opt/ros/jazzy/setup.bash
source install/setup.bash
export ROS_DOMAIN_ID=123
ros2 topic info /yolo_detect_result -v
ros2 topic info /yolo_detect_overlay -v
ros2 topic echo /yolo_detect_result --once
默认阈值 0.7 下,测试图片应包含 4 个检测结果:
person  0.8867
person  0.8794
bus     0.8755
person  0.8647
/yolo_detect_overlay 应为 640 x 640 的 bgr8 图片。需要图形化查看时,在与 Q900 使用相同 ROS_DOMAIN_ID 的 ROS 2 Jazzy 桌面环境中启动 rqt,依次选择 Plugins > Visualization > Image View,再选择 /yolo_detect_overlay。
停止
在运行示例的终端中按 Ctrl + C。
限制
- 本次仅验证本地图片输入,未验证 QRB、Orbbec 或 USB 摄像头。
- 输入图片会缩放为
640 x 640,检测框坐标对应缩放后的图片。 - 未验证跨设备
rqt显示,仅验证 Q900 本地推理、检测消息和叠加图发布。 - 必须从源码构建相关仓库;混用 Debian 和源码版本的
TensorList会导致 ABI 不兼容。