OpenPose 完整示例
此文档介绍如何使用 CIX P1 NPU SDK 将 OpenPose 转换为 CIX SOC NPU 上可以运行的模型。
整体来讲有四个步骤:
步骤1~3 在 x86 主机 Linux 环境下执行
- 下载 NPU SDK 并安装 NOE Compiler
- 下载模型文件 (代码和脚本)
- 编译模型
- 部署模型到 Orion O6
下载 NPU SDK 并安装 NOE Compiler
请参考 安装 NPU SDK 进行 NPU SDK 和 NOE Compiler 的安装.
下载模型文件
在 CIX AI Model Hub 中包含了 Openose 的所需文件, 请用户按照 下载 CIX AI Model Hub 下载,然后到对应的目录下查看
cd ai_model_hub/models/ComputeVision/Pose_Estimation/onnx_openpose
请确认目录结构是否同下图所示
.
├── cfg
│   ├── human-pose-estimationbuild.cfg
│   └── opt_template.json
├── datasets
│   └── calib_data_my.npy
├── inference_npu.py
├── inference_onnx.py
├── output_onnx.jpg
├── ReadMe.md
└── test_data
    ├── 1.jpeg
    └── 2.jpeg
编译模型
用户可无需从头编译模型,radxa 提供预编译好的 human-pose-estimation.cix 模型(可用下面步骤下载),如果使用预编译好的模型,可以跳过“编译模型” 这一步
wget https://modelscope.cn/models/cix/ai_model_hub_24_Q4/resolve/master/models/ComputeVision/Pose_Estimation/onnx_openpose/human-pose-estimation.cix
准备 onnx 模型
-
下载 onnx 模型
-
简化模型
这里使用 onnxsim 进行模型输入固化和模型简化
pip3 install onnxsim onnxruntime
onnxsim human-pose-estimation.onnx human-pose-estimation-sim.onnx --overwrite-input-shape 1,3,256,360
编译模型
CIX SOC NPU 支持 INT8 计算,在编译模型前,我们需要使用 NOE Compiler 对模型进行 INT8 量化
-
准备校准集
-
使用
datasets现有校准集.
└── calib_data_my.npy -
自行准备校准集
在
test_data目录下已经包含多张校准集的图片文件.
├── 1.jpeg
└── 2.jpeg参考以下脚本生成校准文件
import sys
import os
import numpy as np
import cv2
_abs_path = os.path.join(os.getcwd(), "../../../../")
sys.path.append(_abs_path)
from utils.image_process import preprocess_openpose
from utils.tools import get_file_list
# Get a list of images from the provided path
images_path = "test_data"
images_list = get_file_list(images_path)
data = []
for image_path in images_list:
    img_numpy = cv2.imread(image_path)
    input = preprocess_openpose(img_numpy, 256)[0]
    data.append(input)
# concat the data and save calib dataset
data = np.concatenate(data, axis=0)
np.save("datasets/calib_data_tmp.npy", data)
print("Generate calib dataset success.")
-
-
使用 NOE Compiler 量化与编译模型
-
制作量化与编译 cfg 配置文件, 请参考以下配置
[Common]
mode = build

[Parser]
model_type = ONNX
model_name = human-pose-estimation
detection_postprocess =
model_domain = OBJECT_DETECTION
input_data_format = NCHW
input_model = ./human-pose-estimation-sim.onnx
input = images
input_shape = [1, 3, 256, 360]
output_dir = ./

[Optimizer]
dataset = numpydataset
calibration_data = ./datasets/calib_data_tmp.npy
calibration_batch_size = 1
output_dir = ./
quantize_method_for_activation = per_tensor_asymmetric
quantize_method_for_weight = per_channel_symmetric_restricted_range
save_statistic_info = True
opt_config = cfg/opt_template.json
cast_dtypes_for_lib = True

[GBuilder]
target = X2_1204MP3
outputs = human-pose-estimation.cix
tiling = fps -
编译模型
提示如果遇到 cixbuild 报错
[E] Optimizing model failed! CUDA error: no kernel image is available for execution on the device ...这意味着当前版本的 torch 不支持此 GPU,请完全卸载当前版本的 torch, 然后在 torch 官网下载最新版本。cixbuild ./human-pose-estimationbuild.cfg
-
模型部署
NPU 推理
将使用 NOE Compiler 编译好的 .cix 格式的模型复制到 Orion O6 开发板上进行模型验证
python3 inference_npu.py --image_path ./test_data/ --model_path human-pose-estimation.cix
(.venv) radxa@orion-o6:~/NOE/ai_model_hub/models/ComputeVision/Pose_Estimation/onnx_openpose$ time python3 inference_npu.py --image_path ./test_data/ --model_path human-pose-estimation.cix
npu: noe_init_context success
npu: noe_load_graph success
Input tensor count is 1.
Output tensor count is 4.
npu: noe_create_job success
npu: noe_clean_job success
npu: noe_unload_graph success
npu: noe_deinit_context success

real	0m2.788s
user	0m3.158s
sys	0m0.276s
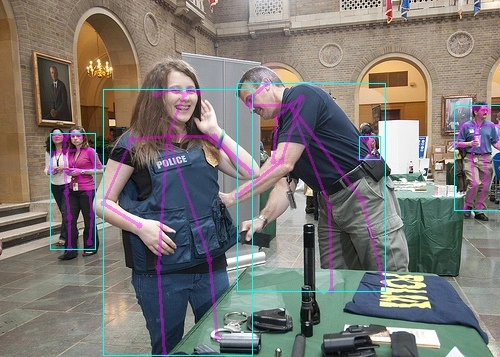
结果保存在 output 文件夹中

CPU 推理
使用 CPU 对 onnx 模型进行推理验证正确性,可在 X86 主机上或 Orion O6 上运行
python3 inference_onnx.py --image_path ./test_data/ --onnx_path ./yolov8l.onnx
(.venv) radxa@orion-o6:~/NOE/ai_model_hub/models/ComputeVision/Pose_Estimation/onnx_openpose$ time python3 inference_onnx.py --image_path ./test_data/ --onnx_path human-pose-estimation.onnx

real	0m3.138s
user	0m6.961s
sys	0m0.318s
结果保存在 output 文件夹中
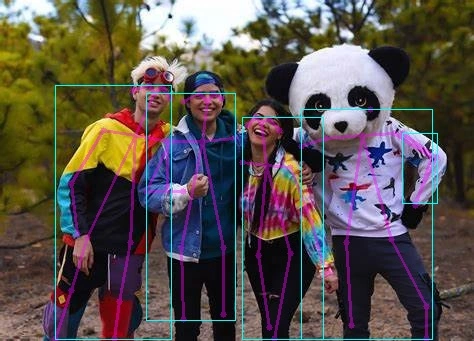

可以看到 NPU 和 CPU 上推理的结果一致,但运行速度大幅缩短
参考文档
论文链接: Real-time 2D Multi-Person Pose Estimation on CPU: Lightweight OpenPose