安装 BIOS
如果您使用的是 RadxaOS,系统提供了更新 BIOS 的相关功能,无需参考以下内容手动进行更新。
您只需要在开机时,选择 Install EDK2 启动项,并按照指示确认操作即可。
您也可以将 RadxaOS 安装到 USB 存储设备中,将其作为 BIOS 更新媒介,为多台设备进行更新。
详情请参考 edk2-cix 相关文档。
硬件准备
- 开发板: 瑞莎 Orion O6
- 电源适配器:20V Type-C 电源适配器
- 制作 BIOS U盘: U 盘
- 输入设备:USB 键盘
- USB 串口数据线(可选):用于串口调试和登录系统
- HDMI 数据线和显示器(可选):用于显示系统界面和图形化界面操作
推荐配件:
硬件说明
Orion O6 主板支持标准 PD 协议的 20V 电源输入,建议电流 3A 以上,确保所有外设稳定运行。
- U 盘
用来制作 BIOS U盘,容量没有明确要求,BIOS 包解压后文件大小约为 10MB。
- USB 串口数据线
使用命令行模式更新 BIOS 时,用于连接 Orion O6 和 PC。
- HDMI 数据线和显示器
使用有屏模式更新 BIOS 时,用于连接 Orion O6 和显示器。
制作 BIOS U盘
下载 BIOS 包
进入 下载页面 下载制作 BIOS U盘的文件并解压。
解压后的文件内容如下:
BuildOptions
BurnImage.efi
cix_flash_all.bin
cix_flash_ota.bin
FlashUpdate.efi
startup.nsh
Shell.efi
VariableInfo.efi
制作 BIOS U盘
-
将 U 盘格式化出一个分区,格式为 FAT32。
-
将解压后的 BIOS 文件放到 U 盘的 FAT32 分区的顶层目录中。
以上就完成 BIOS U盘的制作。
更新 BIOS
介绍有屏模式和串口模式更新 BIOS 的方法。
硬件连接
- 有屏模式
- 串口模式
- 使用 USB 键盘连接 Orion O6
- 使用 HDMI 数据线连接显示器和 Orion O6
- 使用 20V Type-C 电源适配器连接 Orion O6
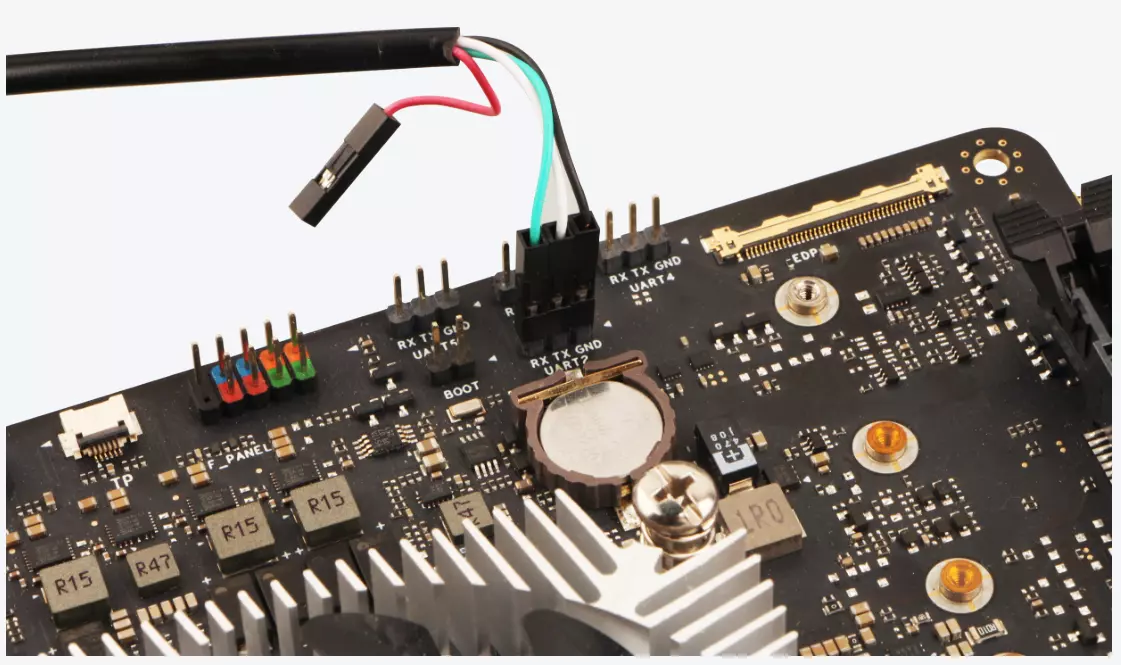
- 使用 USB 串口数据线连接 Orion O6 的 3-pin UART2 插针和 PC 的 USB 接口
- 使用 USB 键盘连接 Orion O6
- 使用 20V Type-C 电源适配器连接 Orion O6
波特率:115200
数据位:8
停止位:1
校验位:无
流控:无
串口工具用户可以根据自己喜好选择,推荐使用 Tabby。
- 串口连接示意图

| Orion O6 引脚功能 | 连接方式 |
|---|---|
| Orion O6 : GND | USB 串口数据线的 GND 引脚(黑色杜邦线) |
| Orion O6 : UART2_TXD | USB 串口数据线的 RXD 引脚(白色杜邦线) |
| Orion O6 : UART2_RXD | USB 串口数据线的 TXD 引脚(绿色杜邦线) |
进入 BIOS
- 有屏模式
- 串口模式
接通电源后,显示器若出现 Radxa Logo 和进度条时,短按键盘的 “Esc” 按键,在显示器将会出现 BIOS 菜单。
接通电源后,串口若输出 Press ESCAPE for boot options,则提示我们按下 ESC 键可以进入 BIOS 菜单。
Tianocore/EDK2 firmware version 0.3.0-1
Press ESCAPE for boot options
- BIOS 界面
 Radxa Orion O6
 CIX P1 CD8180                                       1.50 GHz
 0.3.0-1                                             8192 MB RAM


   Select Language            <English>                  This is the option
                                                         one adjusts to change
 > Device Manager                                        the language for the
 > Boot Manager                                          current system
 > Boot Maintenance Manager

   Continue
   Reset


  ^v=Move Highlight       <Enter>=Select Entry
更新 BIOS
进入 BIOS 界面后,选择 Boot Manager --> UEFI Shell,进入 UEFI Shell 界面。
我们可以按 q 键取消 BIOS 自动更新并退出工具,通过以下方式进入指定的磁盘运行 startup.nsh 脚本文件更新 BIOS。
UEFI Interactive Shell v2.2
EDK II
UEFI v2.70 (EDK II, 0x00010000)
Mapping table
      FS0: Alias(s):HD0b0b:;BLK1:
          VenHw(0D51905B-B77E-452A-A2C0-ECA0CC8D514A,00801E090000000000)/USB(0x1
,0x0)/HD(1,GPT,40EC1CE6-AF3E-4B61-9E8F-29906C777ACE,0x12000,0x73DB800)
     BLK0: Alias(s):
          VenHw(0D51905B-B77E-452A-A2C0-ECA0CC8D514A,00801E090000000000)/USB(0x1
,0x0)
Press ESC in 1 seconds to skip startup.nsh or any other key to continue.
************************************************************************
                       Radxa BIOS Update Utility
************************************************************************

You are about to update the BIOS.
Please make sure the power stays on during the operation.

If you decide to cancel BIOS update, you can run following commands:
    reset     to reboot the system
    reset -s  to shutdown the system

Enter 'q' to quit, any other key to continue:
q
- 进入 BIOS 文件夹
在 Shell 下,输入 FS0: 后按下回车键进入 BIOS U盘,然后使用 ls 命令确认文件是否在该目录下。
你可以根据上面的 Mapping table 信息判断自己的 BIOS U盘设备信息,目前我们的设备信息为 FS0。
Shell> FS0:
FS0:\> ls
Directory of: FS0:\
04/28/2025  03:28                 649  BuildOptions
04/28/2025  03:28              57,344  BurnImage.efi
04/28/2025  03:28           6,288,062  cix_flash_all.bin
04/28/2025  03:28           2,101,982  cix_flash_ota.bin
04/28/2025  03:28             434,176  FlashUpdate.efi
04/28/2025  03:28             970,752  Shell.efi
04/28/2025  03:28               1,354  startup.nsh
04/28/2025  03:28              16,384  VariableInfo.efi
          8 File(s)   9,870,703 bytes
          0 Dir(s)
- 更新 BIOS
在 Shell 下,输入 startup.nsh 后按下回车键更新 BIOS。
若下载的 BIOS 包为 0.3.0-1 以前的版本时,此文件名为 setup.nsh。
FS0:\> startup.nsh
运行 startup.nsh 后,根据提示完成剩下更新 BIOS 的操作。
若更新成功,系统会输出以下信息:
************************************************************************
                       Radxa BIOS Update Utility
************************************************************************

You are about to update the BIOS.
Please make sure the power stays on during the operation.

If you decide to cancel BIOS update, you can run following commands:
    reset     to reboot the system
    reset -s  to shutdown the system

Enter 'q' to quit, any other key to continue:

************************************************************************
                            Updating BIOS...
************************************************************************

========================================================================
 Copyright 2024 Cix Technology Group Co., Ltd. All Rights Reserved.
                   FlashUpdate Utility v1.04.
                   Build Date:Mar 24 2025
========================================================================
Old Version:0.3.0-1
New Version:0.3.0-1
[00.17] Processing...
Flash update success.

************************************************************************
                         BIOS Update completed!
************************************************************************
System will now power off.
You MUST fully remove all connected power source before connecting them.
Failure to do so may prevent some components to use the updated code.

Enter 'q' to quit, any other key to continue:

Reset with BIOS Update (24 bytes)
使用烧录器更新 BIOS 固件
对于需要从损坏的 BIOS 中恢复或偏好直接硬件访问的高级用户,可以使用 Serial Flash 编程器(如 CH341A )将BIOS固件(cix_flash_all.bin)直接刷写到 SPI NOR Flash 芯片中。此方法完全绕过操作系统,即使在设备无法启动的情况下也能工作。
拆卸 SPI Flash 芯片
拆卸 SPI Flash 芯片步骤:
① : 找到主板上 SPI Flash 芯片的安装位置
② : 打开 SPI Flash 右边的卡扣盖子
③ : 打开 SPI Flash 左边的卡扣盖子
完成以上步骤后,使用镊子将 SPI Flash 芯片从主板上取下

烧录 BIOS 固件
有关详细的步骤说明和硬件要求,请参阅社区成员 Meco 提供的全面 论坛指南。
论坛指南教程所需要的 cix_flash_all.bin 文件位于下载 BIOS 包中。
安装 SPI Flash 芯片
① : 将 SPI Flash 芯片安装到主板上
② : 将 SPI Flash 左边的卡扣盖子安装回去
③ : 将 SPI Flash 右边的卡扣盖子安装回去
- 芯片的圆圈对应引脚 1 ,图中用红色小圆圈标注出来了。
- 安装 SPI Flash 的底座有一个三角箭头,对应 SPI Flash 的引脚 1
你可以通过以上两种方式确认 SPI Flash 的安装方向和位置。
