Install an operating system
The default account/password for the official images is radxa/radxa
This tutorial applies to all official images of Radxa products. There are two main methods of installing the operating system
- Burning the system image to a microSD card, eMMC Module or SSD via an reader. (Recommended)
- Burning the system image directly to eMMC, Nand Flash via USB cable.
Method I
- microSD
- eMMC Module
- NVMe SSD
Preparations
- Prepare a microSD card
- Prepare a microSD card reader
- Download corresponding product of the official system image
- Insert the microSD card into the microSD card reader and plug it into the USB port of the computer
Writing OS image to microSD card
We recommend using the open-source image flashing tool Etcher, developed by our partner Balena. Etcher has a user-friendly interface and powerful features, with support for Windows, Linux, and macOS systems. Next, we'll show you how to use Etcher to write an image to an SD card.
- Download Etcher and install it.
- Windows
- Linux
Please download balenaEtcher-Setup-1.18.11.exe After the download is complete, there is no need to perform any additional actions. After downloading, you can double click it to open it without any additional operation.
Please download balena-etcher_1.18.11_amd64.deb. Once the download is complete, please install it by executing the following command in the terminal:
sudo dpkg -i balena-etcher_1.18.11_amd64.deb
-
Open Etcher
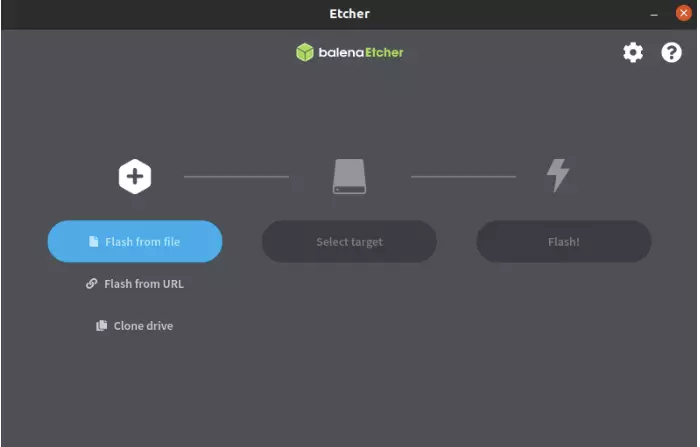
-
Open Etcher and click
Flash from fileto select the image to write to.
-
Click
Select targetto select the device, please select carefully.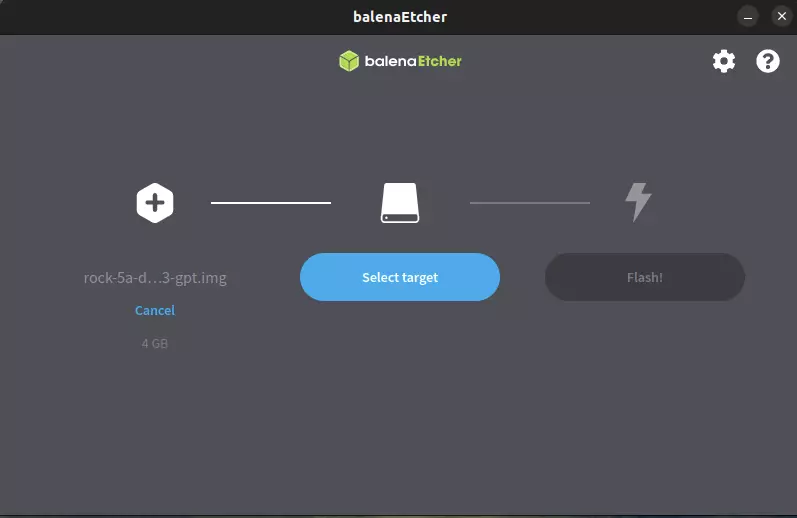
-
Click
Flash!Start writing and wait for the write progress bar to complete.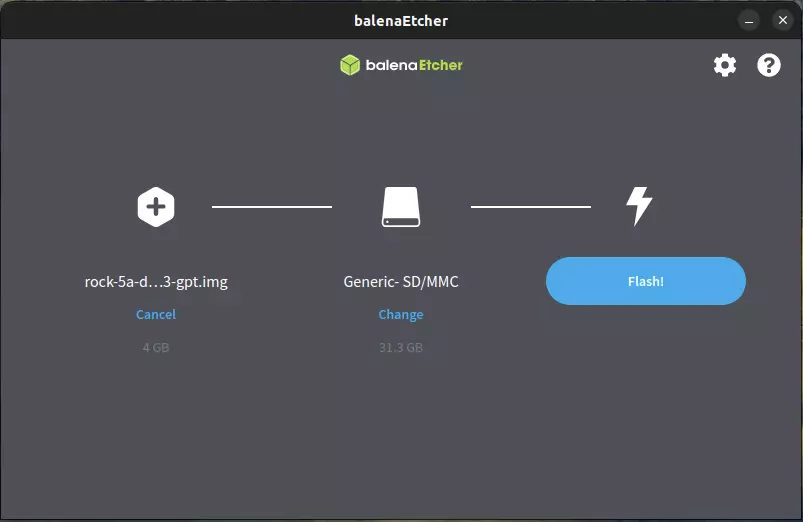
-
When writing the image successfully, Etcher will display
Flash Complete!.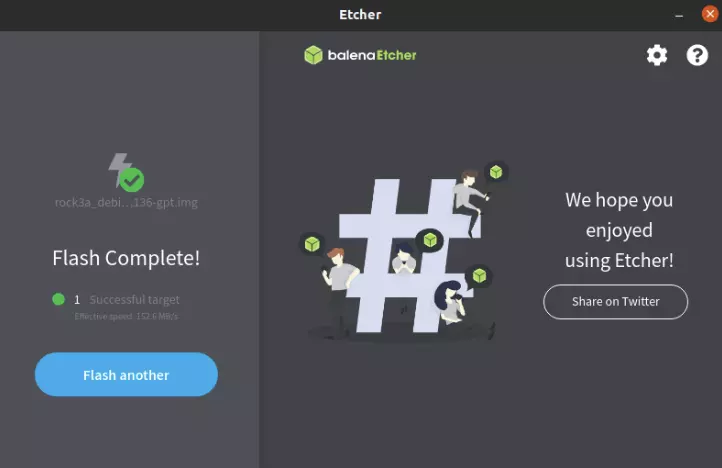
**If there is an error in flashing, please try again. **
- Starting the system
After successfully burning the microSD card according to the above steps,
insert the microSD card into the MicroSD slot of (as shown
below), power on the system with the  power adapter, and
then the system will start booting and HDMI will display the desktop.
- Logging in to the system
After the system has started, log in using the radxa account with the password radxa.
Preparations
This tutorial is only applicable to write removable eMMC modules, onboard eMMCs need to be flashed using rkdevtool.
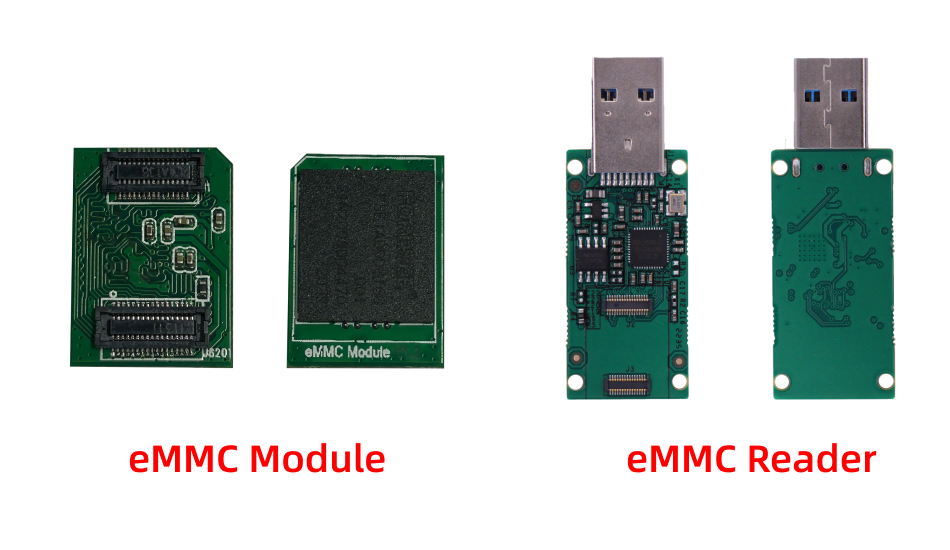
- Prepare an eMMC module and a Radxa eMMC reader
-
Download corresponding product of the official system image
-
Install the eMMC module into the Radxa eMMC USB reader and plug it into the USB port of the computer
When installing eMMC module, point the notched edges outwards, align them with their seats and press to tighten.
Writing OS image to EMMC Module
We recommend using the open-source image flashing tool Etcher, developed by our partner Balena. Etcher has a user-friendly interface and powerful features, with support for Windows, Linux, and macOS systems. Next, we'll show you how to use Etcher to write an image to an SD card.
- Download Etcher and install it.
- Windows
- Linux
Please download balenaEtcher-Setup-1.18.11.exe After the download is complete, there is no need to perform any additional actions. After downloading, you can double click it to open it without any additional operation.
Please download balena-etcher_1.18.11_amd64.deb. Once the download is complete, please install it by executing the following command in the terminal:
sudo dpkg -i balena-etcher_1.18.11_amd64.deb
-
Open Etcher

-
Open Etcher and click
Flash from fileto select the image to write to.
-
Click
Select targetto select the device, please select carefully.
-
Click
Flash!Start writing and wait for the write progress bar to complete.
-
When writing the image successfully, Etcher will display
Flash Complete!.
**If there is an error in flashing, please try again. **
- Starting the system
After successfully burning the microSD card according to the above steps,
insert the microSD card into the MicroSD slot of (as shown
below), power on the system with the  power adapter, and
then the system will start booting and HDMI will display the desktop.
- Logging in to the system
After the system has started, log in using the radxa account with the password radxa.
Preparation
- A Radxa products that support NVMe SSD
- Suitable power adapter
- M.2 NVMe SSD
- NVMe to USB 3.0 reader
- Download corresponding product of the official system image
- Insert the NVMe SSD into the NVMe SSD to USB 3.0 reader and plug it into the USB port of the computer
Writing OS images to M.2 NVMe SSD
We recommend using the open-source image flashing tool Etcher, developed by our partner Balena. Etcher has a user-friendly interface and powerful features, with support for Windows, Linux, and macOS systems. Next, we'll show you how to use Etcher to write an image to an SD card.
- Download Etcher and install it.
- Windows
- Linux
Please download balenaEtcher-Setup-1.18.11.exe After the download is complete, there is no need to perform any additional actions. After downloading, you can double click it to open it without any additional operation.
Please download balena-etcher_1.18.11_amd64.deb. Once the download is complete, please install it by executing the following command in the terminal:
sudo dpkg -i balena-etcher_1.18.11_amd64.deb
-
Open Etcher

-
Open Etcher and click
Flash from fileto select the image to write to.
-
Click
Select targetto select the device, please select carefully.
-
Click
Flash!Start writing and wait for the write progress bar to complete.
-
When writing the image successfully, Etcher will display
Flash Complete!.
**If there is an error in flashing, please try again. **
- Starting the system
After successfully burning the microSD card according to the above steps,
insert the microSD card into the MicroSD slot of (as shown
below), power on the system with the  power adapter, and
then the system will start booting and HDMI will display the desktop.
- Logging in to the system
After the system has started, log in using the radxa account with the password radxa.
Done! You have now successfully installed the OS image on your M.2 NVMe SSD.
Erase M.2 NVMe SSDs
If the M.2 NVMe SSD was previously burned with an Android (or Linux) image, it is recommended that you erase the M.2 NVMe SSD before re-burning and then write the target image.
Boot from NVMe SSD
After writing the image to the NVMe SSD, to boot from the NVMe SSD you need to write the bootloader to the SPI Flash.
Method II
If your device uses a Rockchip chip, refer to the following tutorial:
My computer is Windows
rkdevtool
This article is not about rkdeveloptool (for Linux / macOS).
RKDevTool is a USB flashing software developed by Rockchip for Windows platforms.
Installation of RKDevTool
Please download and extract the following files to install RKDevTool:
- RKDevTool v2.86
- RKDevTool v2.96 (Includes Chinese documentation)
- DriverAssistant v5.0
Installation of drivers
Download and unzip DriverAssistant, then execute DriverInstall.exe and click the Install Driver button to install the driver.
If you have previously installed another version of driver, please click Uninstall Driver to uninstall the driver first and then reinstall it.
Write file to device
Run RKDevTool
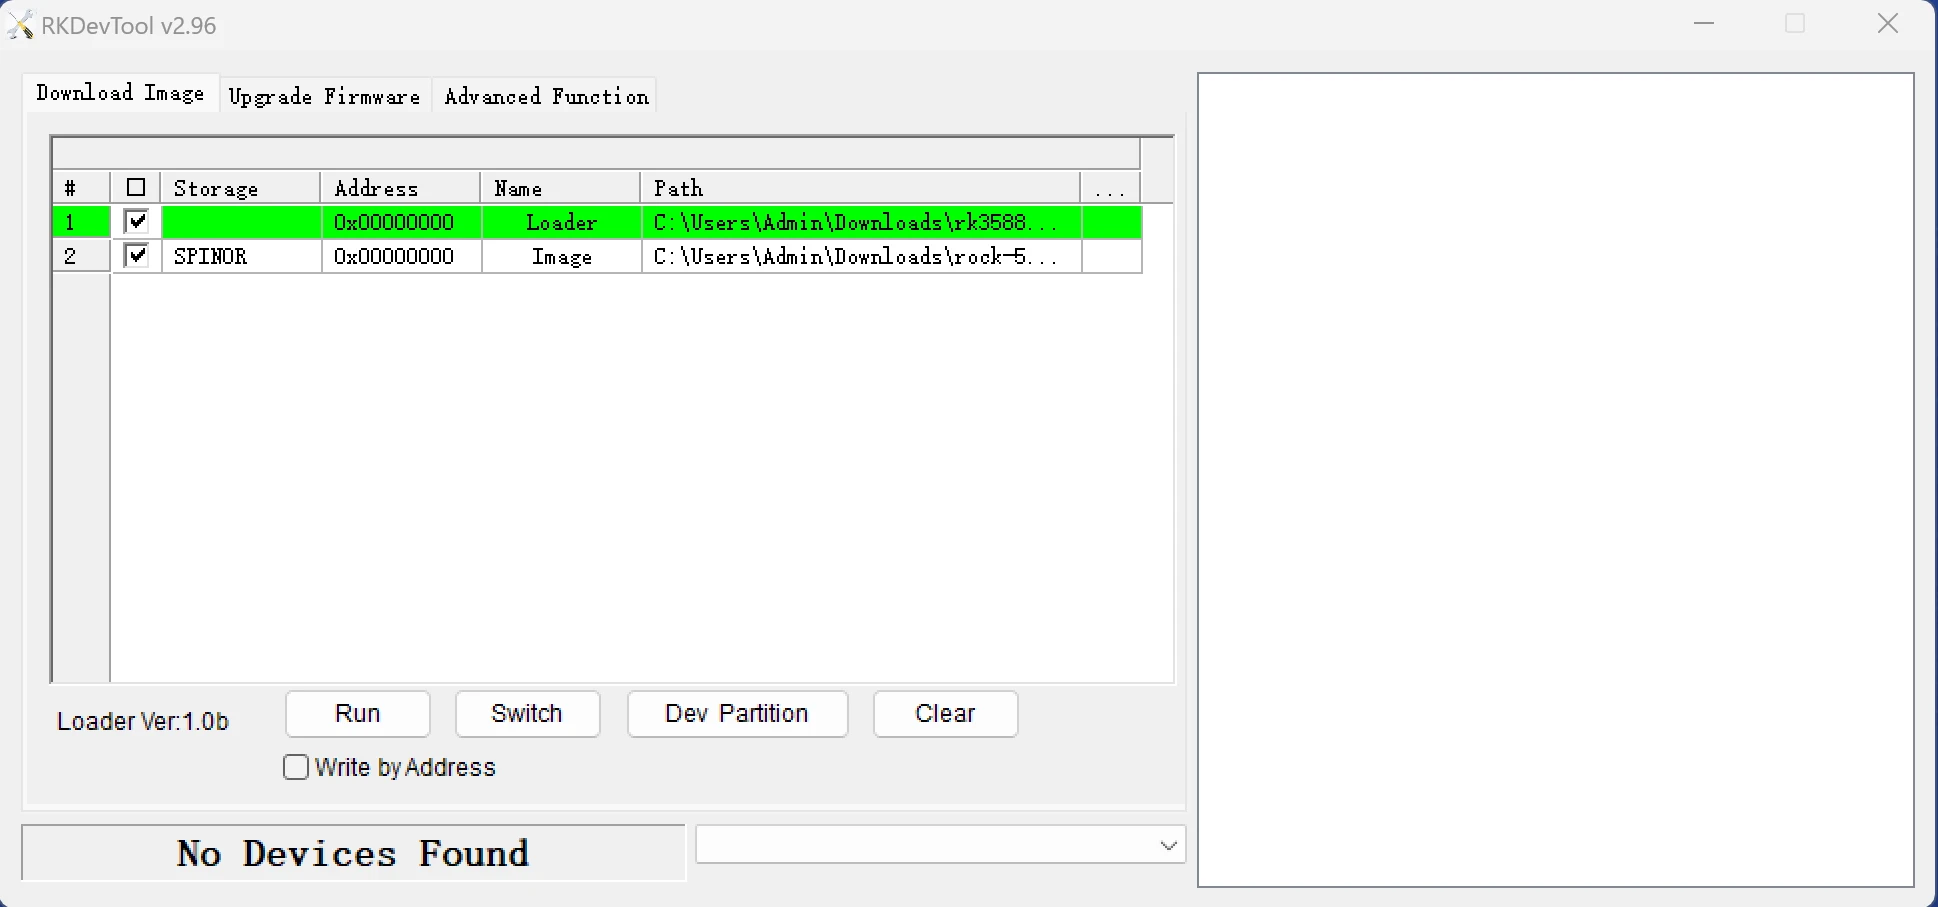
Connect the product and enter Maskrom mode
Please refer to the instructions of the product for operation. The way to enter Maskrom mode varies slightly from product to product.
If the operation is normal, RKDevTool will prompt Found One MASKROM Device:
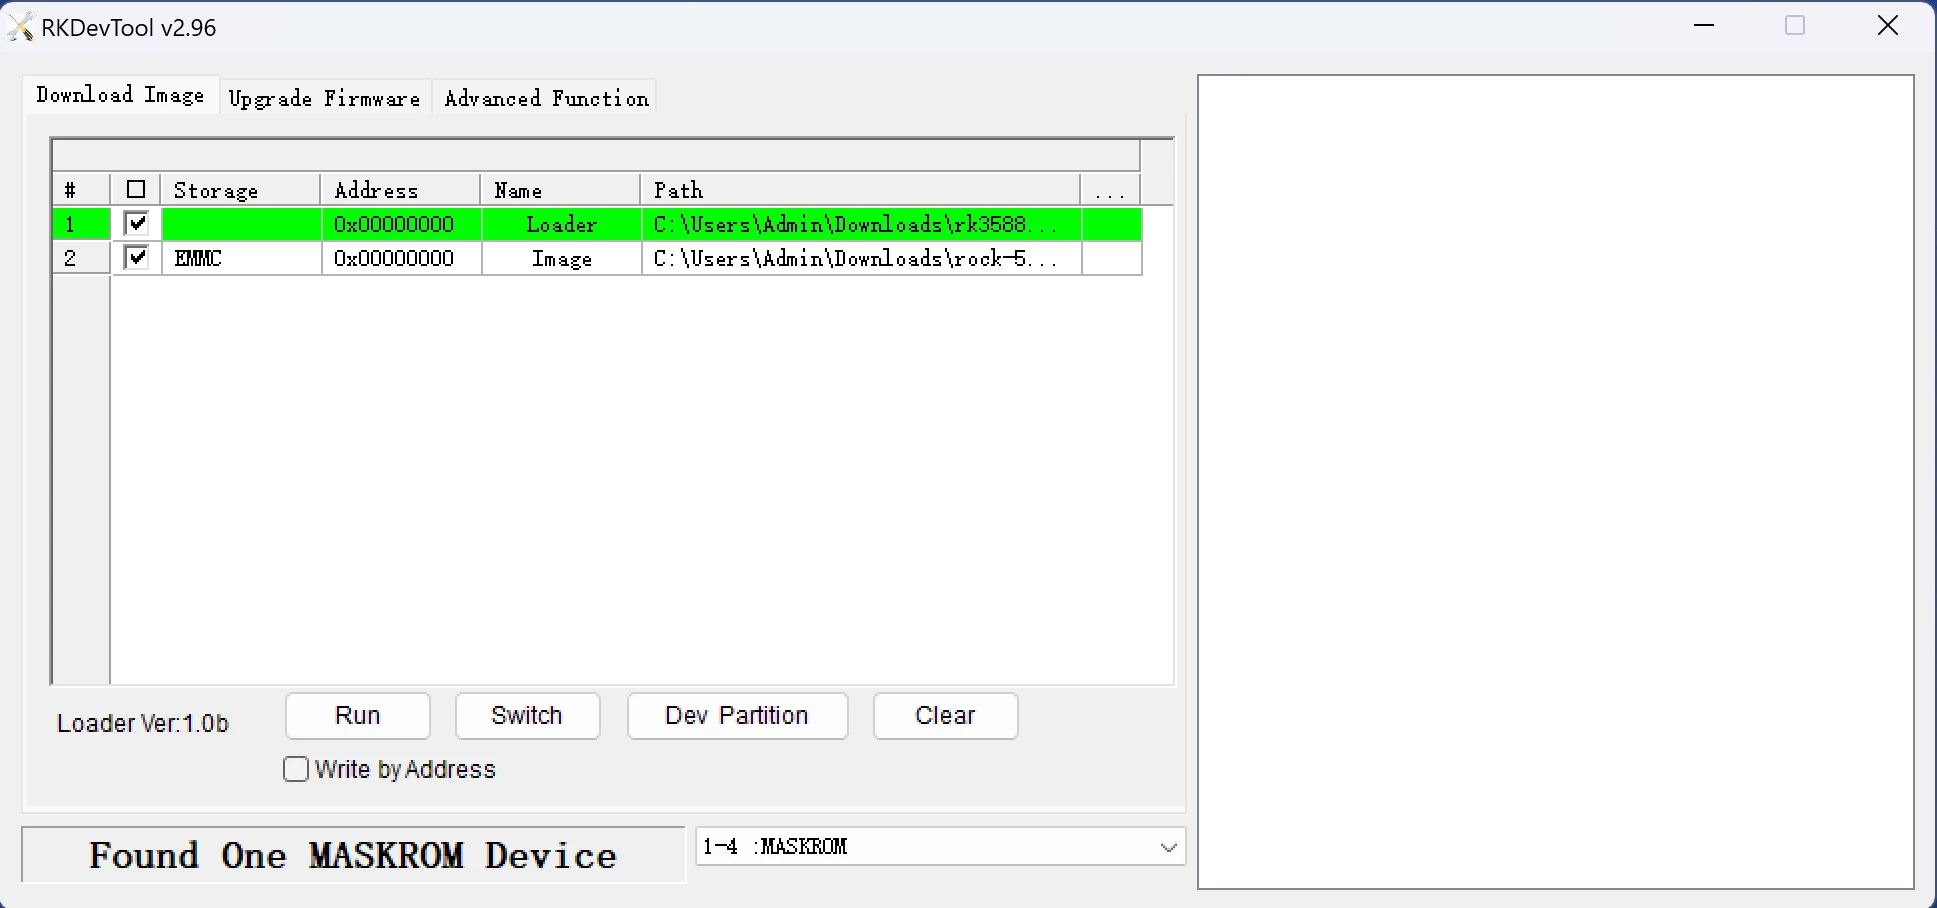
Although RKDevTool supports the selection of Maskrom devices, writing to multiple devices at the same time will result in a write failure for the device being written to.
If you need to write to multiple devices at the same time, use upgrade_tool.
Configuring RKDevTool Write Parameters
RKDevTool does not automatically decompress compressed files when writing to them.
First extract the used files and specify the extracted files in the RKDevTool.
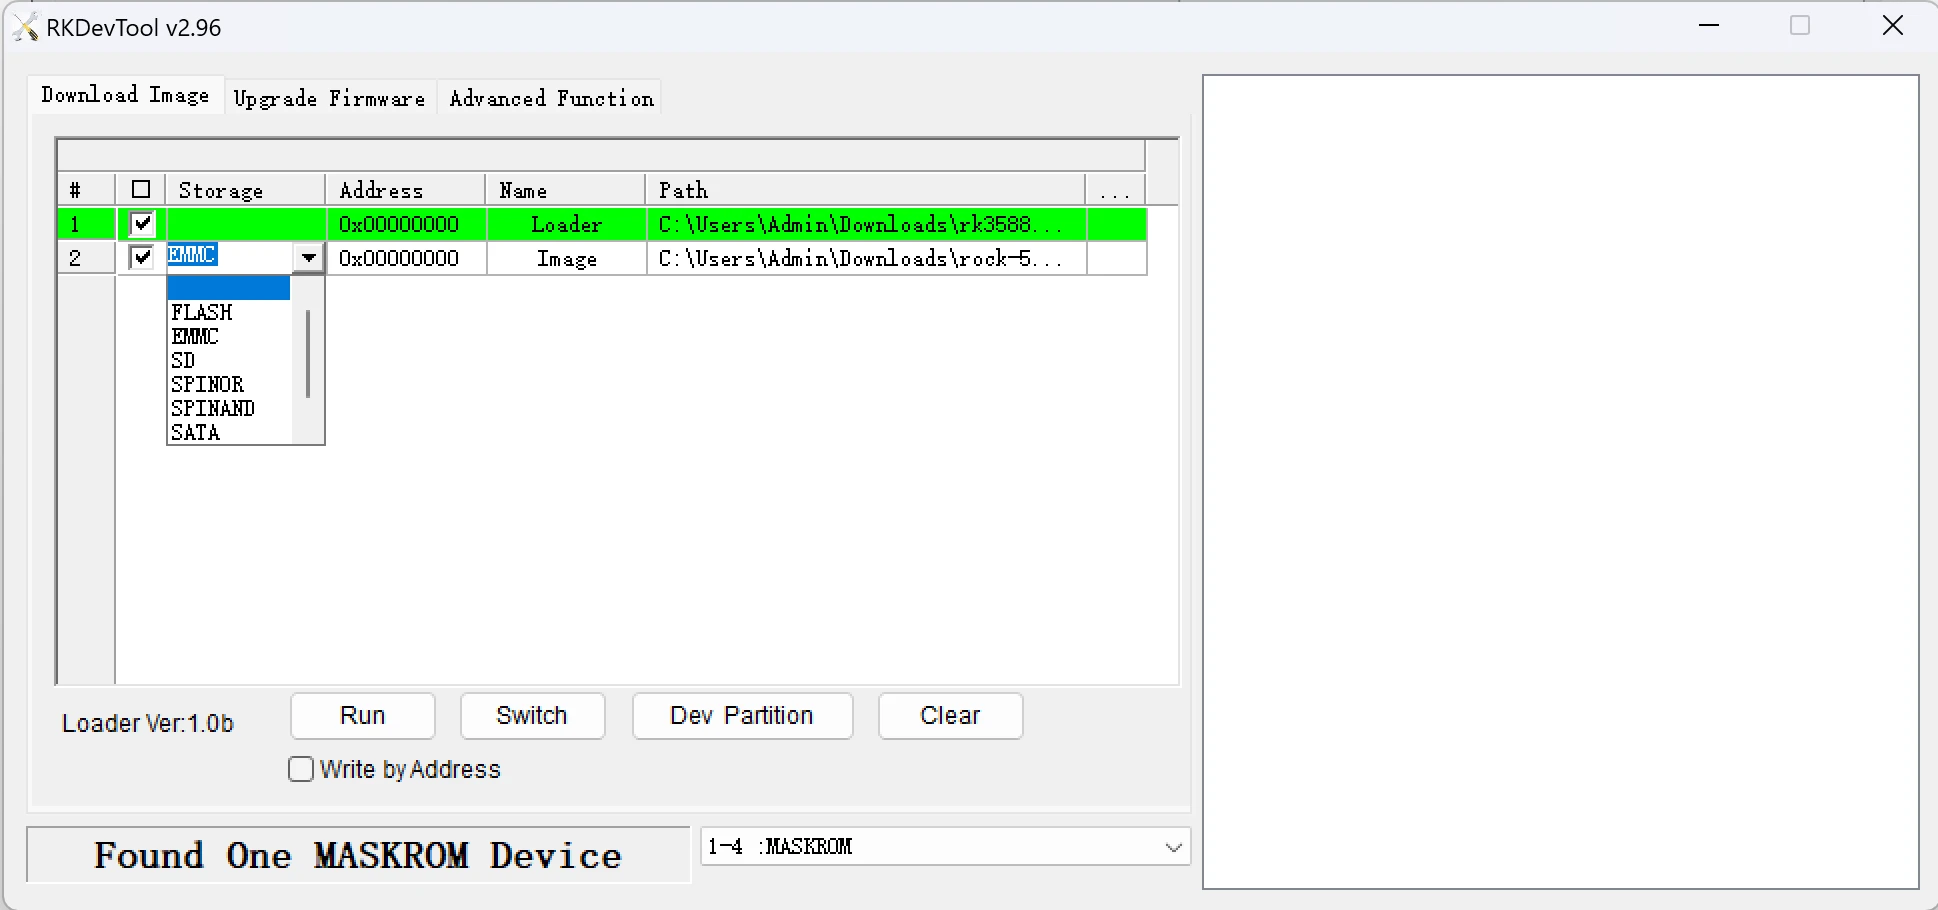
Click a blank cell to select the Loader and Image file to be used(see the File Download at the below):
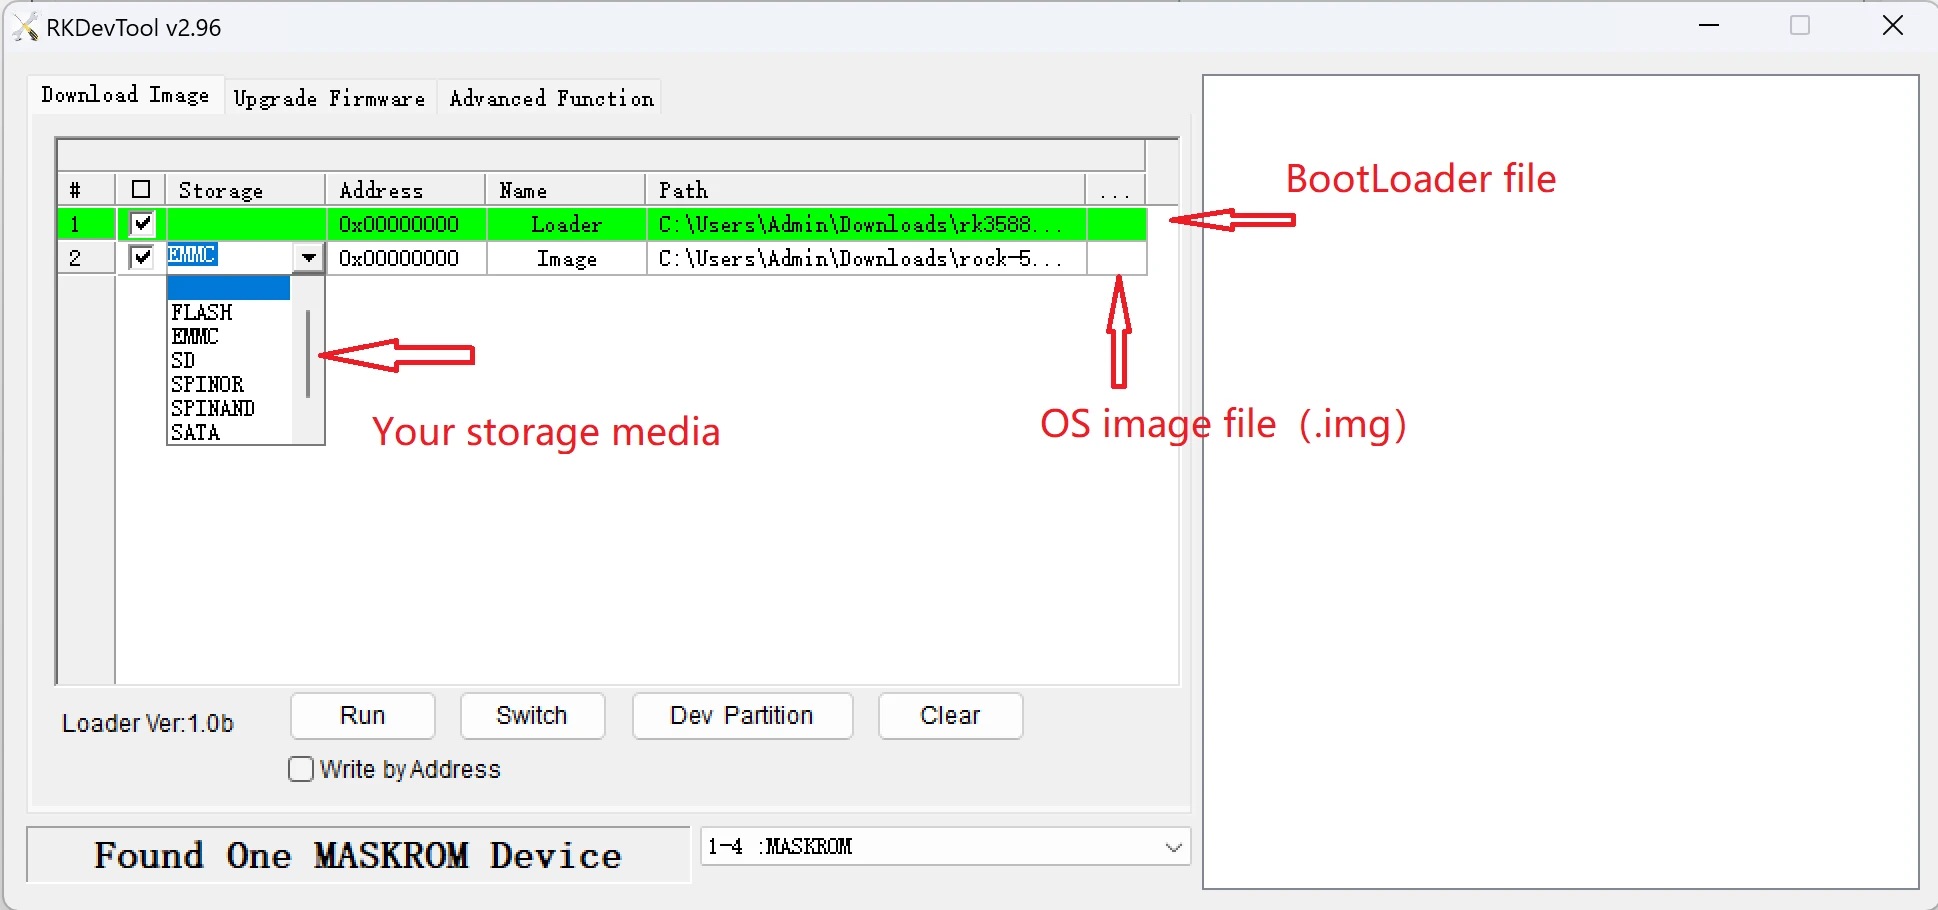
Select the target media in the Storage option:
In general, if you just want to boot from sdcard or Emmc, no need flash SPINOR
- eMMC
- SPINOR
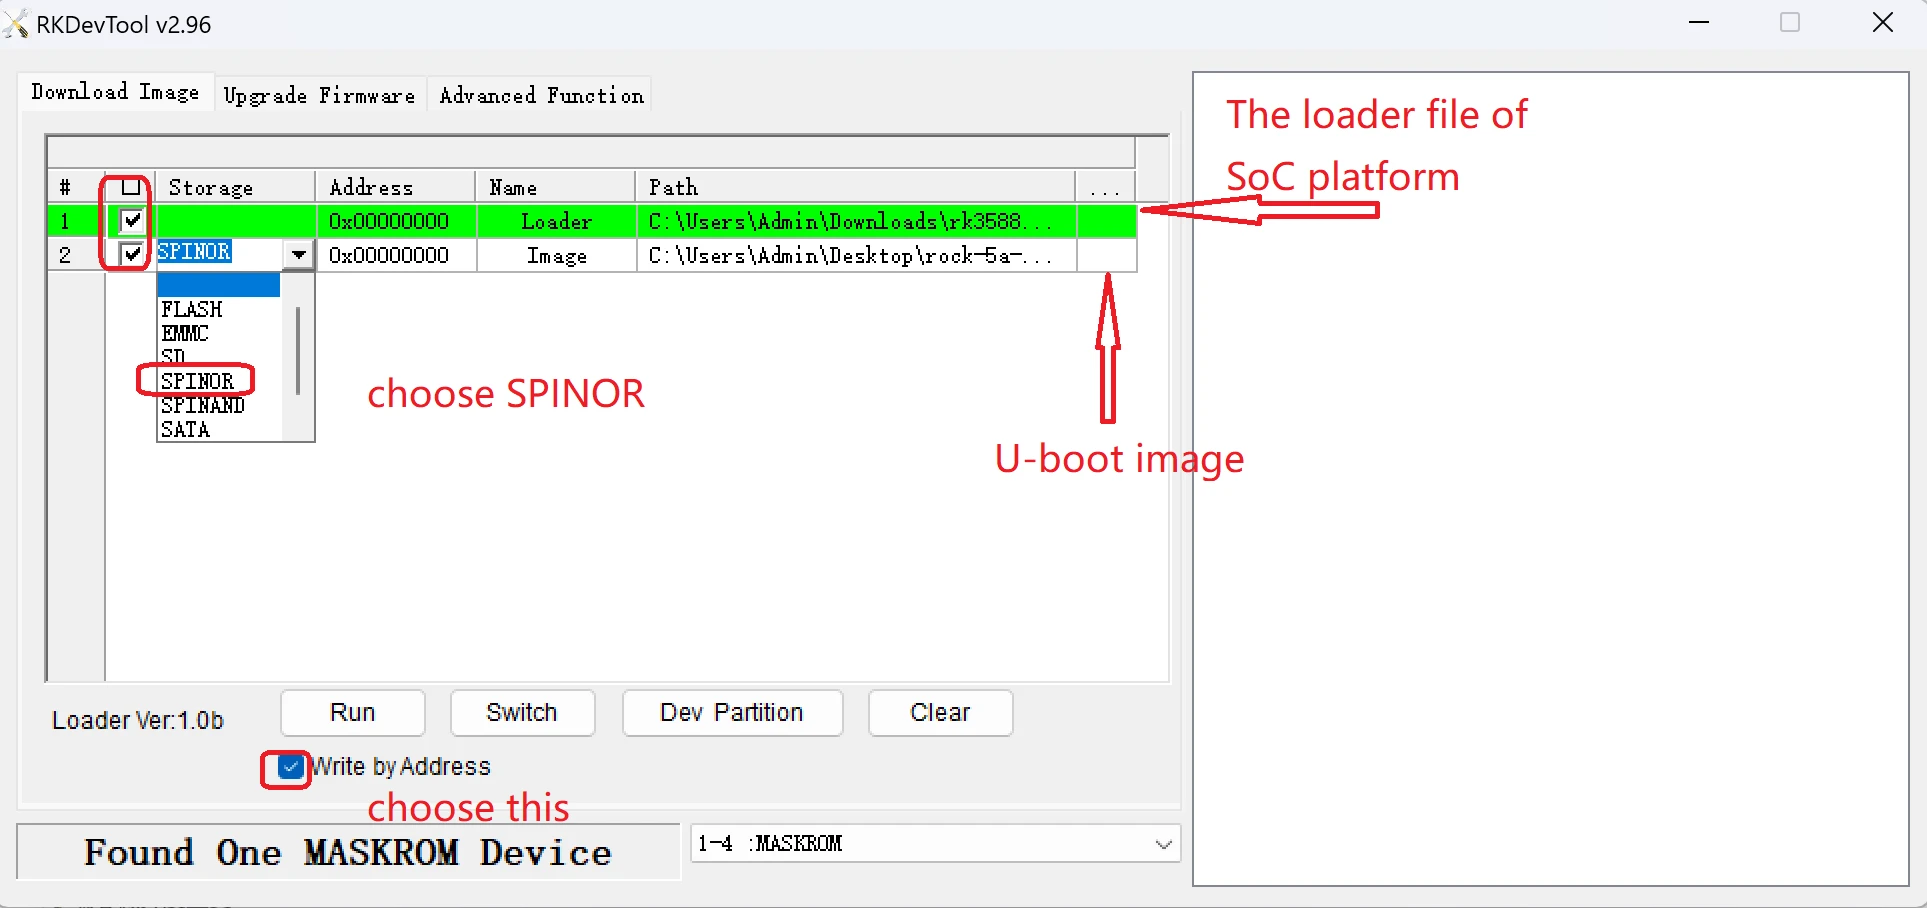
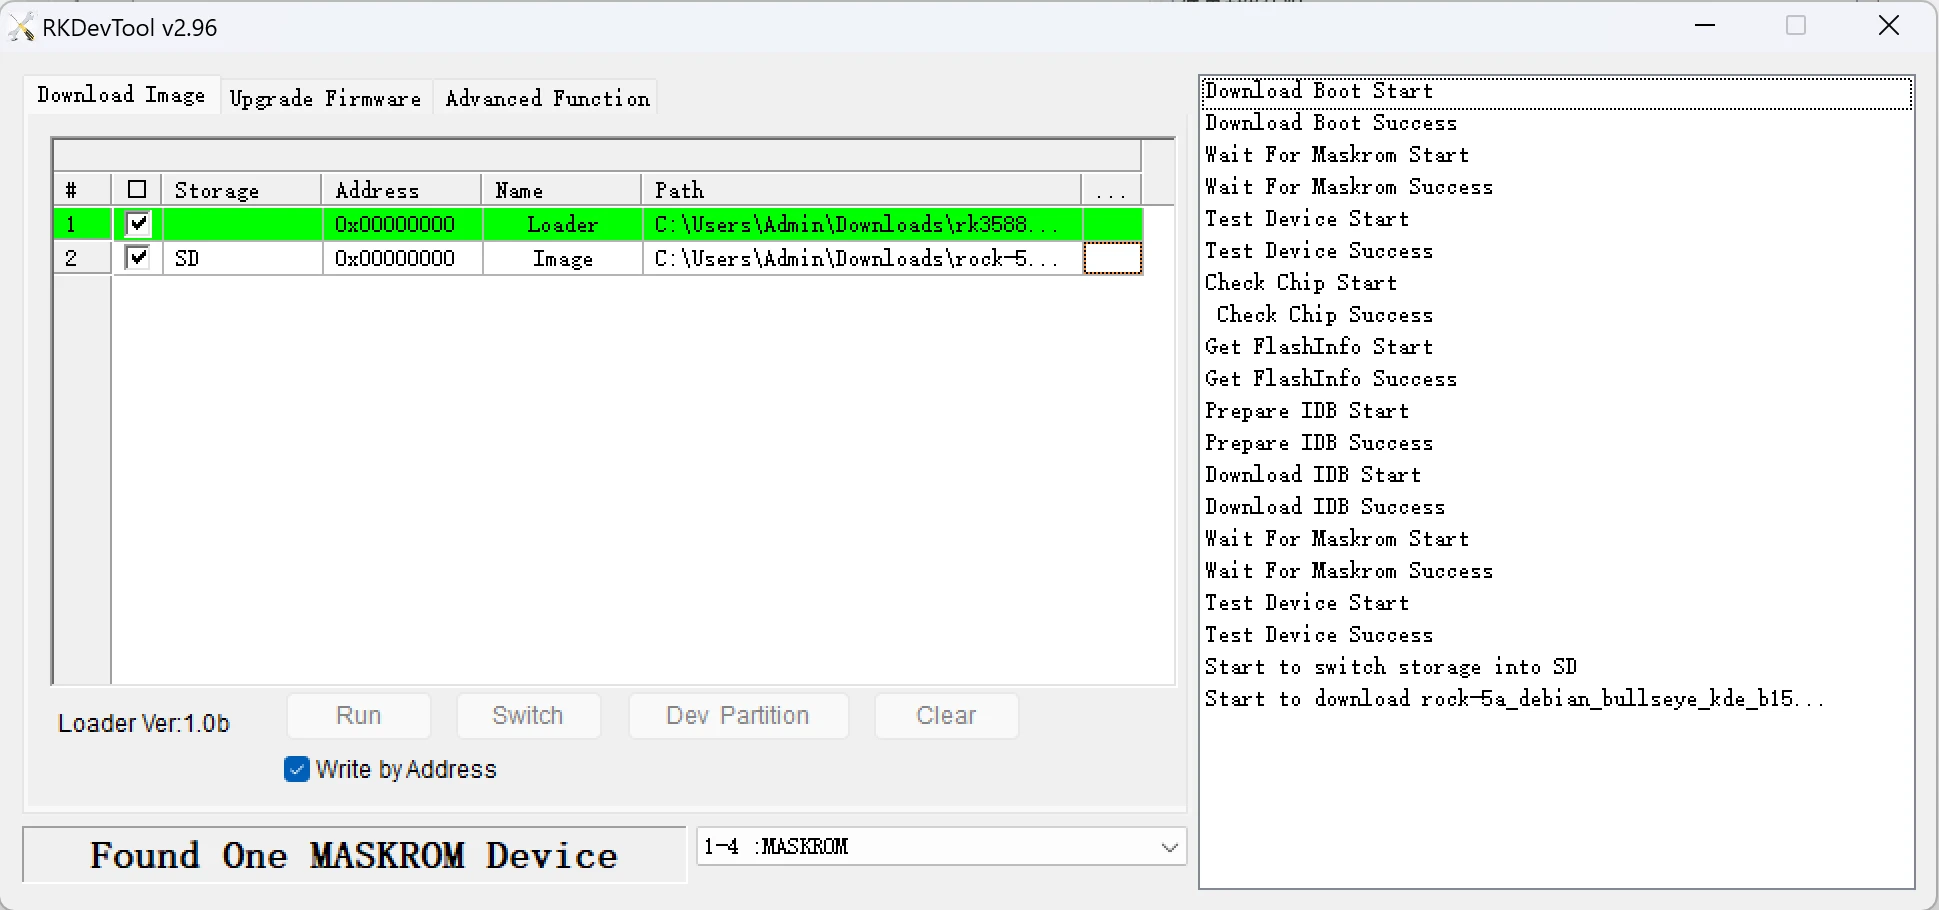
Select Write by Address and click run:
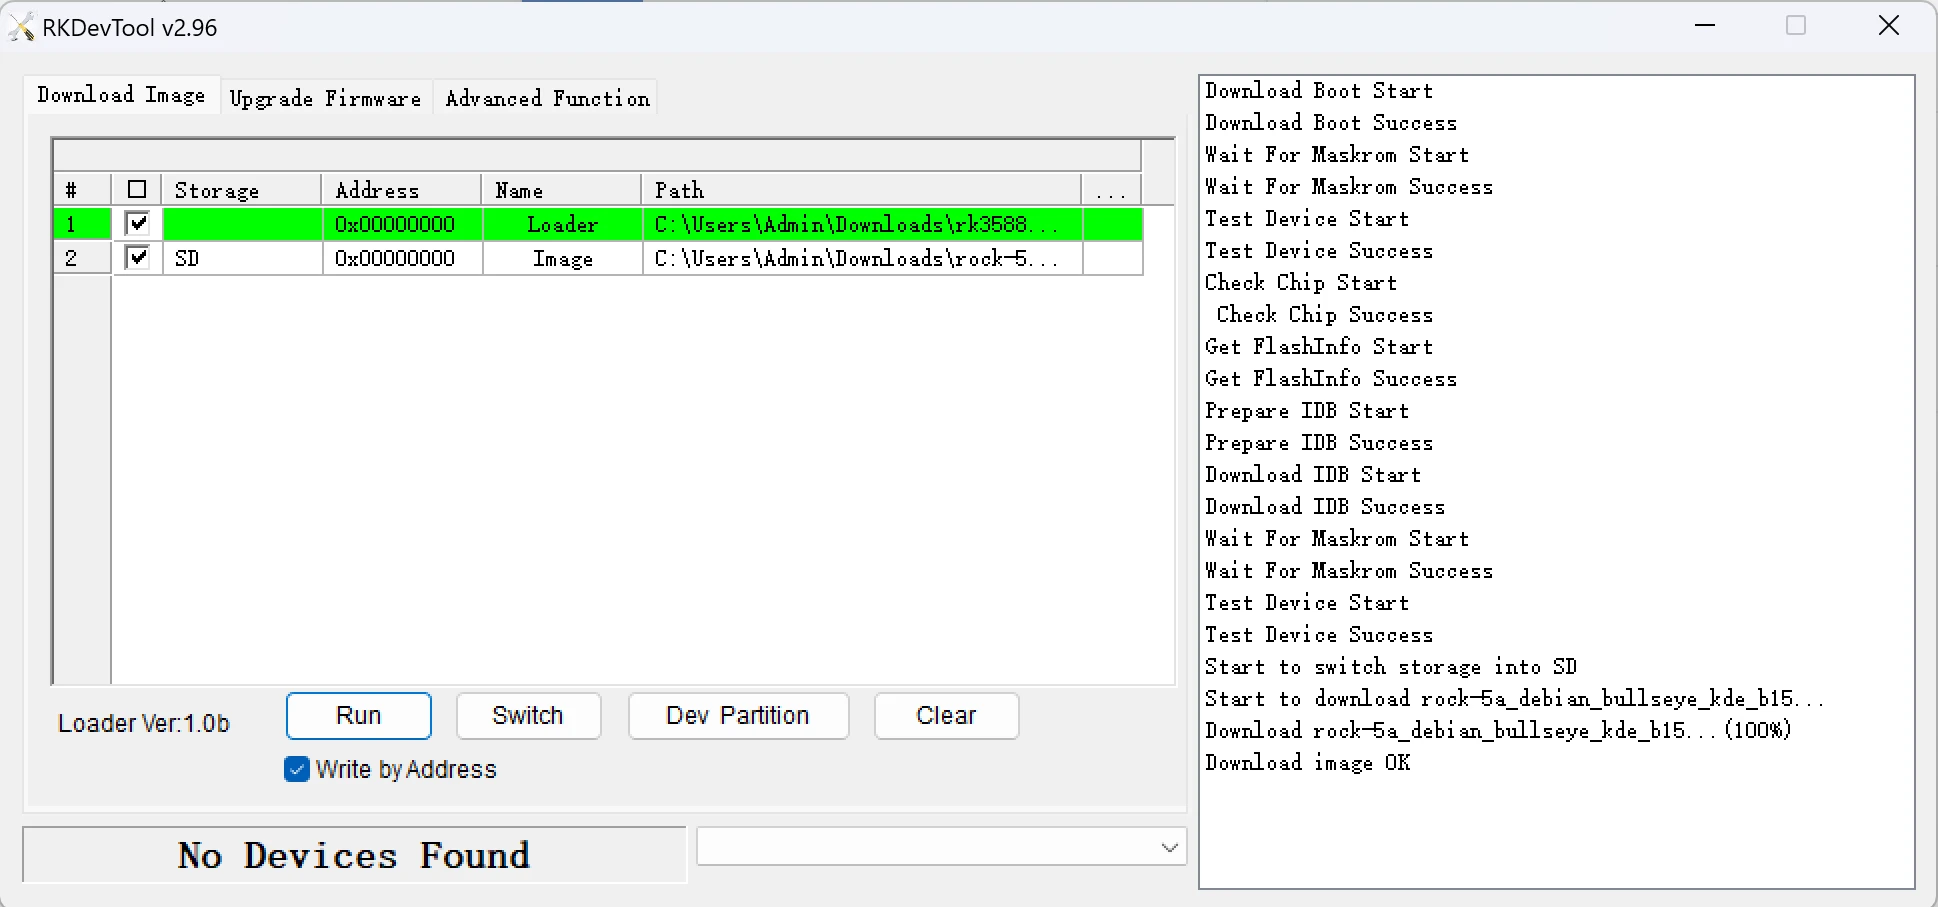
Wait for the write to complete, after which the device will reboot automatically:
File Download
SPI U-Boot and Loader:
The SPI/U-boot/loader file is related to the SoC model, you can find it in the following list according to the corresponding SoC model of the product.
-
ROCK PI S Family: (Corresponding SoC models: RK3308/RK3308B)
-
ROCK 3 / Zero 3 Family: (Corresponding SoC models: RK3566/RK3568/RK3568J)
-
ROCK 4 Family: (Corresponding SoC models: RK3399/RK3399-T/RK3399(Rockchip OP1))
-
ROCK 5 Family: (Corresponding SoC models: RK3588/RK3588S/RK3588S2)
Image:
Reference to the current product's system os download page.
My computer is Linux / macOS
Rkdeveloptool
rkdeveloptool
This article is not about RKDevTool (for Windows).
rkdeveloptool is a USB flashing software developed by Rockchip for Linux/macOS platforms.
rkdeveloptool can be thought of as upgrade_tool for open source version.
Installation for rkdeveloptool
If your operating system does not provide rkdeveloptool, you will need to compile and install it from source.
- Arch Linux
- Debian
- macOS
The rkdeveloptool can be installed from AUR.
Execute the following command from the command line to install:
sudo apt-get update
sudo apt-get install -y libudev-dev libusb-1.0-0-dev dh-autoreconf pkg-config libusb-1.0 build-essential git wget
git clone https://github.com/rockchip-linux/rkdeveloptool
cd rkdeveloptool
autoreconf -i
./configure
make -j $(nproc)
sudo cp rkdeveloptool /usr/local/sbin/
Please install Homebrew first, then run the following command from the command line to install it:
brew install automake autoconf libusb pkg-config git wget
git clone https://github.com/rockchip-linux/rkdeveloptool
cd rkdeveloptool
autoreconf -i
./configure
make -j $(nproc)
cp rkdeveloptool /opt/homebrew/bin/
Usage for rkdeveloptool
View connected Maskrom devices
rkdeveloptool ld
Write file
rkdeveloptool does not automatically decompress compressed files when writing to them.
First extract the used files and specify the extracted files in rkdeveloptool.
rkdeveloptool does not support the selection of Maskrom devices, nor can it select the storage media to be written to. Normally when using rkdeveloptool, only a device and a storage medium are connected in hardware. This step cannot be controlled by software.
If you need to write to multiple devices at the same time, use upgrade_tool.
sudo rkdeveloptool db <loader>
sudo rkdeveloptool wl 0 <image>
Download links for the required Loader and Image files can be found below.
SPI U-Boot and Loader
The SPI/U-boot/loader file is related to the SoC model, you can find it in the following list according to the corresponding SoC model of the product.
-
ROCK PI S Family: (Corresponding SoC models: RK3308/RK3308B)
-
ROCK 3 / Zero 3 Family: (Corresponding SoC models: RK3566/RK3568/RK3568J)
-
ROCK 4 Family: (Corresponding SoC models: RK3399/RK3399-T/RK3399(Rockchip OP1))
-
ROCK 5 Family: (Corresponding SoC models: RK3588/RK3588S/RK3588S2)
Reboot device
sudo rkdeveloptool rd
upgrade-tool (Multiple devices can be burned at the same time)
upgrade_tool is the software developed by Rockchip for USB flashing on Linux platform.
Installation for upgrade_tool
Please download and extract the following file to install upgrade_tool:
Usage for upgrade_tool
- Command Line Mode
- Interactive Mode
upgrade_tool is used in command line mode similar to rkdeveloptool.
In command line mode, upgrade_tool does not support the selection of a Maskrom device, nor can it select the storage media to be written to.
If you need to select a specific one from multiple devices, use interactive mode.
View connected Maskrom devices
./upgrade_tool ld
Write file
upgrade_tool does not automatically decompress compressed files when writing to them.
First extract the used files and specify the extracted files in upgrade_tool.
sudo ./upgrade_tool db <loader>
sudo ./upgrade_tool wl 0 <image>
Download links for the required Loader and Image files can be found below.
Reboot device
sudo ./upgrade_tool rd
If upgrade_tool is executed without any arguments, it will automatically enter interactive mode.
This mode will first ask to select the device to be written to:
$ sudo ./upgrade_tool
Using /home/rock/Linux_Upgrade_Tool/config.ini
Program Log will save in the /root/upgrade_tool/log/
List of rockusb connected
DevNo=1 Vid=0x2207,Pid=0x350b,LocationID=21     Mode=Maskrom
DevNo=2 Vid=0x2207,Pid=0x350b,LocationID=22     Mode=Maskrom
DevNo=3 Vid=0x2207,Pid=0x350b,LocationID=23     Mode=Maskrom
Found 3 rockusb,Select input DevNo,Rescan press <R>,Quit press <Q>:
After selecting the device, upgrade_tool displays all commands available in the current mode. Thereafter the operation is similar to command line mode.
SPI U-Boot and Loader
The SPI/U-boot/loader file is related to the SoC model, you can find it in the following list according to the corresponding SoC model of the product.
-
ROCK PI S Family: (Corresponding SoC models: RK3308/RK3308B)
-
ROCK 3 / Zero 3 Family: (Corresponding SoC models: RK3566/RK3568/RK3568J)
-
ROCK 4 Family: (Corresponding SoC models: RK3399/RK3399-T/RK3399(Rockchip OP1))
-
ROCK 5 Family: (Corresponding SoC models: RK3588/RK3588S/RK3588S2)
Parallel Write
Since upgrade_tool blocks the current terminal when writing to a device, if you need to write to multiple devices at the same time, you need to execute upgrade_tool multiple times to create multiple interactive mode sessions.