ROOBI OS User Guide
Prerequisites
Reading this document requires no professional computer skills.
Supported Devices
Operating Guide
Accessing the Roobi Interface
- X Series
- ROCK 5 ITX
Before powering on, use a sharp object to press the recovery button and hold it. Simultaneously, press the power button (press and immediately release) to power on until the monitor lights up, then release the recovery button.
- If your storage medium does not contain bootable content, ROOBI OS will boot by default.
- If you want to re-enter ROOBI after installing the system: Before booting, short RECOVERY at number 24 and boot.
Select Your Language
After entering the interface, you will see the following screen:

You can select your language on this screen.
Once selected, click the start button.
Read and Agree to the Terms of Use
You must agree to the terms of use to proceed with the next steps. After reading and agreeing to the terms, check the checkbox and click Next.
Check Network
The system will automatically check your network. If your network is normal, it will pass the check.
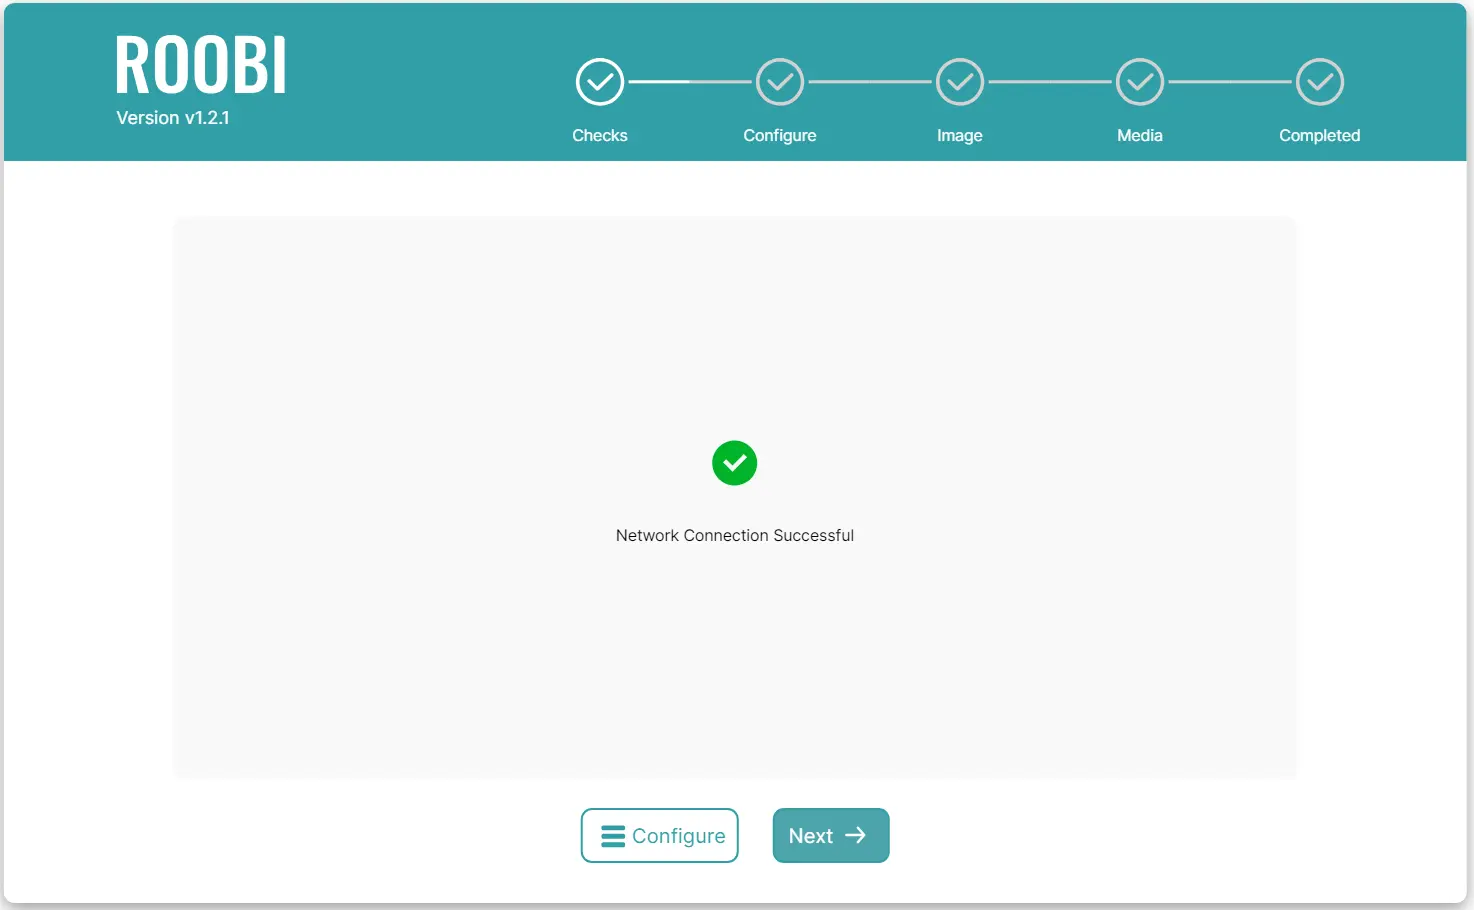
If your network is detected as abnormal, you may need to configure it manually. Please refer to Configure Network.
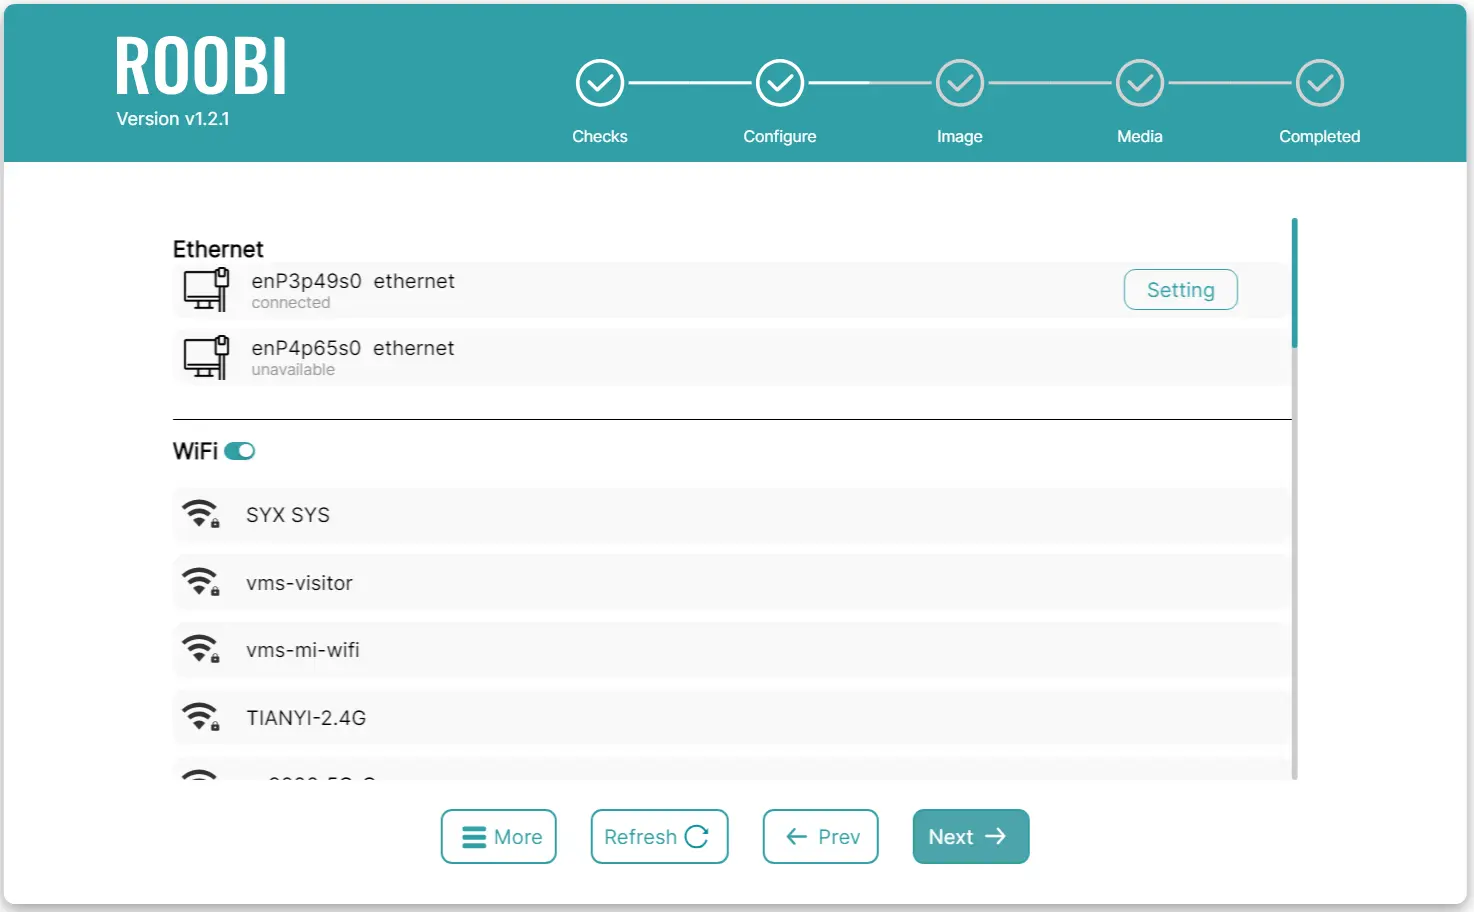
Configure Network
You may need to perform the following steps for configuration. Please note that not every step needs to be executed; choose according to your actual usage environment.
-
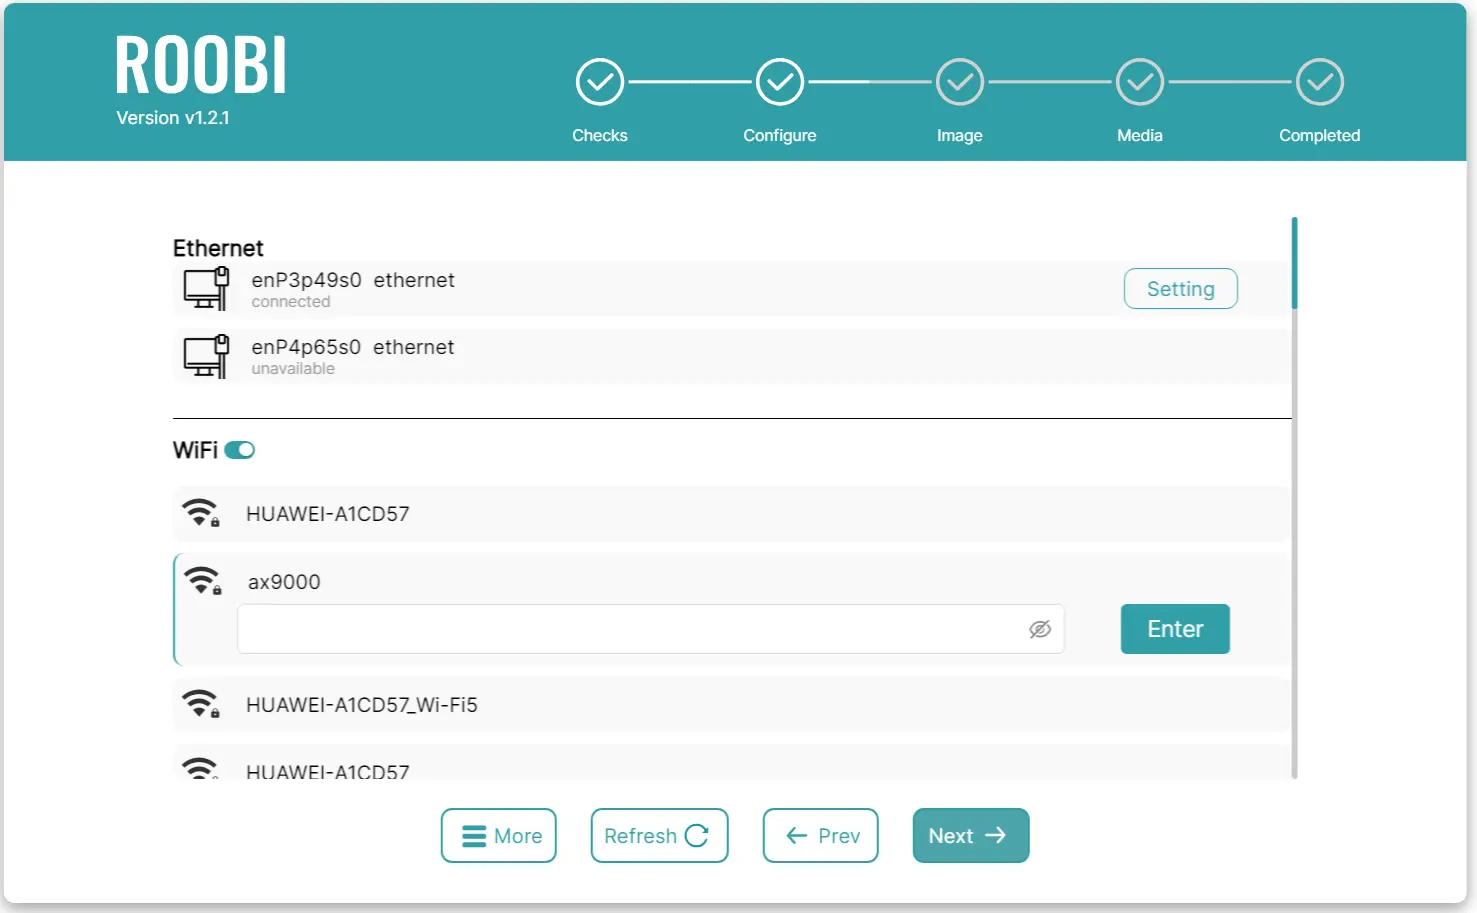
Connect to WiFi: If you are not using a wired network connection, you need to connect to WiFi to proceed. Select your WiFi name, click on the entry, and enter your password. If you are using an unencrypted WiFi, leave the password field blank and click Connect.
-
Configure Ethernet Connection: If your network environment does not support DHCP (please consult your network administrator), you need to set a static IP. Note that this setting only applies to IPv4.
-
Select an Ethernet interface.
-
Click on the settings of this entry.
-
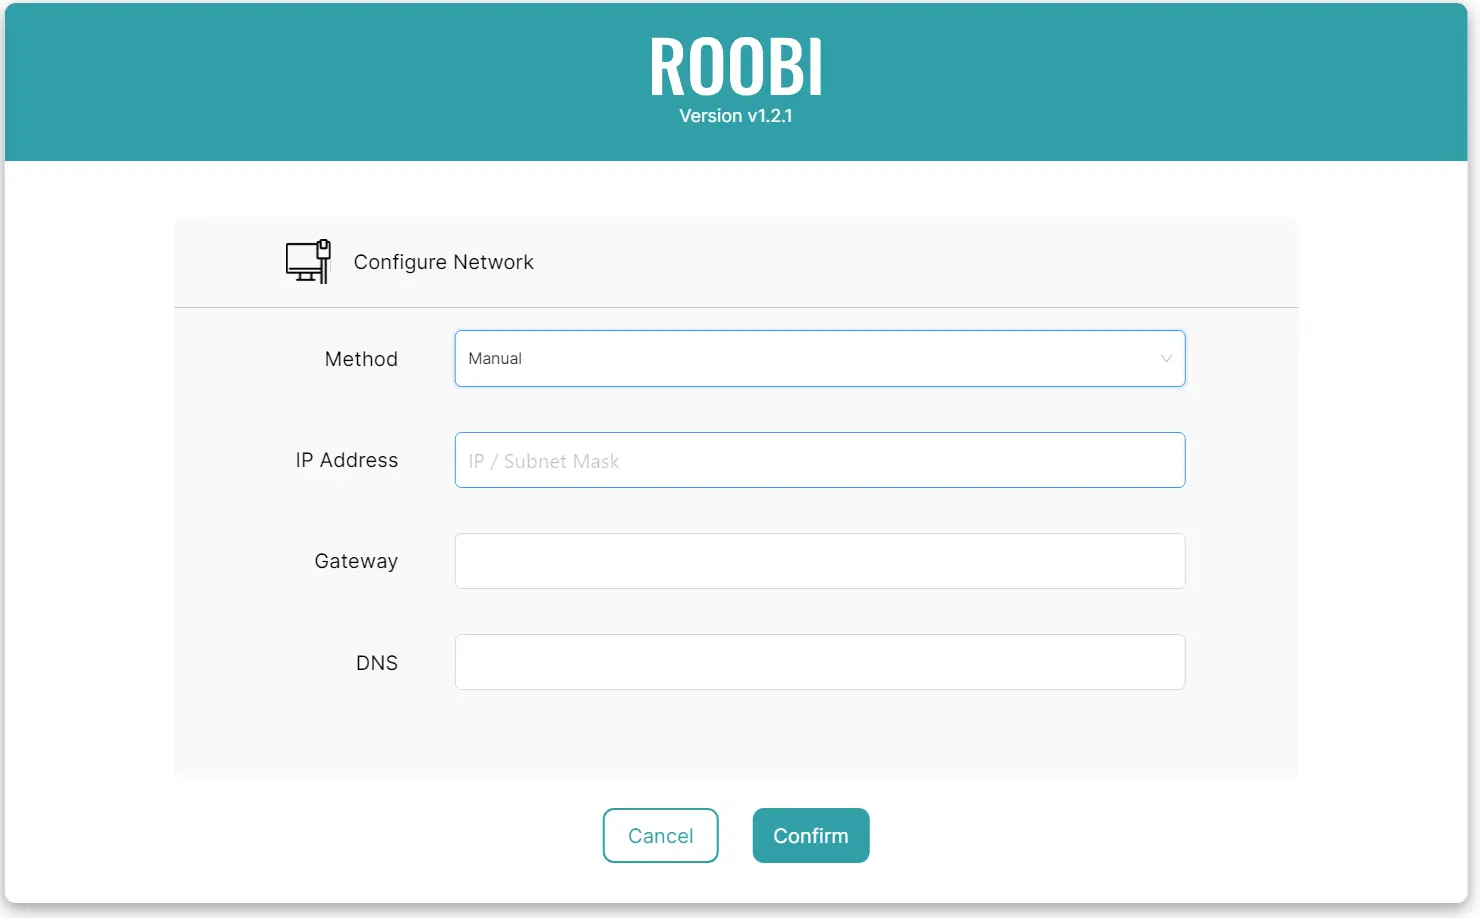
There are three options for the method:
- Auto: This method specifies that the network interface will automatically obtain IP configuration through DHCP (Dynamic Host Configuration Protocol). This is the most commonly used setting as it does not require manual configuration of IP addresses and network information. Typically, you do not need to perform this setting because it is the default option.
- Manual: If you want to manually set a static IP address, you need to use the manual method and specify the IP address, subnet mask, and default gateway. You are most likely to need this setting, which requires three parameters:
- IP Address: Obtain your IP address and subnet mask from your network administrator and enter them in the input field in the format of IP/mask. For example (192.168.2.1/24), the mask is a number between 0 and 32, and you may receive a subnet mask like 255.255.255.0, which you need to convert into numbers.
- Gateway: Enter your gateway address.
- DNS: Enter your DNS.
Shared: This method allows your network interface to share its connection. When using this mode, the system sets up a small DHCP server and provides network connections to other devices. This is typically used when your computer acts as a temporary access point. In most cases, you do not need to perform this network configuration.- Disable: If you do not want the network interface to use IPv4, you can disable IPv4 completely. You can configure this item when there is a conflict with the accessed network port.
-
-
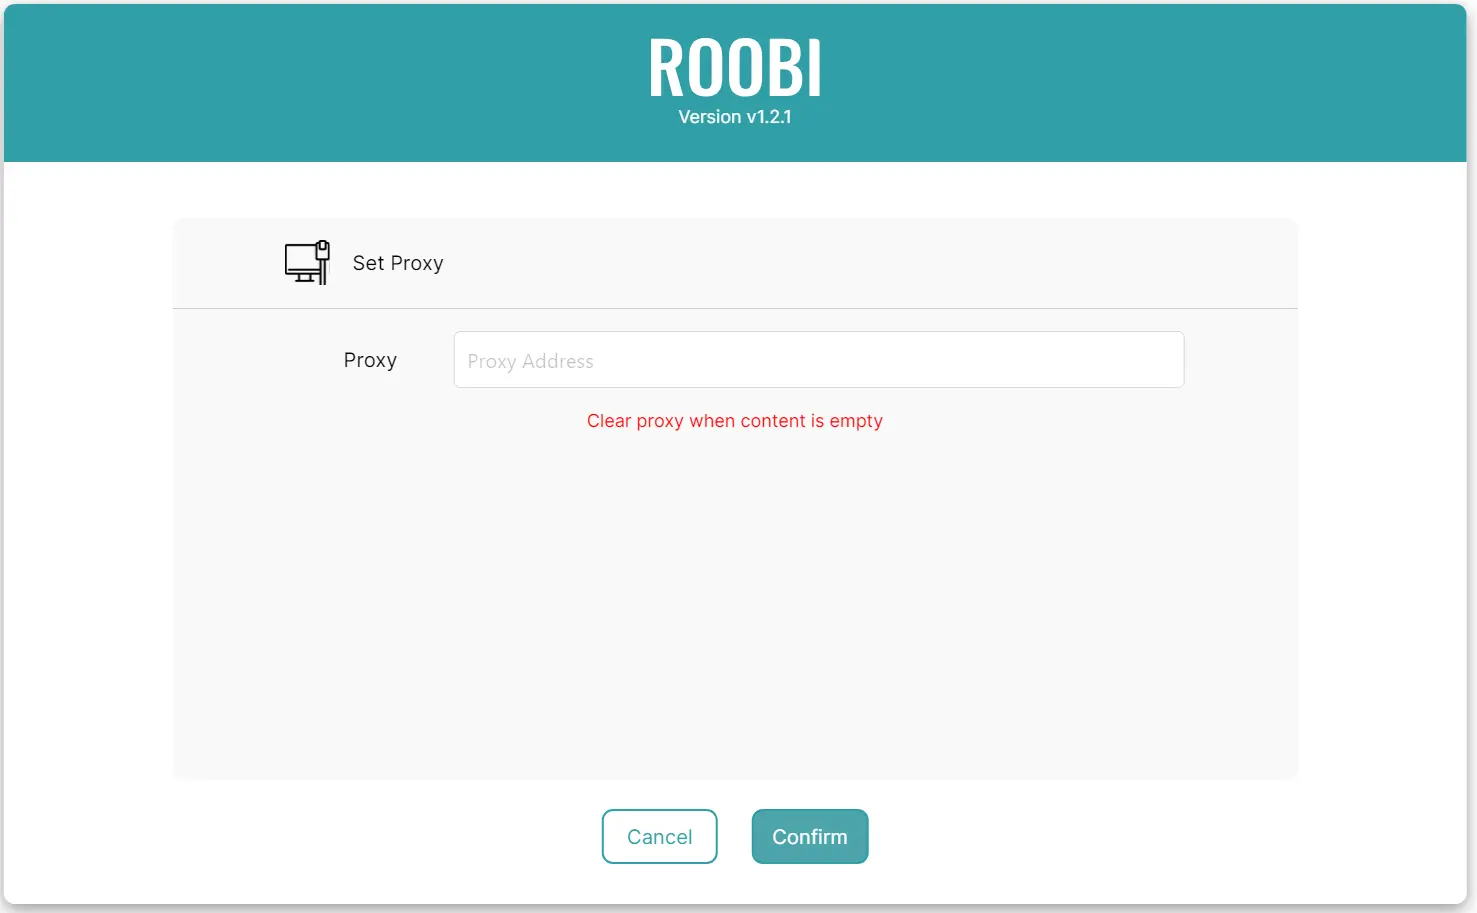
Set Proxy: If your usage environment does not have direct internet access, a proxy server may be provided for internet access. You only need to fill in the proxy address, and the system backend will automatically proxy all http and https requests. (Front-end images may not be proxied, which does not affect your next installation.)
The network information you set here usually will not carry over to the newly installed system.
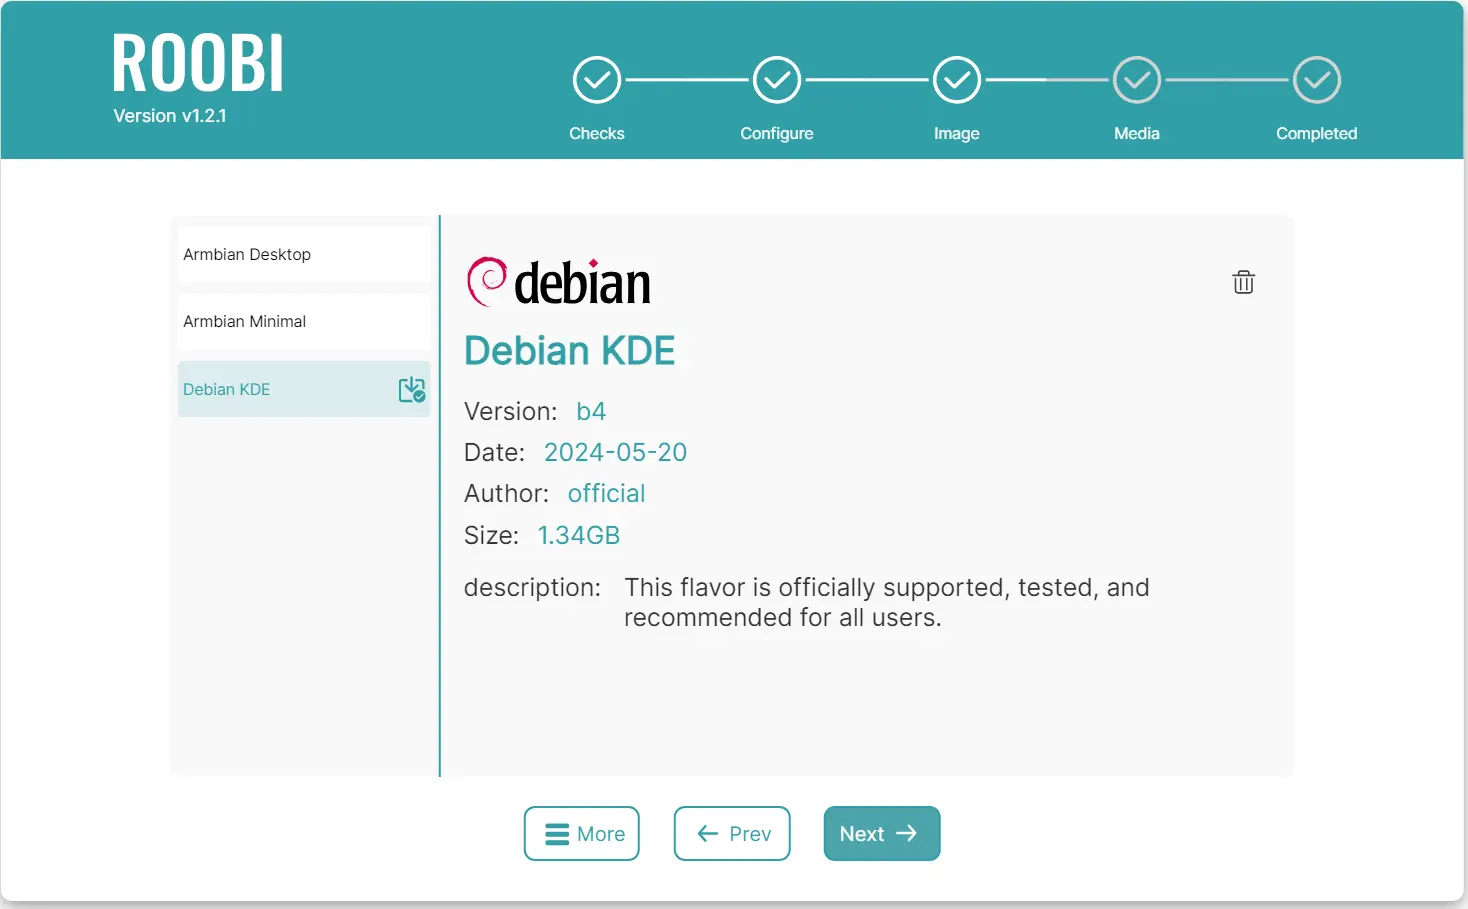
Select Image
When you have a normal network connection, you can select an image for installation. If you currently do not have a network connection, you can install from cached images.
-
You will see two columns on this page, the left column is the image list, and the right column is the image details. The images are for reference only, and the supported image list varies for different devices.
-
Click on any image in the left column to see its details.
-
Click Next to proceed to select the media.
Others
-
When you see this icon in the list, it means the image is cached.

-
If the image is cached, you can click the delete button in the upper right corner of the details page to delete the cached image.

-
Clicking the more button in the lower-left corner will reveal the following two options:
-
Clear Cache: You can perform this option if your downloads often fail or if you are running out of space.
-
Modify Mirror Source Address: This is an advanced feature that allows users to customize mirror addresses.
-
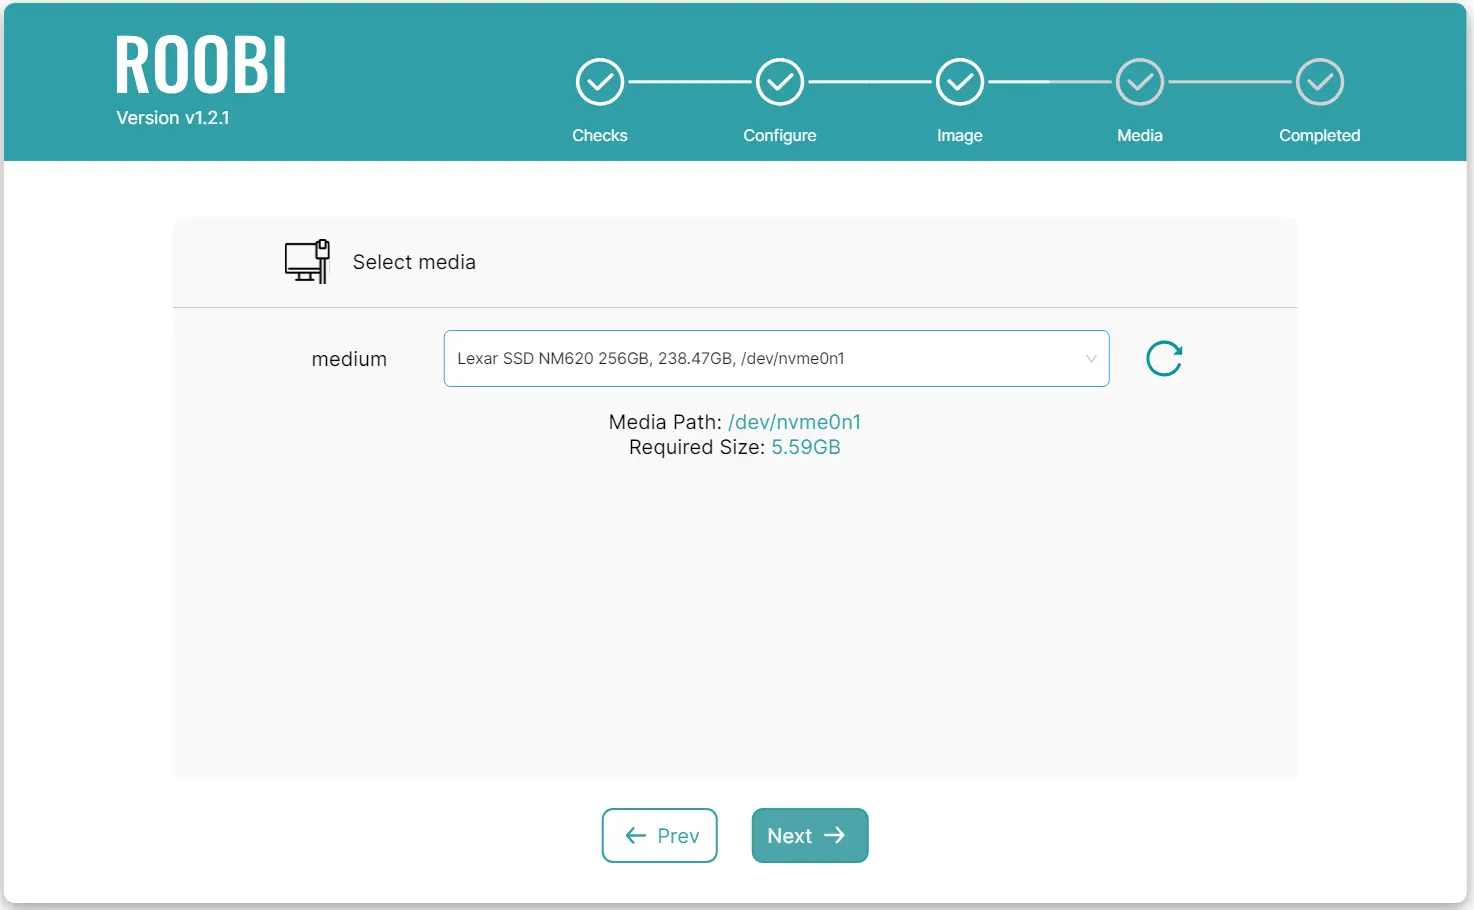
Select Media
In this step, you will see your disk media. Select a media (usually your hard drive) for installation.
In this step, all content on the selected media will be deleted, including but not limited to partitions and files. If you are unsure about what you are doing, do not continue with the installation.
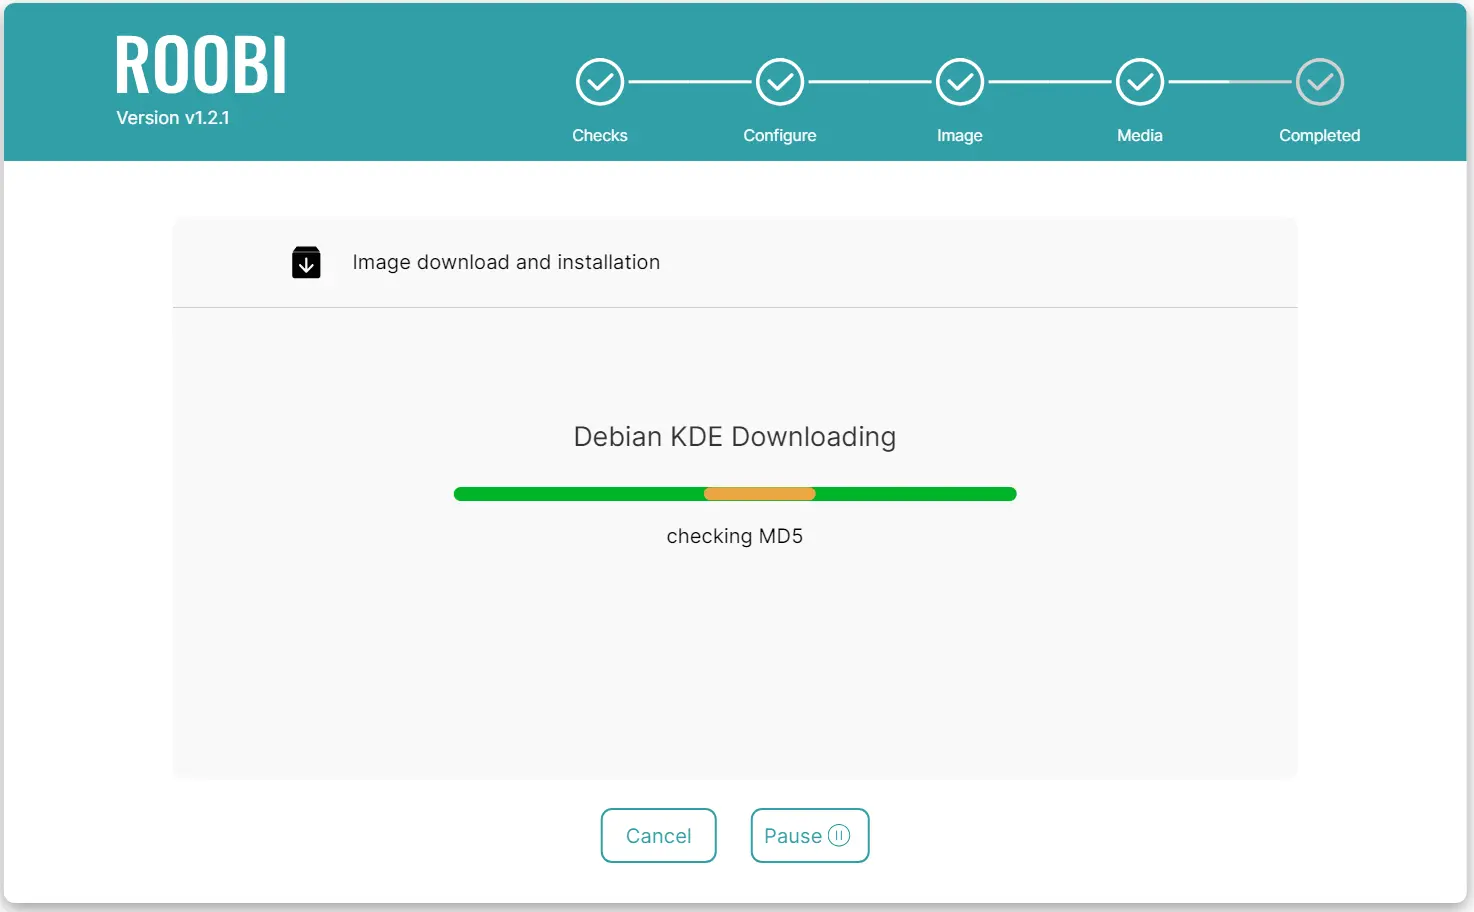
Installation
In this step, you do not need to perform any actions. Just wait quietly for the installation to complete.
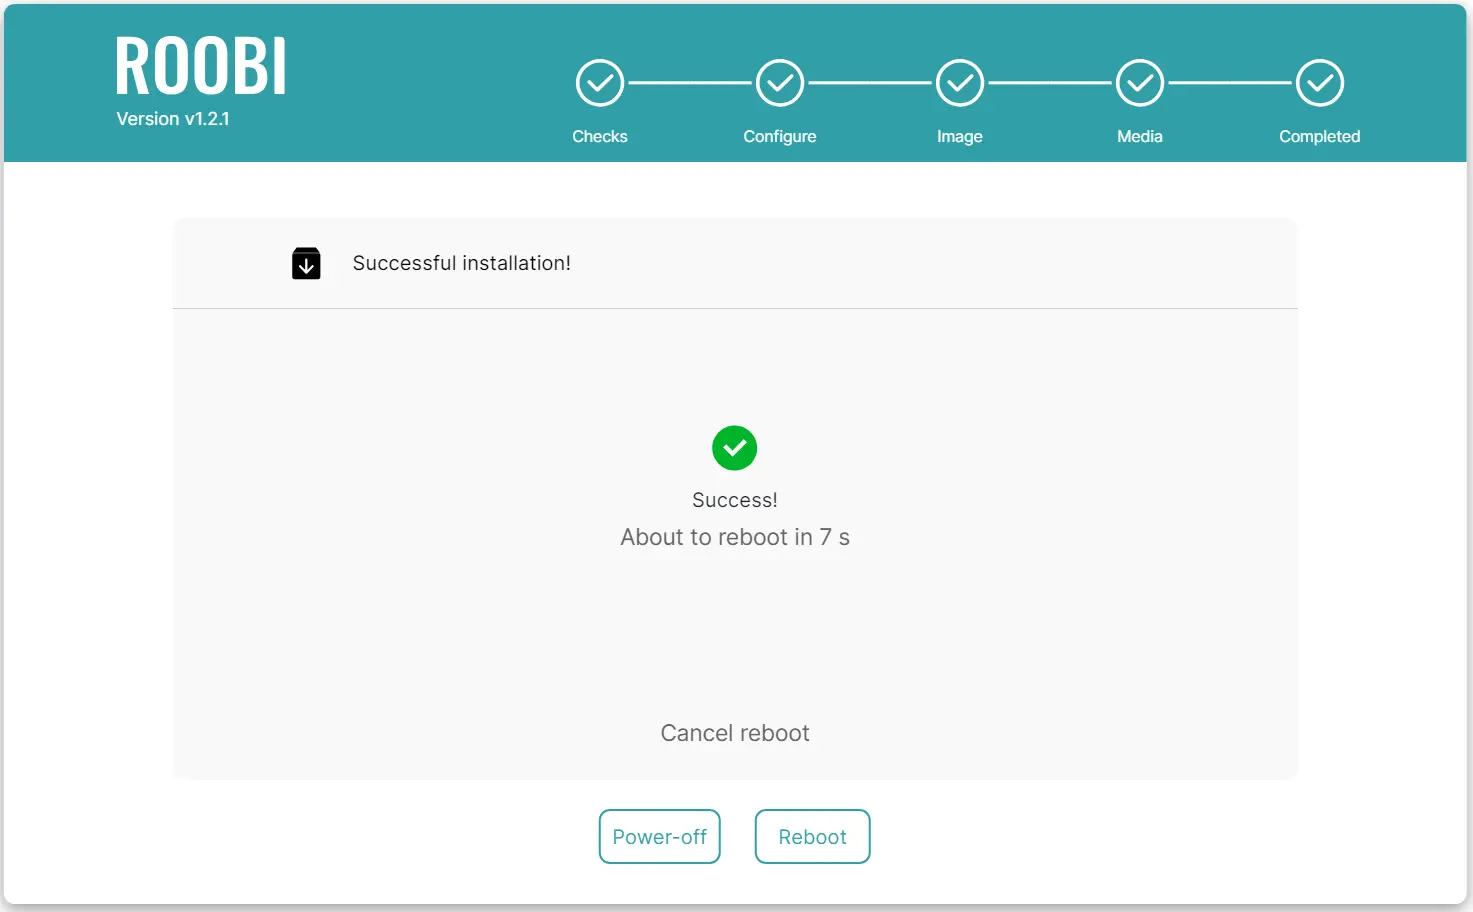
Installation Complete
You will receive a prompt indicating success or failure. If the installation is successful, it will automatically restart within 10 seconds (you can interrupt this operation).
Other Content
Remote Operation
ROOBI provides a method for remote operation. You can configure and install the system without a screen. You can choose any of the following two options according to your actual situation.
-
Access via device IP address:
- If you have an external monitor, you can see the IP address obtained in the watermark section at the bottom right of the screen.
- Obtain the IP address of the network connection: You can obtain your IP address from your router management interface or other methods. Enter the IP address you obtained on your computer, such as http://192.168.2.1/, where 192.168.2.1 is the IP address you obtained.
-
If your router supports mDNS, you can directly enter http://roobi.local/ in the browser address bar for access. (If you are not sure if your router supports this function, feel free to try it; it will not have adverse consequences.)
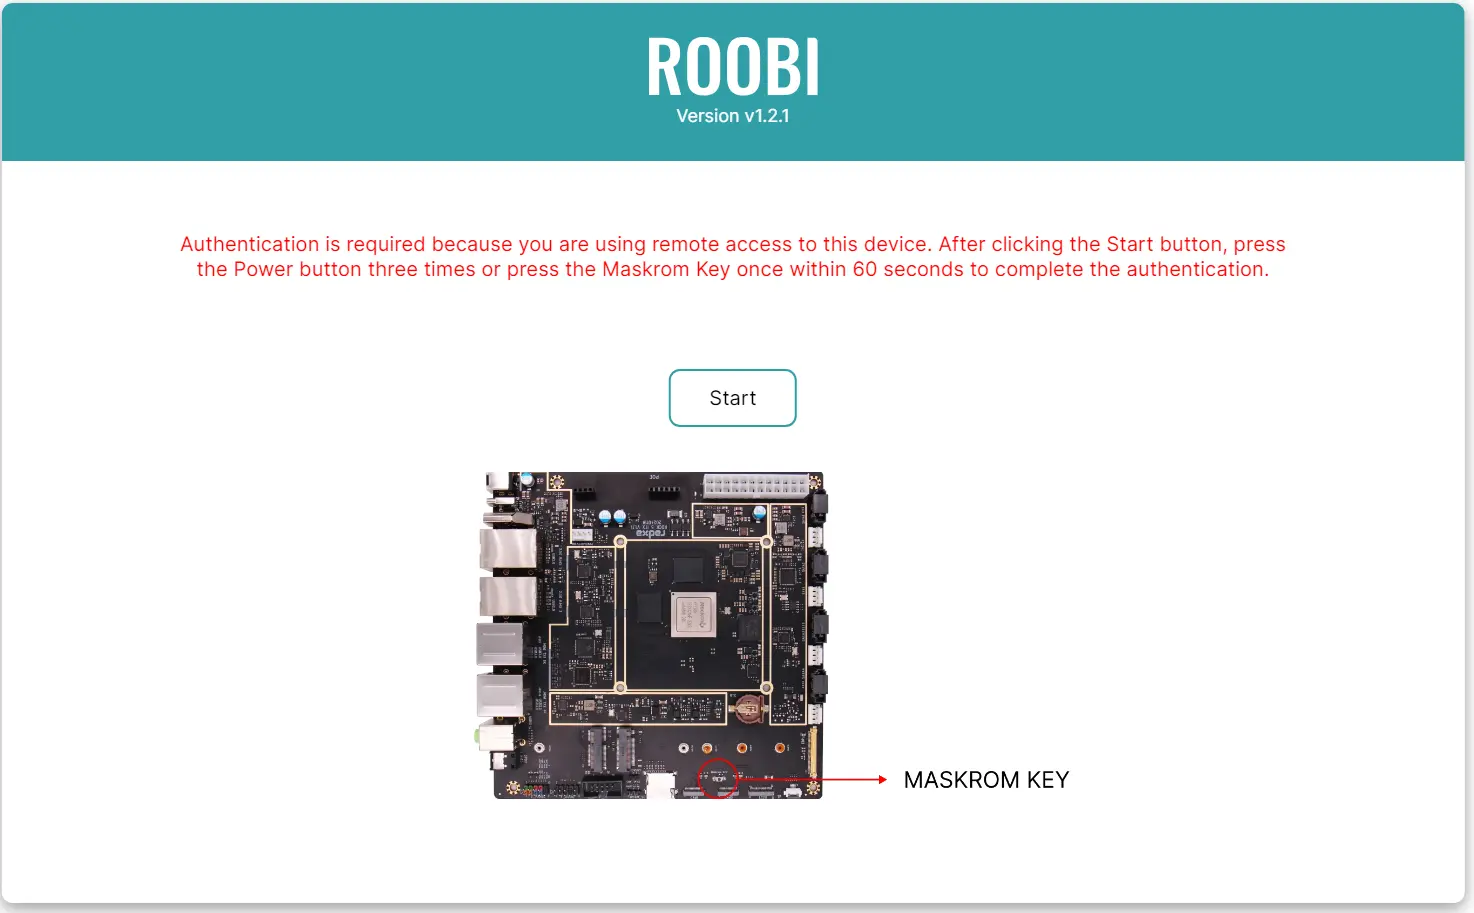
With remote access, you may need to perform identity verification operations as prompted.
Limitations:
-
The system allows network settings to be changed during remote operation, but after the changes, you may need to access the new address.
-
If the system you installed does not enable SSH access by default, you still need to operate with an external screen.
Shutdown Operation
Click the power button to shut down.
Frequently Asked Questions
Black Screen
- It may be that the screen is turned off to save power due to inactivity. Move the mouse or press a key on the keyboard to wake up the screen.
- It may be that no display was connected before booting. Press Ctrl + Q on the keyboard to restart the interface.
Network Detected but Unable to Retrieve Image List
- Network detection only recognizes whether it is connected to the public network, which may be caused by unstable mirror sources. Use a different mirror source address or a local mirror.
- System malfunction, please try restarting.
Small Interface
- Using a high-resolution screen may not adapt automatically. Press Ctrl + Shift + '+' to zoom in (usually located to the left of the backspace key).
Large Interface
- It may be caused by switching to a different resolution screen. Press Ctrl + Q to restart the interface.
- It may be caused by previous scaling. Press Ctrl + '-' (usually located to the left of '+') to zoom out.
Unable to Boot
- ROOBI OS may be damaged. Re-flash the system according to the recovery tutorial.
Release Notes
v1.1.0 Update Contents
- Enable mDNS support.
- Change access port from 739 to 80.
- Add resolution adaptability.
- Fix WiFi auto-enable bug.
- Fix description not updating after selecting media.
- Fix occasional button service failure.
- Modify some descriptions.
v1.1.1 Update Contents
- Fix interface bugs.
- Add support for Radxa A8 module (X2L only).
- Note: Current version has changes to underlying content, requiring re-flashing.
v1.1.3 Update Contents
- Fix inability to scale properly bug.
- Fix some translation issues.
v1.2.0 Update Contents
- Adapt for ROCK 5 ITX.
- Optimize WiFi connection.
- Optimize some slow response bugs.
v1.2.1 Update Contents
- Add multi-screen support, add screen listener, automatically scale screen content.
- Support shortcut keys to switch multi-screens, and automatically adjust mouse position.
- Update several images (ROCK 5 ITX only).
- Update u-boot (ROCK 5 ITX only).
- Support MASKROM KEY authentication during remote connection (ROCK 5 ITX only).
- Fix font issues in remote connections across different platforms.
- Fix interface bugs.