Quick Start
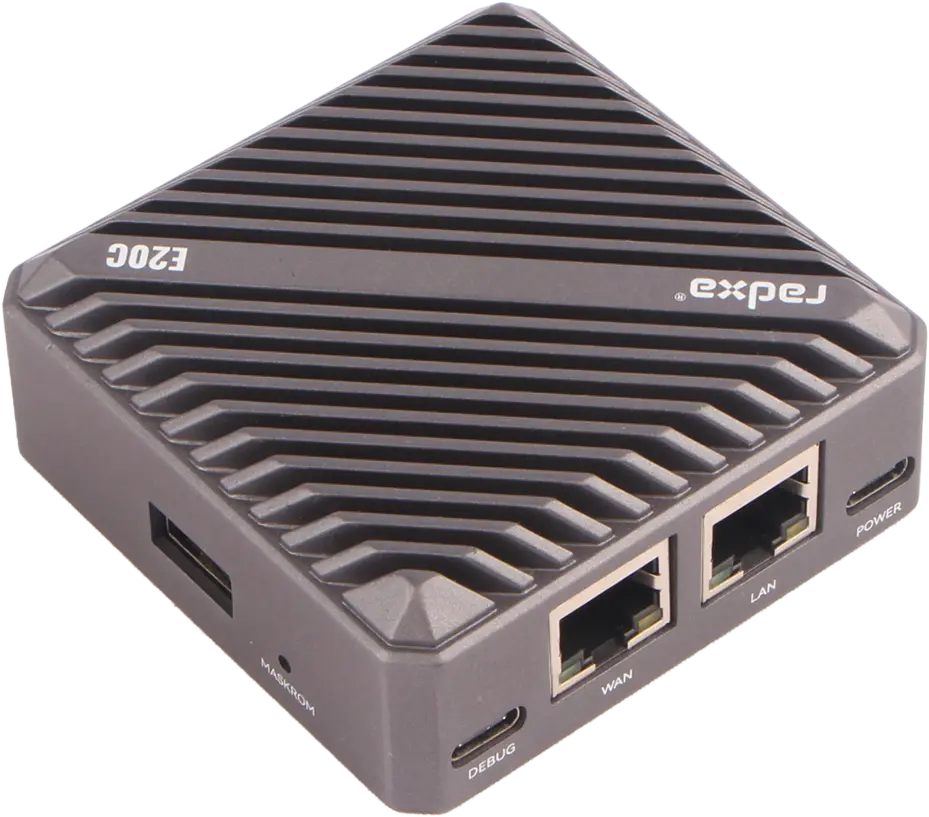
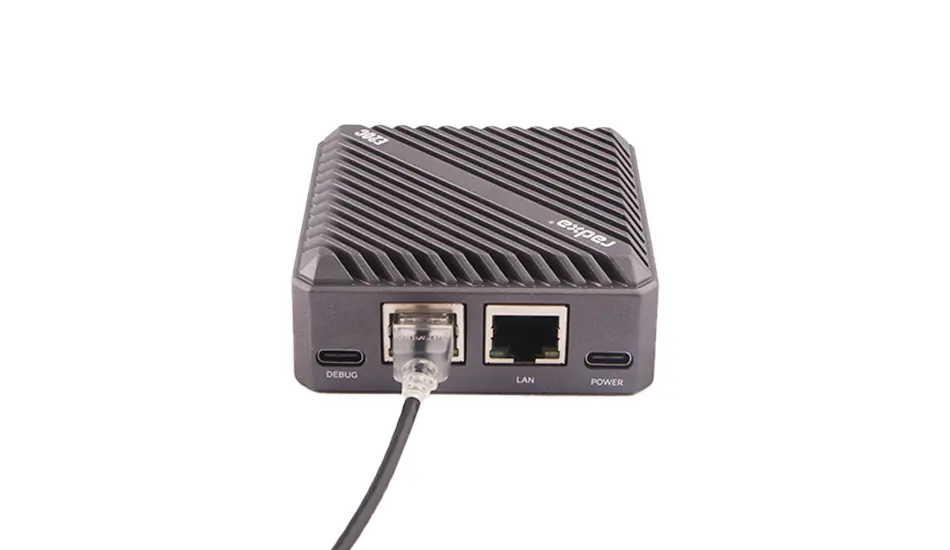
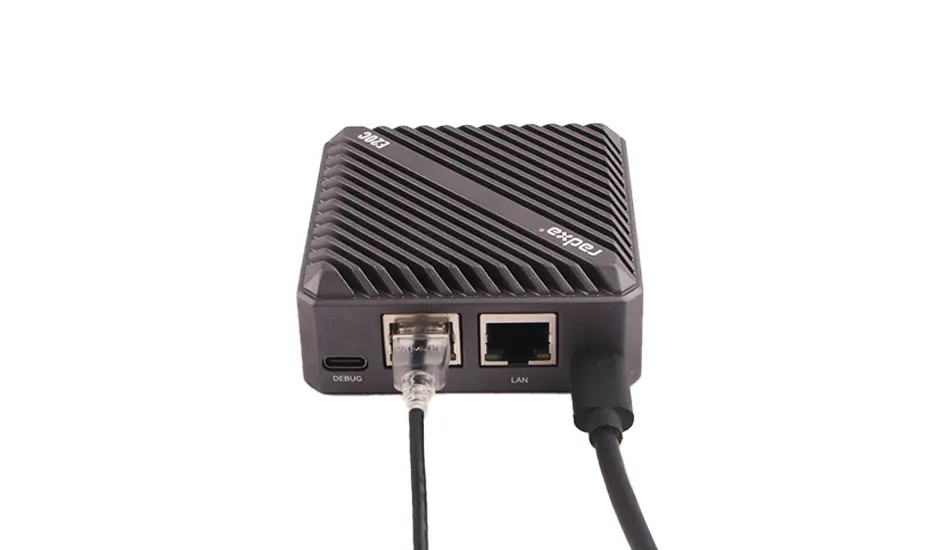
Physical Image
Currently, E20C has multiple configurations, including with casing, bare board, with onboard EMMC, and with empty EMMC soldering. Please distinguish your product model before operation.
To start the Radxa E20C, you need the following equipment:
- 1x 5V/2A power adapter (E20C can only be powered by 5V, you can use a PD power supply that supports 5V), For more details on power supply, please refer to power-supply.
- 2x USB TYPE-A to TYPE-C cable to power and view log output and access the system.
- 2x Ethernet network cable.
Installing the Operating System
- with onBoard EMMC
- without onBoard EMMC
E20C with onBoard EMMC is equipped with a pre-installed system istoreos, no need to install os.
Prepare the microSD card, and refer to Install System to install the operating system.
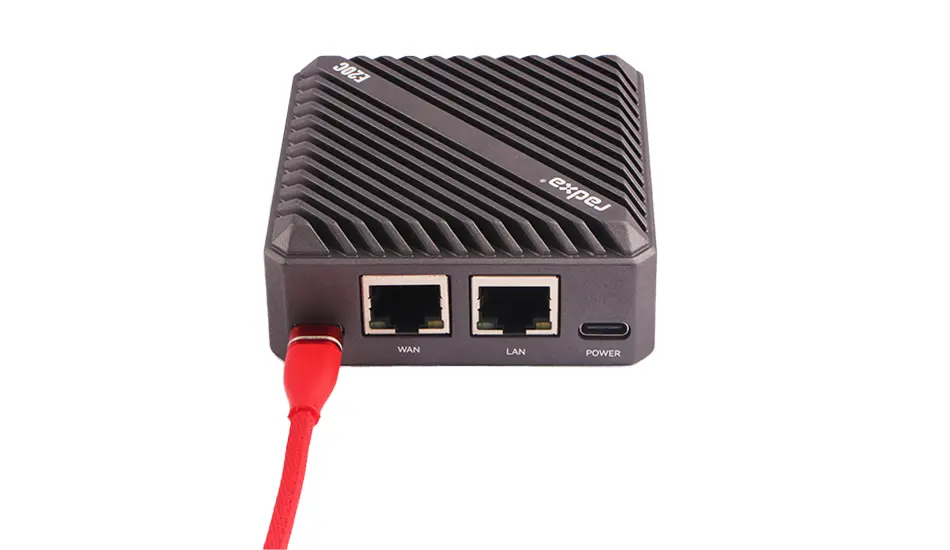
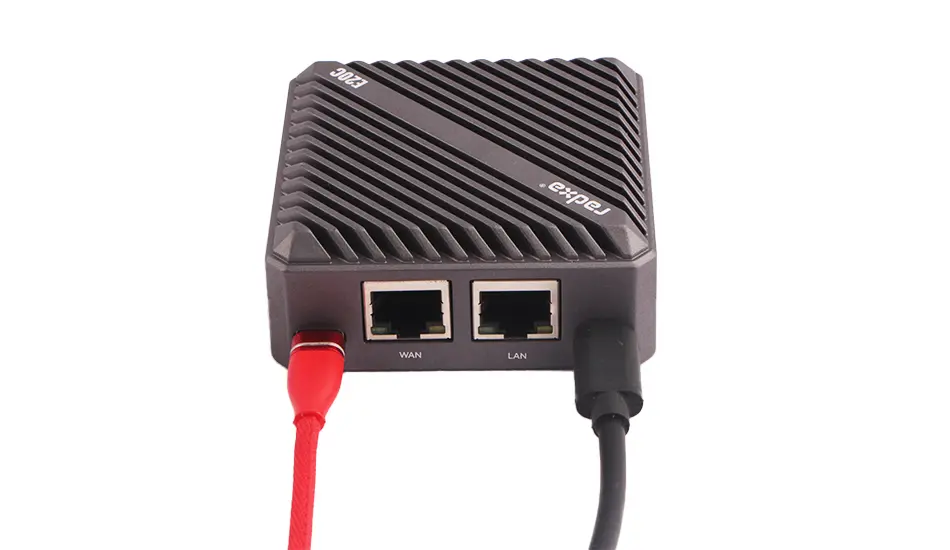
Wiring and Powering Up
Connect WAN and LAN,then power on, the system will boot automatically.
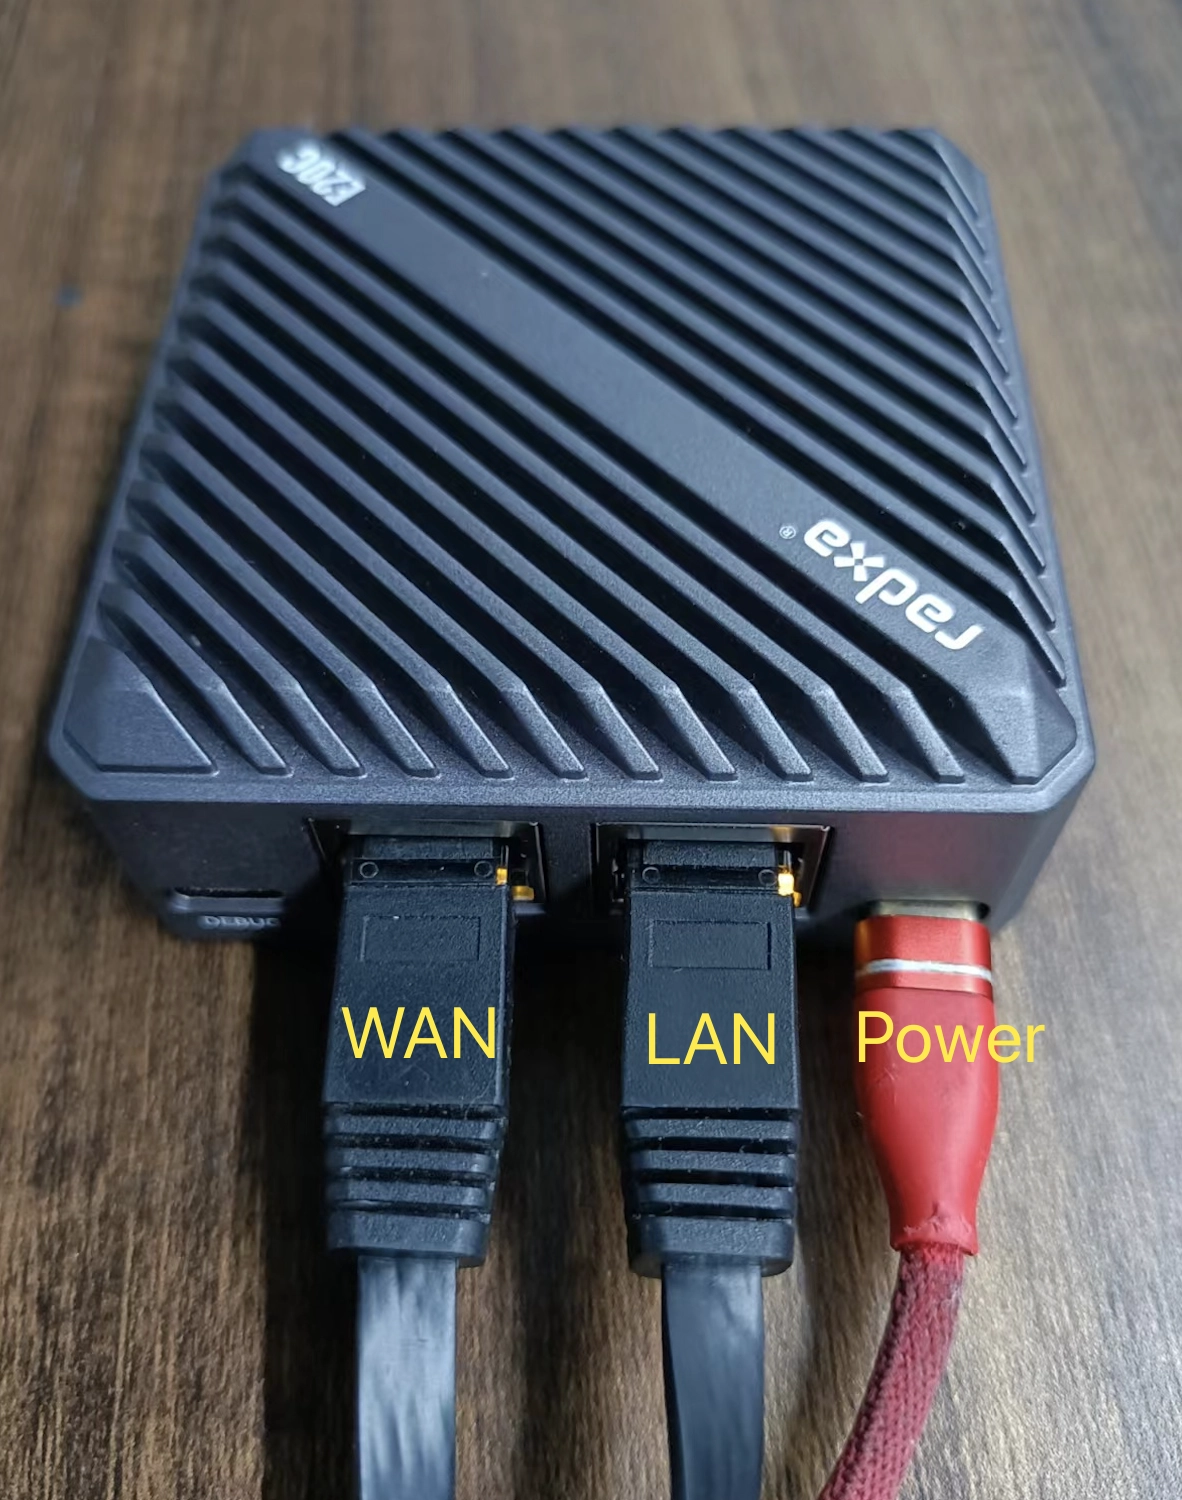
Login
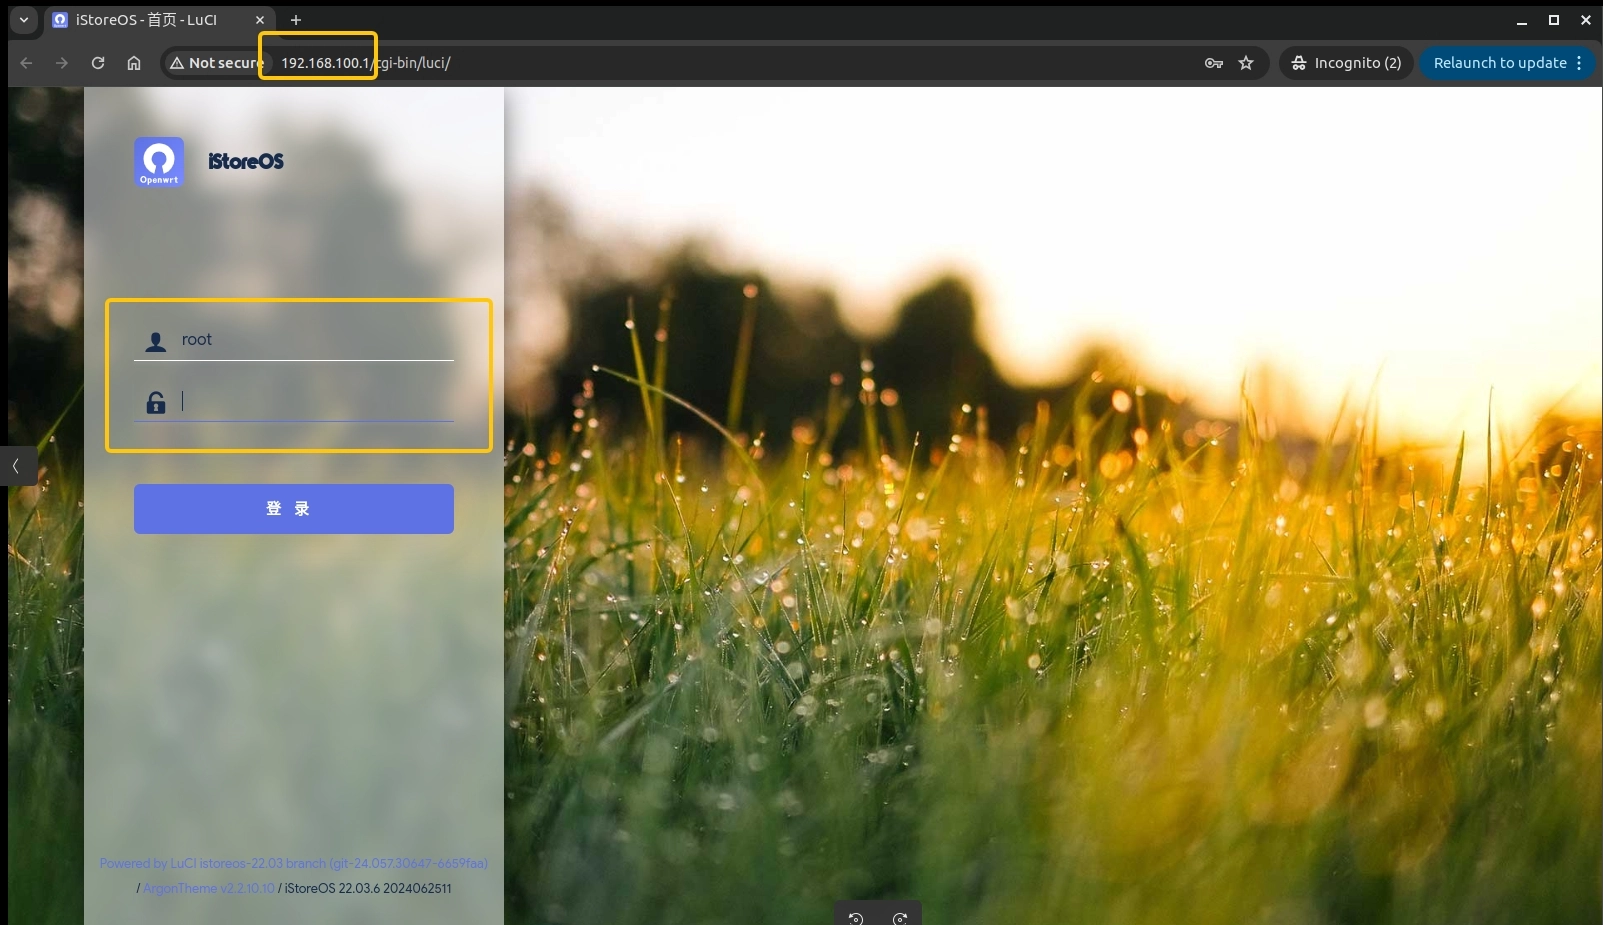
Login Via Browser
If the LAN port is connected to the PC, you can login to the iStoreOS system background through the browser via the iStoreOS default ip 192.168.100.1, The default username of the iStoreOS background is root, and the password is password.

Login Via Serial Port
- Connect the TYPE-A port of the USB Type-A to Type-C cable to the computer, and the Type-C port to the Radxa E20C debug port, and set the baud rate to 1500000.
- Plug the power adapter into the Radxa E20C's power connector. The device will power up and start, the system status light will be on.
- After the system is up, the system status light will flash

- Use the serial port tool
- Windows
- Linux
- Mac
Putty is a serial port tool that can be used on Windows and supports multiple baud rates. Here is how to use Putty to connect to a serial port.
-
Download Putty and install it.
-
Use the USB Type-A to Type-C cable's Type-A port to connect to the computer, and the Type-C port to connect to the Radxa E20C debug port, check the computer's Device Manager interface to find the COM port number. Here we assume it is COM4.
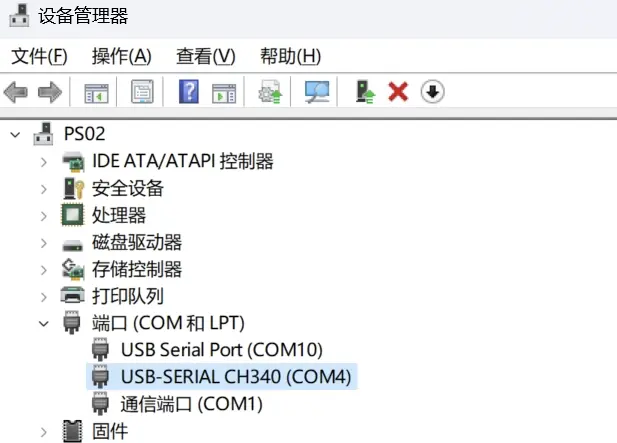
If you cannot properly recognize the serial device, make sure the computer has the CH340 driver installed
If the driver is not installed, please install the CH340 driver
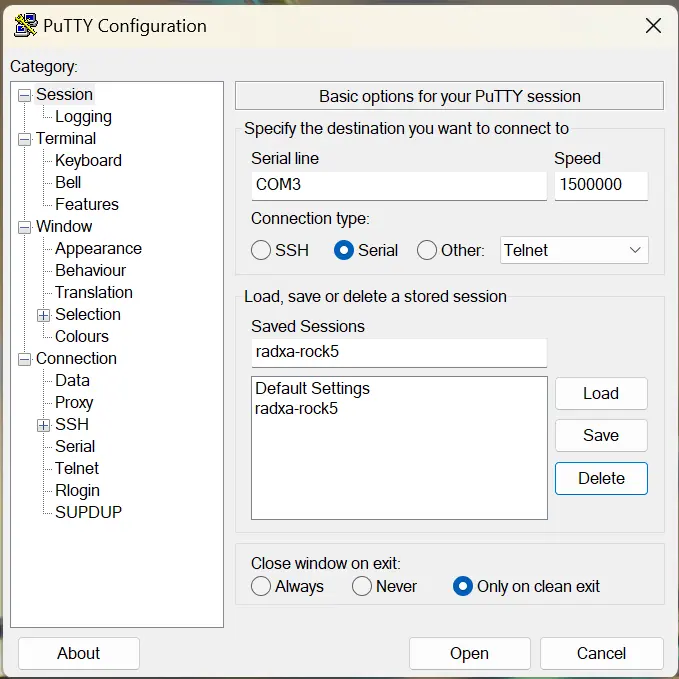
- Open Putty and set it up as follows:
- Select Session in the left column, set the serial line to COM3, the baud rate to 1500000, and the connection type to Serial.
- Write radxa-e20c in the Saved Sessions column and press Save.
- Select Serial at the bottom of the left column and configure it with the following parameters:
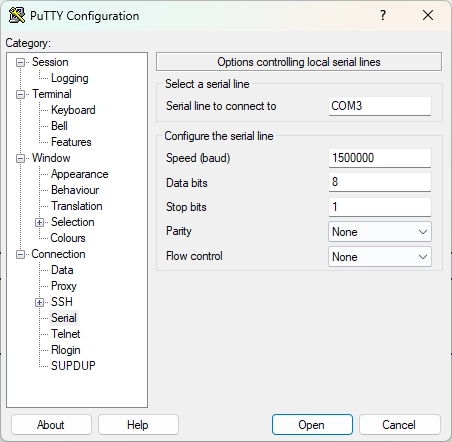
- After setting, click Open to open the serial port, make sure the TTL port is correctly connected, and then turn on the power of the motherboard.
Minicom is a serial port utility that can be used on Linux and supports multiple baud rates. Here is how to use Minicom to connect to a serial port.
- After plugging the USB port into the host PC, please find the serial device first:
Type dmesg | tail in the terminal and you will get a printout similar to the following:
[10.654076] usb 1-6.4.3: new full-speed USB device number 103 using xhci_hcd
[10.755730] usb 1-6.4.3: New USB device found, idVendor=0403, idProduct=6001
[10.755732] usb 1-6.4.3: New USB device strings: Mfr=1, Product=2, SerialNumber=0
[10.755733] usb 1-6.4.3: Product: USB <-> Serial
[10.755734] usb 1-6.4.3: Manufacturer: FTDI
[10.756728] ftdi_sio 1-6.4.3:1.0: FTDI USB Serial Device converter detected
[10.756750] usb 1-6.4.3: Detected FT232BM
[10.757195] usb 1-6.4.3: FTDI USB Serial Device converter now attached to ttyUSB0
According to the last line, /dev/ttyUSB0 is the newly inserted serial device.
There may be cases where you do not have permission to read or write to the serial port.
Temporary solution: Modify the permissions with chmod command.
sudo chmod 777 /dev/ttyUSB0
Permanent: add the current user to the dialout group
sudo usermod -aG dialout $USER
- Install minicom:
sudo apt-get update
sudo apt-get install minicom
- Setting up minicom
First, add the current non-root or non-sudo user to the plugdev group.
sudo usermod -aG plugdev $USER
Edit ~/.bashrc, add the following parameters, and reopen a new terminal.
alias minicom='minicom -w -t xterm -l -R UTF-8'
Create and edit the file ~/.minirc.1500000-usb0 to add the following:
pu port             /dev/ttyUSB0
pu baudrate         1500000
pu bits             8
pu parity           N
pu stopbits         1
pu rtscts           No
- Execute the following command to connect the device, specifying the parameter 1500000-usb0 to use the above configuration.
minicom 1500000-usb0
Picocom is a serial port utility that can be used on a Mac and supports multiple baud rates. Here is how to use Picocom to connect to a serial port.
- Install picocom
% brew install --build-from-source radxa/picocom/picocom
- Start picocom
% picocom -b 1500000 -d 8 /dev/tty.usbserial-2130
Login Via SSH
- Connect the network cable to the WAN or LAN port, the following is an example of how to access the device by SSH using the WAN port
- Plug the power adapter into the Radxa E20C's power connector. The device will power up and start, the system status light will be on.
- When the system is up, the system status light will blink and the WAN port light will also be on

- Find IP
The iStoreOS system default IP address is 192.168.100.1
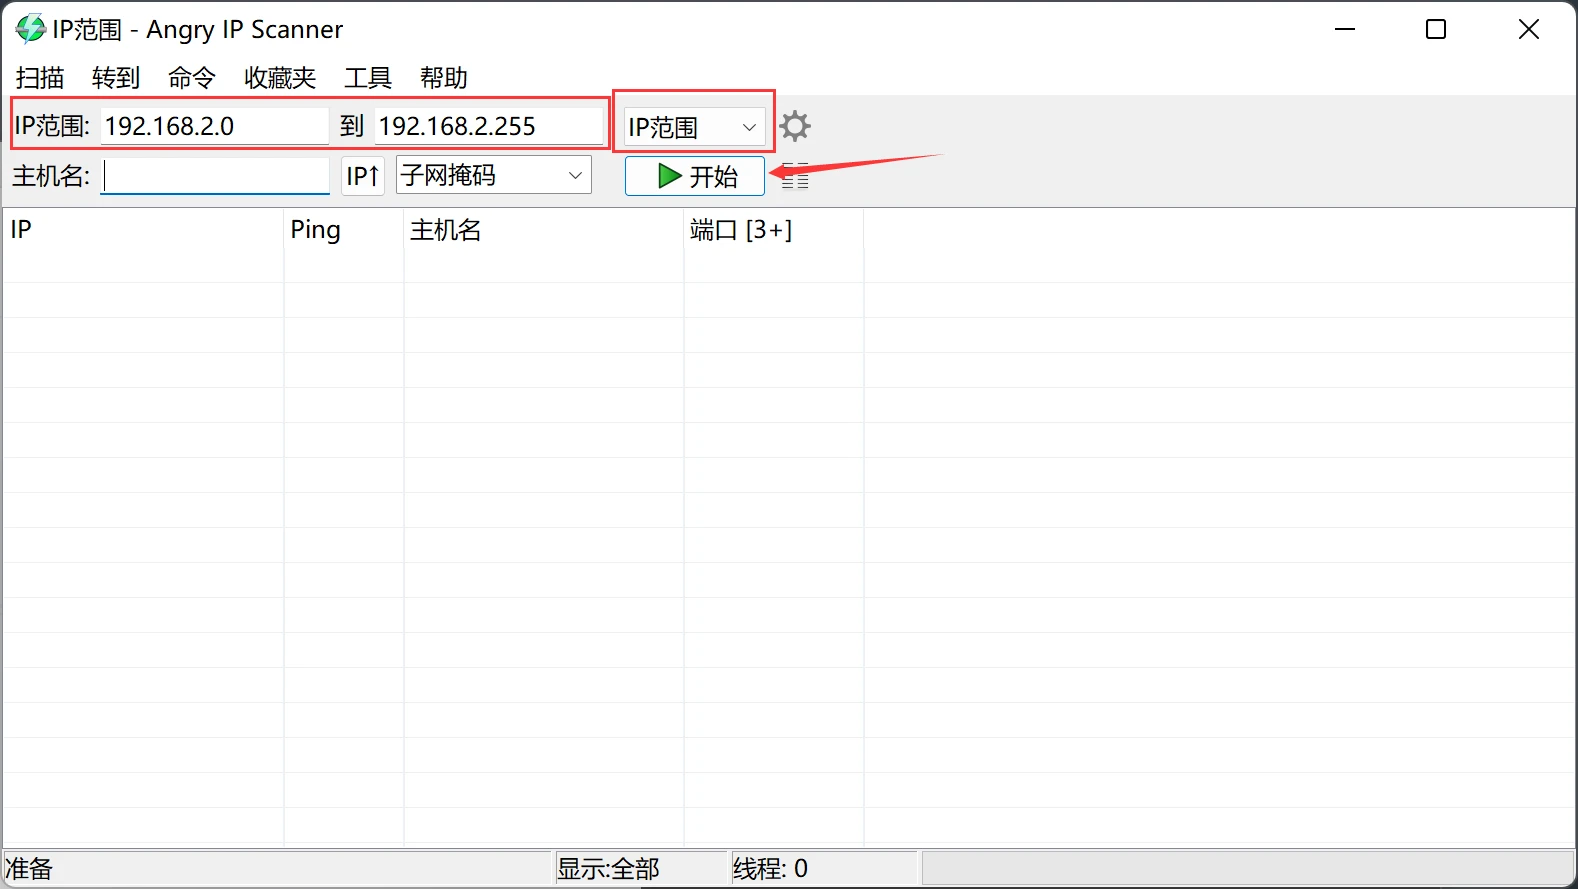
But if the user modifies it themselves, they can use the Angryip tool to query it
-
First, the host needs to download Angryip, and then make sure the host and motherboard are in the same LAN.
-
Open Angryip, select the IP range 192.168.2.0 - 192.168.2.255 (select the network segment where the host computer and motherboard are located), click Start, as shown in the figure.
-
-
Ctrl + F Look for the
2akeyword to find the IP address of the motherboard.
- SSH connection to Radxa E20C
ssh [username]@[IP address] # or ssh [username]@[hostname]
Default username: root Default password: password
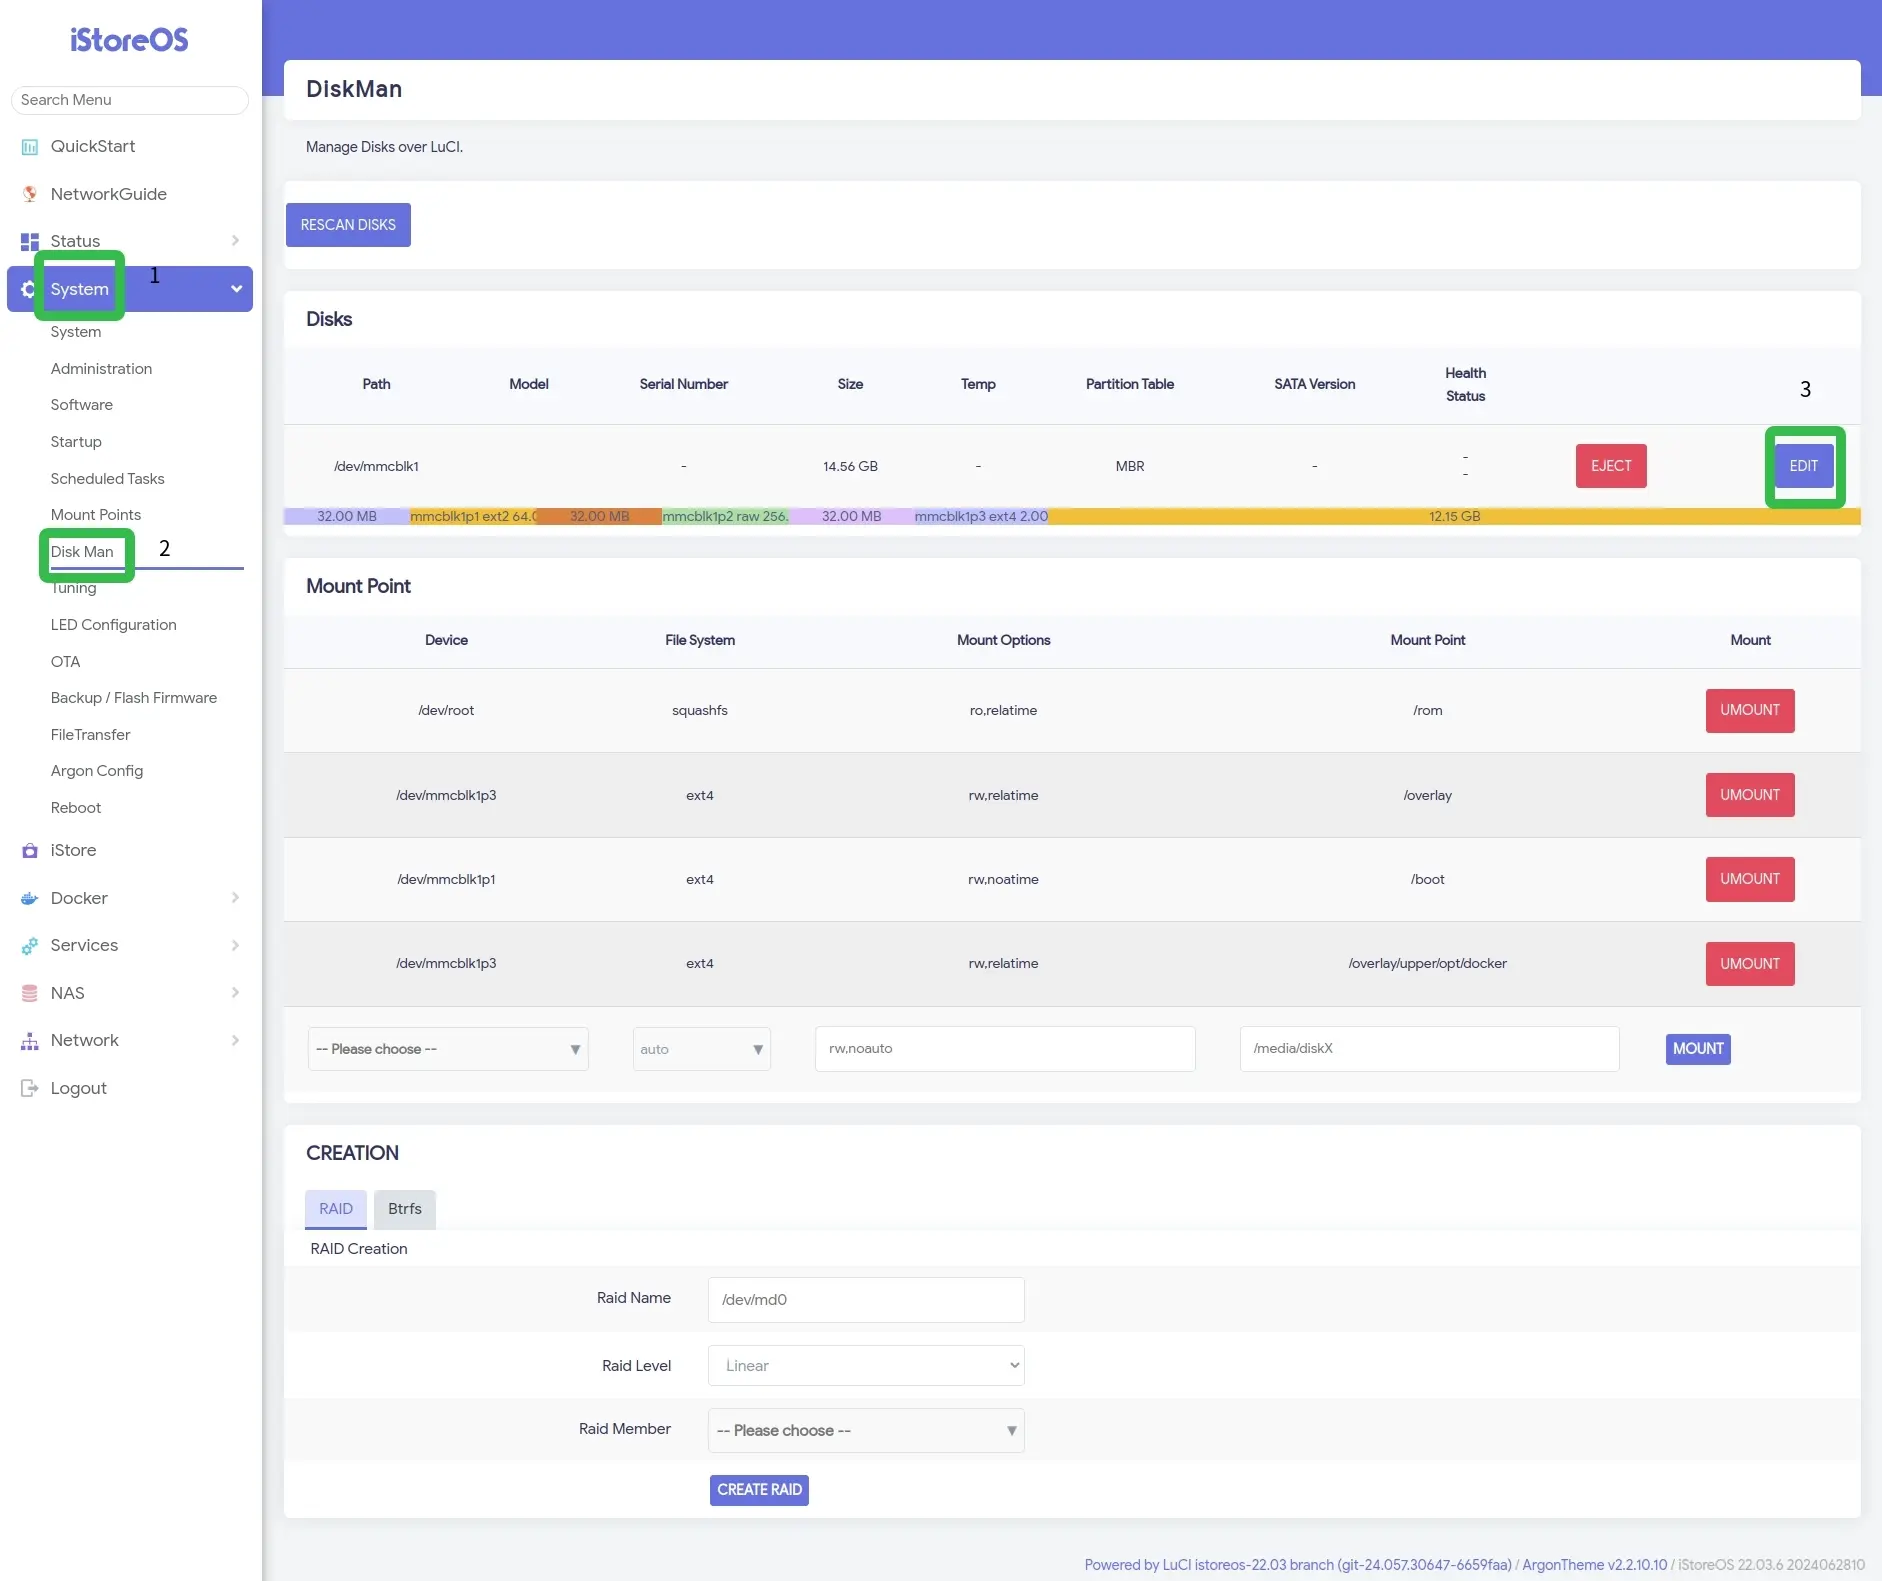
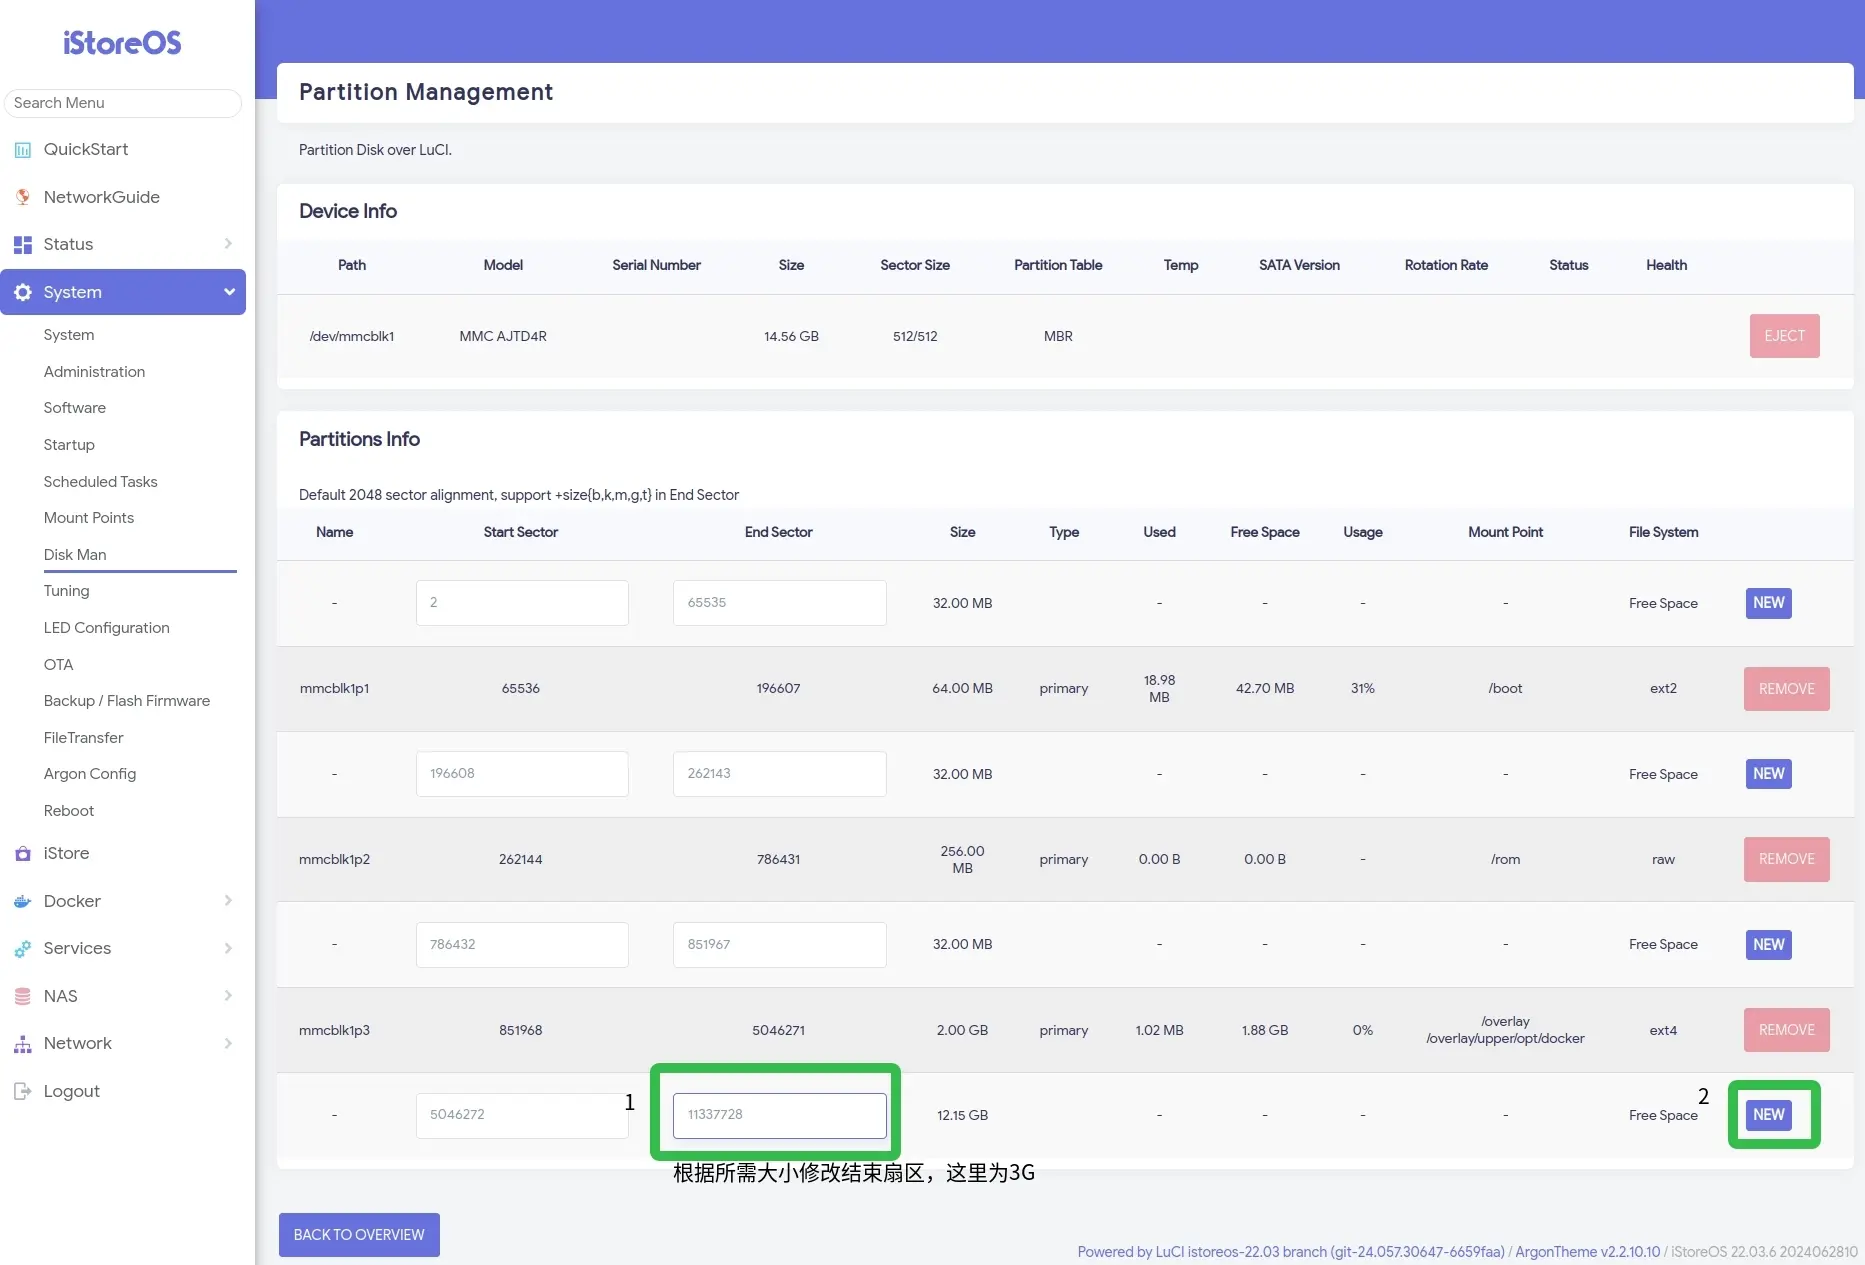
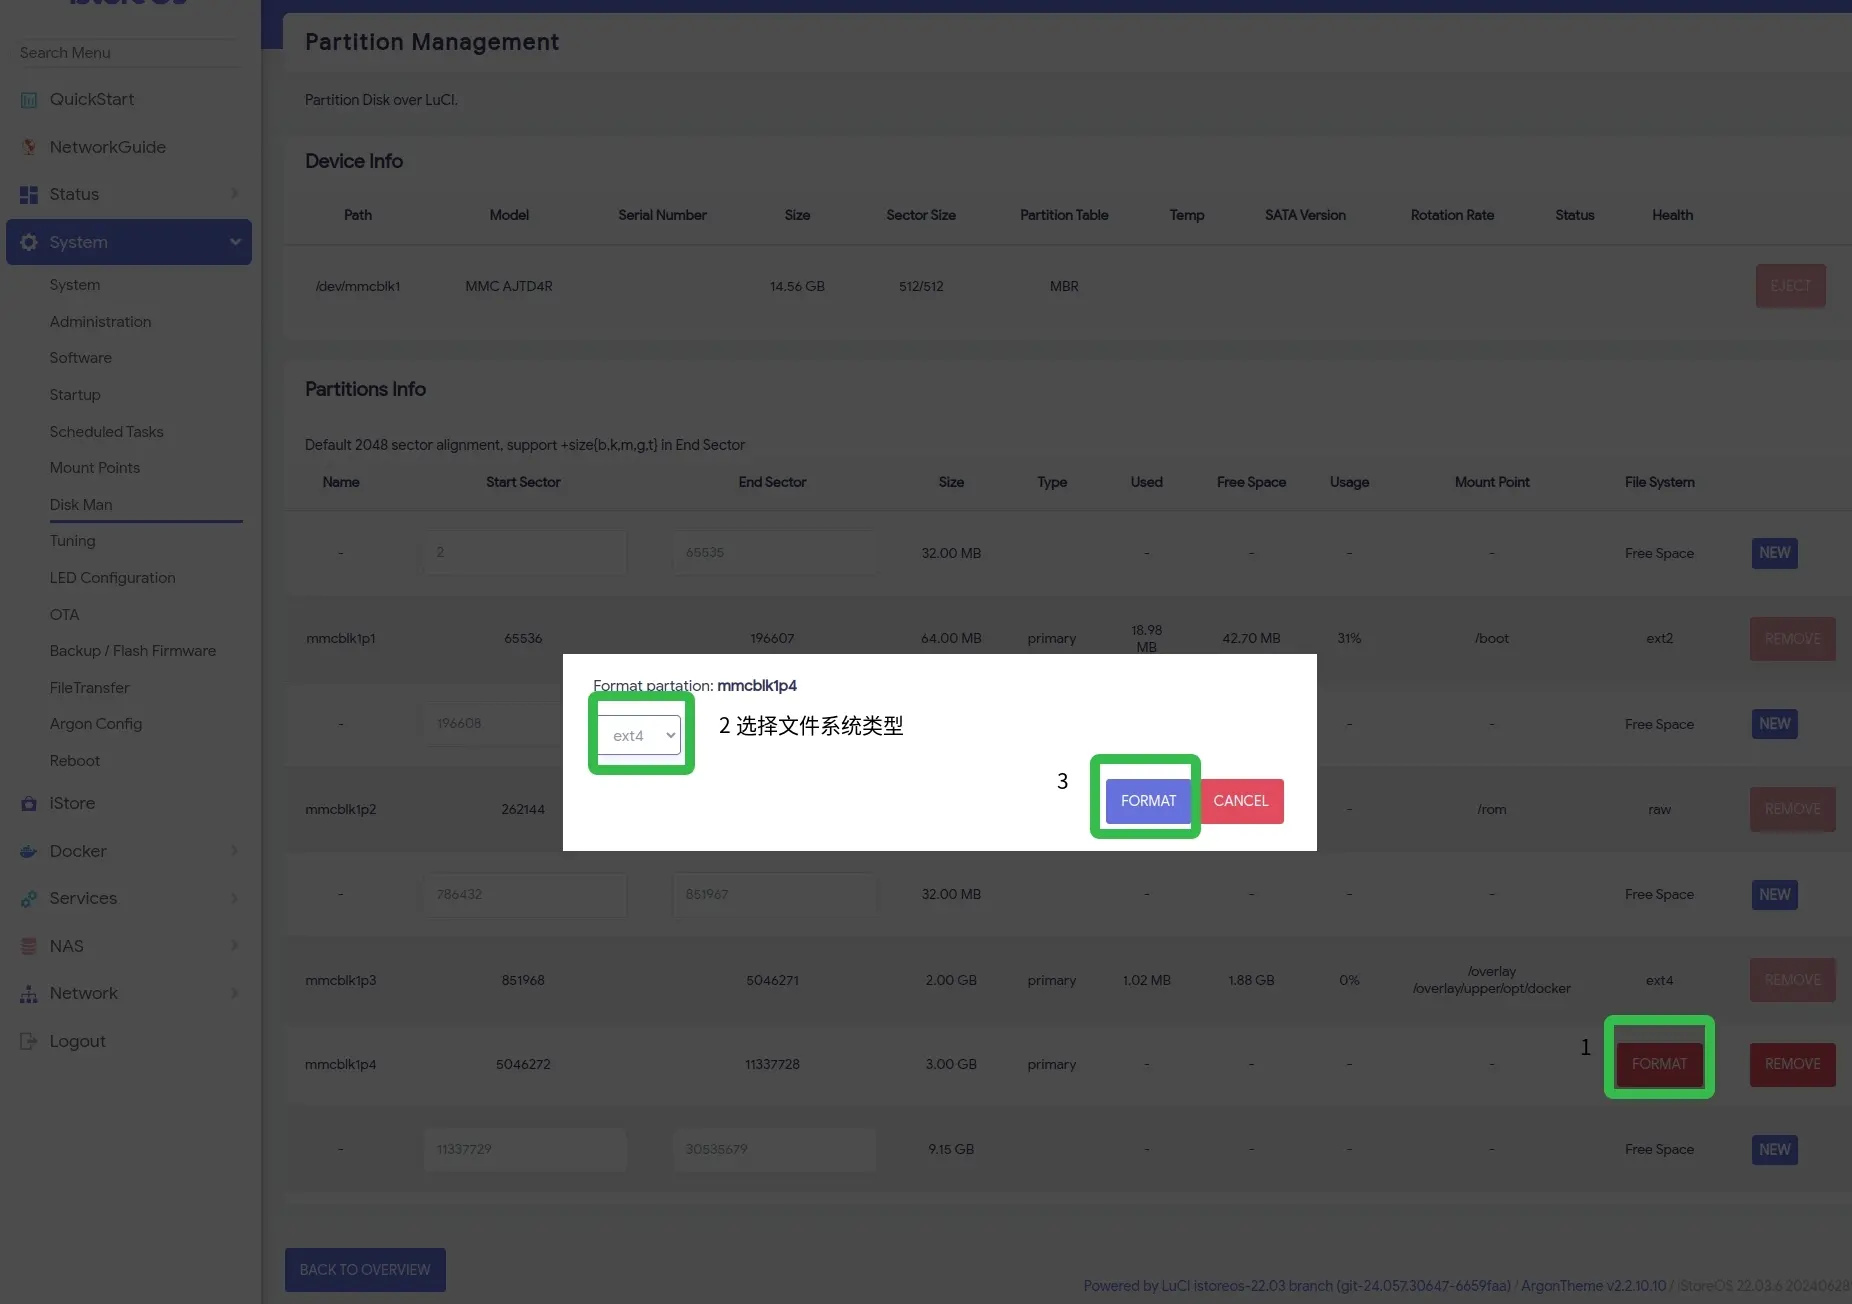
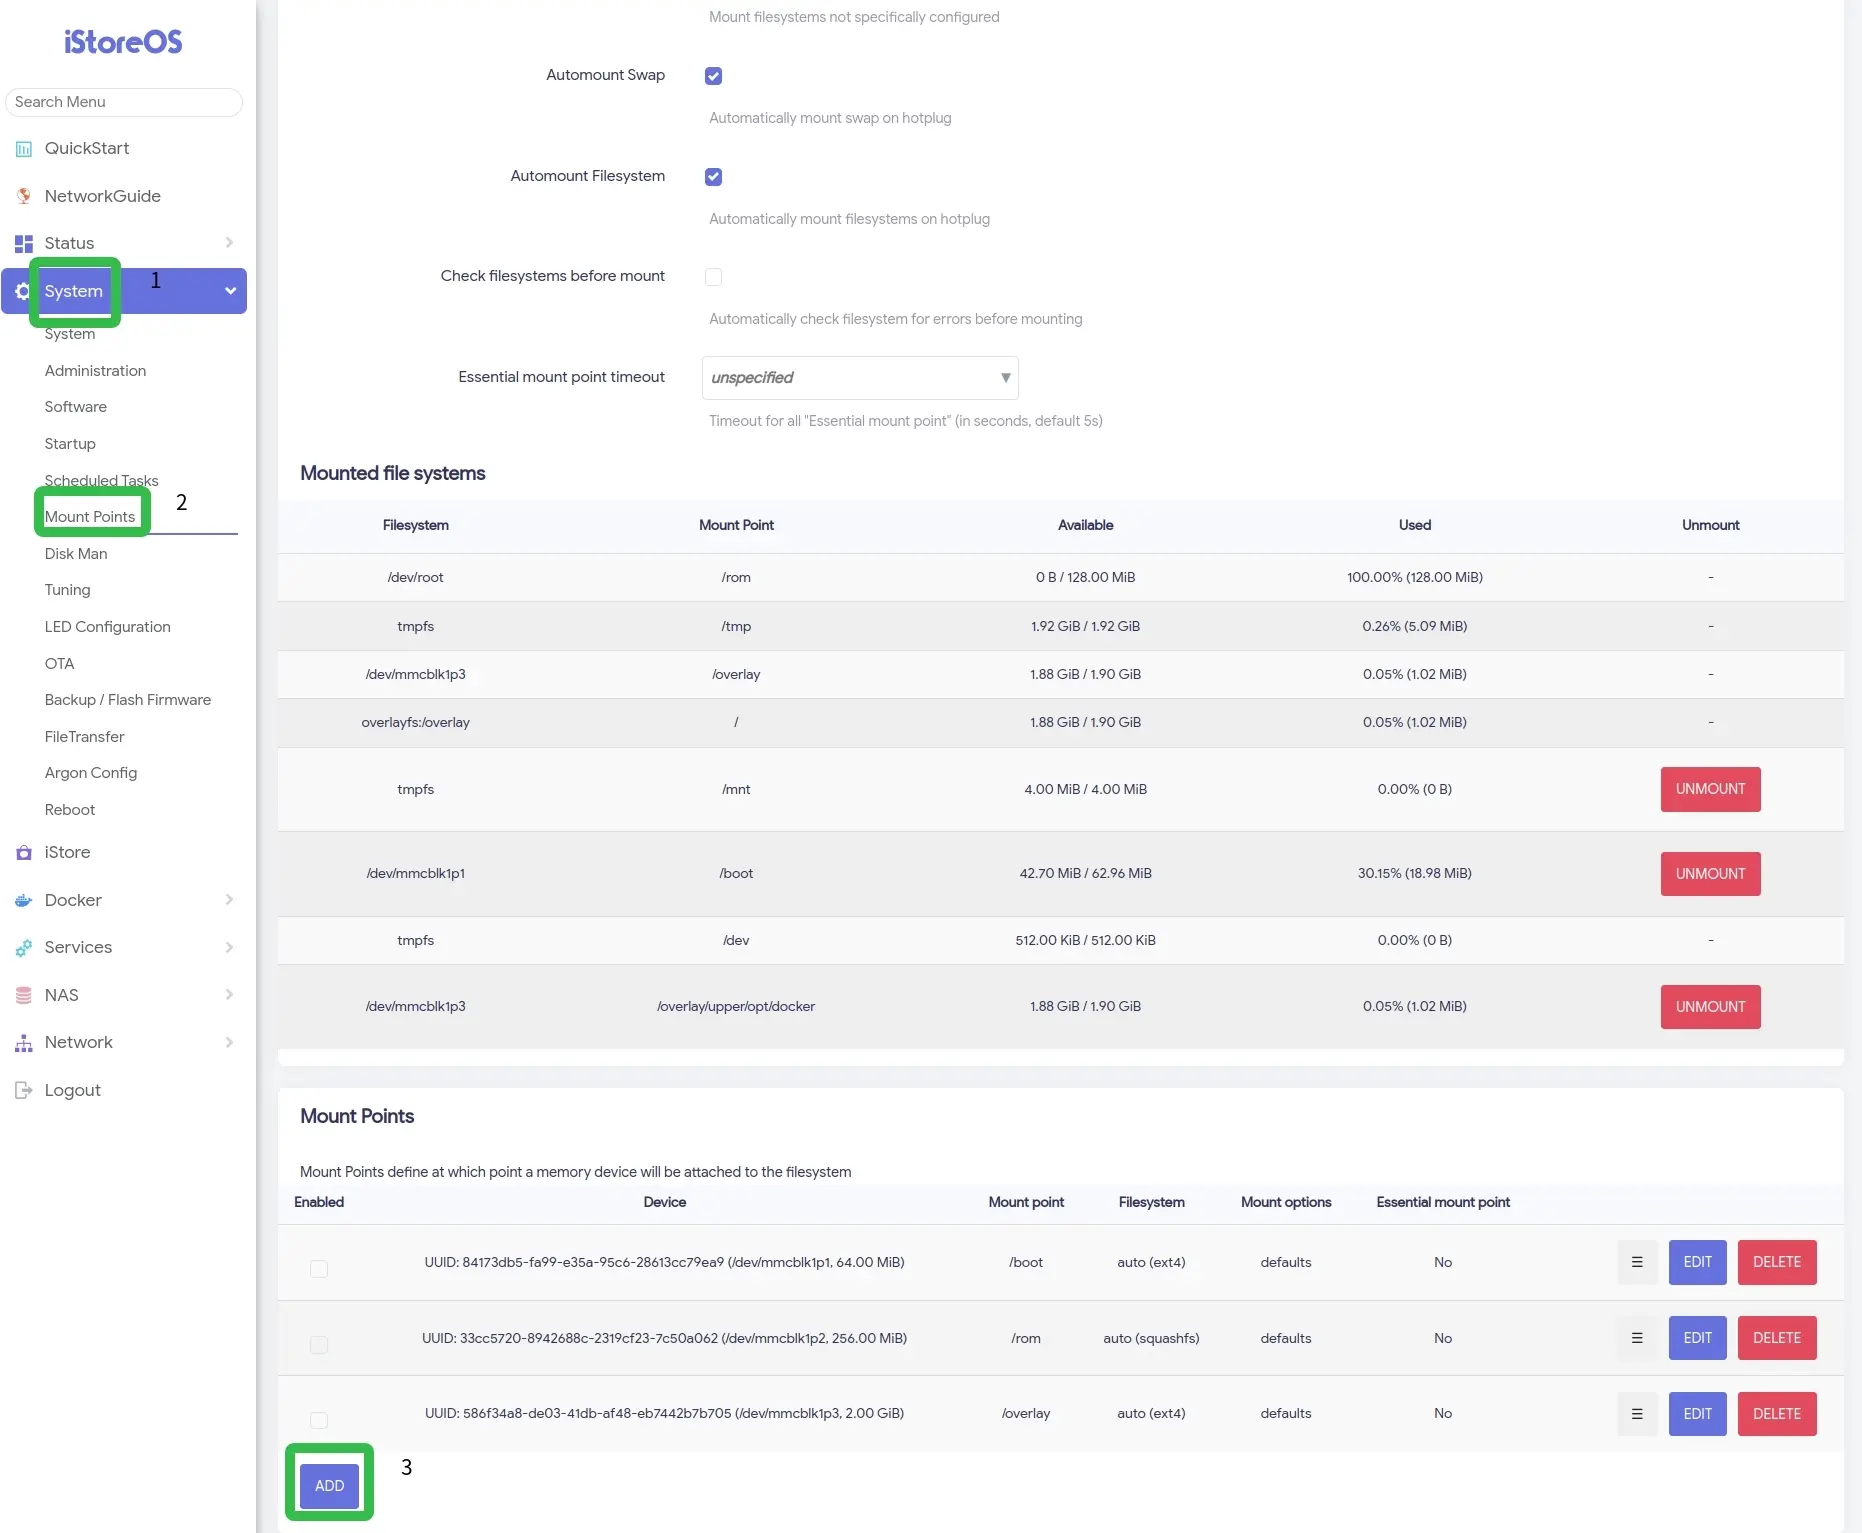
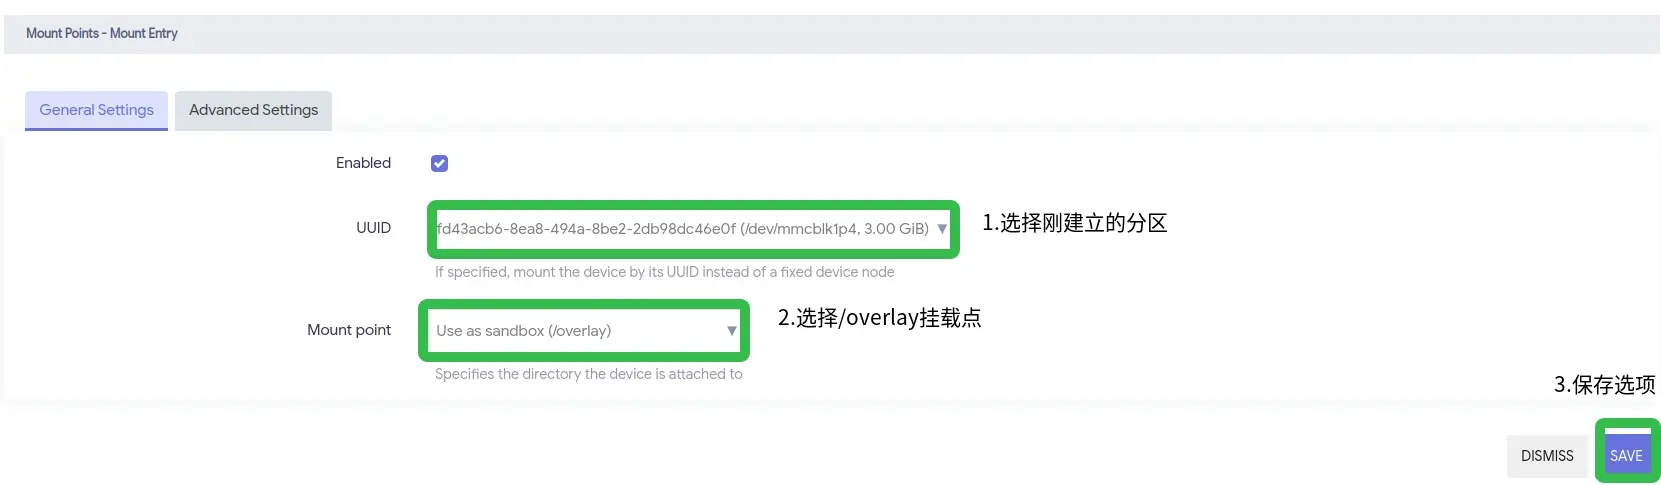
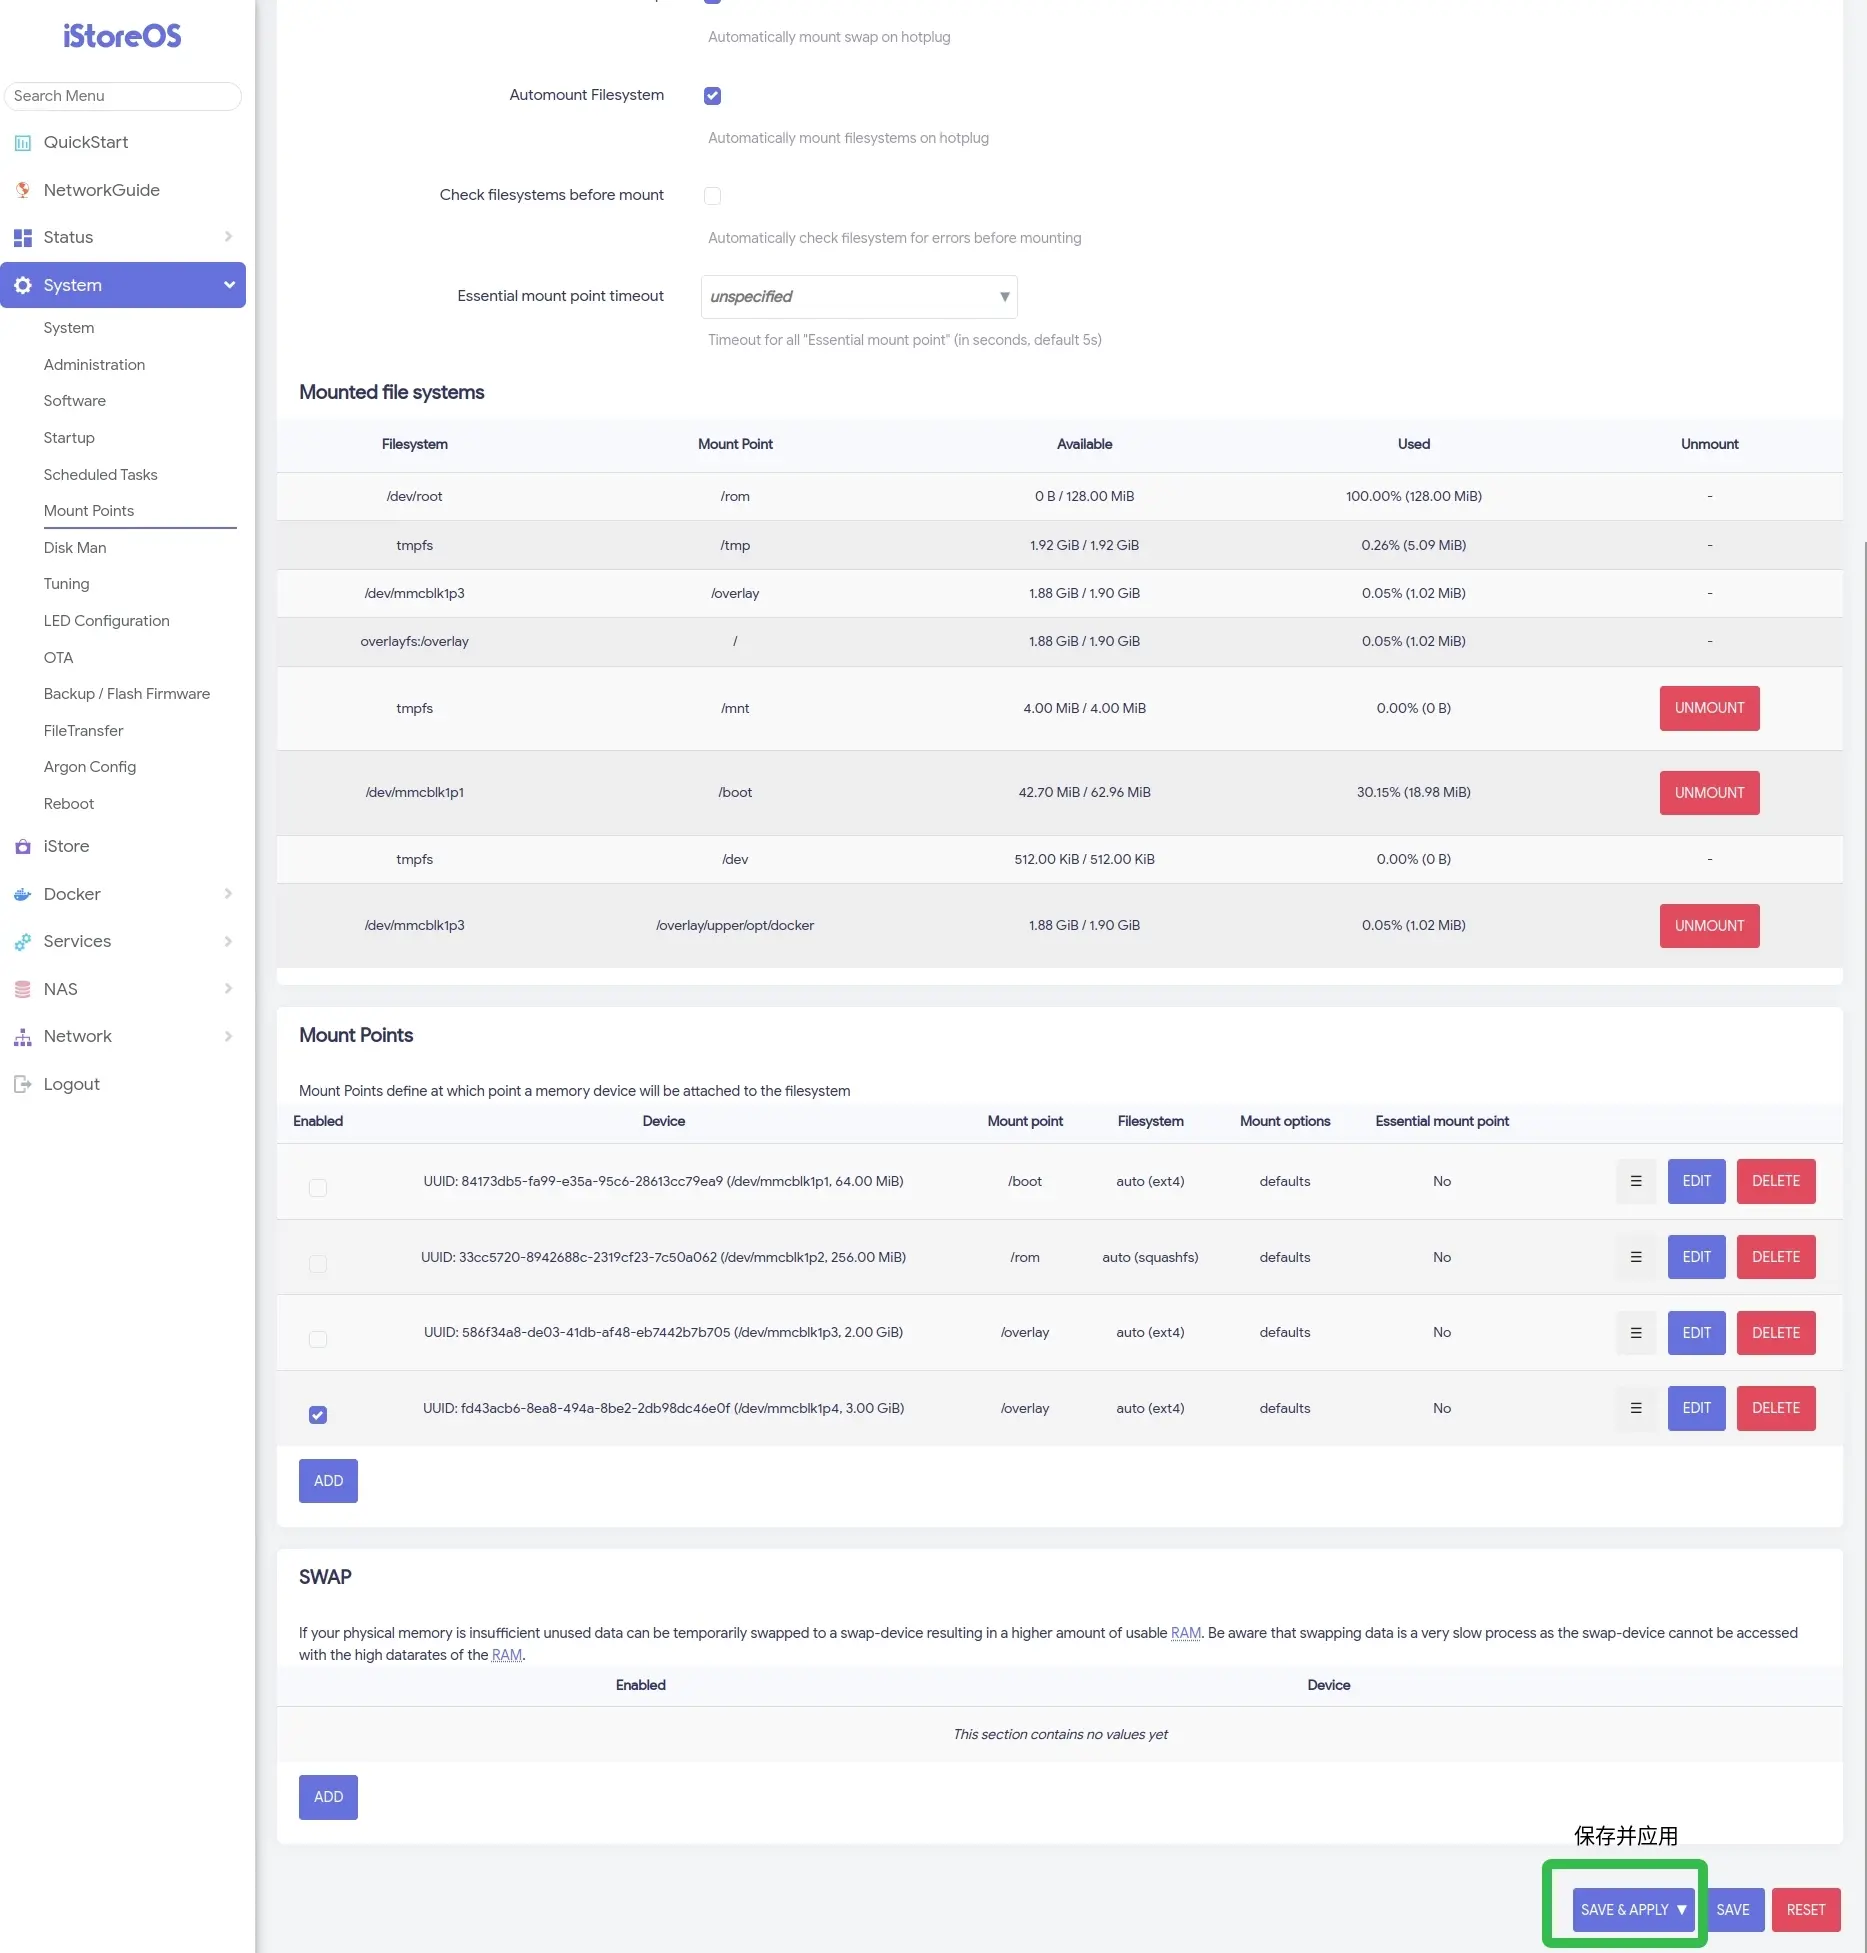
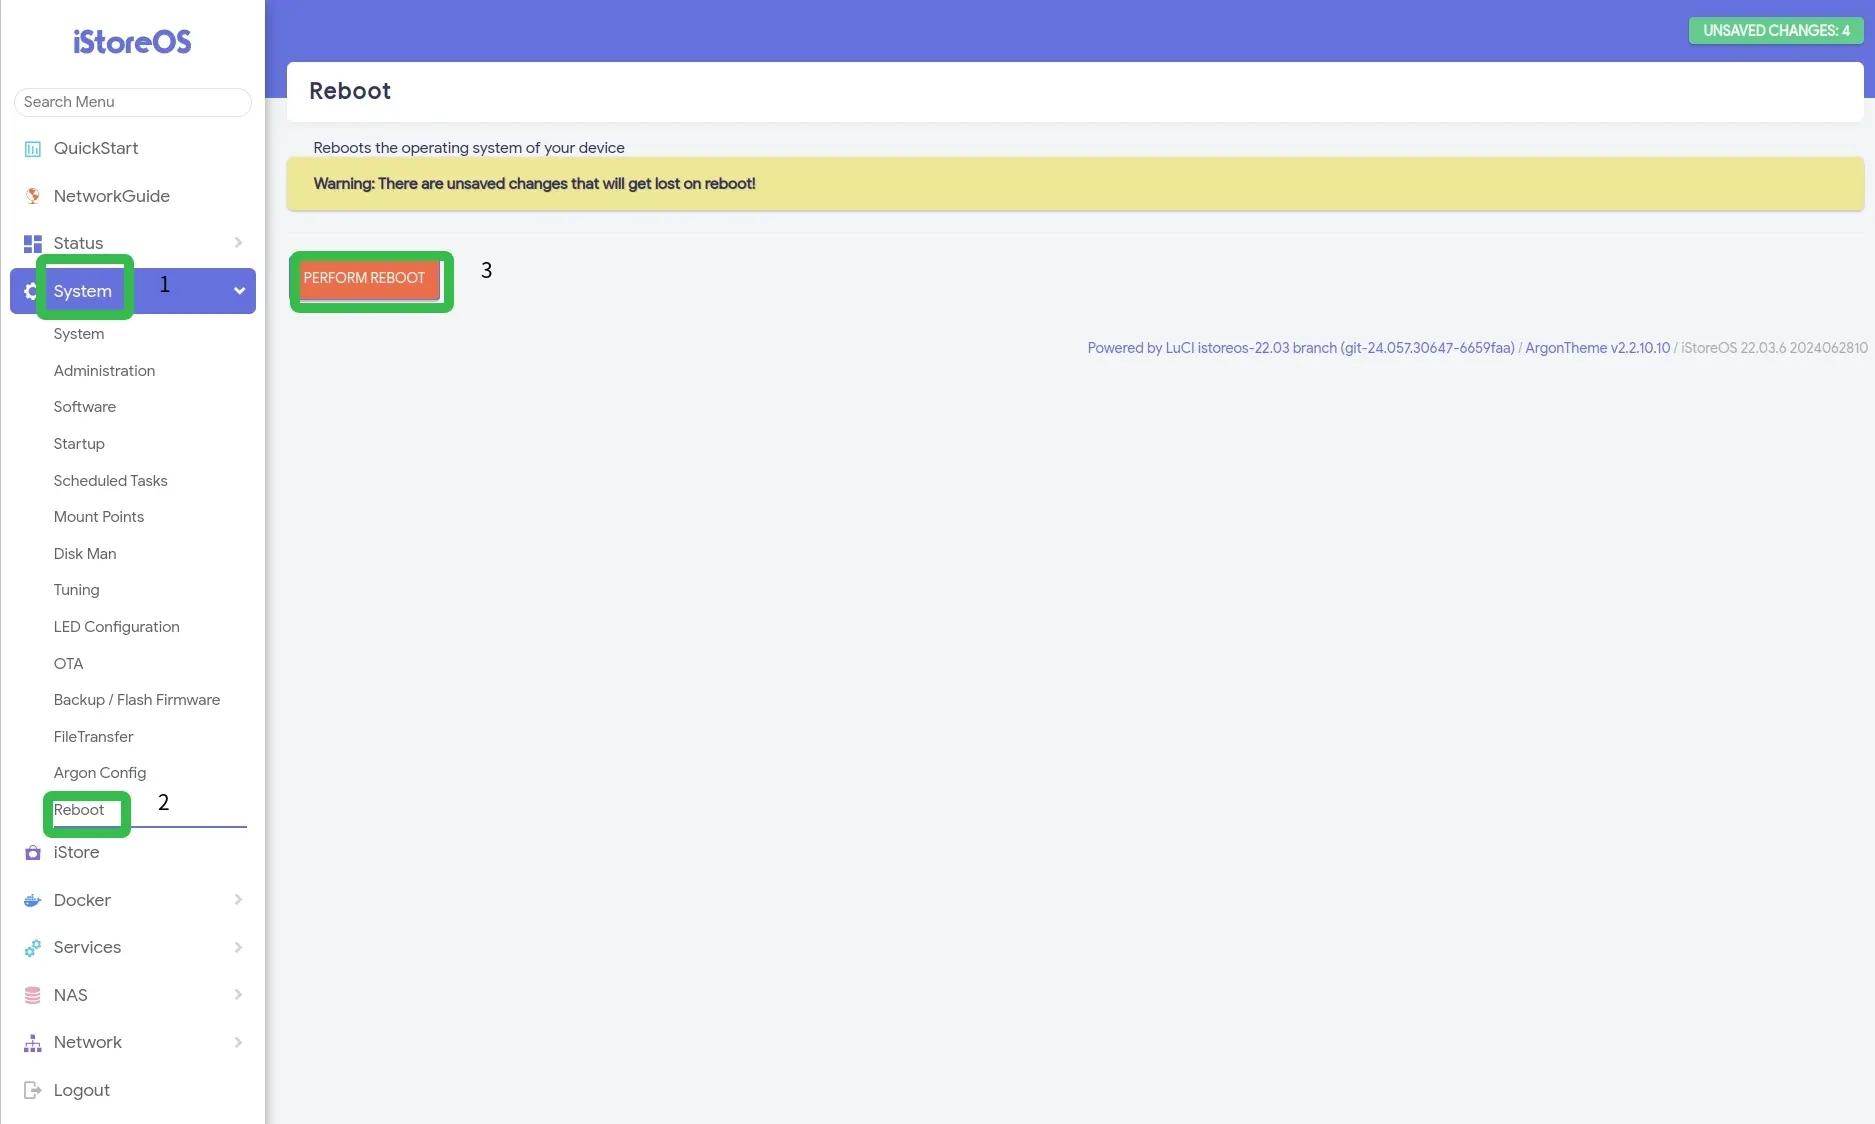
iStoreOS Expansion
Please follow the instructions in the picture to expand/scale up the capacity.