Install Ubuntu Under Linux Host
To install Ubuntu system, you need to use Genio Tools provided by MediaTek. Genio Tools includes the following tools:
genio-configChecks if the Linux or Windows host is properly configured.genio-flashprovides image writing functionality.genio-boardAllows programmatic reset of MediaTek evaluation boards.
Ubuntu host tested:
- Ubuntu 20.04
- Ubuntu 22.04
Genio Tools environment configuration
1. Install the necessary software
$ sudo apt update
$ sudo apt install -y git python3 python3-pip
Run the following command to check the Python and pip versions:
$ python3 --version
Python 3.9.2
$ pip3 --version
pip 21.2.4 from /usr/bin/pip3 (python 3.9)
If pip3 version is lower than 20.3. upgrade by running the following command:
$ pip3 install --upgrade pip
2. Fastboot Installation
$ sudo apt update
$ sudo apt install -y android-tools-adb android-tools-fastboot
If the host is running a Linux distribution other than Ubuntu, see the Android SDK Platform-Tools to install fastboot。
3. Configuring USB device rules
In order for the host to be able to communicate with the device via USB without root privileges, we need to create a udev rule that grants the user access to the device:
$ echo -n \
'SUBSYSTEM=="usb", ATTR{idVendor}=="0e8d", ATTR{idProduct}=="201c", MODE="0660", TAG+="uaccess"
SUBSYSTEM=="usb", ATTR{idVendor}=="0e8d", ATTR{idProduct}=="0003", MODE="0660", TAG+="uaccess"
SUBSYSTEM=="usb", ATTR{idVendor}=="0403", MODE="0660", TAG+="uaccess"
SUBSYSTEM=="gpio", MODE="0660", TAG+="uaccess"
' | sudo tee /etc/udev/rules.d/72-aiot.rules

$ sudo udevadm control --reload-rules

$ sudo udevadm trigger
Also, if using adb to connect to the NIO 12L, add a new udev rule and add your user account to the plugdev group:
$ echo 'SUBSYSTEM=="usb", ATTR{idVendor}=="0e8d", ATTR{idProduct}=="201c", MODE="0660", $ GROUP="plugdev"' \
 | sudo tee -a /etc/udev/rules.d/96-rity.rules
$ sudo udevadm control --reload-rules
$ sudo udevadm trigger
$ sudo usermod -a -G plugdev $USER
udev is a device manager for the Linux kernel. It can be used to grant users or groups access to devices. In this example, we add a udev rule that assigns the plugdev group to a newly created SoC USB device. In order to access the SoC, the host user account must be a member of the plugdev group.
4. Genio Tools Installation
$ pip3 install -U genio-tools
Log out and log back in after installing genio-tools. This ensures that the PATH environment variable is properly updated.
After logging back in, use genio-config to check your installation.
$ genio-config
fastboot: OK
udev rules: OK
For more information, please refer to MediaTek Official Documentation
Install Ubuntu image
Get the Ubuntu image
Go to the Resource Download to download the Ubuntu image and extract it.
Begin to install an Ubuntu system
Run genio-flash
Go to the directory where the files are located and execute the genio-flash command.
radxa@ubuntu:~$ cd ~/baoshan-classic-desktop-2204-x01-20231005-133-g1200-radxa-nio-12l-ufs-b7/
- For NIO 12L with 4GB RAM:
radxa@ubuntu:~/baoshan...ufs-b7$ cp fip-ddr4g.bin fip.bin && cp u-boot-initial-env-ddr4g u-boot-initial-env
- For NIO 12L with 8GB RAM:
radxa@ubuntu:~/baoshan...ufs-b7$ cp fip-ddr8g.bin fip.bin && cp u-boot-initial-env-ddr8g u-boot-initial-env
- For NIO 12L with 16GB RAM:
radxa@ubuntu:~/baoshan...ufs-b7$ cp fip-ddr16g.bin fip.bin && cp u-boot-initial-env-ddr16g u-boot-initial-env
radxa@ubuntu:~/baoshan...ufs-b7$ genio-flash
Output:
Genio Tools: v1.3.6
Ubuntu Image:
	edition:  Ubuntu classic/core images
	version:  22.04
	codename: jammy

WARNING:aiot:No 'ftdi-cbus' device found
WARNING:aiot:Unable to find and reset the board. Possible causes are:
1. This is not a Genio 350/700 EVK, nor a Pumpkin board.
2. The board port UART0 is not connected.
3. The UART0 port is being opened by another tool, such as TeraTerm on Windows.
You can now manually reset the board into DOWNLOAD mode.

INFO:aiot:Continue flashing...
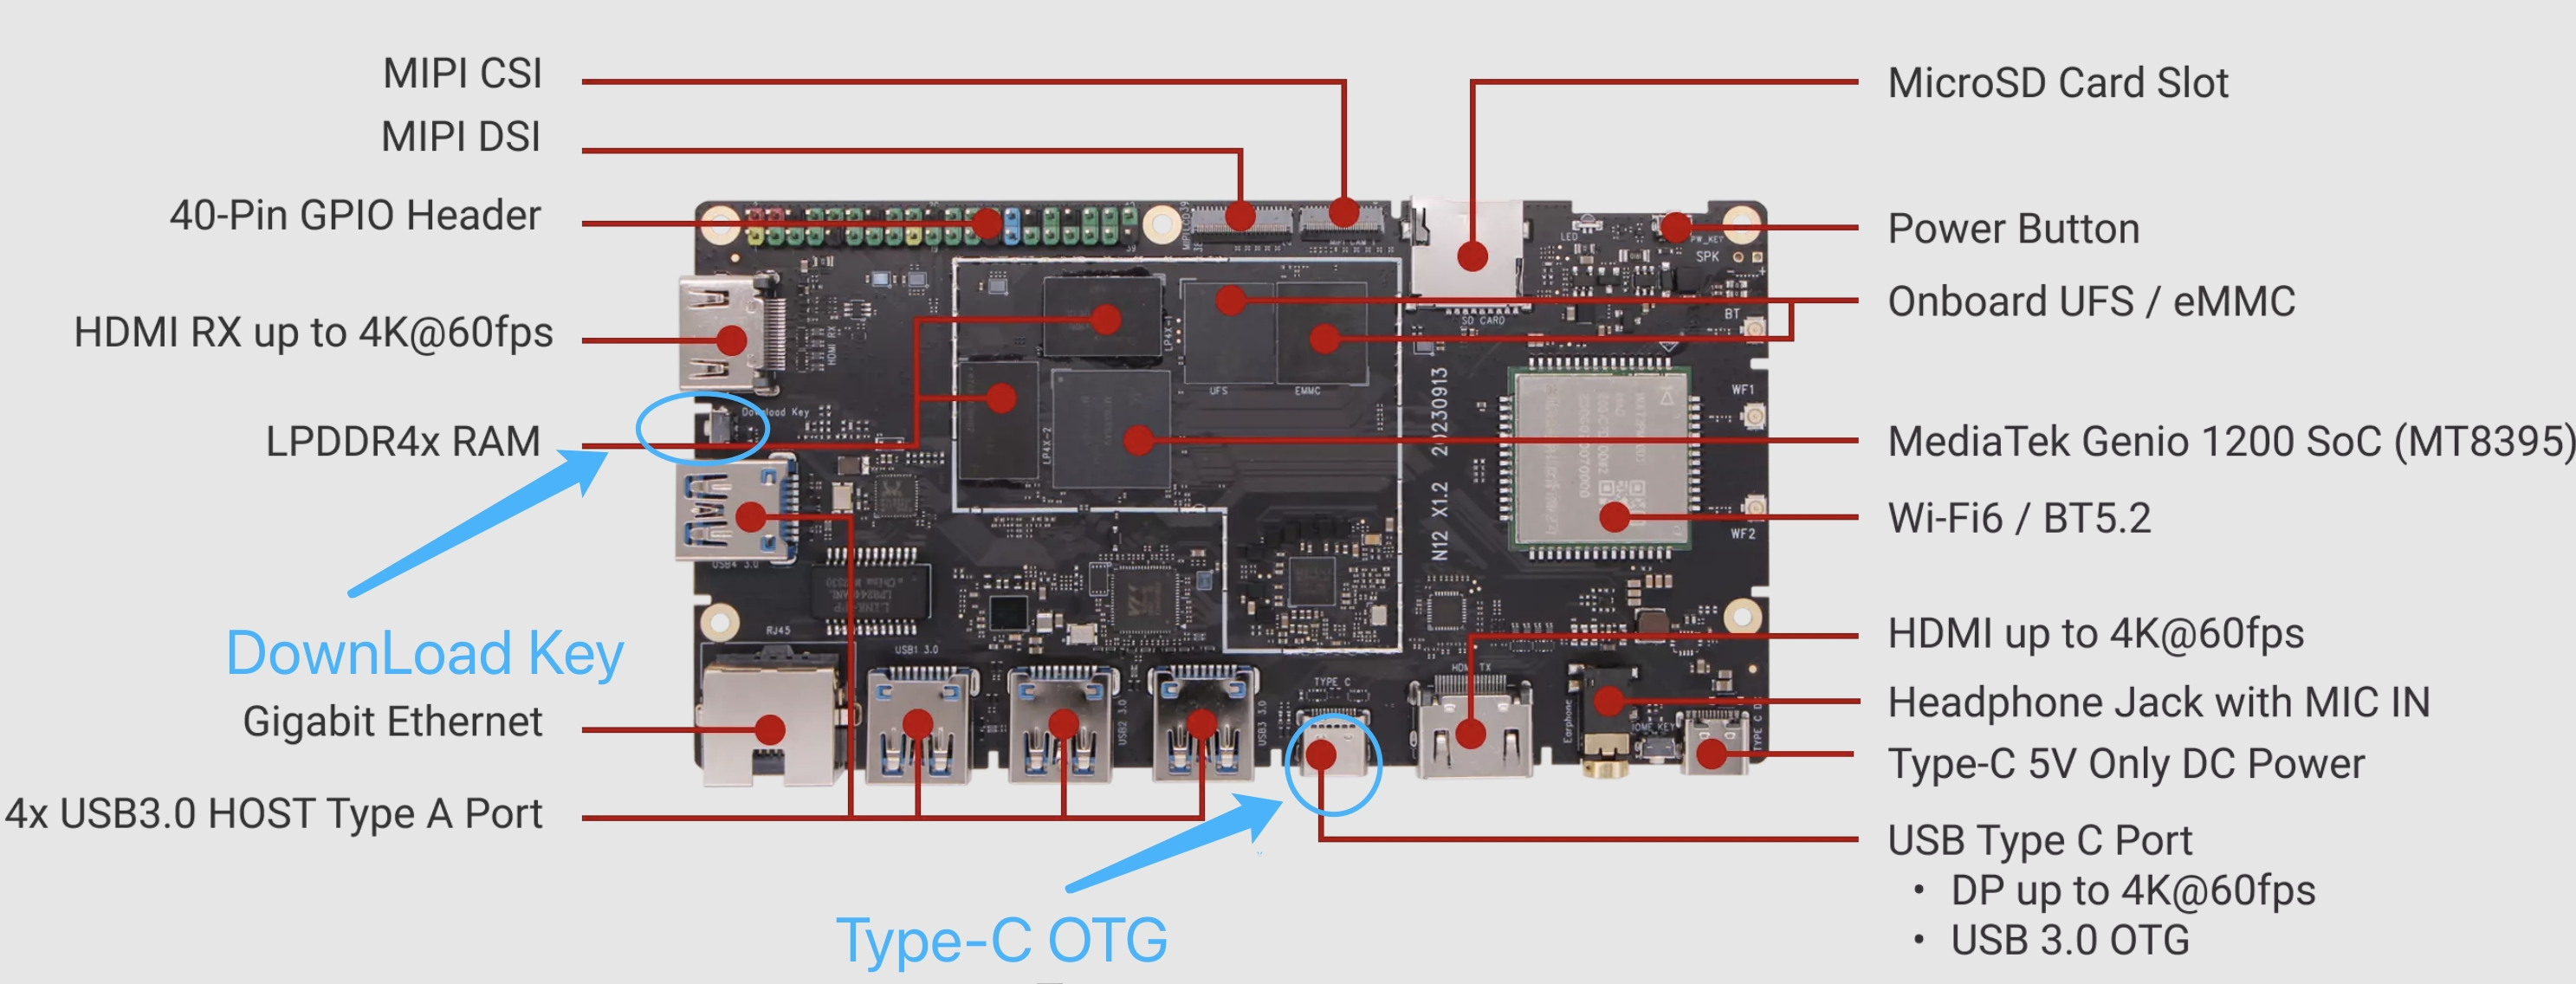
Enter Download Mode
Steps:
- Press and hold the Download Button
- Use a USB Type-C cable with one end connected to the NIO 12L's Type-C OTG port and the other end connected to the PC's USB-A port
- Release the Download Button
 After successfully entering the Download Mode, the green LED will flash and the download process will begin.
You must first execute the step "Run genio-flash" and then do the step "Enter Download Mode".