Buildroot
Environment Setup
Prepare an Ubuntu 20.04/22.04 x86_64 host machine.
A virtual machine is also acceptable:
- ubuntu-22.04.5-live-server-amd64 virtual machine with at least 120GB of available disk space.
Install Build Dependencies
sudo apt update
sudo apt install python2 git rsync gcc g++ make device-tree-compiler bc flex bison lz4 libssl-dev libgmp-dev libmpc-dev expect expect-dev file unzip bzip2 fakeroot bsdmainutils
sudo ln -s /bin/python2 /bin/python
Get Rockchip Original SDK
- Mega: https://mega.nz/file/kjZExAzL#pzw5des1W_rDzTm-P2iLAJ-n9RLYQY-gEVajpm3U_sQ
- Baidu Netdisk: https://pan.baidu.com/s/1bm4IXy7tJ-sBDVdMxehRAQ?pwd=1pty
Extract the SDK
On the Ubuntu PC, use the following commands to extract the SDK:
tar xvf rk3588_linux6.1_rkr4_sdk.repo.tar
.repo/repo/repo sync -l
Add ROCK 5C Board Support
Use Radxa's maintained rockchip repository:
cd device/rockchip
git remote add radxa https://github.com/radxa/device-rockchip.git
git fetch radxa
git checkout -b rk3588-linux-6.1 remotes/radxa/rk3588-linux-6.1
Use Radxa's maintained u-boot repository:
cd u-boot
git remote add radxa https://github.com/radxa/u-boot.git
git fetch radxa
git checkout -b next-dev-buildroot remotes/radxa/next-dev-buildroot
Use Radxa's maintained kernel repository:
cd kernel
git remote add radxa https://github.com/radxa/kernel.git
git fetch radxa
git checkout -b linux-6.1-stan-rkr4.1-buildroot remotes/radxa/linux-6.1-stan-rkr4.1-buildroot
Use Radxa's maintained rkwifibt repository:
cd external/rkwifibt
git remote add radxa https://github.com/radxa/rkwifibt.git
git fetch radxa
git checkout -b develop remotes/radxa/develop
Use Radxa's maintained buildroot repository:
cd buildroot
git remote add radxa https://github.com/radxa/buildroot.git
git fetch radxa
git checkout -b rockchip/2024.02 remotes/radxa/rockchip/2024.02
Add WiFi Module Configuration
Before building the SDK, enable the WiFi-related configurations as follows:
Enable AIC8800D80_USB Macro
In the SDK's top-level directory, run make menuconfig, search for the keyword "aic" to find the "supported modules" option, and select "AIC8800D80 USB" as shown below:
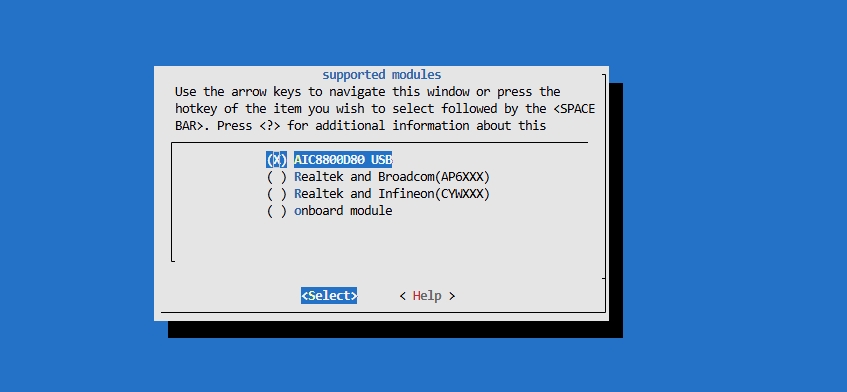
After selection, the WiFi module driver files will be compiled into the rootfs.
Enable BR2_PACKAGE_RKWIFIBT_AIC8800D80_USB_FIRMWARE Macro
For the WiFi module to function properly, firmware needs to be loaded.
Add BR2_PACKAGE_RKWIFIBT_AIC8800D80_USB_FIRMWARE=y to the buildroot/configs/rockchip_rk3588_defconfig file as shown below:
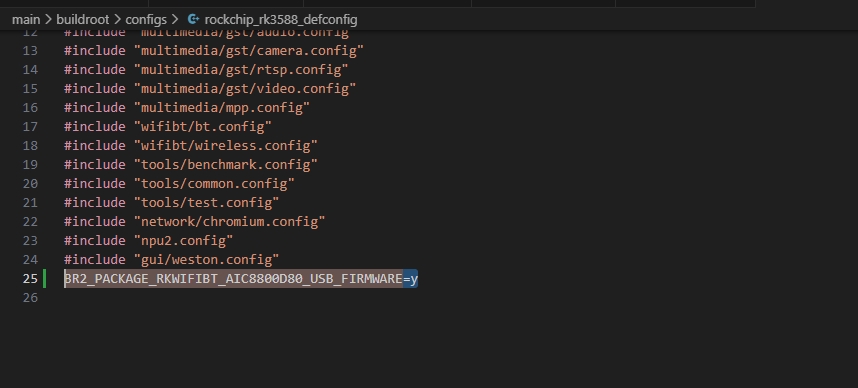
Enabling BR2_PACKAGE_RKWIFIBT_AIC8800D80_USB_FIRMWARE will install the WiFi firmware in the system.
Build the SDK
In the SDK's top-level directory, run the command:
./build.sh
Then select the configuration file rockchip_rk3588s_rock_5c_defconfig.
After the build is complete, the images will be generated in the rockdev/ directory. The system image file is update.img.
Flash the Image
Flash Image to eMMC
On a Linux/Mac OS host, use the upgrade_tool utility through the Type-A port to flash the system image update.img to eMMC:
upgrade_tool uf update.img
On a Windows host, use the RKDevTool utility through the Type-A port to flash the system image update.img to eMMC.
Flash Image to microSD Card
Use SDDiskTool to flash the generated image to a microSD Card.
SDDiskTool is Rockchip's official SD card flashing tool.
-
Download SDDiskTool
-
SDDiskTool currently only has a Windows version, so please use it on a Windows computer.
-
Download link:SDDiskTool_en_v1.74.zip
-
-
Flash SD card
-
We need to flash the corresponding complete image in RK format.
-
Complete image in RK format refers to The
update.imgimage compiled using a series of Linux SDKs released by Rockchip based on Buildroot -
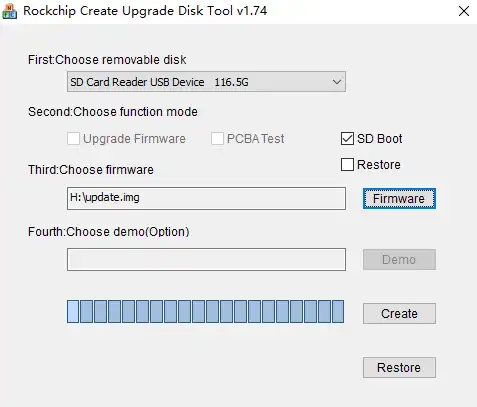
Open the executable file
SD_Firmware_Tool.exeof SDDiskTool and insert the SD card.warningWhen multiple storage devices are connected, please ensure you select the correct SD card to flash, otherwise other storage devices may be overwritten.
-
Select the SD card to flash from the removable disk devices, choose SD Boot as the function mode, ensure that the firmware upgrade is a complete image in RK format, and finally click Create to flash the image.
-
Please be patient during the flashing process. The image contains many partitions, and if the image is large, the flashing time will be longer.
-
If you encounter problems clearing the MBR while burning, you need to change the SD card disk label type from dos to gpt.
- Windows
- Linux
-
Delete all partitions and convert to gpt using command prompt under windows
-
Press Win + X and select Windows Terminal (Administrator) or Command Prompt (Administrator).
-
Enter the following command and press Enter:
-
diskpart
- Then, enter the following command to list all disks:
list disk
- Locate your SD card (assuming it is disk 3) and enter:
select disk 3
-
(If your SD card has a different disk number, change 3 to the correct number accordingly.)
-
Clear all partitions on the disk:
clean
-
(This deletes all partitions and data on the SD card.)
-
Converts a disk to GPT format:
convert gpt
- Type
exitto exit the diskpart utility.
-
Use the fdisk command to change the label format to gpt on Linux.
- Find your SD card (assuming it's /dev/sdb) and enter:
sudo fdisk /dev/sdb
-
Type
pand the label format and partition of the current disk will be displayed. -
Then type
gto convert the disk to gpt format -
Then just type
wqto save and exit.