YOLOv8 Example
This document introduces how to use the CIX P1 NPU SDK to convert YOLOv8 into a model that can run on the CIX SOC NPU.
There are four main steps:
Steps 1-3 should be executed in an x86 Linux environment.
- Download the NPU SDK and install the NOE Compiler
- Download the model files (code and scripts)
- Compile the model
- Deploy the model to Orion O6
Download the NPU SDK and Install the NOE Compiler
Refer to Install NPU SDK for the installation of the NPU SDK and NOE Compiler.
Download Model Files
The CIX AI Model Hub includes all necessary files for YOLOv8. Please follow the instructions in Download the CIX AI Model Hub Repository and navigate to the corresponding directory.
cd ai_model_hub/models/ComputeVision/Object_Detection/onnx_yolov8_l
Ensure that the directory structure matches the following:
.
├── cfg
│   └── yolov8_lbuild.cfg
├── datasets
│   ├── calibration_data.npy
│   └── input0.bin
├── graph.json
├── inference_npu.py
├── inference_onnx.py
├── ReadMe.md
└── test_data
    ├── 1.jpeg
    └── ILSVRC2012_val_00004704.JPEG
Compile the Model
Users do not need to compile the model from scratch. Radxa provides a precompiled yolov8_l.cix model (which can be downloaded using the command below). If using the precompiled model, you can skip the "Compile the Model" step.
wget https://modelscope.cn/models/cix/ai_model_hub_24_Q4/resolve/master/models/ComputeVision/Object_Detection/onnx_yolov8_l/yolov8_l.cix
Prepare the ONNX Model
-
Download the ONNX model:
-
Simplify the model:
Use
onnxsimfor model input shape fixing and simplification:pip3 install onnxsim onnxruntime
onnxsim yolov8l.onnx yolov8l-sim.onnx --overwrite-input-shape 1,3,640,640
Compile the Model
The CIX SOC NPU supports INT8 computation. Before compiling, we need to use the NOE Compiler to perform INT8 quantization.
-
Prepare the calibration dataset:
-
Use the existing dataset in
datasets:.
└── calibration_data.npy -
Prepare your own calibration dataset:
The
test_datadirectory already contains several calibration images:.
├── 1.jpeg
└── ILSVRC2012_val_00004704.JPEGUse the following script to generate a calibration file:
import sys
import os
import numpy as np
_abs_path = os.path.join(os.getcwd(), "../../../../")
sys.path.append(_abs_path)
from utils.image_process import preprocess_object_detect_method1
from utils.tools import get_file_list

# Get a list of images from the provided path
images_path = "test_data"
images_list = get_file_list(images_path)
data = []

for image_path in images_list:
    input = preprocess_object_detect_method1(image_path, (640, 640))[3]
    data.append(input)

# Concatenate the data and save the calibration dataset
data = np.concatenate(data, axis=0)
np.save("datasets/calib_data_tmp.npy", data)
print("Calibration dataset generated successfully.")
-
-
Use the NOE Compiler to quantize and compile the model:
-
Create a configuration file for quantization and compilation:
[Common]
mode = build

[Parser]
model_type = ONNX
model_name = yolov8_l
detection_postprocess =
model_domain = OBJECT_DETECTION
input_data_format = NCHW
input_model = ./yolov8l-sim.onnx
input = images
input_shape = [1, 3, 640, 640]
output_dir = ./

[Optimizer]
dataset = numpydataset
calibration_data = datasets/calib_data_tmp.npy
calibration_batch_size = 1
output_dir = ./
dump_dir = ./
quantize_method_for_activation = per_tensor_asymmetric
quantize_method_for_weight = per_channel_symmetric_restricted_range
save_statistic_info = True
trigger_float_op = disable & <[(258, 272)]:float16_preferred!>
weight_bits = 8& <[(273,274)]:16>
activation_bits = 8& <[(273,274)]:16>
bias_bits = 32& <[(273,274)]:48>

[GBuilder]
target = X2_1204MP3
outputs = yolov8_l.cix
tiling = fps
profile = True -
Compile the model:
tipIf
cixbuildthrows an error[E] Optimizing model failed! CUDA error: no kernel image is available for execution on the device ..., it means the current version oftorchdoes not support this GPU. Uninstall the current version completely and install the latest version from the official PyTorch website.cixbuild ./yolov8_lbuild.cfg
-
Model Deployment
NPU Inference
Copy the compiled .cix model to the Orion O6 development board for verification:
python3 inference_npu.py --image_path ./test_data/ --model_path ./yolov8_l.cix
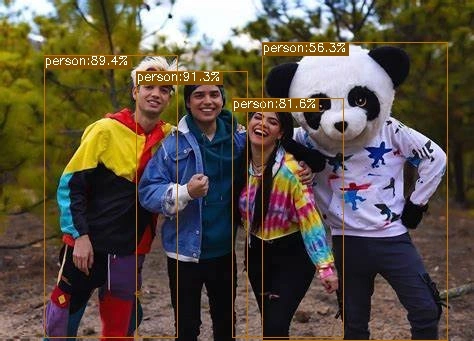
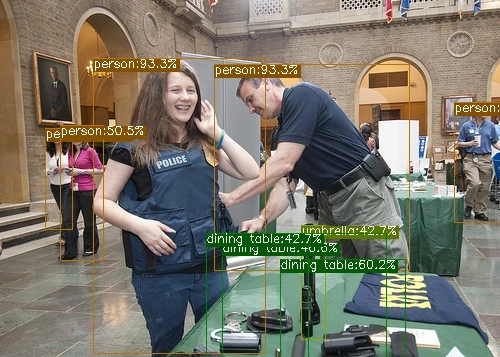
Results are saved in the output_npu folder:
CPU Inference
Run inference on the ONNX model using the CPU, either on an x86 host or Orion O6:
python3 inference_onnx.py --image_path ./test_data/ --onnx_path ./yolov8l.onnx
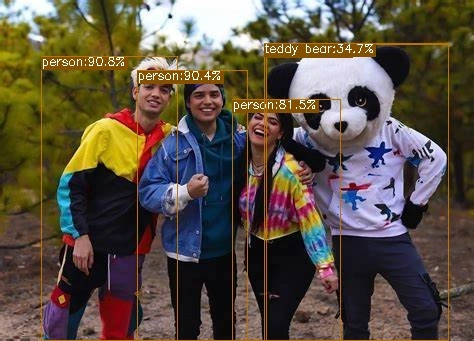
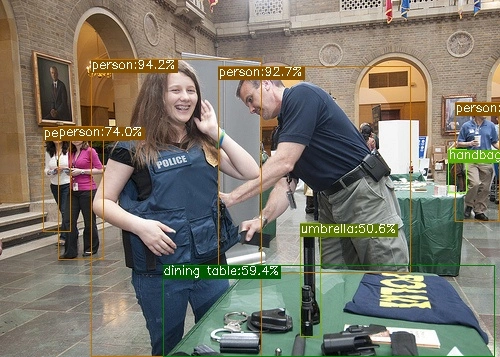
Results are saved in the output_onnx folder:
The inference results on both NPU and CPU are consistent, but the execution time is significantly reduced on the NPU.