Radxa OS
Introduces system login, network connection, etc to let user to be familiar with the system quickly.
User name and Password
User name:radxa/rock
Password: radxa/rock
Serial Debug
Most of radxa's products define pins 8 (TX) and 10 (RX) on the GPIO pins as UART serial communication interfaces to make it easier to troubleshoot problems in the early startup phase of the system.
Preparation
- Radxa product with GPIO, compatible power supply
- PC
- USB to TTL Serial Cable
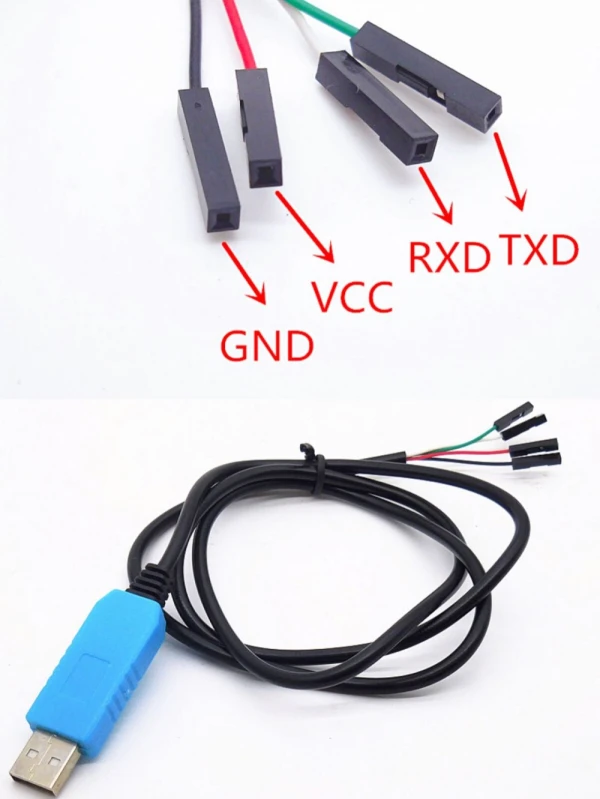
Please connect according to the pin functions specified by the cable’s manufacturer. The diagram illustrates the pin functions of a common USB serial cable.
For Radxa products based on Rockchip chips, the default UART configuration is 1500000n8 without flow control.
Please check if your USB to TTL serial cable supports 1.5M baud rate:
- Based on CP210X and PL2303x some products have baud rate limitations.
- Based on FT232RL, some products have power issues.
The following text uses a serial cable based on CH340.
Serial Connection
As shown below, connect the USB to TTL serial cable:
| Radxa SBC | Connection | Serial Cable |
|---|---|---|
| GND (pin 6) | <---> | Black line (GND) |
| TX (pin 8) | <---> | White line (RXD) |
| RX (pin 10) | <---> | Green line (TXD) |

Please do not connect the red power line!
Using Serial Tools
For Radxa products based on Rockchip chips, the default UART configuration is as follows:
baudrate: 1500000
data bit: 8
stop bit: 1
parity  : none
flow control: none
- Windows
- Linux
- Mac
Windows
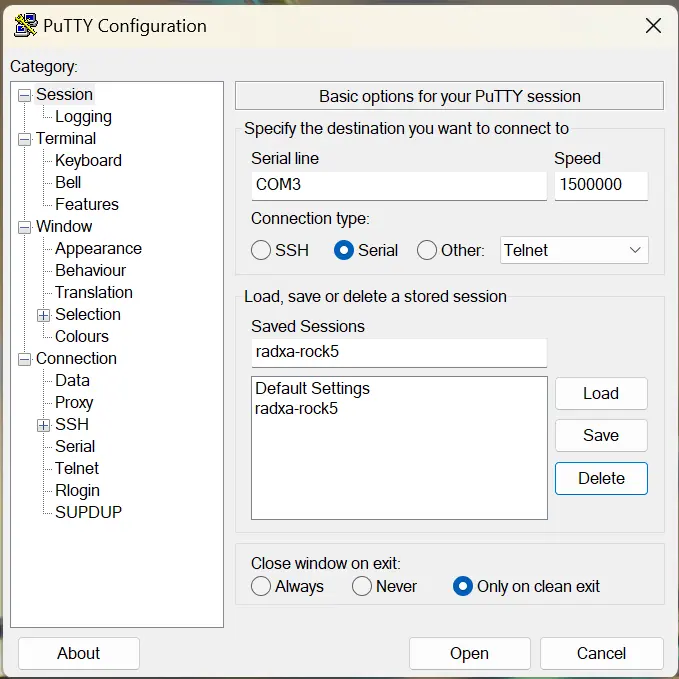
Putty is a serial tool that supports multiple baud rates on Windows. Here's how to use Putty to connect to the serial port.
-
Download Putty and install it.
-
Plug the USB to TTL serial cable into the PC, check the Device Manager to find the COM number. Here, assume it is COM3.
-
Open Putty and set it up as follows:
- Select Session in the left column, set the serial line to COM3, baud rate to 1500000, and connection type to Serial.
- Write radxa-rock5 in the Saved Sessions column and click Save.
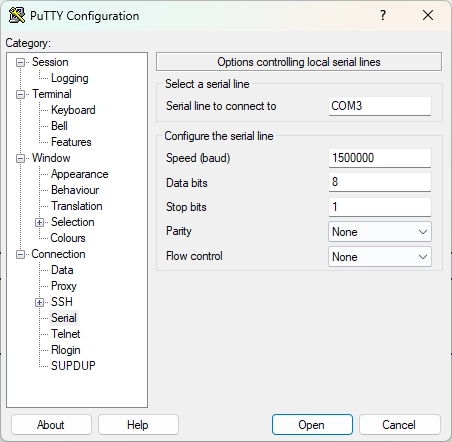
- Select Serial at the bottom of the left column and configure it as follows:
Make sure to set Flow control to None (or XON/XOFF if your terminal supports it). Hardware flow control should be disabled for Radxa products.
- After setting up, click Open to open the serial port. Make sure the TTL end is correctly connected, then turn on the power to the board.
Linux
Minicom is a serial tool that supports multiple baud rates on Linux. Here's how to use Minicom to connect to the serial port.
- Plug the USB end of the serial cable into the host PC, then find the serial device:
On the terminal, type dmesg | tail to get a printout similar to the following:
[10.654076] usb 1-6.4.3: new full-speed USB device number 103 using xhci_hcd
[10.755730] usb 1-6.4.3: New USB device found, idVendor=0403, idProduct=6001
[10.755732] usb 1-6.4.3: New USB device strings: Mfr=1, Product=2, SerialNumber=0
[10.755733] usb 1-6.4.3: Product: USB <-> Serial
[10.755734] usb 1-6.4.3: Manufacturer: FTDI
[10.756728] ftdi_sio 1-6.4.3:1.0: FTDI USB Serial Device converter detected
[10.756750] usb 1-6.4.3: Detected FT232BM
[10.757195] usb 1-6.4.3: FTDI USB Serial Device converter now attached to ttyUSB0
As shown in the last line, /dev/ttyUSB0 is the newly inserted serial device.
Maybe there is no permission to read and write the serial port.
Temporary solution: Change the permission with the chmod command
sudo chmod 777 /dev/ttyUSB0
Permanent solution: Add the current user to the dialout group
sudo usermod -aG dialout $USER
- Install minicom:
sudo apt-get update
sudo apt-get install minicom
- Set up minicom:
Please add the current non-root or non-sudo user to the plugdev group first.
sudo usermod -aG plugdev $USER
Edit ~/.bashrc and add the following parameters. After reopening a new terminal, it will take effect.
alias minicom='minicom -w -t xterm -l -R UTF-8'
Create and edit the file ~/.minirc.1500000-usb0, add the following content:
pu port             /dev/ttyUSB0
pu baudrate         1500000
pu bits             8
pu parity           N
pu stopbits         1
pu rtscts           No
- Run the following command to connect to the device, specifying the parameter 1500000-usb0 to use the above configuration.
minicom 1500000-usb0
Mac
Picocom is a serial tool that supports multiple baud rates on Mac. Here's how to use Picocom to connect to the serial port.
- Install picocom
% brew install --build-from-source radxa/picocom/picocom
- Open picocom
% picocom -b 1500000 -d 8 /dev/tty.usbserial-2130
FAQs
- When using the debug console, the system startup information is displayed on the screen, but I cannot enter text using the keyboard?
It may be that
Hardware Flow Controlis enabled by default. After turning offHardware Flow Control, it should return to normal.
Setting Network
Connect WiFi
nmcli device wifi                                           # Scan WiFi
sudo nmcli device wifi connect <ssid> password <passwd>     # Connect to WiFi