Quick Setup
Username and password
| User name | Password |
|---|---|
| radxa | radxa |
| rock | rock |
Note: The default credentials above (radxa/radxa and rock/rock) are correct. If you are unable to log in using these credentials, try the following:
- Ensure you have entered the username and password correctly (note case sensitivity)
- Try logging in via serial console for troubleshooting
If none of the above methods work, it may be because the user creation process was not completed during the first system boot (e.g., due to power loss during initial setup). In this case, please re-flash the system image.
Updating the system
See the System Update section to update your system.
Network
Set Ethernet
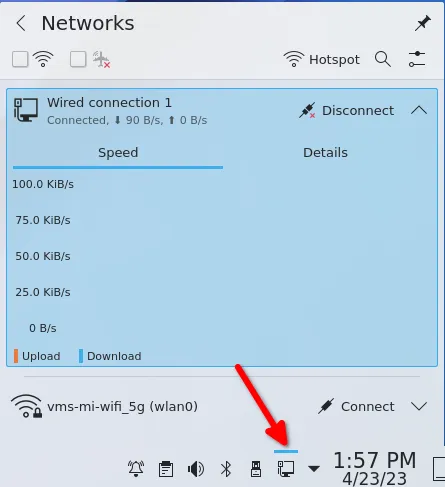
When using wired Internet access, please plug the network cable into the RJ45 port. There will be a network connection icon at the bottom right corner of your desktop, select the network you want to connect to, and you will be able to access the Internet.
Set WLAN
If you need to connect to the Internet wirelessly, you need to have a wireless module. The following is the tutorial of Radxa ROCK 5A wireless Internet access:
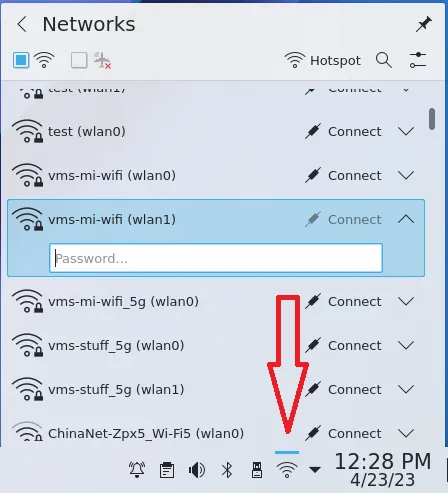
• Click the WiFi icon in the lower right corner of the desktop, select the WiFi you want to connect to and enter the password.
• In the KDE Wallet Service interface, follow the tutorial and set up the wallet.
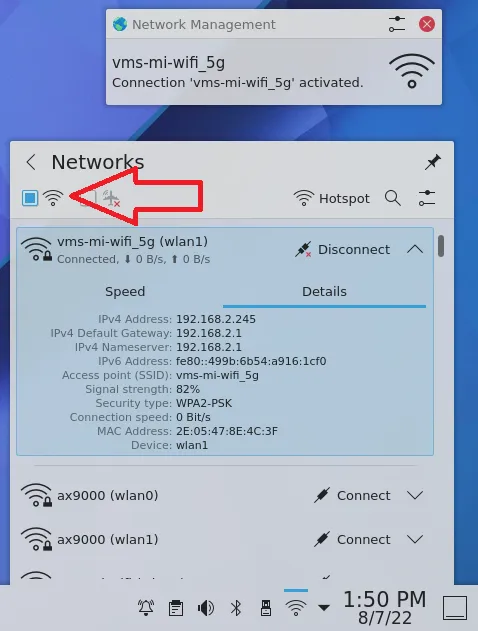
• If the WiFi connection is successful, network management will show that your wifi name is activated. If you want to turn off wifi, click the box pointed by the arrow to cancel the wifi connection.
Static IP settings
Networks typically use dynamic IP addresses to better manage IP address allocation on the network. Dynamic IP addresses are automatically assigned through DHCP (Dynamic Host Configuration Protocol), which means that each device is assigned a unique IP address when it connects to the network. This approach makes it easier to manage the network and avoids the possibility of IP address conflicts between devices.
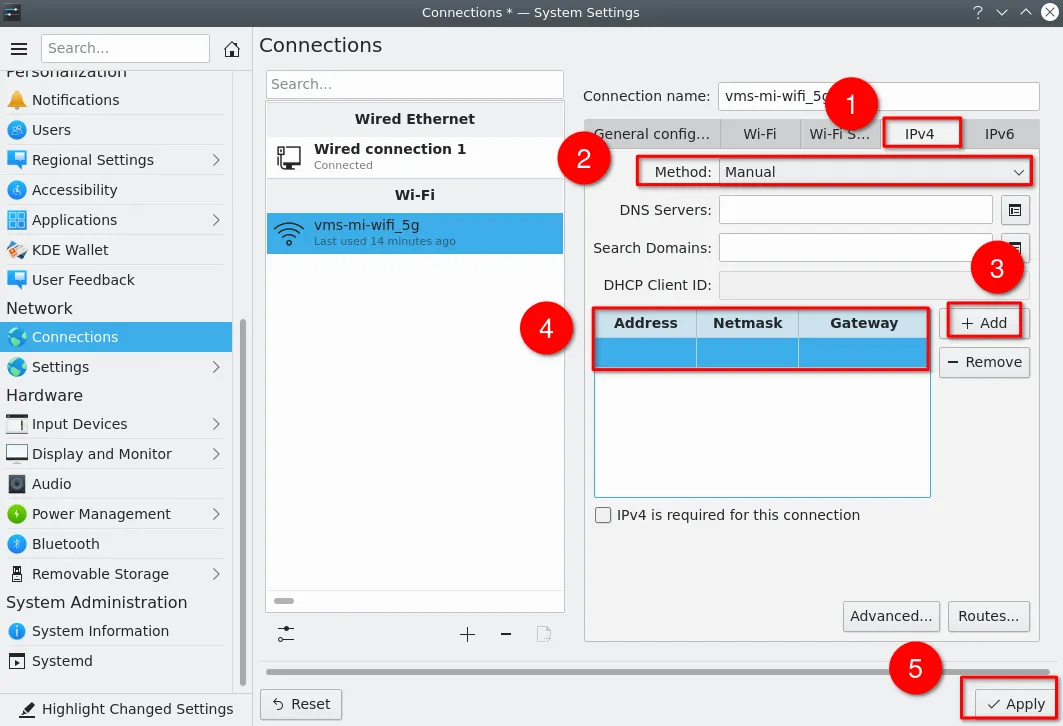
If you want to set a static IP address, you will need to manually assign a fixed IP address for the device.
As shown in the following operations:
system setting >> connections >> wire-ed Ethernet or Wi-Fi >> IPv4 >> select Manual >> Add >> enter address, netmask, gatewat >> Apply
Locale
Change sysytem language
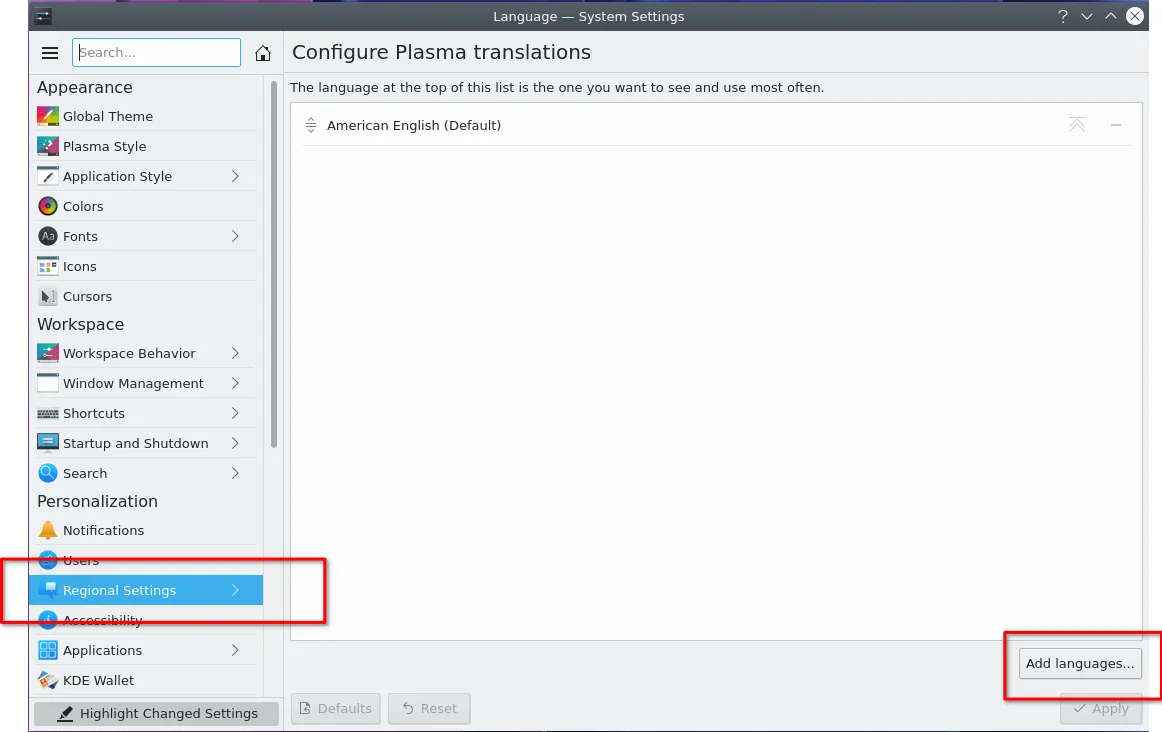
Note: The default setting of the system is English, if you need other languages, please follow the instructions below.
In the system settings, click regional settings to add language.
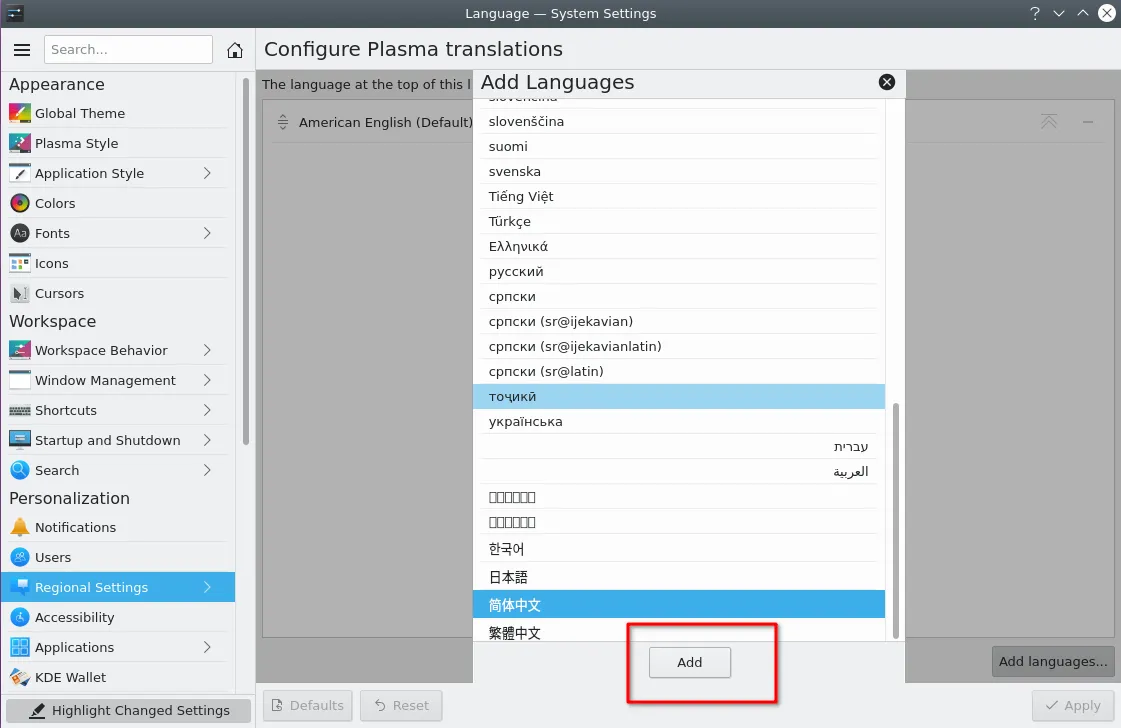
Select language you want and click Add.
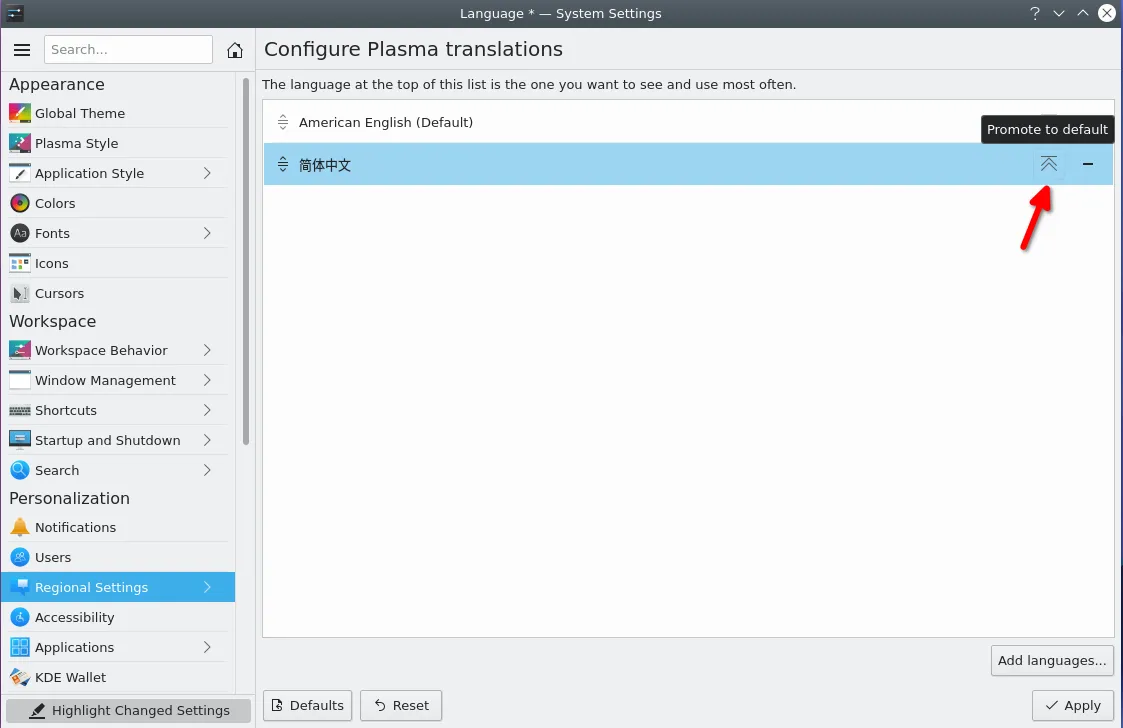
In the new language column, click the up icon to promote to default, and click Apply. Restart your computer that the system language will be setting new language.
Change language input method
Debian system only has English input method by default, if you need input method in other languages, you need to install it separately. Here we give an example of how to install Pinyin.
Environment configuration
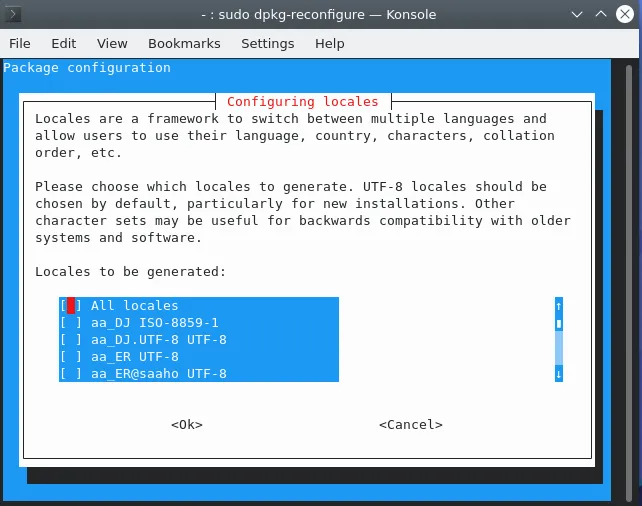
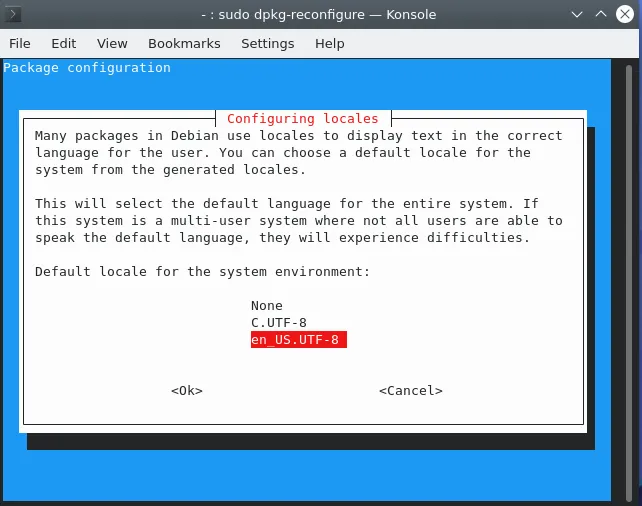
If the Debian environment is not the Chinese environment and needs to switch to the Chinese environment, you can use the following command to switch, then enter user password
sudo dpkg-reconfigure locales
Press the space or enter to select OK to prepare for the next step of installation.
Execute the following commands to update and install the system environment software:
sudo apt update
Install fctix Chinese input method
- Open the command terminal and enter the following command:
sudo apt install fcitx # Type "Y" and the package will be installed.
- Execute the Chinese input method command you need to install, then enter user password.
sudo apt install fcitx-googlepinyin # Type "Y" to complete the installation.
After the installation is successful, please restart the computer, and the keyboard icon will be displayed on the taskbar of the computer.
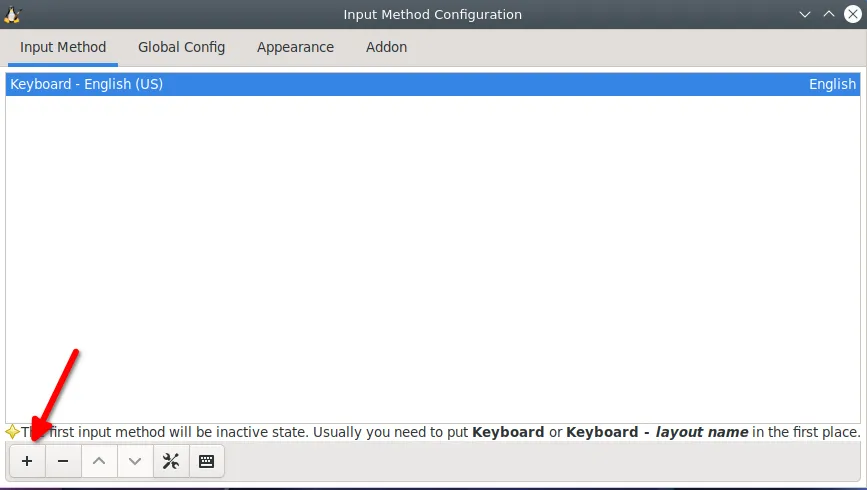
Right-click the keyboard picture and then click configure
![]()
Click '+' add new language input method.
Click the box to cancel "only show current language"
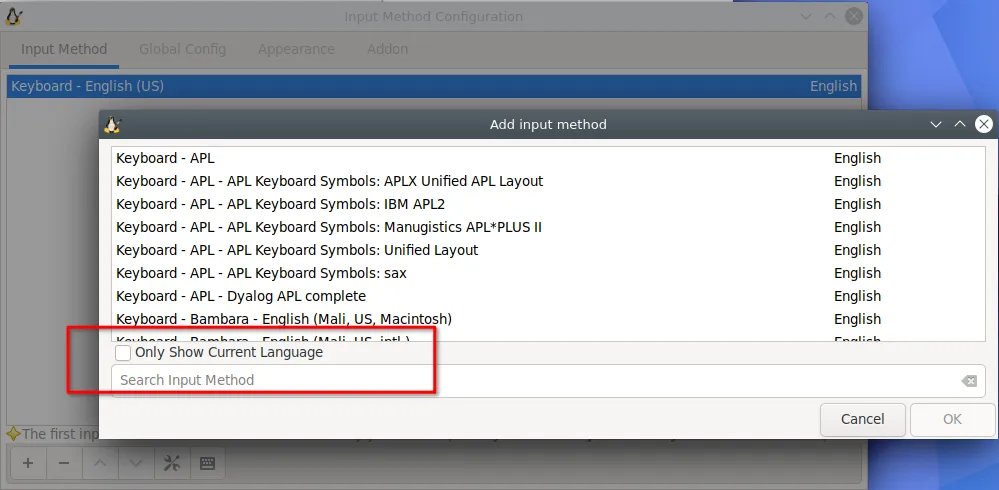
Enter Google pinyin in the search box and click ok to complete adding a new language input method.
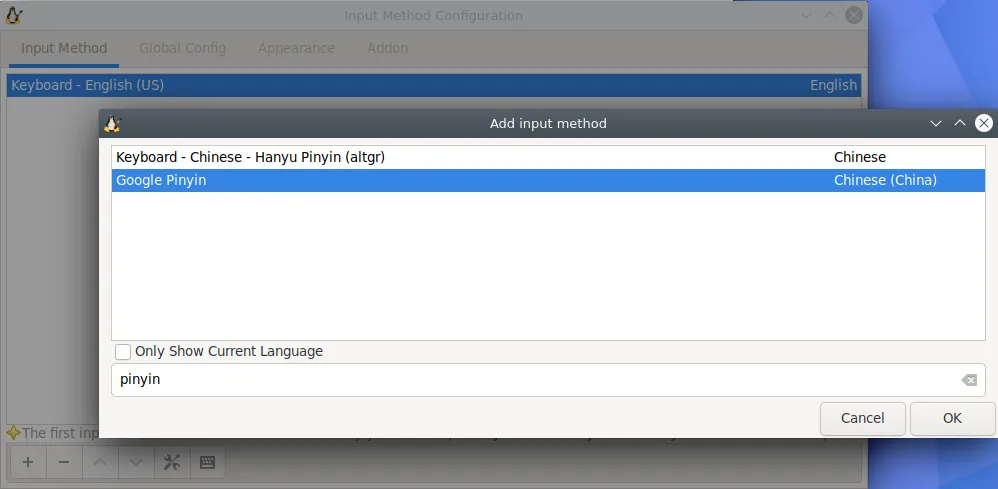
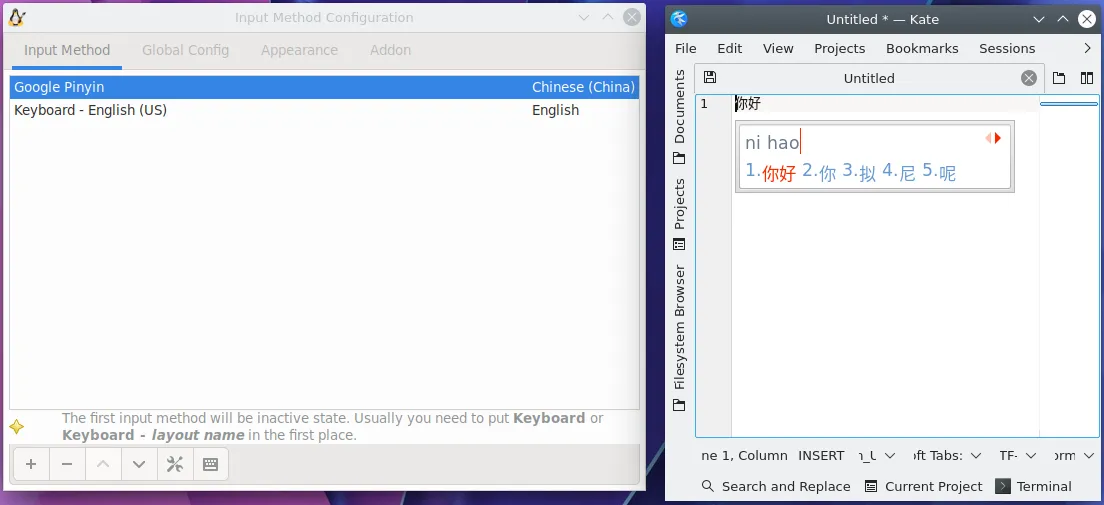
Click ^ to adjust language priority as shown.
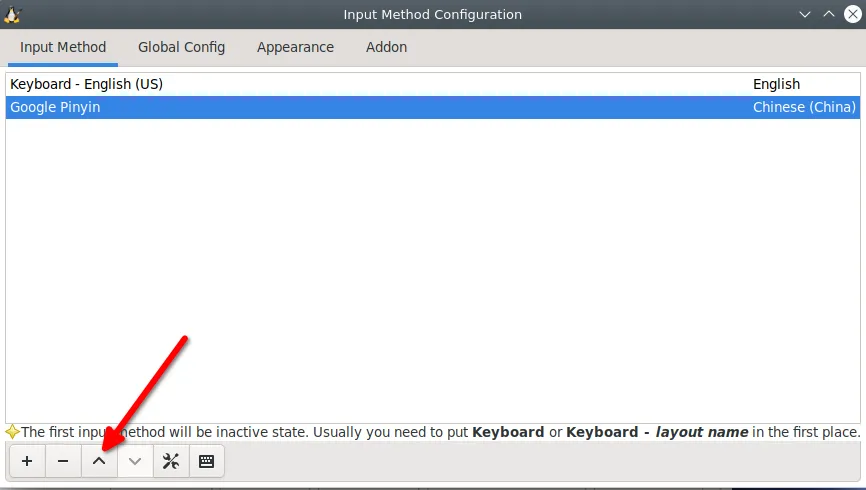
Now you can start working with Pinyin. If you want to switch the language, you only click the keyboard icon to switch the language input method.
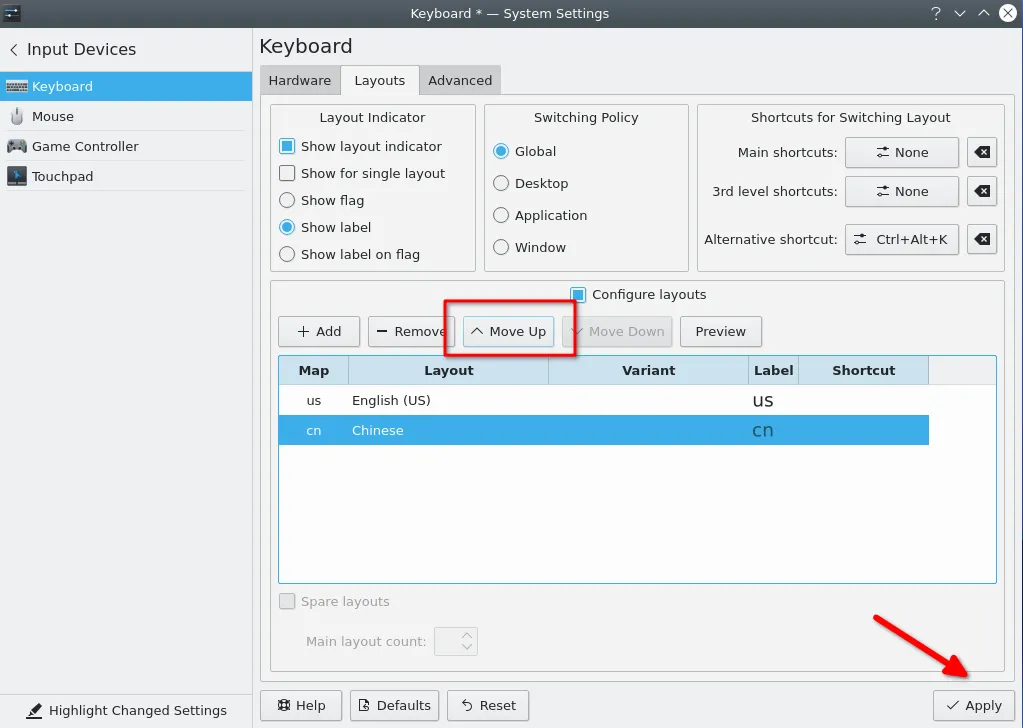
Keyboard Layout
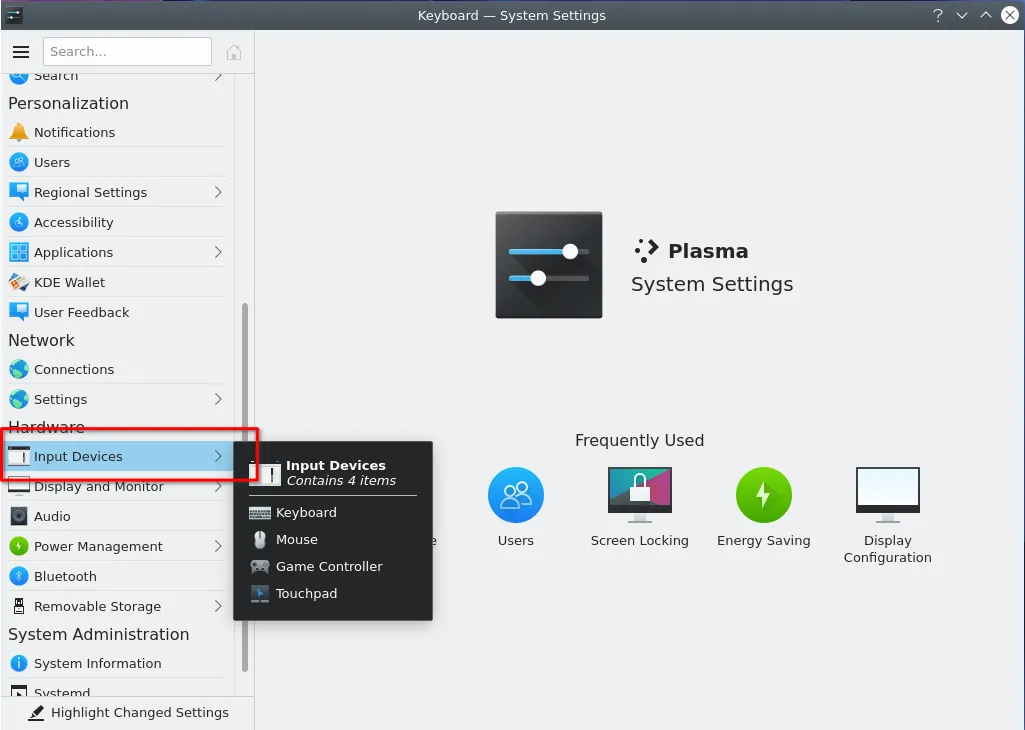
Open the input devices in the system interface.
Click Layouts and then click Add to choose the keyboard layout you want.
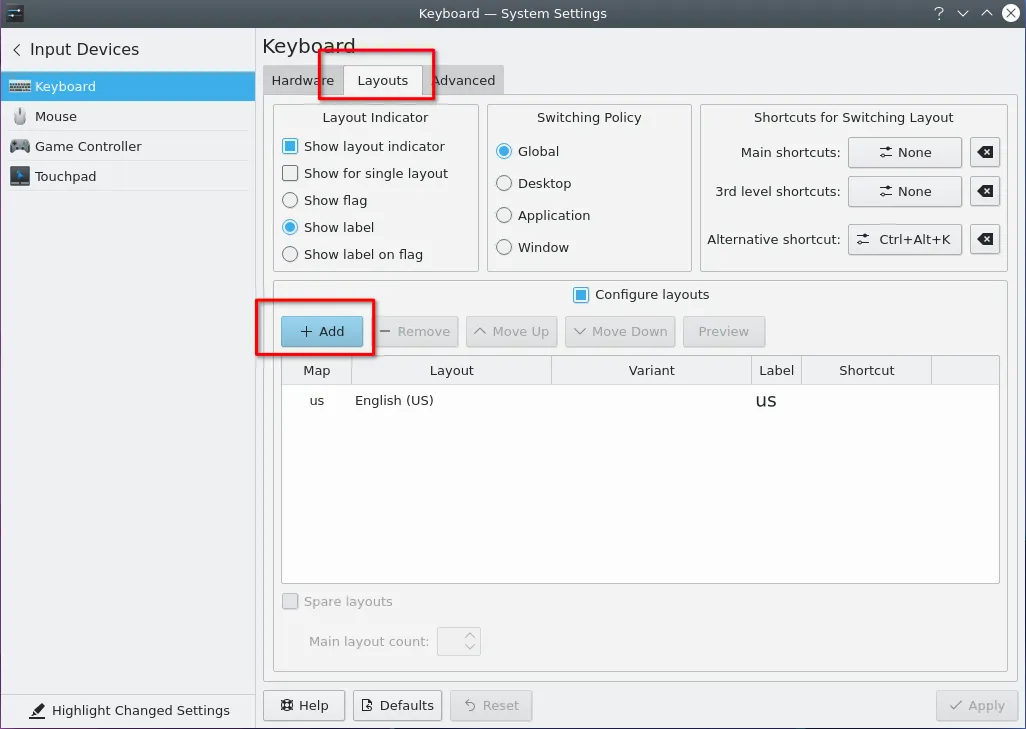
Select Limit selection by language or layout to set the keyboard layout you want, you can click preview to view.

Move up your newly added layout and click Apply.
Remote Access
SSH
This is a tutorial on how to access the board remotely from another computer using SSH.
View username
Open a terminal on the board and enter the following command in the terminal to view the username
  radxa@rock-5a:~$ whoami
  radxa
This command displays the username of the current user, as shown above, the current user's username is radxa
View IP address
View IP by command
Open a terminal on the board and enter the following command in the terminal to view the IP address:
radxa@rock-5a:~$ ip a
The ip address on the same network segment as the host is the ip address we need for SSH connection, e.g. 192.168.2.100 in the following output is the ip address we need.
1: lo: <LOOPBACK,UP,LOWER_UP> mtu 65536 qdisc noqueue state UNKNOWN group default qlen 1000
    link/loopback 00:00:00:00:00:00 brd 00:00:00:00:00:00:00
    inet 127.0.0.1/8 scope host lo
       valid_lft forever preferred_lft forever
    inet6 ::1/128 scope host
       valid_lft forever preferred_lft forever
2: eth0: <BROADCAST,MULTICAST,UP,LOWER_UP> mtu 1500 qdisc mq state UP group default qlen 1000
    link/ether 56:ae:03:82:18:51 brd ff:ff:ff:ff:ff:ff:ff
    inet 192.168.2.100/24 brd 192.168.2.255 scope global dynamic noprefixroute eth0
       valid_lft 43176sec preferred_lft 43176sec
    inet6 fe80::8e:d164:96ea:40b6/64 scope link noprefixroute
       valid_lft forever preferred_lft forever
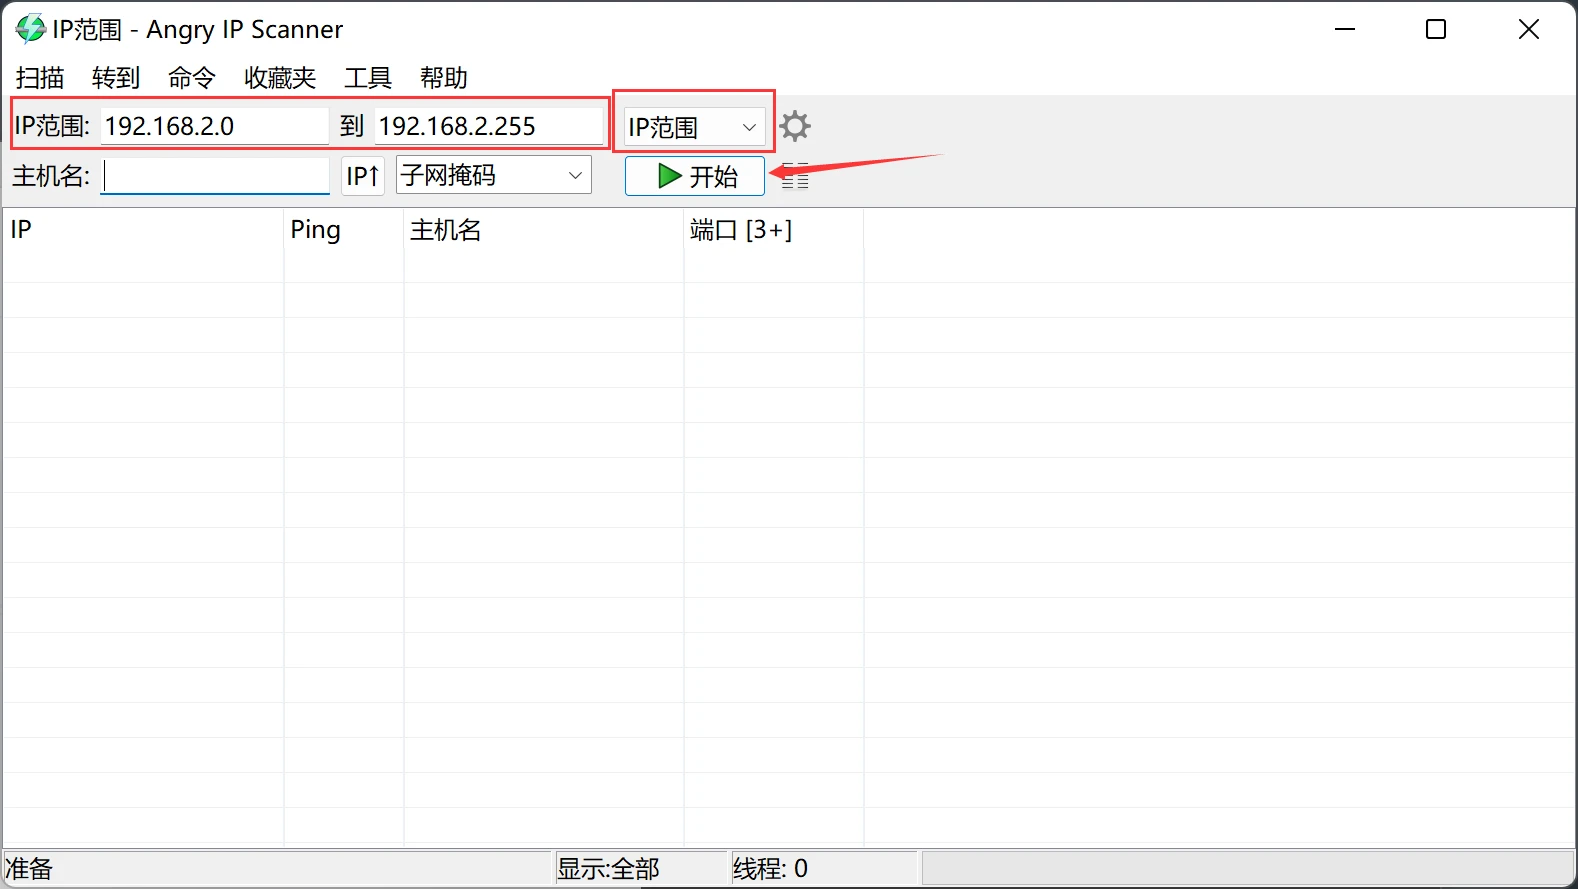
Finding IPs with Angryip
This method can be used to look up an ip address when you can't operate the motherboard directly to get an ip address without a screen or remotely.
-
First the host PC needs to download Angryip, then make sure the host PC and the board are on the same LAN.
-
Open Angryip, select the IP range from 192.168.2.0 - 192.168.2.255 (select the network segment where the host PC and the motherboard are located), click Start, as shown in the figure.
-
-
Ctrl + F Look for the
rockkeyword to find the IP address of the board.
Checking SSH Service Status
Run the following command in a terminal:
radxa@rock-5a:~$ sudo systemctl status ssh
This command is used to view the status of the SSH service. If you run this command and are prompted with "Unit ssh.service could not be found.", then you need to install the SSH service.
  radxa@rock-5a:~$ sudo apt-get update
  radxa@rock-5a:~$ sudo apt-get install openssh-server openssh-sftp-server
● ssh.service - OpenBSD Secure Shell server
     Loaded: loaded (/lib/systemd/system/ssh.service; enabled; preset: enabled)
     Active: active (running) since Wed 2024-05-08 07:52:50 UTC; 24min ago
TriggeredBy: ● ssh.socket
       Docs: man:sshd(8)
             man:sshd_config(5)
    Process: 637 ExecStartPre=/usr/sbin/sshd -t (code=exited, status=0/SUCCESS)
   Main PID: 657 (sshd)
      Tasks: 1 (limit: 3420)
     Memory: 5.5M
        CPU: 398ms
     CGroup: /system.slice/ssh.service
             └─657 "sshd: /usr/sbin/sshd -D [listener] 0 of 10-100 startups"

May 08 07:52:49 radxa-zero systemd[1]: Starting ssh.service - OpenBSD Secure Shell server...
May 08 07:52:50 radxa-zero sshd[657]: Server listening on :: port 22.
May 08 07:52:50 radxa-zero systemd[1]: Started ssh.service - OpenBSD Secure Shell server.
May 08 07:53:22 radxa-zero sshd[783]: Accepted password for radxa from 192.168.31.1 port 49474 ssh2
May 08 07:53:22 radxa-zero sshd[783]: pam_unix(sshd:session): session opened for user radxa(uid=1000) by (uid=0)
May 08 07:53:22 radxa-zero sshd[783]: pam_env(sshd:session): deprecated reading of user environment enabled
- If the status of
Activeisactive (running), the state of SSH is running. - If the status of
Activeisinactive (dead), then SSH is stopped, i.e. the service is not running and needs to be restarted.
radxa@rock-5a:~$ sudo systemctl restart ssh
- If you need to start the SSH service automatically at boot, please run the following command:
radxa@rock-5a:~$ sudo systemctl enable --now ssh
SSH connection to the board
ssh [username]@[IP address] # or ssh [username]@[hostname]
VNC
This is a tutorial on how to remotely access your system from a Windows computer using VNC.
Installing VNC Server
- Open the Terminal application and enter the following command to update the package list.
radxa@rock-5a:~$ sudo apt-get update
- Install TigerVNC Server by entering the following command.
radxa@rock-5a:~$ sudo apt-get install tigervnc-standalone-server
- Install the dbus-x11 dependency to ensure proper connection to your VNC server:
radxa@rock-5a:~$ sudo apt-get install dbus-x11
- After installation to complete the initial configuration of your VNC server, use the vncserver command to set the security password and create the initial configuration file:
radxa@rock-5a:~$ vncserver
Would you like to enter a view-only password (y/n)? n Prompt for view-only, would you like to select no and enter n so that you can operate remotely instead of just watching, depending on your situation?
Configuring the VNC Server
- Once TigerVNC starts, it will create a VNC session containing the IP address and port number (usually 5901) of the VNC server. To change the way the VNC server is configured, first stop the instance of the VNC server running on port 5901 with the following command:
radxa@rock-5a:~$ vncserver -kill :1
- When you run the vncserver command, an xstartup is generated in the ~/.vnc directory. If it is not generated, please create it manually and give it executable permissions:
  radxa@rock-5a:~$ touch ~/.vnc/xstartup
  radxa@rock-5a:~$ chmod +x ~/.vnc/xstartup
Edit the xstartup configuration file as follows:
  radxa@rock-5a:~$ cat ~/.vnc/xstartup
  #!/bin/sh
  unset SESSION_MANAGER
  unset DBUS_SESSION_BUS_ADDRESS
  unset XDG_RUNTIME_DIR
  /etc/X11/xinit/xinitrc
  [ -x /etc/vnc/xstartup  ] && exec /etc/vnc/xstartup
  [ -r $HOME/.Xresources ] && xrdb $HOME/.Xresources
  xsetroot -solid grey
  #vncconfig -iconic &
  startkde &
- Once the configuration is edited, restart the VNC server:
radxa@rock-5a:~$ vncserver -localhost no
- View the VNC server:
  radxa@rock-5a:~$ vncserver -list
  TigerVNC server sessions:
  X DISPLAY #	RFB PORT #	PROCESS ID	SERVER
  :1         	5901      	2160      	Xtigervnc
  :2         	5902      	2872      	Xtigervnc
- Test the connection on the VNC viewer: On your Windows PC, open the VNC viewer, enter the IP address and port number of your product, and then authenticate with the VNC server's username and password.
Installing the VNC Viewer on a Windows PC
- Go to the VNC viewer download page on your web browser, e.g. https://www.realvnc.com/en/connect/download/viewer/
- Download and install the VNC viewer.
Connection Setup
- On the VNC viewer, enter the IP address and port number of the product. 2.
- Use the VNC server's user name and password to authenticate.
- After a successful connection, you can remote control.
TeamViewer
Installing TeamViewer
  radxa@rock-5a:~$ wget https://download.teamviewer.com/download/linux/teamviewer-host_arm64.deb
  radxa@rock-5a:~$ sudo apt install . /teamviewer-host_arm64.deb
configure TeamViewer
radxa@rock-5a:~$ sudo teamviewer setup # Agree to protocol login and authorization
uninstall xfce4-screensaver
This procedure fixes a problem with TeamViewer's keyboard and mouse controls not working due to prolonged hang time.
radxa@rock-5a:~$ sudo apt remove xfce4-screensaver
Configuring virtual monitors
This step is optional if a real monitor is connected.
  radxa@rock-5a:~$ sudo apt update
  radxa@rock-5a:~$ sudo apt install xserver-xorg-video-dummy
  radxa@rock-5a:~$ sudo mv /usr/share/X11/xorg.conf.d/20-modesetting.conf /usr/share/X11/xorg.conf.d/20-modesetting.bak
  radxa@rock-5a:~$ sudo nano /etc/X11/xorg.conf.d/10-headless.conf
# Add the following and reboot
Section "Monitor"
        Identifier "dummy_monitor"
        HorizSync 28.0-80.0
        VertRefresh 48.0-75.0
        Modeline "1920x1080" 172.80 1920 2040 2248 2576 1080 1081 1084 1118
EndSection

Section "Device"
        Identifier "dummy_card"
        VideoRam 256000
        Driver "dummy"
EndSection

Section "Screen"
        Identifier "dummy_screen"
        Device "dummy_card"
        Monitor "dummy_monitor"
        SubSection "Display"
        EndSubSection
EndSection
Connecting to TeamViewer
You can refer to TeamViewer official documentation.
Please refer to our radxa-os section for more information on software configuration.