This document describes how to install an Android image to the ROCK 5 ITX.
ROCK 5 ITX can be booted from microSD card , EMMC and SPI+NVME, depending on the boot method, the system will be installed on different media.
Install the operating system
Before starting ROCK 5 ITX using microSD card/eMMC, it is necessary to erase the SPI as follows:
- Download the Loader file locally
- Enter Maskrom mode
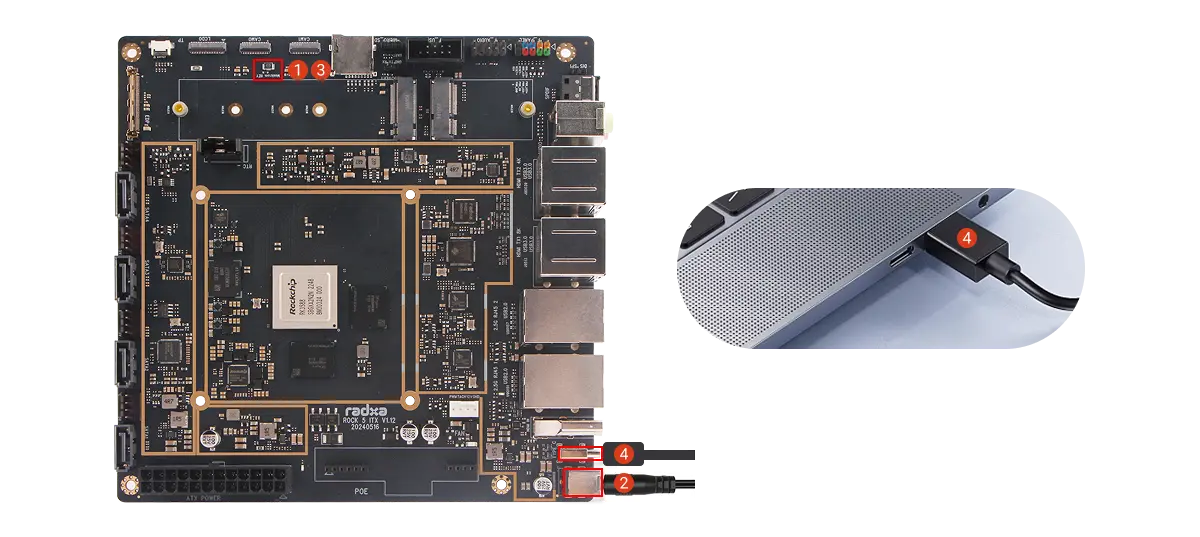
There is a dedicated Maskrom button on the board. Press and hold the Maskrom button before powering on the board. After power is applied, the system will detect the button press and automatically enter maskrom mode.
Steps:
① Press and hold the Maskrom button.
② Power on the board using the power adapter.
③ Release the Maskrom button.
④ Use a data cable to connect the board's OTG port to a USB port on your computer.
- Erase SPI as follows
- Windows
- Linux/Mac
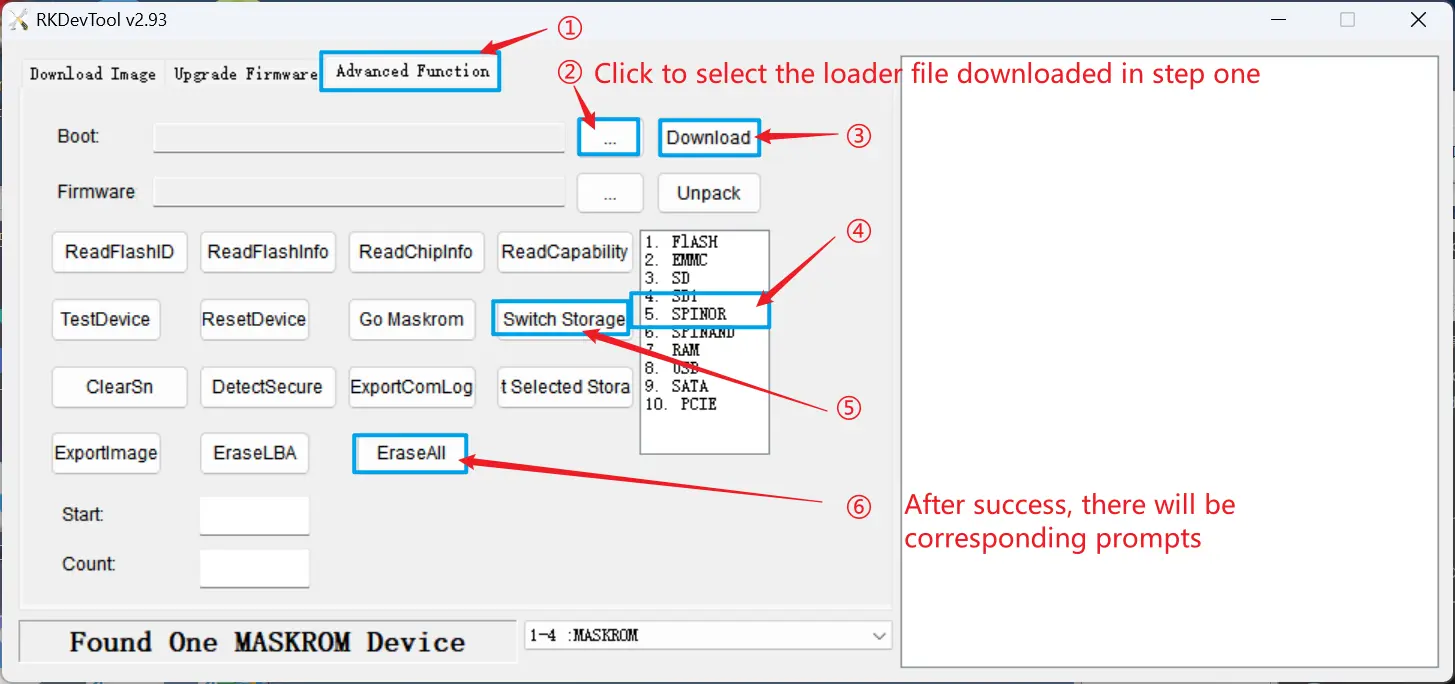
Windows use rkdevtool
Linux/Mac use rkdeveloptool
dd if=/dev/zero of=zero.img bs=16M count=1
rkdeveloptool db rk3588_spl_loader_v1.15.113.bin (select the loader file downloaded in step 1)
rkdeveloptool wl 0 zero.img
rkdeveloptool rd
- Install system to microSD card
- Installing the system to eMMC
- Install system to SPI-NVME
Preparation
- 1x microSD card (capacity >=16GB, speed level >= class10)
- 1x microSD card reader
- 12V DC Power Supply
Image Download
Please go to Resource Download to download the corresponding image file.
Install the system
Balena Etcher is a cross-platform and user friendly image file burning tool that we recommend you use.
- Download Etcher and install it.
- Windows
- Linux
Please download balenaEtcher-2.1.4.Setup.exe After the download is complete, there is no need to perform any additional actions. After downloading, you can double click it to open it without any additional operation.
Please download balena-etcher_2.1.4_amd64.deb. Once the download is complete, please install it by executing the following command in the terminal:
sudo dpkg -i balena-etcher_2.1.4_amd64.deb
-
Open Etcher

-
Click
Flash from fileto select the image to write to.
The downloaded system image is in compressed format. You must decompress it first before using Balena Etcher for image flashing.
-
Click
Select targetto select the device, please select carefully.
-
Click
Flash!Start writing and wait for the write progress bar to complete.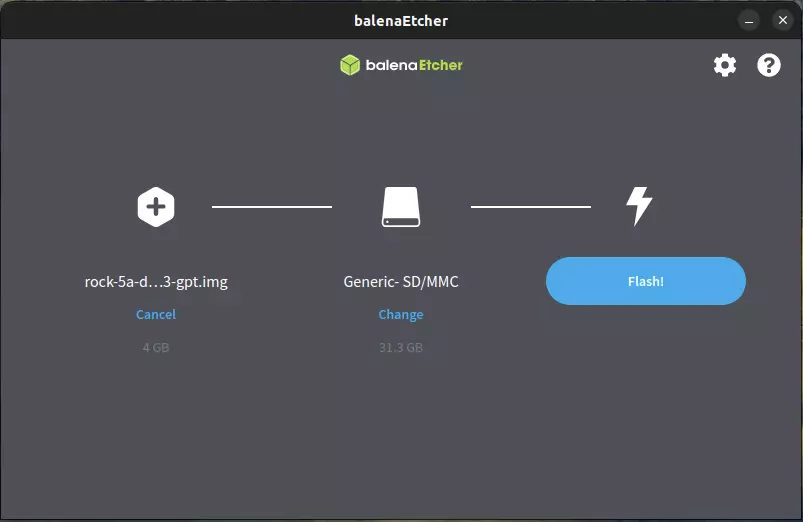
-
When writing the image successfully, Etcher will display
Flash Complete!.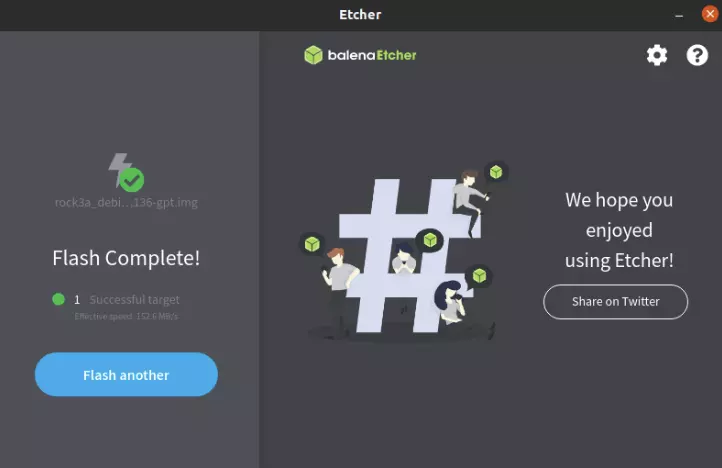
If there is an error in flashing, please try again.
Boot the system
- After successfully burning the microSD card as described above, insert the microSD card into the microSD slot of ROCK 5 ITX.
- Using a 12V DC power adapter to power the ROCK 5 ITX.
Reference Documentation
Preparation
Prepare installation media
- Type-C to Type-A USB connector cable
- 1x eMMC module (On board)
- 12V DC Power Supply
Download the image
Please go to Resource Download to download the corresponding image file.
System Installation
Enter maskrom mode
- Disconnect the board from the power supply.
- Remove the SD card
- Use Type-C to Type-A USB cable to connect ROCK 5 ITX and PC
- Press and hold the Maskrom key,Power up the board.
- Check for USB devices
- Linux/macOS: Check if "Bus 001 Device 112: ID 2207:350a Fuzhou Rockchip Electronics Company" is displayed after running lsusb.
- Windows: Open RKDevTool and you will see the device in "maskrom mode".
- Linux
- mac
- Windows
Install rkdeveloptool
rkdeveloptool is Rockchip's software for USB burning on Linux/macOS platforms.
The rkdeveloptool can be thought of as an upgrade_tool for the open source version.
If your operating system does not provide rkdeveloptool, you will need to compile and install it from source.
- Debian
- Ubuntu
- ArchLinux
Execute the following command from the command line to install:
sudo apt-get update
sudo apt-get install -y libudev-dev libusb-1.0-0-dev dh-autoreconf pkg-config libusb-1.0 build-essential git wget
git clone https://github.com/rockchip-linux/rkdeveloptool
cd rkdeveloptool
autoreconf -i
./configure
make -j $(nproc)
sudo cp rkdeveloptool /usr/local/sbin/
Execute the following command from the command line to install:
sudo apt-get updateOn Ubuntu 22.10 and later you can install it from the command line: sudo apt-get install rkdeveloptool
sudo apt-get install -y libudev-dev libusb-1.0-0-dev dh-autoreconf pkg-config libusb-1.0 build-essential git wget
git clone https://github.com/rockchip-linux/rkdeveloptool
cd rkdeveloptool
autoreconf -i
./configure
make -j $(nproc)
sudo cp rkdeveloptool /usr/local/sbin/
Enter Maskrom Mode
Using rkdeveloptool
Write to a file
rkdeveloptool does not automatically decompress compressed files when writing to them.
You must first extract the used files and specify the extracted files in rkdeveloptool.
rkdeveloptool does not support the selection of a Maskrom device, nor the selection of a storage medium to be written to. Normally, when using rkdeveloptool, only one device and one storage medium are connected in hardware. This step cannot be controlled by software.
If you need to write to multiple devices at the same time, use upgrade_tool.
- Extract the image file (See File Download above for details of the image file, here rock_debian_bullseye-_desktop_release_b1.img.xz is used as an example)
xz -d rock_debian_bullseye-_desktop_release_b1.img.xz (if the image file is gz format,then use `gunzip -d <image>.gz` command)
- Flash Loader(See File Download above for details of the loader file,here
<loader-file>.binis just an example)
sudo rkdeveloptool db <loader-file>.bin
- Flash System Image (Here rock_debian_bullseye-_desktop_release_b1.img is an example, use the file got from step1 as a replacement)
sudo rkdeveloptool wl 0 rock_debian_bullseye-_desktop_release_b1.img
Reboot
sudo rkdeveloptool rd
Login
After rebooting the device, you can log in to the system via HDMI or serial port.
Install rkdeveloptool
rkdeveloptool is Rockchip's software for USB burning on Linux/macOS platforms.
The rkdeveloptool can be thought of as an upgrade_tool for the open source version.
If your operating system does not provide rkdeveloptool, you will need to compile and install it from source.
Please install Homebrew first and then run the following command from the command line to install it:
brew install automake autoconf libusb pkg-config git wget
git clone https://github.com/rockchip-linux/rkdeveloptool
cd rkdeveloptool
autoreconf -i
./configure
make -j $(nproc)
cp rkdeveloptool /opt/homebrew/bin/
Enter Maskrom Mode
Using rkdeveloptool
Write to a file
rkdeveloptool does not automatically decompress compressed files when writing to them.
You must first extract the used files and specify the extracted files in rkdeveloptool.
rkdeveloptool does not support the selection of a Maskrom device, nor the selection of a storage medium to be written to. Normally, when using rkdeveloptool, only one device and one storage medium are connected in hardware. This step cannot be controlled by software.
If you need to write to multiple devices at the same time, use upgrade_tool.
- Extract the image file (See File Download above for details of the image file, here rock_debian_bullseye-_desktop_release_b1.img.xz is used as an example)
xz -d rock_debian_bullseye-_desktop_release_b1.img.xz (if the image file is gz format,then use `gunzip -d <image>.gz` command)
- Flash Loader(See File Download above for details of the loader file,here
<loader-file>.binis just an example)
sudo rkdeveloptool db <loader-file>.bin
- Flash System Image (Here rock_debian_bullseye-_desktop_release_b1.img is an example, use the file got from step1 as a replacement)
sudo rkdeveloptool wl 0 rock_debian_bullseye-_desktop_release_b1.img
Reboot
sudo rkdeveloptool rd
Login
After rebooting the device, you can log in to the system via HDMI or serial port.
Install RKDevTool
RKDevTool is Rockchip's software for USB burning on Windows platform. If RKDevTool is not installed on your Windows host, please follow the steps below to install it.
Please download and extract the following files to install RKDevTool:
- RKDevTool (Includes Chinese documentation)
- DriverAssitant
Installation of drivers
Download and unzip DriverAssitant, then execute DriverInstall.exe and click the Install Driver button to install the driver.
If you have already installed another version of driver, please click Uninstall Driver to uninstall the driver first, and then reinstall it again.

Install RKDevTool
unzip RKDevTool_Release.zip ,click RKDevTool.exe to open.
Enter Maskrom mode
If the operation is normal, RKDevTool will prompt A MASKROM device was found.
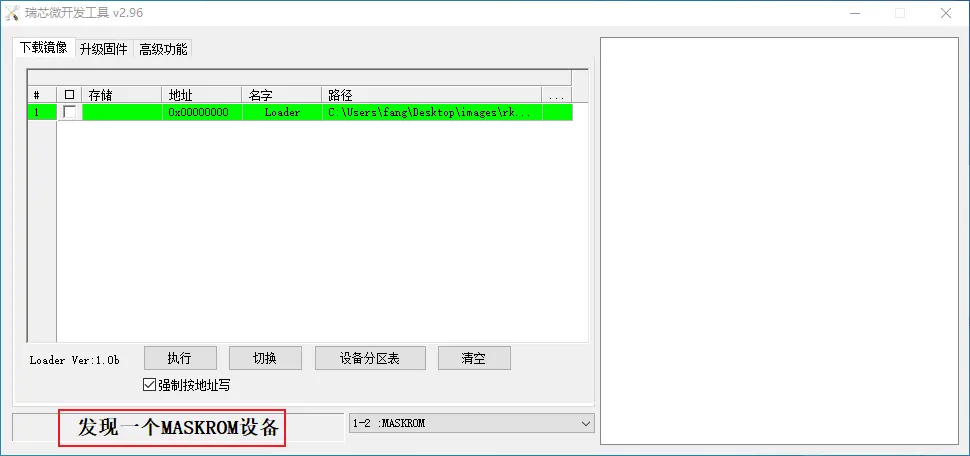
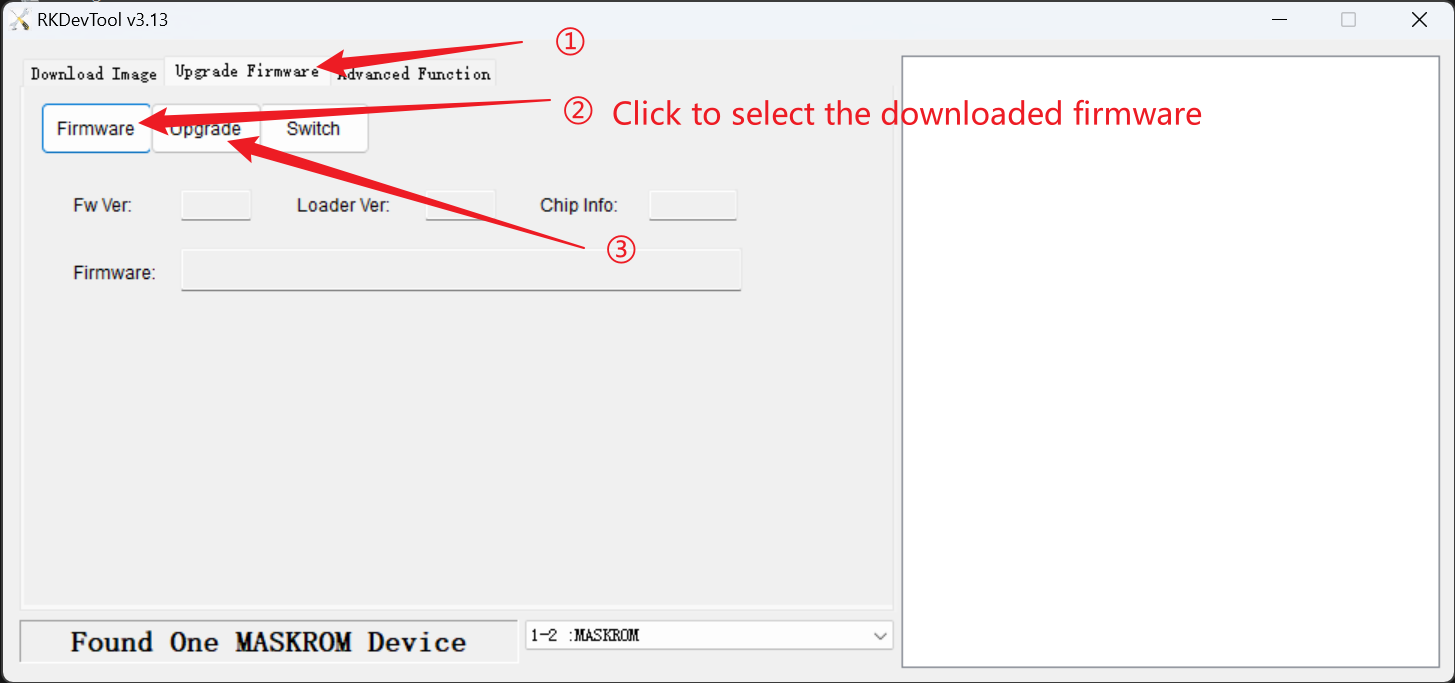
Follow the steps below to flash the operation image
System startup
Starting the ROCK 5 ITX
Power up the ROCK 5 ITX via the adapter.
Prepare installation media
- Type-C to Type-A USB connector cable
- 1x NVME ssd (M.2)
- 12V Power Supply
Download the image
Please go to Resource Download to download the corresponding image file.
System Installation
Enter maskrom mode
- Disconnect the board from the power supply.
- Remove the SD card and insert the NVME SSD into the M.2 slot of the ROCK 5 ITX
- Use Type-C to Type-A USB cable to connect ROCK 5 ITX and PC
- Press and hold the Maskrom key,Power up the board.
- Check for USB devices
- Linux/macOS: Check if "Bus 001 Device 112: ID 2207:350a Fuzhou Rockchip Electronics Company" is displayed after running lsusb.
- Windows: Open RKDevTool and you will see the device in "maskrom mode".
Install the system
- Linux
- mac
- Windows
Install rkdeveloptool
rkdeveloptool is Rockchip's software for USB burning on Linux/macOS platforms.
The rkdeveloptool can be thought of as an upgrade_tool for the open source version.
If your operating system does not provide rkdeveloptool, you will need to compile and install it from source.
- Debian
- Ubuntu
- ArchLinux
Execute the following command from the command line to install:
sudo apt-get update
sudo apt-get install -y libudev-dev libusb-1.0-0-dev dh-autoreconf pkg-config libusb-1.0 build-essential git wget
git clone https://github.com/rockchip-linux/rkdeveloptool
cd rkdeveloptool
autoreconf -i
./configure
make -j $(nproc)
sudo cp rkdeveloptool /usr/local/sbin/
Execute the following command from the command line to install:
sudo apt-get updateOn Ubuntu 22.10 and later you can install it from the command line: sudo apt-get install rkdeveloptool
sudo apt-get install -y libudev-dev libusb-1.0-0-dev dh-autoreconf pkg-config libusb-1.0 build-essential git wget
git clone https://github.com/rockchip-linux/rkdeveloptool
cd rkdeveloptool
autoreconf -i
./configure
make -j $(nproc)
sudo cp rkdeveloptool /usr/local/sbin/
Enter Maskrom Mode
Using rkdeveloptool
Write to a file
rkdeveloptool does not automatically decompress compressed files when writing to them.
You must first extract the used files and specify the extracted files in rkdeveloptool.
rkdeveloptool does not support the selection of a Maskrom device, nor the selection of a storage medium to be written to. Normally, when using rkdeveloptool, only one device and one storage medium are connected in hardware. This step cannot be controlled by software.
If you need to write to multiple devices at the same time, use upgrade_tool.
- Extract the image file (See File Download above for details of the image file, here rock_debian_bullseye-_desktop_release_b1.img.xz is used as an example)
xz -d rock_debian_bullseye-_desktop_release_b1.img.xz (if the image file is gz format,then use `gunzip -d <image>.gz` command)
- Flash Loader(See File Download above for details of the loader file,here
<loader-file>.binis just an example)
sudo rkdeveloptool db <loader-file>.bin
- Flash System Image (Here rock_debian_bullseye-_desktop_release_b1.img is an example, use the file got from step1 as a replacement)
sudo rkdeveloptool wl 0 rock_debian_bullseye-_desktop_release_b1.img
Reboot
sudo rkdeveloptool rd
Login
After rebooting the device, you can log in to the system via HDMI or serial port.
Install rkdeveloptool
rkdeveloptool is Rockchip's software for USB burning on Linux/macOS platforms.
The rkdeveloptool can be thought of as an upgrade_tool for the open source version.
If your operating system does not provide rkdeveloptool, you will need to compile and install it from source.
Please install Homebrew first and then run the following command from the command line to install it:
brew install automake autoconf libusb pkg-config git wget
git clone https://github.com/rockchip-linux/rkdeveloptool
cd rkdeveloptool
autoreconf -i
./configure
make -j $(nproc)
cp rkdeveloptool /opt/homebrew/bin/
Enter Maskrom Mode
Using rkdeveloptool
Write to a file
rkdeveloptool does not automatically decompress compressed files when writing to them.
You must first extract the used files and specify the extracted files in rkdeveloptool.
rkdeveloptool does not support the selection of a Maskrom device, nor the selection of a storage medium to be written to. Normally, when using rkdeveloptool, only one device and one storage medium are connected in hardware. This step cannot be controlled by software.
If you need to write to multiple devices at the same time, use upgrade_tool.
- Extract the image file (See File Download above for details of the image file, here rock_debian_bullseye-_desktop_release_b1.img.xz is used as an example)
xz -d rock_debian_bullseye-_desktop_release_b1.img.xz (if the image file is gz format,then use `gunzip -d <image>.gz` command)
- Flash Loader(See File Download above for details of the loader file,here
<loader-file>.binis just an example)
sudo rkdeveloptool db <loader-file>.bin
- Flash System Image (Here rock_debian_bullseye-_desktop_release_b1.img is an example, use the file got from step1 as a replacement)
sudo rkdeveloptool wl 0 rock_debian_bullseye-_desktop_release_b1.img
Reboot
sudo rkdeveloptool rd
Login
After rebooting the device, you can log in to the system via HDMI or serial port.
Install RKDevTool
RKDevTool is Rockchip's software for USB burning on Windows platform. If RKDevTool is not installed on your Windows host, please follow the steps below to install it.
Please download and extract the following files to install RKDevTool:
- RKDevTool (Includes Chinese documentation)
- DriverAssitant
Installation of drivers
Download and unzip DriverAssitant, then execute DriverInstall.exe and click the Install Driver button to install the driver.
If you have already installed another version of driver, please click Uninstall Driver to uninstall the driver first, and then reinstall it again.
Install RKDevTool
unzip RKDevTool_Release.zip ,click RKDevTool.exe to open.
Enter Maskrom mode
If the operation is normal, RKDevTool will prompt A MASKROM device was found.
Follow the steps below to flash the operation image
Boot the system
- Using a 12V power supply to power the ROCK 5 ITX