RKNN Installation
This document aims to demonstrate how to install the RKNN SDK. For more information, please refer to the RKNN Toolkit2 source repository in the doc directory.
Introduction to RKNN
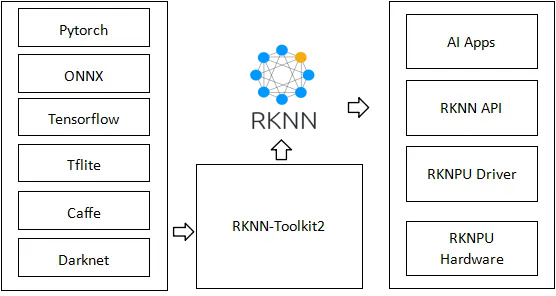
The Rockchip RK3566/RK3568 series, RK3588 series, RK3562 series, and RV1103/RV1106 series chips are equipped with a neural network processor (NPU). RKNN helps users quickly deploy AI models onto Rockchip chips using NPU hardware acceleration for model inference. To use RKNPU, users first need to convert their trained models to RKNN format using the RKNN-Toolkit2 tool on an x86 computer, and then perform inference on the development board using the RKNN C API or Python API.
Required tools:
- RKNN-Toolkit2 is a software development kit for users to perform model conversion, inference, and performance evaluation on PC and Rockchip NPU platforms.
- RKNN-Toolkit-Lite2 provides a Python programming interface for the Rockchip NPU platform, helping users deploy RKNN models and accelerate AI application implementation.
- RKNN Runtime offers a C/C++ programming interface for the Rockchip NPU platform, assisting users in deploying RKNN models and accelerating AI application implementation.
- RKNPU Kernel Driver is responsible for interacting with the NPU hardware.
The overall framework is as follows:

Installing the RKNN Environment
Download RKNN-Toolkit2 Repository on PC
-
Download the RKNN repository.
It is recommended to create a new directory to store the RKNN repository. For example, create a folder named "Projects" and store the RKNN-Toolkit2 and RKNN Model Zoo repositories in that directory.
X86 Linux PC# Create Projects folder
mkdir Projects && cd Projects
# Download RKNN-Toolkit2 repository
git clone -b v2.3.0 https://github.com/airockchip/rknn-toolkit2.git
# Download RKNN Model Zoo repository
git clone -b v2.3.0 https://github.com/airockchip/rknn_model_zoo.git -
(Optional) Install Anaconda
If Python 3.8 (recommended version) is not installed on your system, or if you have multiple versions of Python environments, it is recommended to use Anaconda to create a new Python 3.8 environment.
-
Install Anaconda
Execute the following command in the terminal to check if Anaconda is installed. If it is installed, you can skip this step.
X86 Linux PC$ conda --version
conda 24.9.2If "conda: command not found" appears, it indicates that Anaconda is not installed. Please refer to the Anaconda official website for installation instructions.
-
Create a conda environment
X86 Linux PCconda create -n rknn python=3.8.2 -
Activate the rknn conda environment
X86 Linux PCconda activate rknn -
Exit the environment
X86 Linux PCconda deactivate
-
Install RKNN-Toolkit2 on PC
-
After activating the conda rknn environment, enter the rknn-toolkit2 directory and install dependencies according to your architecture platform and Python version by selecting the corresponding
requirements_cpxx.txt. Install RKNN-Toolkit2 via wheel package. Here is an example command for a 64-bit x86 architecture Python 3.8 environment:X86 Linux PC# Enter rknn-toolkit2 directory
cd rknn-toolkit2/rknn-toolkit2/packages/x86_64/
# Please select the appropriate requirements file based on your Python version; here it is for python3.8
pip3 install -r requirements_cp38-2.3.0.txt
# Please select the appropriate wheel installation package based on your Python version and processor architecture:
pip3 install ./rknn_toolkit2-2.3.0-cp38-cp38-manylinux_2_17_x86_64.manylinux2014_x86_64.whltipIf you are using an ARM architecture platform, please install the dependencies under arm64.
-
Verify successful installation
Execute the following command. If there are no errors, it means that the RKNN-Toolkit2 environment has been installed successfully.
X86 Linux PC$ python3
>>> from rknn.api import RKNN
Install RKNN Toolkit Lite2 and its dependencies on the board
For users of RK356X products, you need to enable the NPU in the terminal using rsetup before using the NPU: sudo rsetup -> Overlays -> Manage overlays -> Enable NPU, then restart the system.
If there is no Enable NPU option in the overlays options, please update the system via: sudo rsetup -> system -> System Update, restart, and execute the above steps to enable the NPU.
The official Radxa image has RKNPU2 and its required dependencies installed by default. You only need to install python3-rknnlite2. If it does not run, you can try commenting out the command.
sudo apt update
sudo apt install python3-rknnlite2
# sudo apt install rknpu2-rk3588   # If the SOC is RK3588 series
# sudo apt install rknpu2-rk356x   # If the SOC is RK356X series
-
If you are using the CLI version, you can access the rknn toolkit lite2 deb package download link
-
Check the rknpu2 driver version. The output below indicates that the rknpu2 driver version is 0.9.6.
tiprk356X product system, rknpu2 driver version is 0.8.8
Radxa OSsudo dmesg | grep "Initialized rknpu"
[ 15.522298] [drm] Initialized rknpu 0.9.6 20240322 for fdab0000.npu on minor 1
(Optional) Install rknn_toolkit-lite2 Python API in a virtual environment on the board
If you prefer to use the Python venv virtual environment on the board system, you need to install the rknn_toolkit-lite2 wheel separately.
For instructions on using the virtual environment, please refer to Python Virtual Environment Usage.
cd rknn-toolkit2/rknn-toolkit-lite2/packages/
Copy the corresponding rknn_toolkit_lite2-2.3.0-cp3X-cp3X-manylinux_2_17_aarch64.manylinux2014_aarch64.whl to the board based on the Python version of the board system.
After entering the virtual environment, use pip3 to install:
pip3 install ./rknn_toolkit_lite2-2.3.0-cp3X-cp3X-manylinux_2_17_aarch64.manylinux2014_aarch64.whl
Execute the following command. If there are no errors, it means that the rknn_toolkit-lite2 environment has been installed successfully.
$ python3
>>> from rknnlite.api import RKNNLite as RKNN
(Optional) Install RKNN Model Zoo on the board
# Download RKNN Model Zoo repository
git clone -b v2.3.0 https://github.com/airockchip/rknn_model_zoo.git