Control RP2040 on Linux
OverView
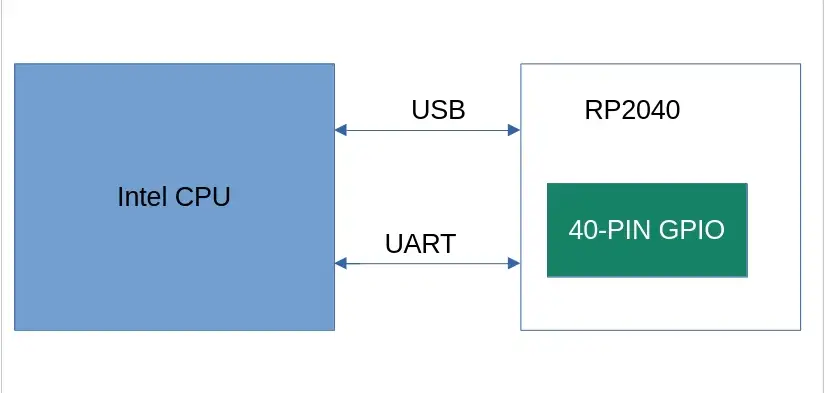
Relation introduction between J4215 and 40-PIN GPIO
The Radxa X4 integrates an Intel N100 CPU and a RP2040 MCU, which communicate with each other via USB or UART. The 40-PIN interface serves as an I/O expansion port extending from the RP2040 microcontroller. The CPU exerts control over this interface through communication with the RP2040, which leverages the Pico SDK for efficient manipulation and operation of the 40-PIN interface.
Tools Introduction
In order to operate the IO resources on RP2040, we need a complete software environment, here we mainly introduce a set of C/C++ SDKs, namely pico-sdk and pico-examples. pico-sdk mainly provides some APIs to operate the RP2040, while pico-examples provides a compilation framework for us to add our own programs according to the compilation framework provided by pico-examples. pico-sdk provides some APIs to operate the RP2040, while pico-examples provides a compilation framework for us to add our own programs according to the compilation framework provided by pico-examples.
PICO-SDK
Introduction
The Raspberry Pi Pico SDK (henceforth the SDK) provides the headers, libraries and build system necessary to write programs for the RP2040-based devices (such as the Raspberry Pi Pico/Radxa X4) in C, C++ or assembly language.
The SDK is designed to provide an API and programming environment that is familiar both to non-embedded C developers and embedded C developers alike. A single program runs on the device at a time and starts with a conventional main() method. Standard C/C++ libraries are supported along with C level libraries/APIs for accessing all of the RP2040's hardware include PIO (Programmable IO).
Usage
You can either download pico-sdk/pico-examples and install the tools on your PC in a Linux environment, or you can do it in the Linux environment of Radxa X4. For convenience, we can do this directly in the Linux environment of Radxa X4.
- Install the necessary tools
sudo apt update -y
sudo apt install -y git cmake gcc-arm-none-eabi libnewlib-arm-none-eabi libstdc++-arm-none-eabi-newlib
- Get the code
git clone https://github.com/raspberrypi/pico-sdk.git
cd pico-sdk
git submodule update --init
PICO-EXAMPLES
Introduction
pico-examples is an official example codebase that shows how to use the Raspberry Pi Pico and the Pico SDK to implement a variety of features. It provides a range of examples covering everything from basic GPIO operations to complex communication protocols to get developers up to speed and understanding how to develop on the Pico.
Usage
You can either download pico-sdk/pico-examples and install the tools on your PC in a Linux environment, or you can do it in the Linux environment of Radxa X4. For convenience, we can do this directly in the Linux environment of Radxa X4.
- Get the code
git clone https://github.com/raspberrypi/pico-examples.git --branch master
- Compile
export PICO_SDK_PATH=path/to/pico-sdk
cd pico-examples
mkdir build
cd build
cmake .. && make -j4
Examples
RP2040 Control the 40-PIN
- GPIO
- I2C
- MCP2515
- PWM
- PoE FAN
- UART
GPIO
Preparation
- One Radxa X4
- One LED
Connection
| Radxa X4 | <--> | LED |
|---|---|---|
| PIN_5 | <--> | LED |
| PIN_1 | <--> | VCC |
| PIN_9 | <--> | GND |
Here PIN_5 corresponds to GPIO29 in the following code, please refer to GPIO Definition for details.
Test
-
Replace pico-examples/blink/blink.c with the following code
blink.c
#include "pico/stdlib.h"
#define BLINK_PIN 29 // GPIO29

int main() {

    gpio_init(BLINK_PIN);
    gpio_set_dir(BLINK_PIN, GPIO_OUT);

    while (true) {
        gpio_put(BLINK_PIN, 1);
        sleep_ms(250);
        gpio_put(BLINK_PIN, 0);
        sleep_ms(250);
    }
} -
Compile
cd pico-examples/build
rm -rf *
cmake ..
make -j$(nproc)
After successful compilation, a file named blink.uf2 will be created in the pico-examples/build/blink/ directory.
-
Flash
- Reboot RP2040
-
Drag the blink.uf2 file into the RP2040, and when the RP2040 disappears, the LED will start blinking.
I2C
Preparation
- One Radxa X4
- One I2C OLED 1306
Connection
| Radxa X4 | <--> | OLED |
|---|---|---|
| PIN_5 | <--> | SCL |
| PIN_3 | <--> | SDA |
| PIN_1 | <--> | VCC |
| PIN_9 | <--> | GND |
Here PIN_5 corresponds to I2C0 SDA for GPIO29 in the following code, and PIN_3 corresponds to I2C0 SCL for GPIO28 in the following code, for details, please refer to GPIO Definition.
Test
- Replace the following code with pico-examples/i2c/lcd_1602_i2c/lcd_1602_i2c.c
lcd_1602_i2c.c
    #include <stdio.h>
    #include <string.h>
    #include "pico/stdlib.h"
    #include "hardware/i2c.h"
    #include "pico/binary_info.h"

    #define I2C_ID i2c0
    #define I2C_SDA_PIN 28
    #define I2C_SCL_PIN 29

    // commands
    const int LCD_CLEARDISPLAY = 0x01;
    const int LCD_RETURNHOME = 0x02;
    const int LCD_ENTRYMODESET = 0x04;
    const int LCD_DISPLAYCONTROL = 0x08;
    const int LCD_CURSORSHIFT = 0x10;
    const int LCD_FUNCTIONSET = 0x20;
    const int LCD_SETCGRAMADDR = 0x40;
    const int LCD_SETDDRAMADDR = 0x80;

    // flags for display entry mode
    const int LCD_ENTRYSHIFTINCREMENT = 0x01;
    const int LCD_ENTRYLEFT = 0x02;

    // flags for display and cursor control
    const int LCD_BLINKON = 0x01;
    const int LCD_CURSORON = 0x02;
    const int LCD_DISPLAYON = 0x04;

    // flags for display and cursor shift
    const int LCD_MOVERIGHT = 0x04;
    const int LCD_DISPLAYMOVE = 0x08;

    // flags for function set
    const int LCD_5x10DOTS = 0x04;
    const int LCD_2LINE = 0x08;
    const int LCD_8BITMODE = 0x10;

    // flag for backlight control
    const int LCD_BACKLIGHT = 0x08;

    const int LCD_ENABLE_BIT = 0x04;

    // By default these LCD display drivers are on bus address 0x27
    static int addr = 0x27;

    // Modes for lcd_send_byte
    #define LCD_CHARACTER  1
    #define LCD_COMMAND	0

    #define MAX_LINES	  2
    #define MAX_CHARS	  16

    /* Quick helper function for single byte transfers */
    void i2c_write_byte(uint8_t val) {
        i2c_write_blocking(I2C_ID, addr, &val, 1, false);
    }

    void lcd_toggle_enable(uint8_t val) {
        // Toggle enable pin on LCD display
        // We cannot do this too quickly or things don't work
    #define DELAY_US 600
        sleep_us(DELAY_US);
        i2c_write_byte(val | LCD_ENABLE_BIT);
        sleep_us(DELAY_US);
        i2c_write_byte(val & ~LCD_ENABLE_BIT);
        sleep_us(DELAY_US);
    }

    // The display is sent a byte as two separate nibble transfers
    void lcd_send_byte(uint8_t val, int mode) {
        uint8_t high = mode | (val & 0xF0) | LCD_BACKLIGHT;
        uint8_t low = mode | ((val << 4) & 0xF0) | LCD_BACKLIGHT;

        i2c_write_byte(high);
        lcd_toggle_enable(high);
        i2c_write_byte(low);
        lcd_toggle_enable(low);
    }

    void lcd_clear(void) {
        lcd_send_byte(LCD_CLEARDISPLAY, LCD_COMMAND);
    }

    // go to location on LCD
    void lcd_set_cursor(int line, int position) {
        int val = (line == 0) ? 0x80 + position : 0xC0 + position;
        lcd_send_byte(val, LCD_COMMAND);
    }

    static void inline lcd_char(char val) {
        lcd_send_byte(val, LCD_CHARACTER);
    }

    void lcd_string(const char *s) {
        while (*s) {
            lcd_char(*s++);
        }
    }

    void lcd_init() {
        lcd_send_byte(0x03, LCD_COMMAND);
        lcd_send_byte(0x03, LCD_COMMAND);
        lcd_send_byte(0x03, LCD_COMMAND);
        lcd_send_byte(0x02, LCD_COMMAND);

        lcd_send_byte(LCD_ENTRYMODESET | LCD_ENTRYLEFT, LCD_COMMAND);
        lcd_send_byte(LCD_FUNCTIONSET | LCD_2LINE, LCD_COMMAND);
        lcd_send_byte(LCD_DISPLAYCONTROL | LCD_DISPLAYON, LCD_COMMAND);
        lcd_clear();
    }

    int main() {
        i2c_init(I2C_ID, 100 * 1000);
        gpio_set_function(I2C_SDA_PIN, GPIO_FUNC_I2C);
        gpio_set_function(I2C_SCL_PIN, GPIO_FUNC_I2C);
        gpio_pull_up(I2C_SDA_PIN);
        gpio_pull_up(I2C_SCL_PIN);
        // Make the I2C pins available to picotool
        bi_decl(bi_2pins_with_func(I2C_SDA_PIN, I2C_SCL_PIN, GPIO_FUNC_I2C));

        lcd_init();

        static char *message[] =
                {
                        "RP2040 by", "Raspberry Pi",
                        "A brand new", "microcontroller",
                        "Twin core M0", "Full C SDK",
                        "More power in", "your product",
                        "More beans", "than Heinz!"
                };

        while (1) {
            for (int m = 0; m < sizeof(message) / sizeof(message[0]); m += MAX_LINES) {
                for (int line = 0; line < MAX_LINES; line++) {
                    lcd_set_cursor(line, (MAX_CHARS / 2) - strlen(message[m + line]) / 2);
                    lcd_string(message[m + line]);
                }
                sleep_ms(2000);
                lcd_clear();
            }
        }
    }
-
Compile
cd pico-examples/build
rm -rf *
cmake ..
make -j$(nproc)
After successful compilation, a file named lcd_1602_i2c.uf2 will be created in the pico-examples/build/i2c/lcd_1602_i2c/ directory
-
Flash
- Reboot RP2040
-
Drag the lcd_1602_i2c.uf2 file into the RP2040, and after the RP2040 disappears, the OLED will have a paragraph of text
MCP2515
-
Prepare
-
One Radxa X4
-
One MCP2515 module
-
Connections
| Radxa X4 | <--> | MCP2515 |
|---|---|---|
| PIN_13 | <--> | SPI SCK |
| PIN_11 | <--> | SPI CS |
| PIN_15 | <--> | SPI TX |
| PIN_7 | <--> | SPI RX |
| PIN_1 | <--> | VCC |
| PIN_9 | <--> | GND |
The following program is for loopback test only, so you need to short PIN_H and PIN_L of MCP2515.
- Download the library for MCP2515
cd pico-examples

git clone https://github.com/adamczykpiotr/pico-mcp2515.git
- Adding pico-mcp2515 to the pico-examples compilation
Edit pico-examples/CMakeLists.txt
... ...
add_subdirectory(pico_w)
add_subdirectory(pico-mcp2515)
add_subdirectory(pio)
... ...
- Open the serial port
Edit pico-examples/pico-mcp2515/CMakeLists.txt
pico_enable_stdio_uart(pico-mcp2515 1)
pico_enable_stdio_usb(pico-mcp2515 1)
- Modify the pico-mcp2515/include/mcp2515/mcp2515.h.
Modify the SPI pins according to the connections we made above
For example:
    public:
        MCP2515(
            spi_inst_t* CHANNEL = spi0,
            uint8_t CS_PIN = 5,
            uint8_t TX_PIN = 3,
            uint8_t RX_PIN = 4,
            uint8_t SCK_PIN = 6,
            uint32_t _SPI_CLOCK = DEFAULT_SPI_CLOCK
        );
- Replace pico-examples/pico-mcp2515/src/pico-mcp2515.cpp with the following code
pico-mcp2515.cpp
#include <stdio.h>
#include <string.h>
#include "pico/stdlib.h"
#include "mcp2515/mcp2515.h"
#include "hardware/uart.h"

int main() {
    MCP2515 can0;
    struct can_frame rx;
    struct can_frame tx;

    tx.can_id = 0x123;
    tx.can_dlc = 8;
    tx.data[0] = 0x11;
    tx.data[1] = 0x22;
    tx.data[2] = 0x33;
    tx.data[3] = 0x44;
    tx.data[4] = 0x55;
    tx.data[5] = 0x66;
    tx.data[6] = 0x77;
    tx.data[7] = 0x88;

    stdio_init_all();

    //Initialize interface
    can0.reset();
    can0.setBitrate(CAN_1000KBPS, MCP_16MHZ);
    can0.setLoopbackMode();

    // loopback
    while(true) {
        MCP2515::ERROR result = can0.sendMessage(&tx);
        if(result == MCP2515::ERROR_OK) {
            printf("CAN TX: sent successfully ...\r\n");
        }
        sleep_ms(1000);

        if(can0.readMessage(&rx) == MCP2515::ERROR_OK) {
            for(int i = 0; i < 8; i++) {
                printf("CAN RX: data[%d]: 0x%x\r\n", i, rx.data[i]);
            }
        }
        sleep_ms(1000);
    }

    return 0;
}
-
Compile
cd pico-examples/build
rm -rf *
cmake ..
make -j$(nproc)
After successful compilation, a file named pico-mcp2515.uf2 will be created in the pico-examples/build/pico-mcp2515/ directory.
-
Flash
- Reboot RP2040
-
Drag the pico-mcp2515.uf2 file into the RP2040 and wait for the RP2040 to disappear
-
Verification
Open the serial port /dev/ttyS4, we can see the following printout:
CAN TX: sent successfully ...
CAB RX: data[0]: 0x11
CAB RX: data[1]: 0x22;
CAB RX: data[2]: 0x33;
CAB RX: data[3]: 0x44;
CAB RX: data[4]: 0x55;
CAB RX: data[5]: 0x66;
CAB RX: data[6]: 0x77;
CAB RX: data[7]: 0x88;
PWM
Preparation
- One Radxa X4
- One LED
Connection
| Radxa X4 | <--> | LED |
|---|---|---|
| PIN_5 | <--> | LED |
| PIN_1 | <--> | VCC |
| PIN_9 | <--> | GND |
Here PIN_5 corresponds to GPIO29 in the following code, please refer to GPIO Definition for details.
Test
- Replace the following code with pico-examples/pwm/led_fade/pwm_led_fade.c
pwm_led_fade.c
    #include "pico/stdlib.h"
    #include <stdio.h>
    #include "pico/time.h"
    #include "hardware/irq.h"
    #include "hardware/pwm.h"

    #define PWD_FADE_LED_PIN 29

    void on_pwm_wrap() {
        static int fade = 0;
        static bool going_up = true;

        pwm_clear_irq(pwm_gpio_to_slice_num(PWD_FADE_LED_PIN));

        if (going_up) {
            ++fade;
            if (fade > 255) {
                fade = 255;
                going_up = false;
            }
        } else {
            --fade;
            if (fade < 0) {
                fade = 0;
                going_up = true;
            }
        }

        pwm_set_gpio_level(PWD_FADE_LED_PIN, fade * fade);
    }

    int main() {

        gpio_set_function(PWD_FADE_LED_PIN, GPIO_FUNC_PWM);

        uint slice_num = pwm_gpio_to_slice_num(PWD_FADE_LED_PIN);

        pwm_clear_irq(slice_num);
        pwm_set_irq_enabled(slice_num, true);
        irq_set_exclusive_handler(PWM_IRQ_WRAP, on_pwm_wrap);
        irq_set_enabled(PWM_IRQ_WRAP, true);

        pwm_config config = pwm_get_default_config();
        pwm_config_set_clkdiv(&config, 4.f);
        pwm_init(slice_num, &config, true);

        while (1)
            tight_loop_contents();
    }
-
Compile
cd pico-examples/build
rm -rf *
cmake ..
make -j$(nproc)
After successful compilation, a file named pwm_led_fade.uf2 will be created in the pico-examples/build/pwm/led_fade/ directory.
-
Flash
- Reboot RP2040
-
Drag the pwm_led_fade.uf2 file into the RP2040, after the RP2040 disappears, the LED will fade from dark to light/bright to dark.
PoE FAN
Preparations
- One Radxa X4
- One Radxa 25W PoE+ HAT for X4
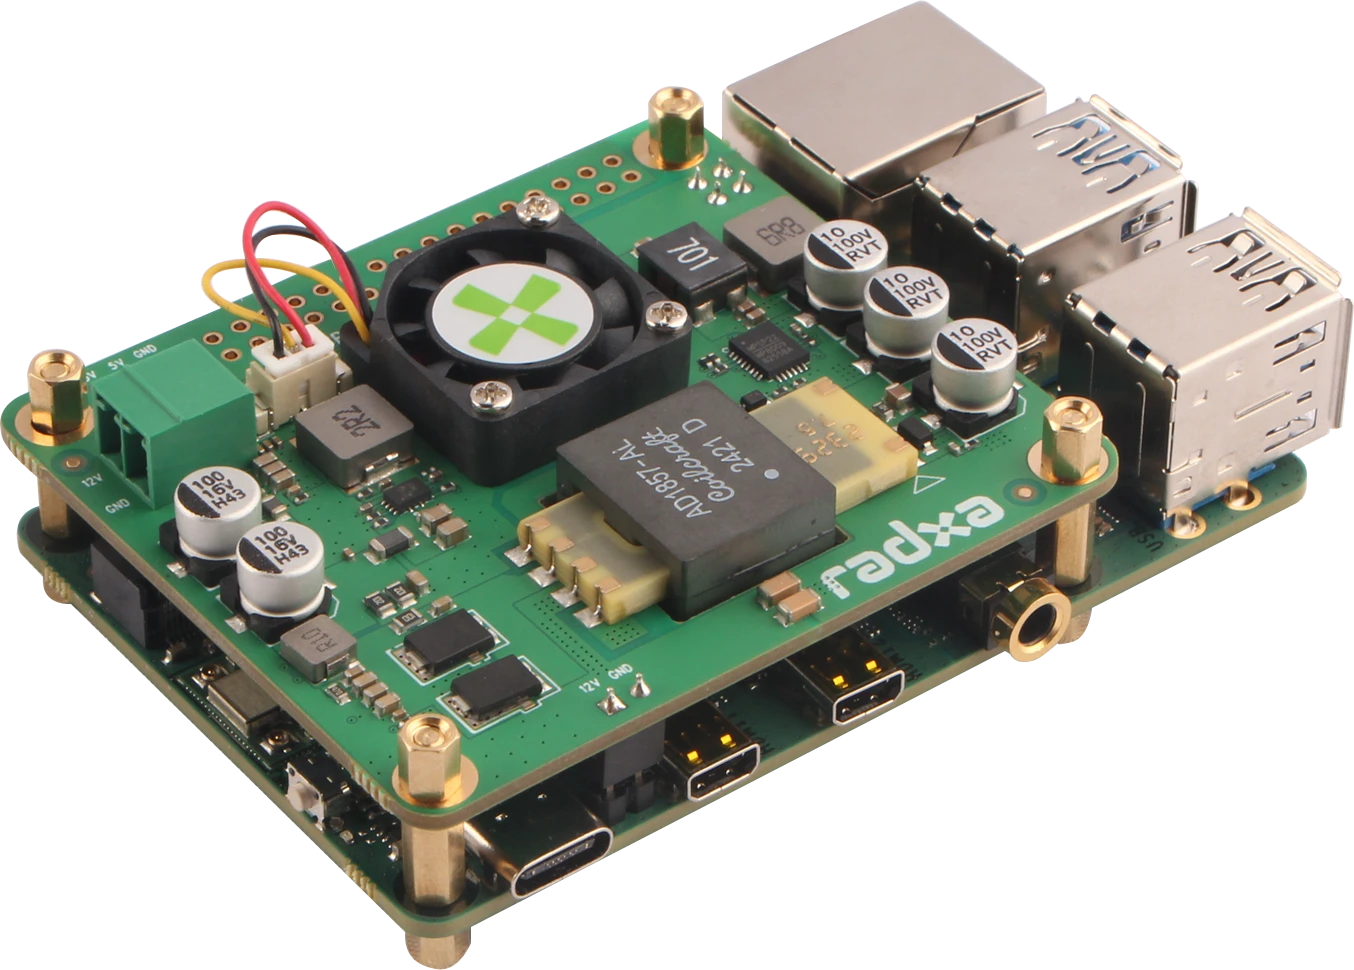
Connection
Install Radxa 25W PoE+ HAT for X4 on Radxa X4 as shown:
Test
- Replace pico-examples/pio/onewire/onewire.c with the following code
onewire.c
#include <stdio.h>
#include "pico/stdlib.h"
#include "pico/binary_info.h"

#include "onewire_library.h"    // onewire library functions
#include "ow_rom.h"             // onewire ROM command codes
#include "ds18b20.h"            // ds18b20 function codes

#define FAN_PIN 13
#define TEMP_THRESHOLD 45.0
#define CONVERSION_DELAY_MS 750 // DS18B20 conversion time is about 750ms
#define SLEEP_BETWEEN_READS_MS 1000 // Delay between consecutive temperature reads

int main() {
    stdio_init_all();

    PIO pio = pio0;
    uint gpio = 4;

    // configure PIN 13
    gpio_init(FAN_PIN);
    gpio_set_dir(FAN_PIN, GPIO_OUT);

    OW ow;
    uint offset;
    if (pio_can_add_program(pio, &onewire_program)) {
        offset = pio_add_program(pio, &onewire_program);
        if (ow_init(&ow, pio, offset, gpio)) {
            int maxdevs = 10;
            uint64_t romcode[maxdevs];
            int num_devs = ow_romsearch(&ow, romcode, maxdevs, OW_SEARCH_ROM);

            printf("Found %d devices\n", num_devs);
            for (int i = 0; i < num_devs; i++) {
                printf("\t%d: 0x%llx\n", i, romcode[i]);
            }

            while (true) {
                // start temperature conversion in parallel on all devices
                ow_reset(&ow);
                ow_send(&ow, OW_SKIP_ROM);
                ow_send(&ow, DS18B20_CONVERT_T);

                // wait for the conversion to finish
                sleep_ms(CONVERSION_DELAY_MS);

                for (int i = 0; i < num_devs; i++) {
                    ow_reset(&ow);
                    ow_send(&ow, OW_MATCH_ROM);
                    for (int b = 0; b < 64; b += 8) {
                        ow_send(&ow, romcode[i] >> b);
                    }
                    ow_send(&ow, DS18B20_READ_SCRATCHPAD);
                    int16_t temp = ow_read(&ow) | (ow_read(&ow) << 8);

                    float temperature = temp / 16.0;
                    // set fan speed to max
                    if (temperature >= TEMP_THRESHOLD) {
                        printf("\tTemperature >= 45, Device %d: temp: %.2f\n", i, temperature);
                        gpio_put(FAN_PIN, 0);
                    } else {
                        // set fan speed to min
                        printf("\tTemperature < 45, Device %d: temp: %.2f\n", i, temperature);
                        gpio_put(FAN_PIN, 1);
                    }
                }

                // sleep between consecutive reads
                sleep_ms(SLEEP_BETWEEN_READS_MS);
            }
        } else {
            puts("could not initialise the driver");
        }
    } else {
        puts("could not add the program");
    }

    return 0;
}
-
compile
cd pico-examples/build
rm -rf *
cmake ..
make -j$(nproc)
After successful compilation, a file named pio_onwire.uf2 will be generated in the pico-examples/build/pio/onewire/ directory.
-
Flash
- Reboot RP2040
-
Drag the pio_onwire.uf2 file into the RP2040, after the RP2040 disappears, the program will start to execute, if the PoE temperature is greater than or equal to 45 degree Celsius, the fan will spin at full speed, otherwise the fan will stop.
UART
- Replace pico-examples/uart/hello_uart/hello_uart.c with the following code
hello_uart.c
/**
 * Copyright (c) 2020 Raspberry Pi (Trading) Ltd.
 *
 * SPDX-License-Identifier: BSD-3-Clause
 */


#include <stdio.h>
#include "pico/stdlib.h"
#include "hardware/uart.h"

/// \tag::hello_uart[]

#define UART_ID uart0
#define BAUD_RATE 115200

// We are using pins 0 and 1, but see the GPIO function select table in the
// datasheet for information on which other pins can be used.
#define UART_TX_PIN 0
#define UART_RX_PIN 1

int main() {
    // Set up our UART with the required speed.
    uart_init(UART_ID, BAUD_RATE);

    // Set the TX and RX pins by using the function select on the GPIO
    // Set datasheet for more information on function select
    gpio_set_function(UART_TX_PIN, GPIO_FUNC_UART);
    gpio_set_function(UART_RX_PIN, GPIO_FUNC_UART);

    // Use some the various UART functions to send out data
    // In a default system, printf will also output via the default UART

    // Send out a character without any conversions
    uart_putc_raw(UART_ID, 'A');

    // Send out a character but do CR/LF conversions
    uart_putc(UART_ID, 'B');

    // Send out a string, with CR/LF conversions
    while(1) {
        uart_puts(UART_ID, "Hello, UART!\r\n");
        sleep_ms(1000);
    }

}

/// \end::hello_uart[]
- Replace pico-examples/uart/hello_uart/CMakeLists.txt with the following code
CMakeLists.txt
add_executable(hello_uart
        hello_uart.c
        )

# pull in common dependencies
target_link_libraries(hello_uart pico_stdlib)

# create map/bin/hex file etc.
pico_add_extra_outputs(hello_uart)

# add url via pico_set_program_url
example_auto_set_url(hello_uart)

pico_enable_stdio_usb(hello_uart 1)
pico_enable_stdio_uart(hello_uart 1)
-
Compile
cd pico-examples/build
rm -rf *
cmake ..
make -j$(nproc)
After successful compilation, a file named hello_uart.uf2 will be created in the pico-examples/build/uart/hello_uart/ directory.
-
Flash
- Reboot RP2040
-
Drag the hello_uart.uf2 file into the RP2040, after the RP2040 disappears, the program starts to execute.
-
Enter the following command in the terminal to view the serial port output
sudo minicom -D /dev/ttyS4 -b 115200
- Verification
In minicom, you will see the terminal output the line "Hello, UART!" every second.
Intel CPU Controls RP2040 via Uart
- PWM
- UART
FAN
The purpose of this paragraph is to provide the user with an example of the Radxa X4 CPU communicating with the MCU RP2040 by obtaining the temperature of the Radxa X4 CPU and making the fan spin up when the specified temperature is reached.
Connection
Connect the fan's pwm pin to PIN_3, the fan VCC to Radxa X4's VCC, and the fan GND to Radxa X4's GND.
Install the required Python libraries On the Radxa X4
pip install pyserial psutil
sudo apt-get update
sudo apt-get install stress
sudo apt-get install minicom
Create a new Temperature.py file on the Radxa X4 with the following contents:
Temperature.py
    import psutil
    import serial
    import time

    SERIAL_PORT = '/dev/ttyS0'
    BAUD_RATE = 115200

    set = serial.Serial(SERIAL_PORT, BAUD_RATE)

    def get_cpu_temperature():
        # get temperature from PC
        temps = psutil.sensors_temperatures()
        if 'coretemp' in temps:
            cpu_temp = temps['coretemp'][0].current
            return cpu_temp
        else:
            return None

    try:
        while True:
            temp = get_cpu_temperature()
            if temp is not None:
                print(f"CPU Temperature: {temp}°C")
                set.write(f"{temp}\n".encode())
            else:
                print("Unable to read temperature.")
            time.sleep(1)
    except KeyboardInterrupt:
        set.close()
        print("Program terminated.")
Add a directory for pwm_fan inside pico-examples/pwm/CMakeLists.txt
About how to use pico-examples, Please refer to the pico-sdk/pico-examples section above
Replace pico-example/pwm/CMakeLists.txt with the following code
CMakeLists.txt
    if (TARGET hardware_pwm)
        add_subdirectory_exclude_platforms(hello_pwm)
        add_subdirectory_exclude_platforms(led_fade)
        add_subdirectory_exclude_platforms(measure_duty_cycle)
        add_subdirectory_exclude_platforms(pwm_fan)
    else()
        message("Skipping PWM examples as hardware_pwm is unavailable on this platform")
    endif()
Create a new CMakeLists.txt in the pico-examples/pwm/pwm_fan/ directory with the following contents:
CMakeLists.txt
    add_executable(pwm_fan
        pwm_fan.c
        )

    # pull in common dependencies and additional pwm hardware support
    target_link_libraries(pwm_fan pico_stdlib hardware_pwm)

    # create map/bin/hex file etc.
    pico_add_extra_outputs(pwm_fan)

    # add url via pico_set_program_url
    example_auto_set_url(pwm_fan)
Create a new pwm_fan.c in the pico-examples/pwm/pwm_fan/ directory with the following contents:
pwm_fan.c
    #include <stdio.h>
    #include <stdlib.h>
    #include "pico/stdlib.h"
    #include "hardware/uart.h"
    #include "hardware/pwm.h"

    #define UART_ID uart0
    #define BAUD_RATE 115200
    #define UART_TX_PIN 0
    #define UART_RX_PIN 1
    #define FAN_PWM_PIN 28
    #define TEMP_THRESHOLD 60.0

    void set_pwm_duty_cycle(uint slice_num, uint channel, float duty_cycle) {
        if (duty_cycle < 0.0f) duty_cycle = 0.0f;
        if (duty_cycle > 100.0f) duty_cycle = 100.0f;
        uint16_t level = (uint16_t)(duty_cycle * (float)(1 << 16) / 100.0f);
        pwm_set_gpio_level(FAN_PWM_PIN, level);
    }

    int main() {
        stdio_init_all();

        uart_init(UART_ID, BAUD_RATE);
        gpio_set_function(UART_TX_PIN, GPIO_FUNC_UART);
        gpio_set_function(UART_RX_PIN, GPIO_FUNC_UART);

        uart_set_format(UART_ID, 8, 1, UART_PARITY_NONE);
        uart_set_fifo_enabled(UART_ID, false);

        gpio_set_function(FAN_PWM_PIN, GPIO_FUNC_PWM);
        uint slice_num = pwm_gpio_to_slice_num(FAN_PWM_PIN);
        pwm_config config = pwm_get_default_config();
        pwm_config_set_clkdiv(&config, 4.0f);
        pwm_init(slice_num, &config, true);

        char buffer[32];
        int index = 0;

        printf("Waiting for data...\n");

        while (1) {
            if (uart_is_readable(UART_ID)) {
                char c = uart_getc(UART_ID);
                if (c == '\n') {
                    buffer[index] = '\0';
                    float temperature = atof(buffer);
                    printf("Received temperature: %.2f°C\n", temperature);
                    if (temperature > TEMP_THRESHOLD) {
                        set_pwm_duty_cycle(slice_num, PWM_CHAN_A, 100.0f);
                    } else {
                        set_pwm_duty_cycle(slice_num, PWM_CHAN_A, 0.0f);
                    }
                    index = 0;
                } else {
                    buffer[index++] = c;
                    if (index >= sizeof(buffer)) {
                        index = sizeof(buffer) - 1;
                    }
                }
            }
        }

        return 0;
    }
Compile
cd pico-examples/build
rm -rf *
cmake ..
make -j$(nproc)
After successful compilation, a file named pwm_fan.uf2 is generated in the build/pwm/pwm_fan directory
Flash
- Reboot RP2040
- Drag the pwm_fan.uf2 file into the RP2040, and after the RP2040 disappears, the program starts to read the messages from /dev/ttyS0.
Run Temperature.py on the board
sudo python3 Temperature.py
If the program runs successfully, the program gets the current temperature of the Radxa X4 computer, sends the temperature to the serial port /dev/ttyS0, and formats the output temperature such as “CPU Temperature: 42.0°C”
Run the minicom on the board
sudo minicom -D /dev/ttyS0 -b 115200
Check if the RP2040 has received the temperature from the Radxa X4, if it has, the minicom will output the corresponding temperature, e.g. “Received temperature: 42.00°C”.
The purpose of this example is to interpret the Uart communication between Intel CPU and RP2040 by controlling the GPIO resources of RP2040 through Intel CPU.
Intel CPU controls GPIOs on 40-PIN via Uart.
Preparation
-
One Radxa X4
-
One LED
Connection
| Radxa X4 | <--> | LED |
|---|---|---|
| PIN_3 | <--> | LED |
| PIN_1 | <--> | VCC |
| PIN_9 | <--> | GND |
Here PIN_3 corresponds to GPIO29 in the following code, please refer to GPIO Definition for details.
Test
- Replace pico-examples/uart/hello_uart/hello_uart.c with following code
hello_uart.c
    #include <stdio.h>
    #include <stdlib.h>
    #include <string.h>
    #include "pico/stdlib.h"
    #include "hardware/uart.h"

    #define UART_ID uart0
    #define BAUD_RATE 115200

    #define UART_TX_PIN 0
    #define UART_RX_PIN 1

    #define BLINK_PIN 29

    int main() {

        gpio_init(BLINK_PIN);
        gpio_set_dir(BLINK_PIN, GPIO_OUT);

        uart_init(UART_ID, BAUD_RATE);
        gpio_set_function(UART_TX_PIN, GPIO_FUNC_UART);
        gpio_set_function(UART_RX_PIN, GPIO_FUNC_UART);
        uart_set_hw_flow(UART_ID, false, false);

        while(1) {
            if(uart_is_readable(UART_ID)) {
                uint8_t ch = uart_getc(UART_ID);
                uart_puts(UART_ID, "Received data!\r\n");
                uart_putc(UART_ID, ch);
                gpio_put(BLINK_PIN, 1);
            } else {
                gpio_put(BLINK_PIN, 0);
                uart_puts(UART_ID, "Uart is not readable!\r\n");
            }

            sleep_ms(500);
        }

        return 0;
    }
-
Compile
cd pico-examples/build
rm -rf *
cmake ..
make -j$(nproc)
After successful compilation, a file named hello_uart.uf2 will be created in the pico-examples/build/pwm/led_fade/ directory.
-
Flash
-
Verify
-
Open a terminal and send a string to /dev/ttyS4.
-
If RP2040 receives the string, the Led will light up, otherwise the Led will not light up.
-