Getting Started
System Setup
Powering Up Your Raspberry Pi 5
- Insert the microSD card with the installed operating system into the Raspberry Pi 5's microSD card slot
- Connect the required power supply to the 12V DC jack on the Radxa Dual 2.5G Router HAT
- Wait for the system to boot completely
Connecting to Your Raspberry Pi 5
You can connect to your Raspberry Pi 5 in one of the following ways:
Option 1: SSH Connection (Headless Setup)
If you enabled SSH during the system installation, you can connect remotely:
# Replace 'pi' with your username if you changed it during installation
ssh [email protected]
If the above command doesn't work, you may need to find your Raspberry Pi's IP address on your network and use:
ssh [email protected] # Replace with your Raspberry Pi's actual IP address
Option 2: Direct Connection
Alternatively, you can connect a monitor, keyboard, and mouse directly to your Raspberry Pi 5.
Enabling PCIe on the Raspberry Pi 5
The PCIe interface on the Raspberry Pi 5 is disabled by default. You need to enable it for the Dual 2.5G Router HAT to function properly.
Step 1: Edit the Configuration File
- Open the configuration file using a text editor:
sudo nano /boot/firmware/config.txt
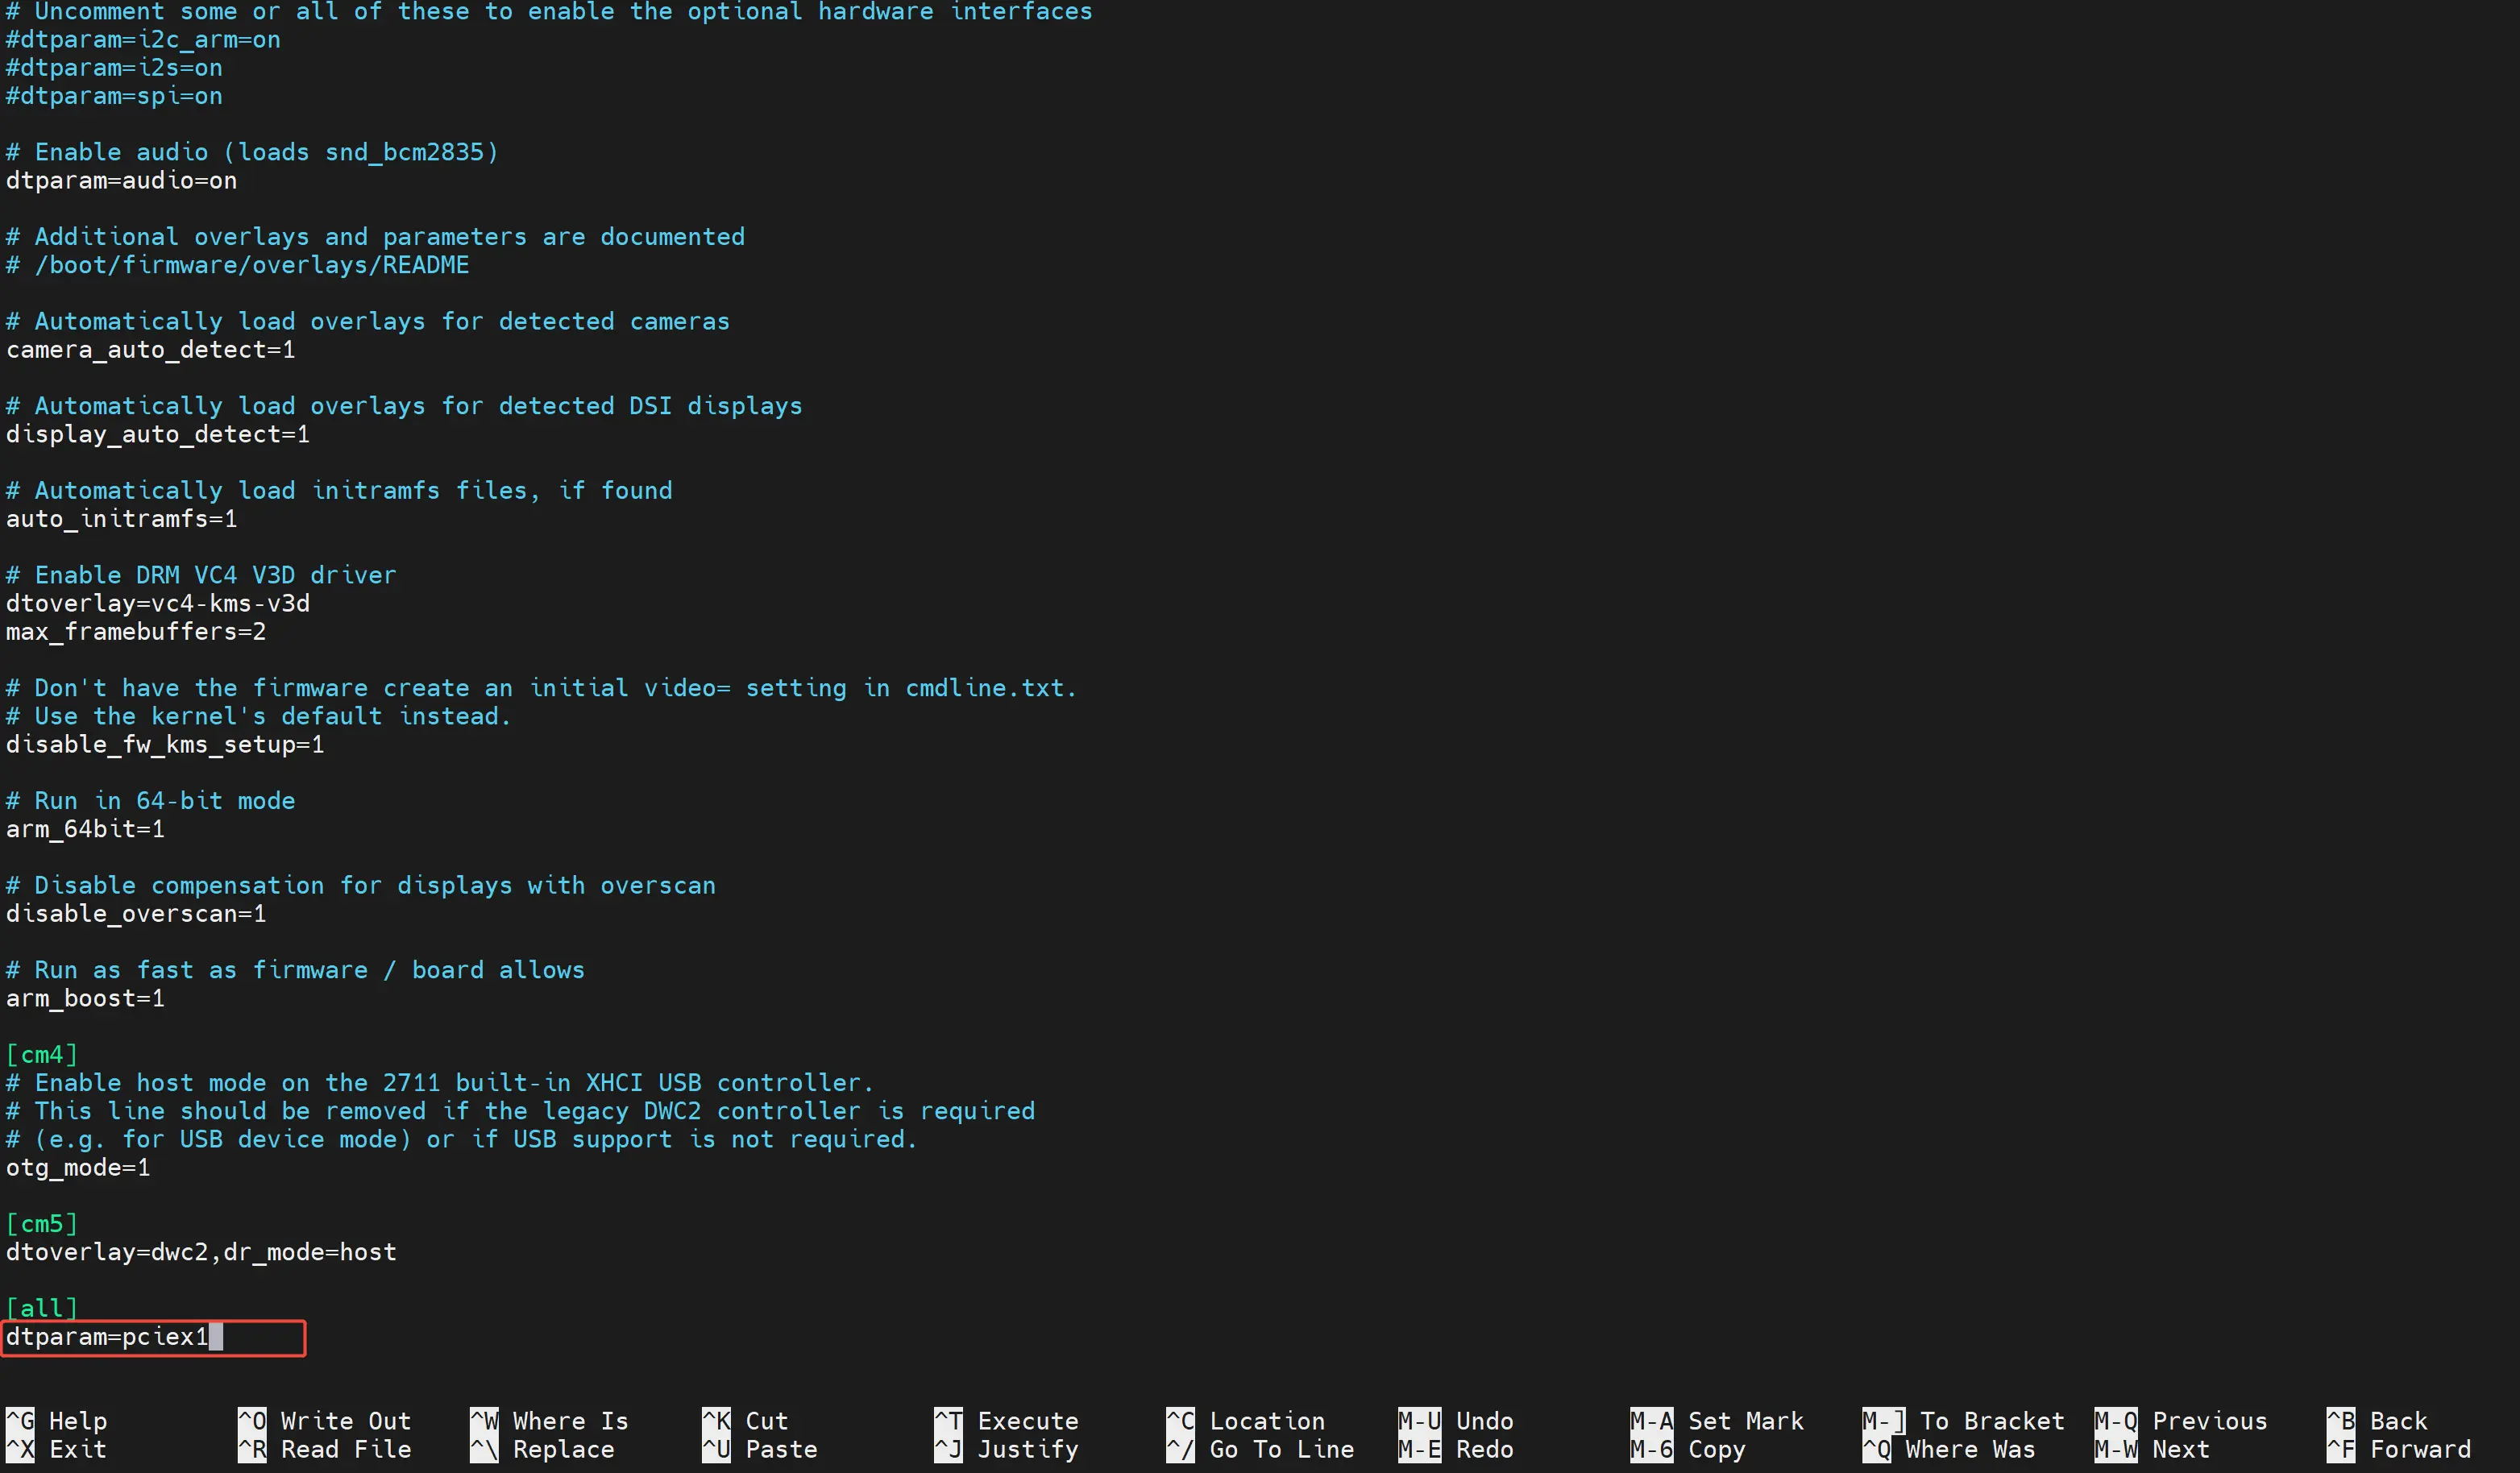
- Add the following line at the end of the file:
dtparam=pciex1
- Press
Ctrl+Oto save the file, thenCtrl+Xto exit
- Reboot your Raspberry Pi 5:
sudo reboot
Note: For more information, refer to the Raspberry Pi official documentation on PCIe connectors.
Verifying Hardware Detection
Checking PCIe Devices
After rebooting, verify that the PCIe devices on the Dual 2.5G Router HAT are properly detected:
sudo lspci
You should see entries for the Realtek RTL8125 Ethernet controllers and any NVMe SSD if installed:

Checking NVMe SSD
If you've installed an NVMe SSD, verify that it's properly detected by the system:
lsblk
This command lists all block devices. Your NVMe SSD should appear as nvme0n1 or similar:

NVMe SSD Performance Testing
You can perform a simple write speed test on your NVMe SSD using the following command:
sudo dd if=/dev/zero of=/dev/nvme0n1 bs=1M count=1000 status=progress oflag=direct
Warning: This command writes directly to the raw disk device. Make sure you're using the correct device name and that the SSD doesn't contain any important data.

Optimizing PCIe Performance (Optional)
By default, the Raspberry Pi 5 may use PCIe Gen 2. For maximum performance with NVMe SSDs, you can force it to use PCIe Gen 3:
- Edit the configuration file again:
sudo nano /boot/firmware/config.txt
- Add the following line:
dtparam=pciex1_gen=3
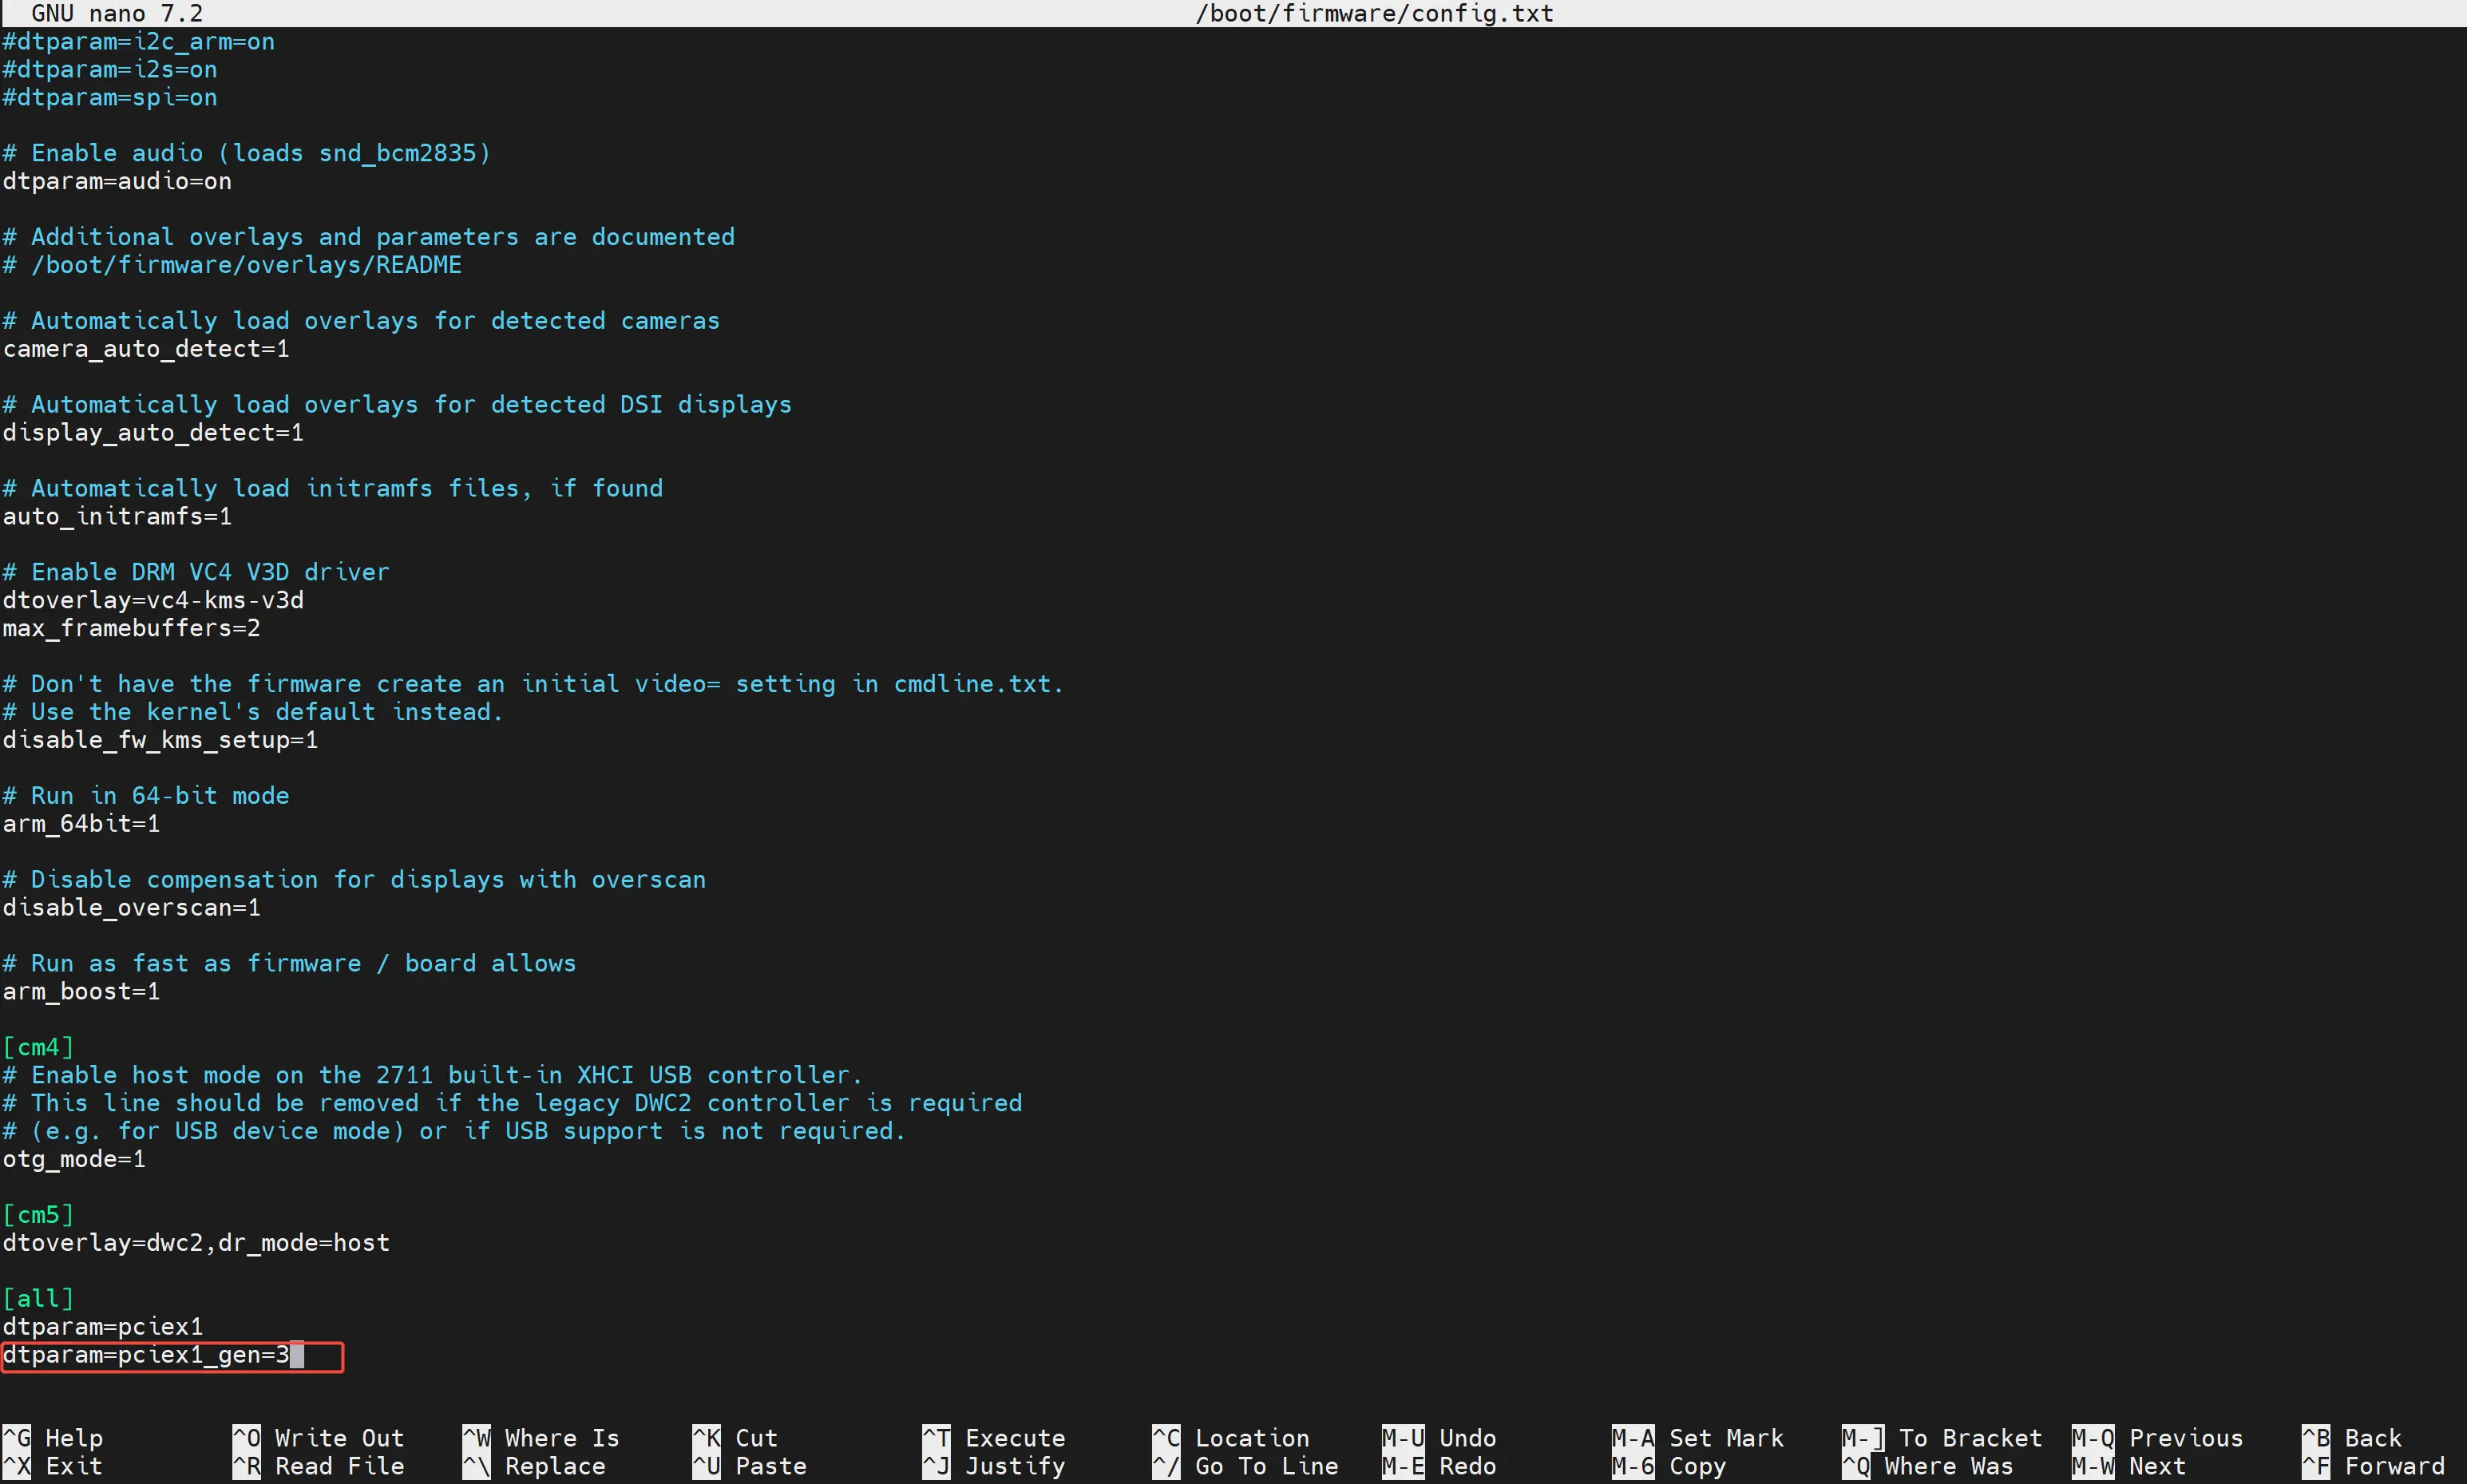
- Save the file and reboot:
sudo reboot
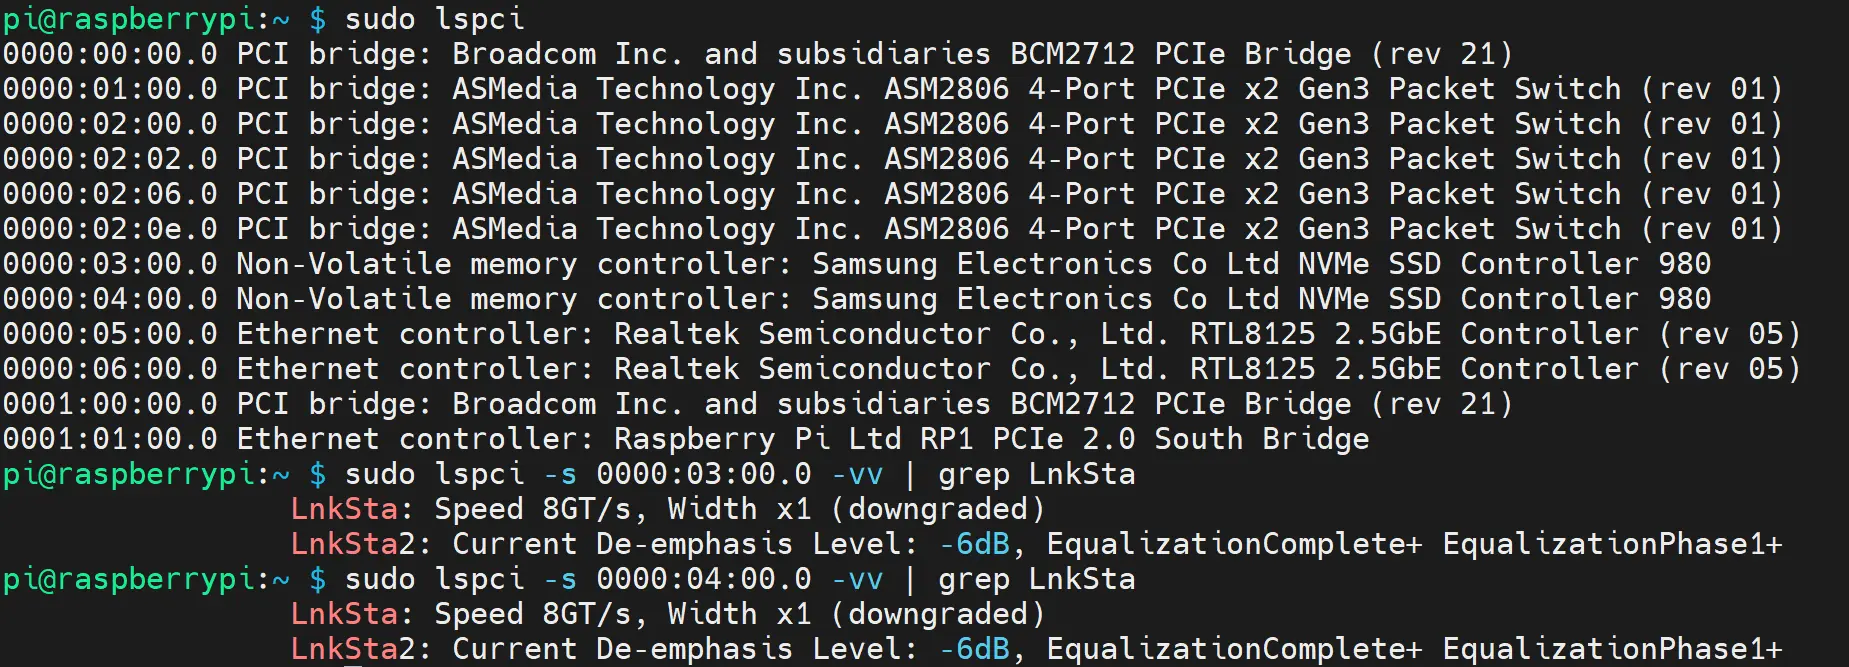
- After rebooting, verify the PCIe link status:
sudo lspci
sudo lspci -vvv -s 0000:03:00.0 | grep LnkSta
Look for "Speed 8GT/s" which indicates PCIe Gen 3:
- Run the speed test again to see the improved performance:
sudo dd if=/dev/zero of=/dev/nvme0n1 bs=1M count=1000 status=progress oflag=direct

Checking Network Interfaces
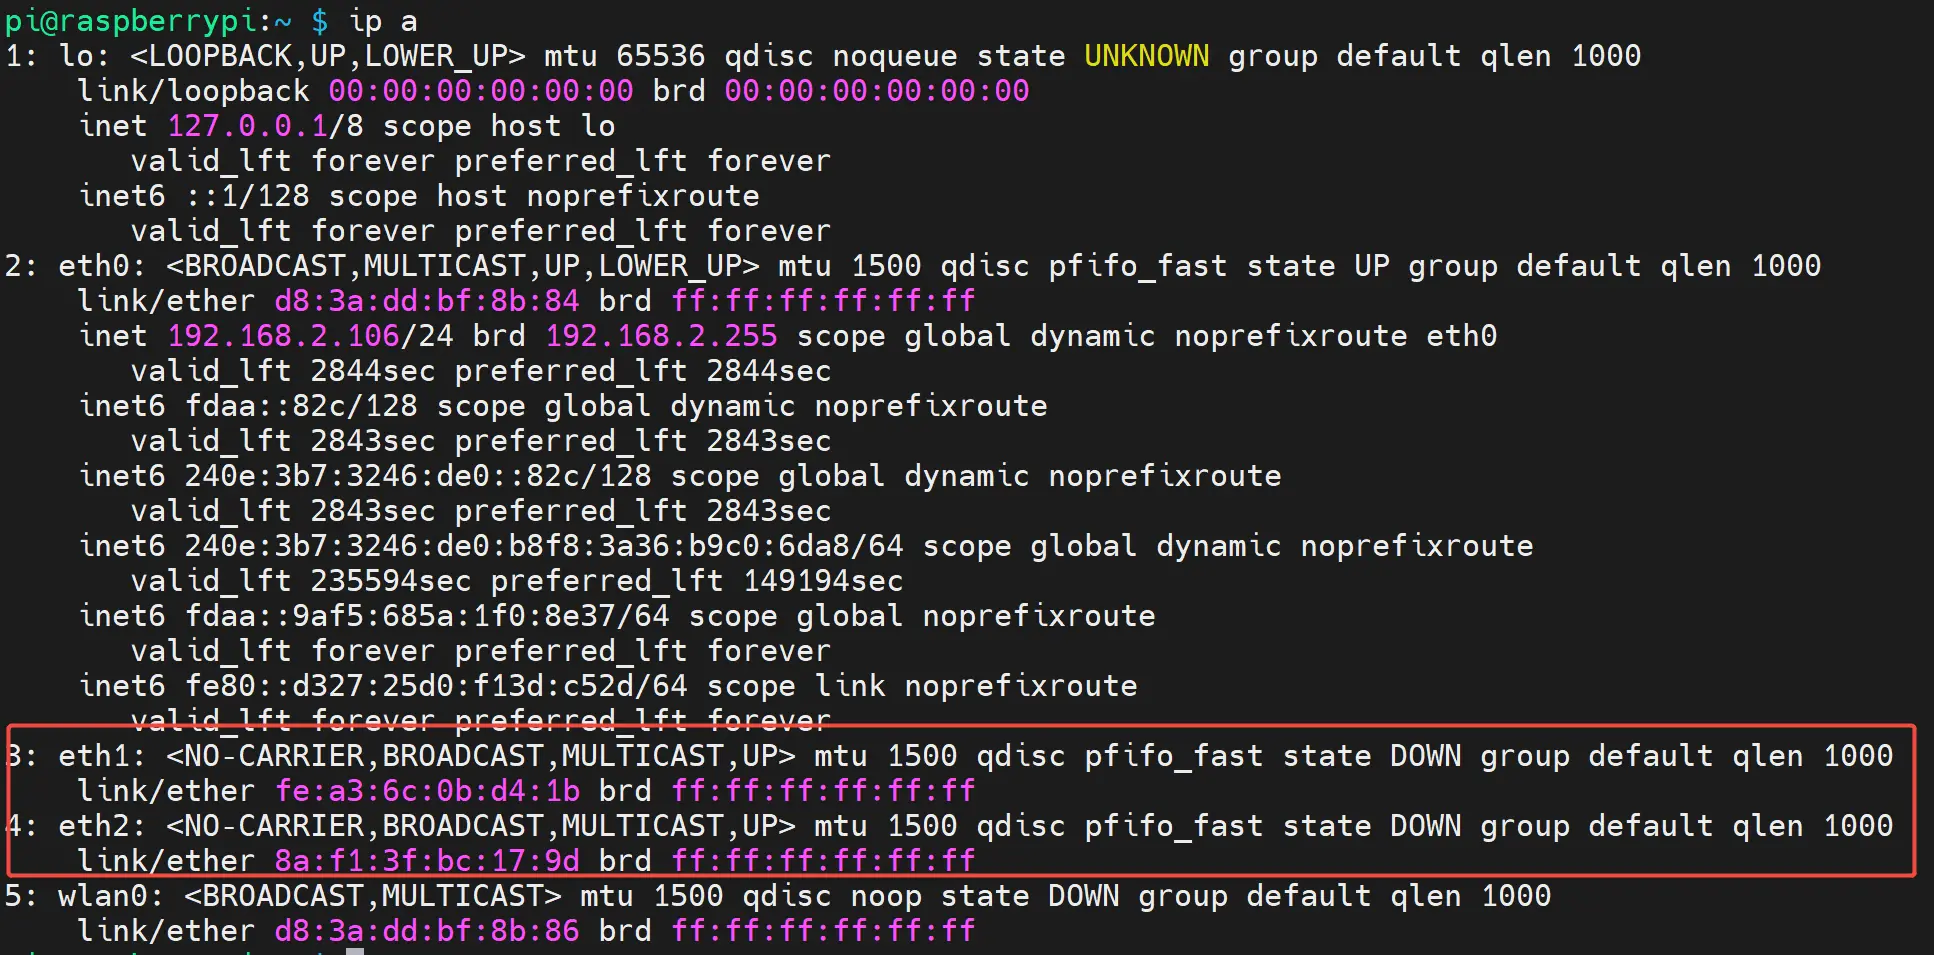
Verify that both 2.5G Ethernet ports are properly detected:
ip a
You should see additional network interfaces (typically eth1 and eth2) besides the built-in Ethernet port:
Network Performance Testing
Testing Ethernet Speed
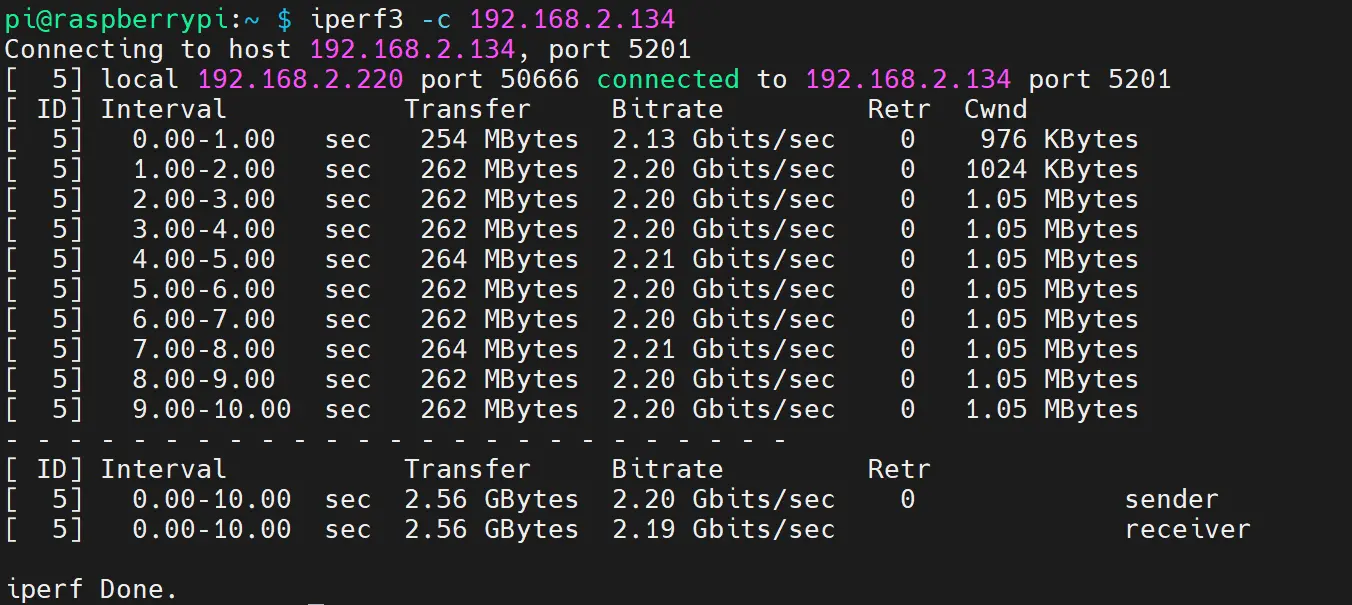
To verify that your 2.5G Ethernet ports are operating at full speed, you can use the iperf3 tool to perform network throughput tests.
Step 1: Install iperf3
sudo apt-get update
sudo apt-get install iperf3
Step 2: Set Up a Test Environment
You'll need another device on your network that:
- Supports at least 2.5G Ethernet
- Has iperf3 installed
- Is connected to the same network switch that supports 2.5G or higher speeds
Step 3: Run the iperf3 Server
On the other device, start iperf3 in server mode:
iperf3 -s
Step 4: Run the iperf3 Client
On your Raspberry Pi 5, run iperf3 in client mode, connecting to the server:
iperf3 -c 192.168.1.100 # Replace with your server's IP address
You should see results showing throughput close to 2.5 Gbps if everything is configured correctly:
Configuring Network Interfaces
You can configure the network interfaces permanently by editing the network configuration file:
sudo nano /etc/dhcpcd.conf
Example Static IP Configuration
Add the following lines to assign static IPs to your network interfaces:
interface eth1
static ip_address=192.168.1.100/24
static routers=192.168.1.1
static domain_name_servers=192.168.1.1 8.8.8.8

interface eth2
static ip_address=192.168.2.100/24
Save the file and reboot for the changes to take effect.
Troubleshooting
Common Issues
-
PCIe devices not detected
- Ensure the PCIe is enabled in config.txt
- Check that the FPC cable is properly connected
- Verify that the 12V power supply is connected
-
Network interfaces not working
- Check network cable connections
- Verify switch/router supports 2.5G speeds
- Try updating the kernel:
sudo apt update && sudo apt full-upgrade
-
NVMe SSD not detected
- Ensure the SSD is properly seated in the M.2 slot
- Try a different SSD to rule out compatibility issues
- Check kernel logs:
dmesg | grep -i nvme
Next Steps
Now that your Radxa Dual 2.5G Router HAT is properly configured, you can use it for various applications such as:
- Setting up a high-performance router or firewall
- Creating a network-attached storage (NAS) solution
- Building a media server with fast network connectivity
- Developing edge computing applications requiring high-speed networking