PCIe E Key
Supported Accessories
E to sata board
-
Installation
- Preparation
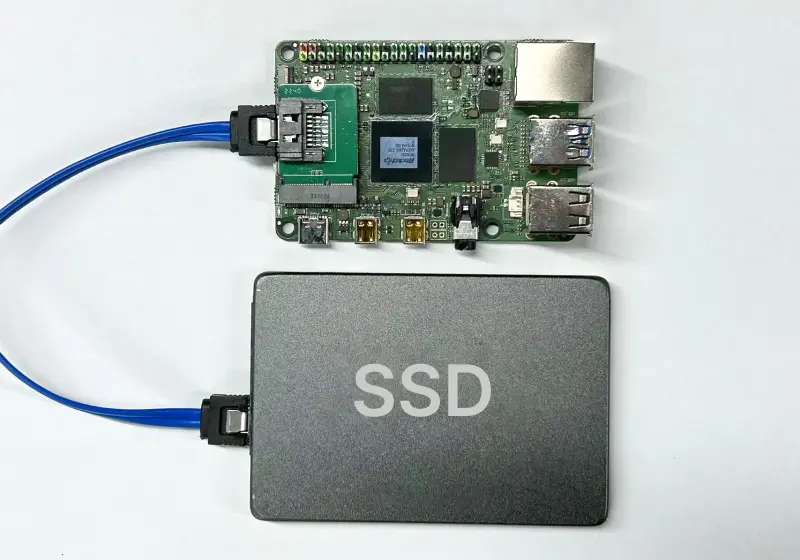
When using the M2.E to SATA adapter board, you need to prepare a SATA cable for connecting the SATA hard drive and a SATA power cable for power supply.
- Connect
As shown in the picture, connect the M.2 E key of the SATA adapter board to the M.2 E port of ROCK 5A, and then use the SATA cable to connect ROCK 5A to the SATA SSD. The red PIN pin of ROCK 5A can be used for SATA 5V power supply, and the black PIN pin is usually used for GND, which can be used for SATA HDD power supply.
- Enable SATA Overlay
Open a terminal and run rsetup
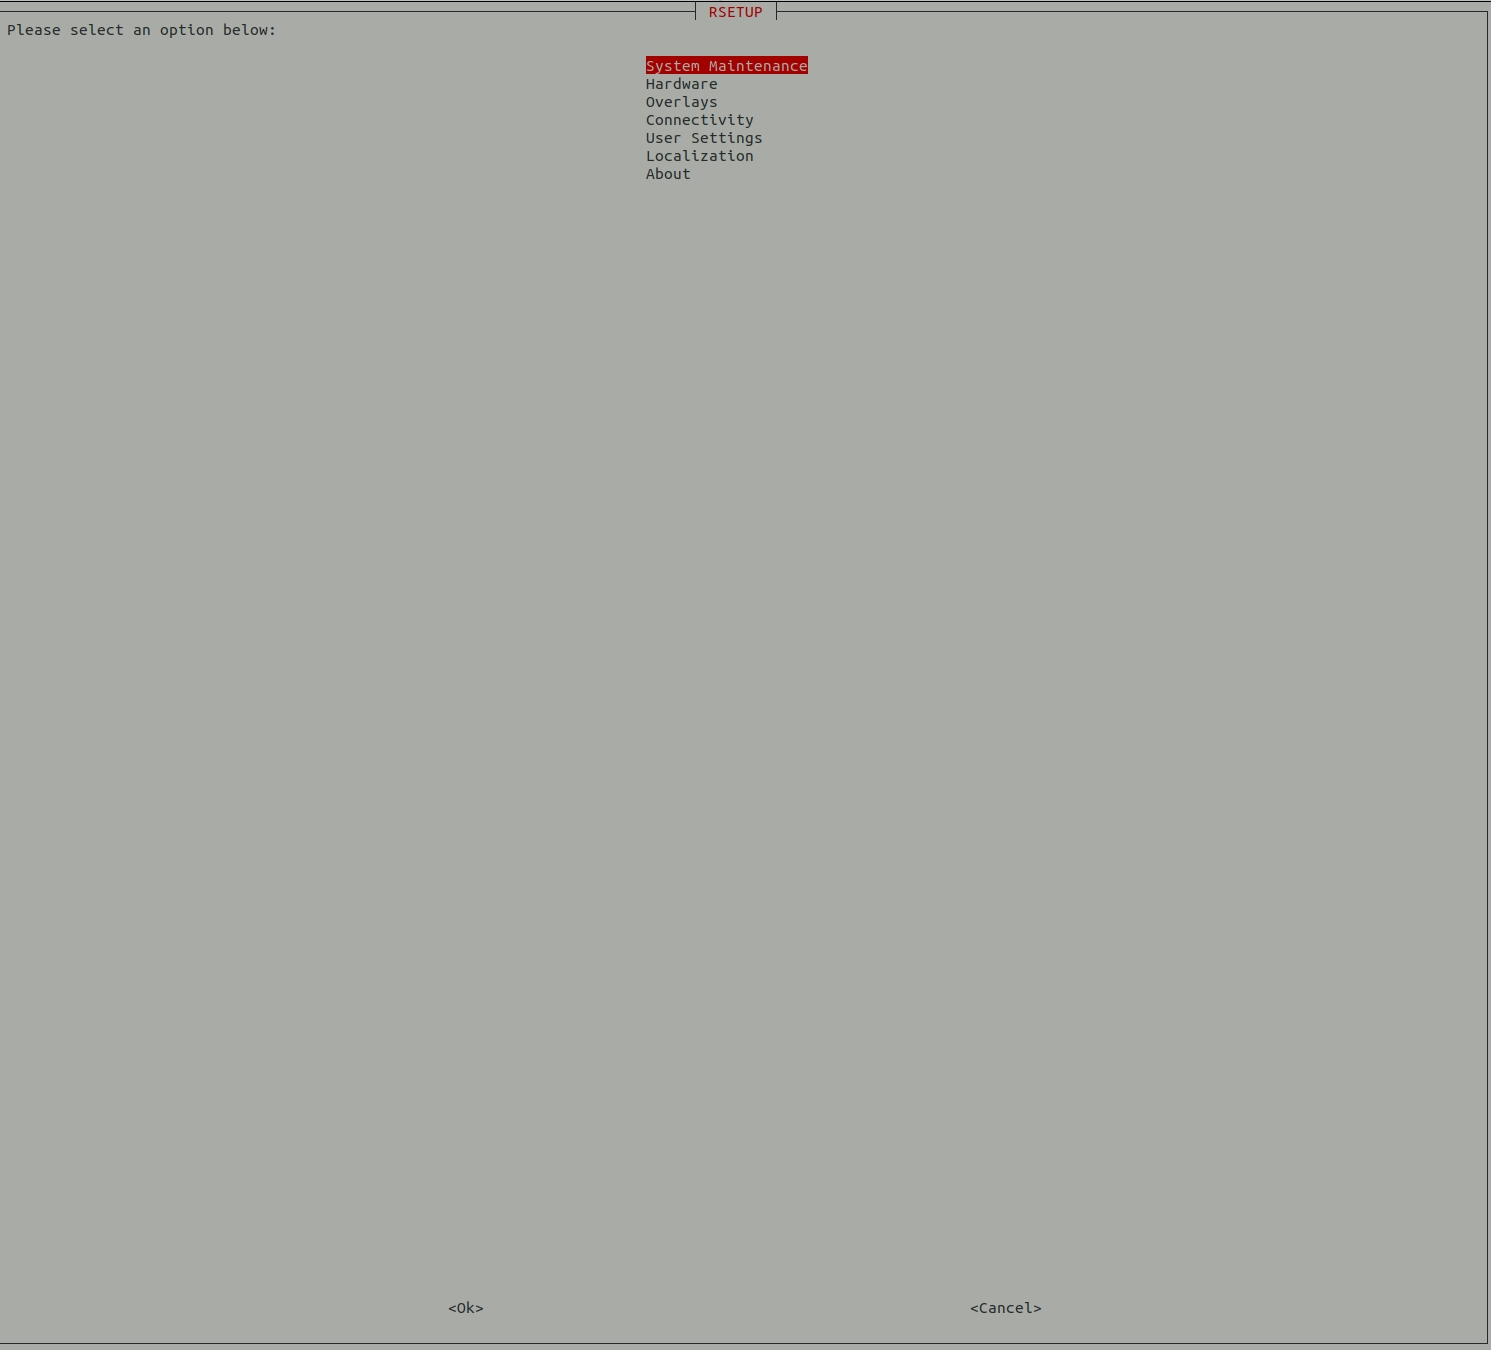
Select
Manage overlays: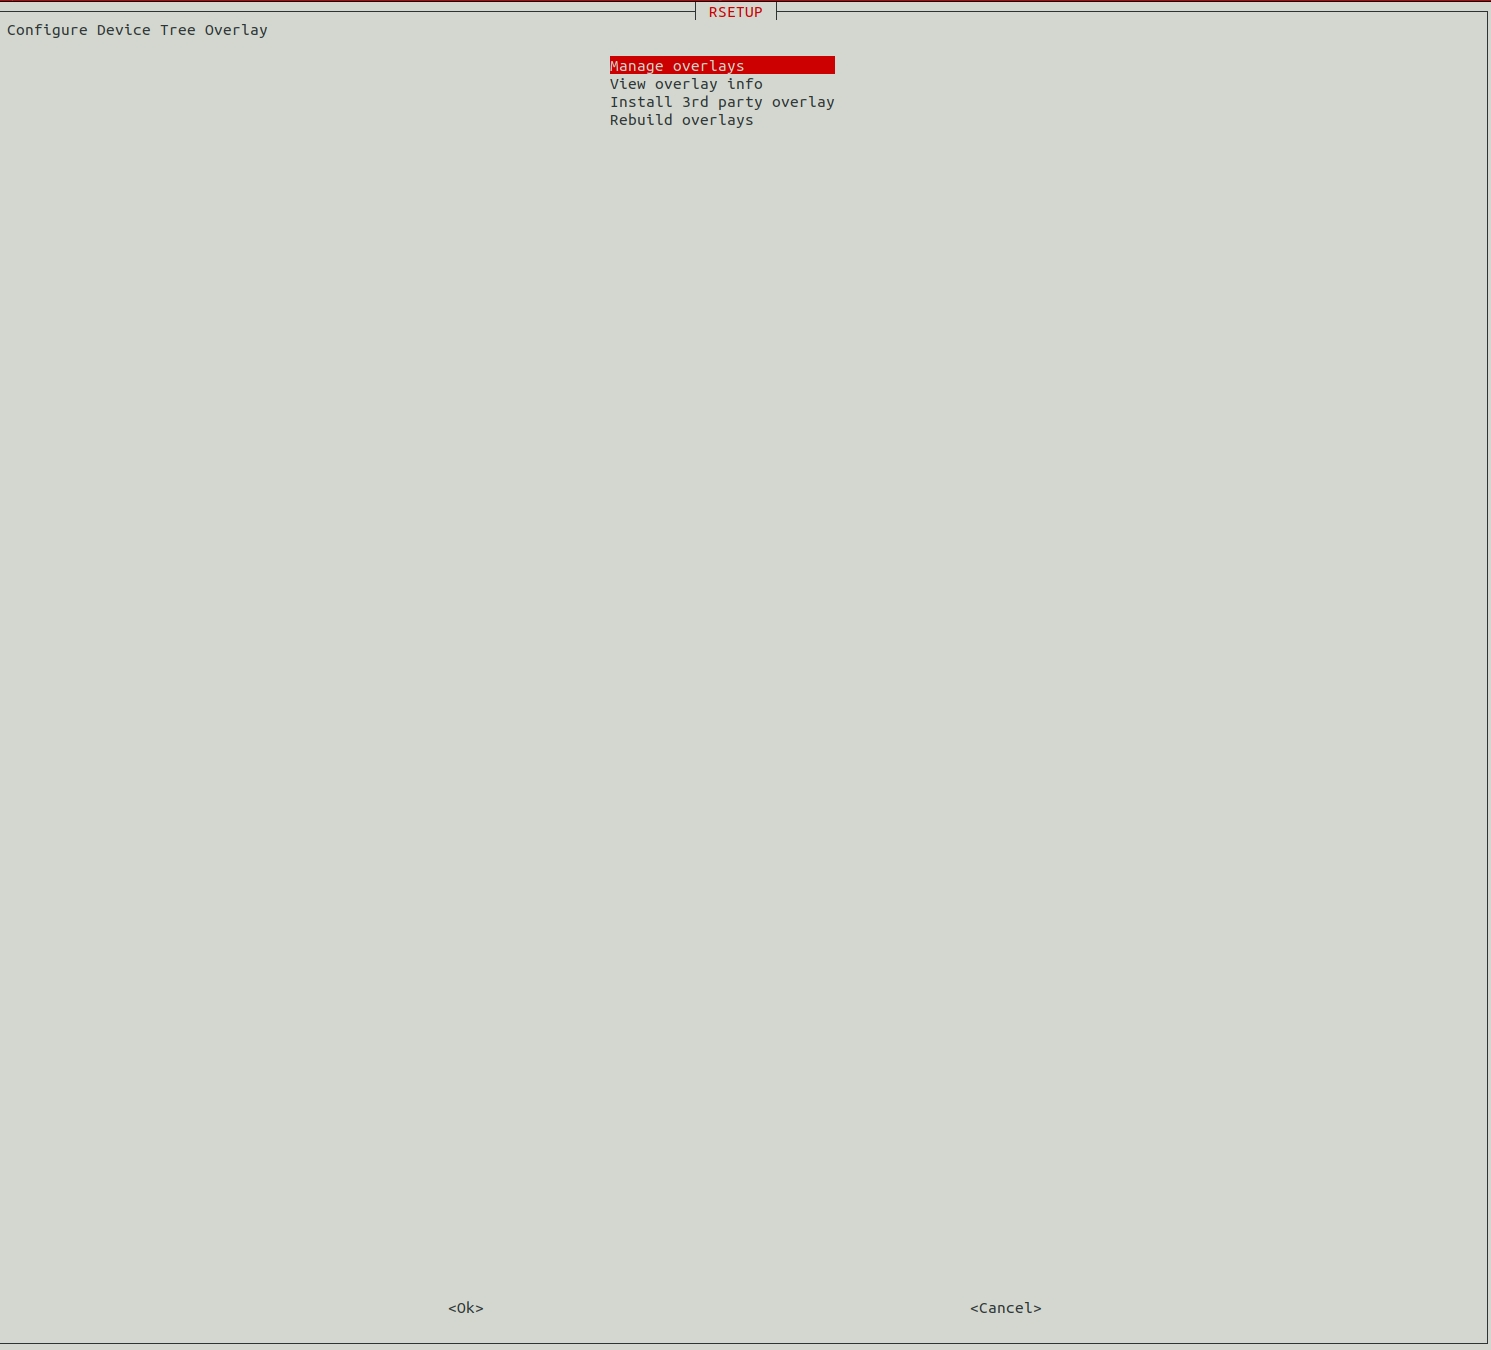
Select by space Enable SATA0
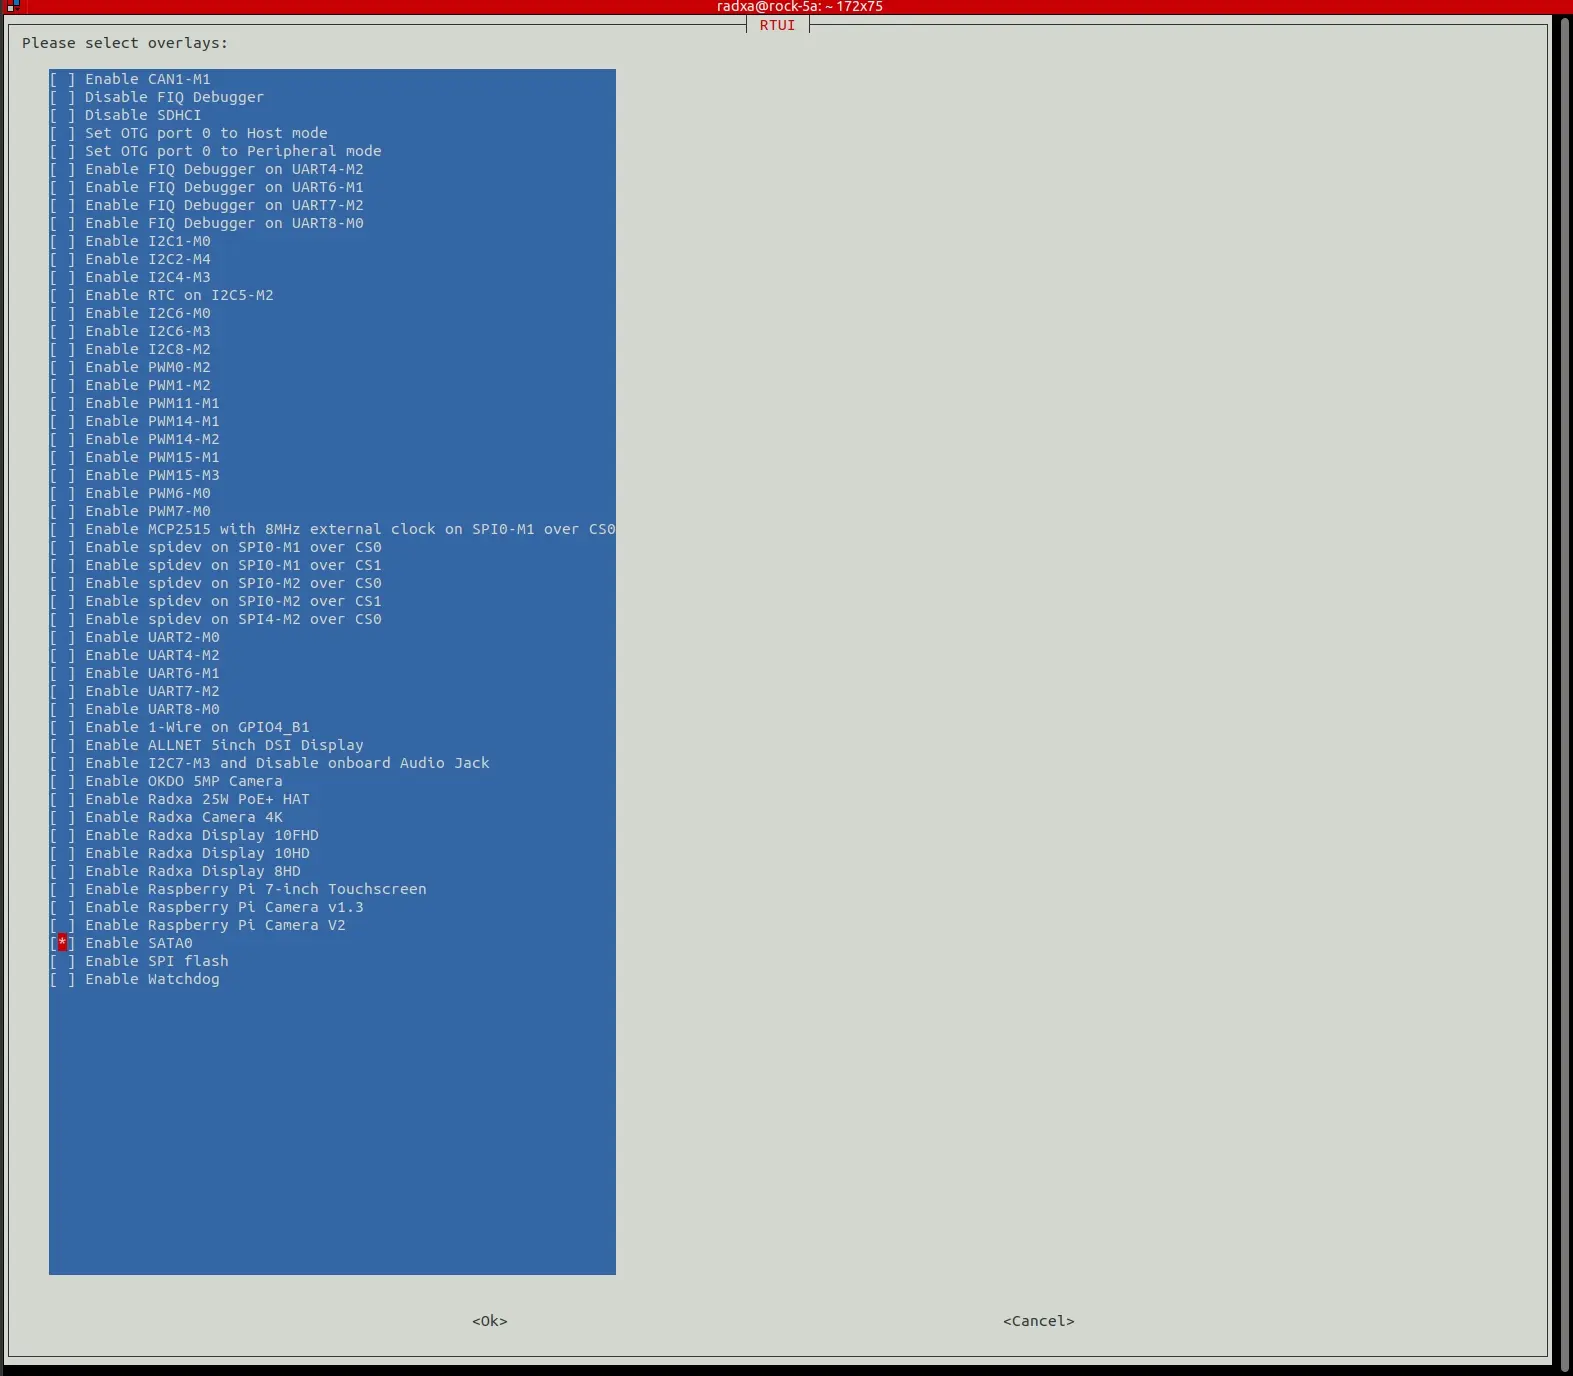
- Press ESC to exit rsetup and reboot the system.
-
Check if the SATA is mounted successfully
See if the SSD is recognised with the
lsblkcommandradxa@rock-5a:~$ lsblk NAME MAJ:MIN RM SIZE RO TYPE MOUNTPOINT sda 8:0 0 476.9G 0 disk mmcblk0 179:0 0 14.5G 0 disk ├─mmcblk0p1 179:1 0 16M 0 part /config └─mmcblk0p2 179:2 0 14.4G 0 part / mmcblk0boot0 179:32 0 4M 1 disk mmcblk0boot1 179:64 0 4M 1 disk zram0 254:0 0 3.9G 0 disk [SWAP]
When SATA is recognised by the system, it can be viewed as sda
-
Refer
For a detailed description of the m.2 sata break board see Radxa M.2 E To SATA Board
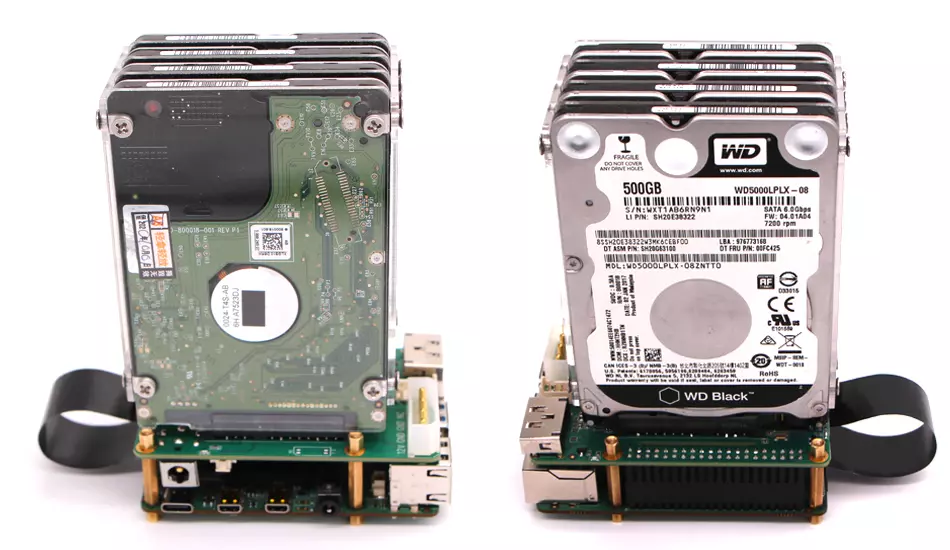
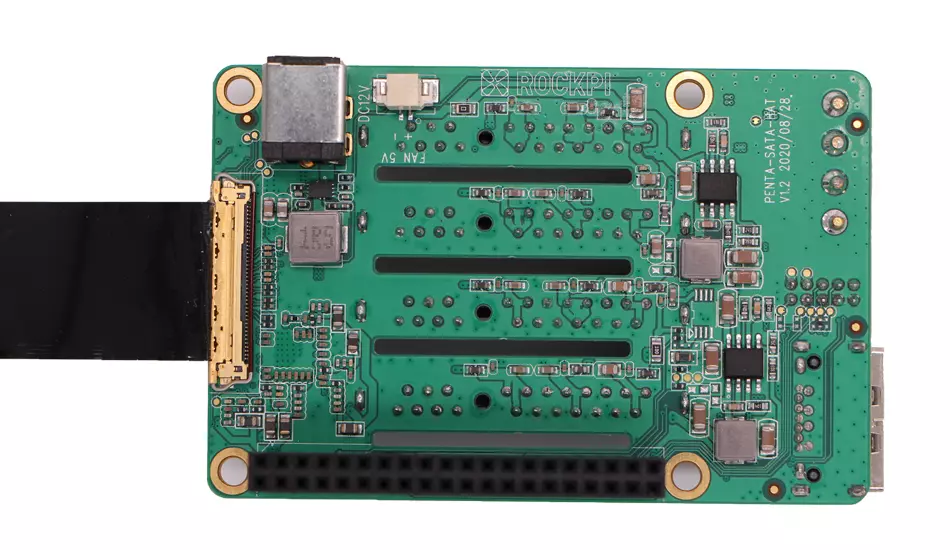
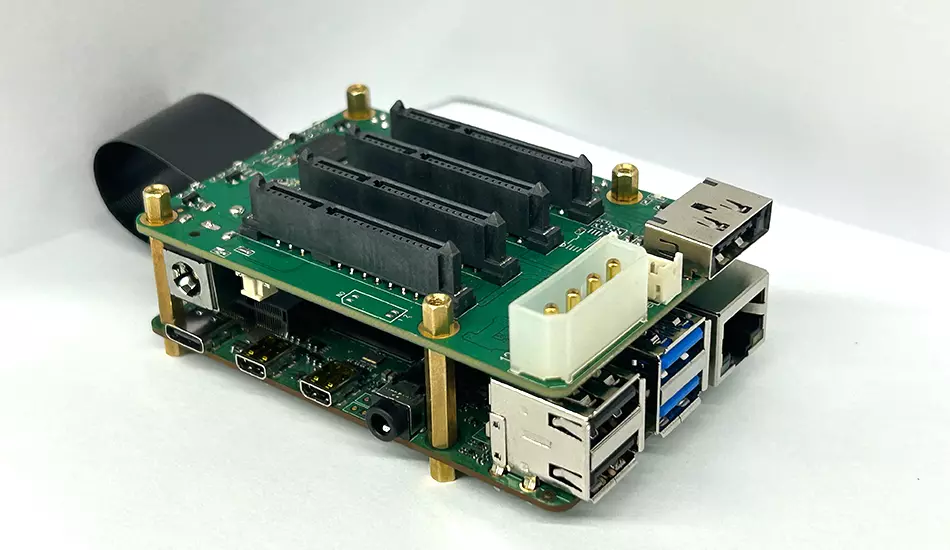
Penta sata hat
- Picture of with Radxa PENTA SATA HAT.
-
The diagram below shows the Radxa Penta SATA HAT and the parts included.
For link details, click on Penta SATA HAT

- Please distinguish between the front and back of the IPEX cable first. As shown in the picture. **The IPEX cables we provide for have the same orientation on both ends. **
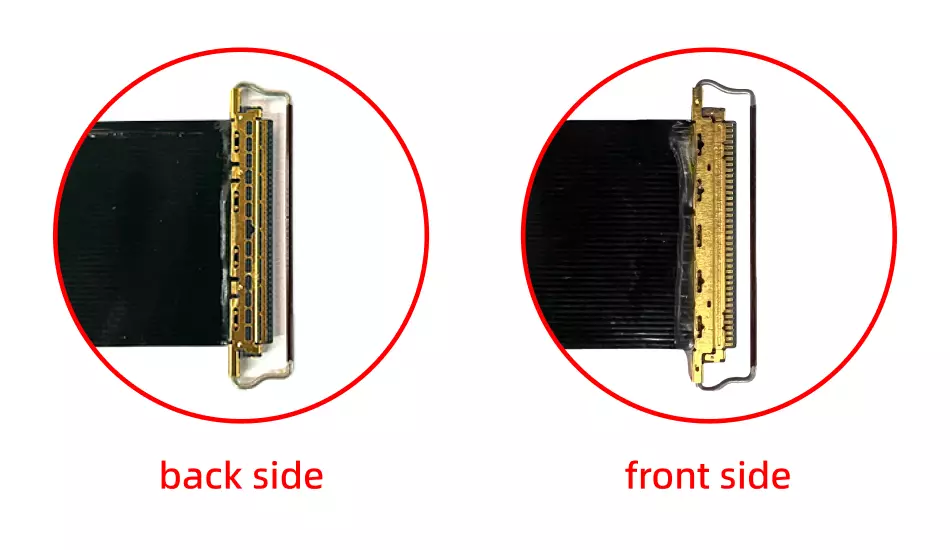
- Please note that the ring clips need to snap into the connectors.
-
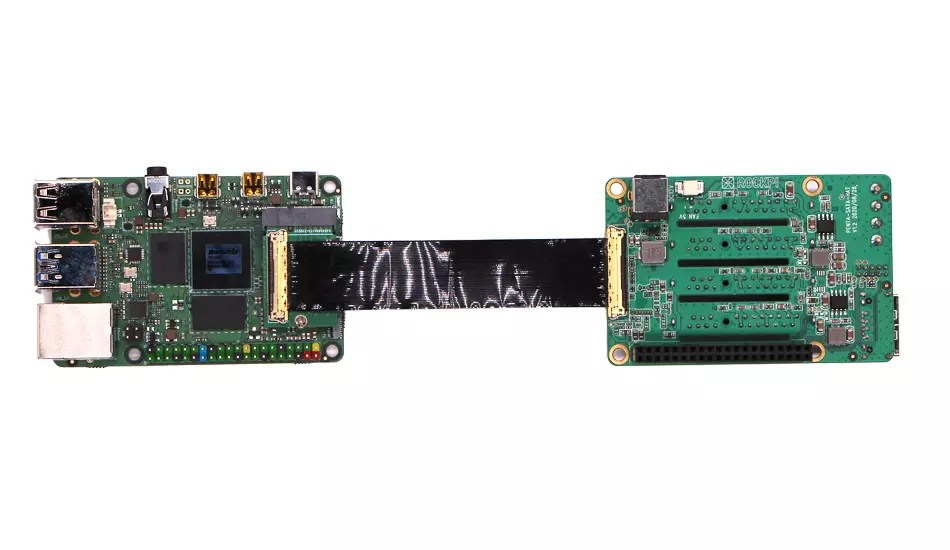
Installation Tutorial
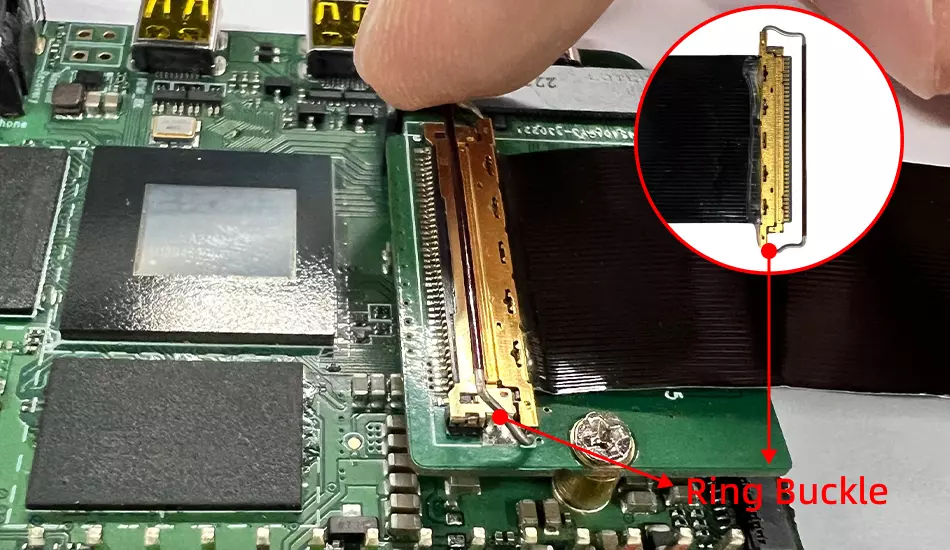
- M.2 E key to M.2 M key Board with IPEX cable. **Note that the IPEX cable is installed here with the front side up, and the ring clips need to snap onto the connector to ensure that it is secured. **
- Radxa Penta SATA HAT motherboard with IPEX cable. **Note that the IPEX cable is installed here with the front side up and the ring clips need to snap onto the connector to ensure retention. **
- Please install the M2.5x18+6 copper post and M2.5x5 copper post supplied with the product on as shown.
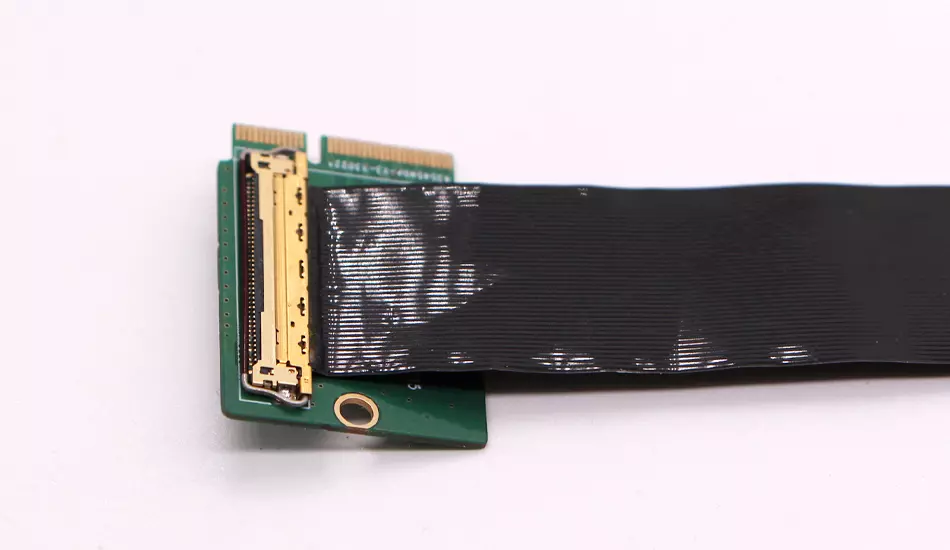
- Please connect one end of the IPEX cable to the M.2 E key to M Key board and the other end to the Radxa Penta SATA HAT and install the M.2 E key to M key board to the connector of the M.2 E key ROCK5A. As shown in the figure.
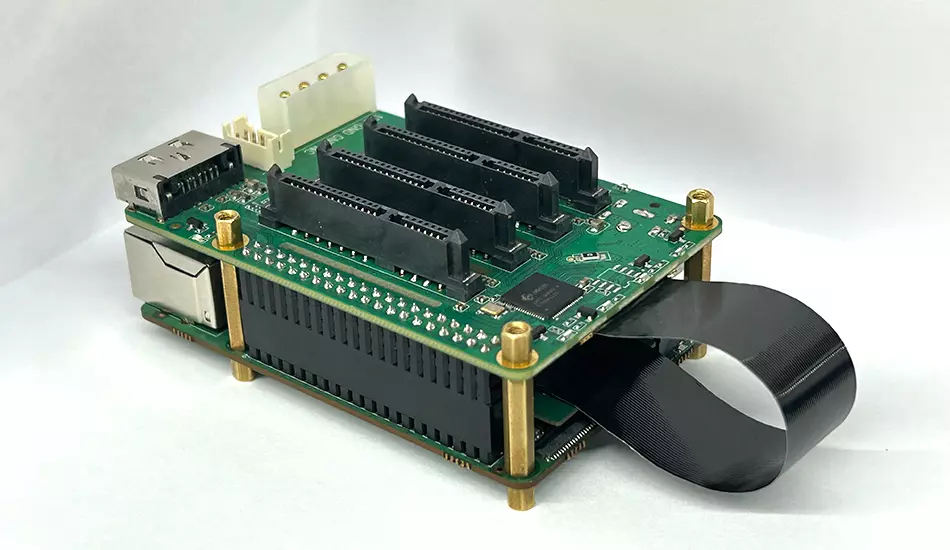
- Finally, the Radxa Penta SATA HAT is assembled using M2.5x5+5 copper posts.
-
To see if the Penta SATA HAT mount is successful
- Check if the SATA device is recognised by
lsblk.
radxa@{props.product}:~$ lsblk
NAME         MAJ:MIN RM   SIZE RO TYPE MOUNTPOINT
sda            8:0    0 465.8G  0 disk
└─sda1         8:1    0 465.8G  0 part
sdb            8:16   0 465.8G  0 disk
└─sdb1         8:17   0 465.8G  0 part
sdc            8:32   0 465.8G  0 disk
└─sdc1         8:33   0 465.8G  0 part
sdd            8:48   0 465.8G  0 disk
└─sdd1         8:49   0 465.8G  0 part
mmcblk0      179:0    0  14.5G  0 disk
├─mmcblk0p1  179:1    0    16M  0 part /config
└─mmcblk0p2  179:2    0  14.4G  0 part /
mmcblk0boot0 179:32   0     4M  1 disk
mmcblk0boot1 179:64   0     4M  1 disk
zram0 254:0 0 3.8G 0 disk [SWAP]- When the system recognises the Penta SATA HAT, you can see the SATA devices (sda/sdb/sdc/sdd).
- Check if the SATA device is recognised by
-
Software Support
To make the OLED display and fan on the top panel work properly, we provide the rockpi-penta software package, which can be installed with the following commands.
sudo apt update
sudo apt install wget
wget https://github.com/radxa/rockpi-penta/releases/download/v0.2.2/rockpi-penta-0.2.2.deb
sudo apt install -y ./rockpi-penta-0.2.2.deb
- Software Configuration
Edit /etc/rockpi-penta.conf, and use the following command to make it effective.
sudo systemctl restart rockpi-penta.service
- Default configuration
The following is the default configuration of /etc/rockpi-penta.conf, which you can modify according to the comments.
[fan]
# When the temperature is above lv0 (35'C), the fan at 25% power,
# and lv1 at 50% power, lv2 at 75% power, and lv3 at 100% power.
# When the temperature is below lv0, the fan is turned off.
# You can change these values if necessary.
lv0 = 35
lv1 = 40
lv2 = 45
lv3 = 50

[key]
# You can customize the function of the key, currently available functions are
# slider: oled display next page
# switch: fan turn on/off switch
# reboot, poweroff
# If you have any good suggestions for key functions,
# please add an issue on https://rock.sh/rockpi-sata
click = slider
twice = switch
press = none

[time]
# twice: maximum time between double clicking (seconds)
# press: long press time (seconds)
twice = 0.7
press = 1.8

[slider]
# Whether the oled auto display next page and the time interval (seconds)
auto = true
time = 10

[oled]
# Whether rotate the text of oled 180 degrees, whether use Fahrenheit
rotate = false
f-temp = false
- Refer
See Radxa Penta SATA Expansion Board for details.
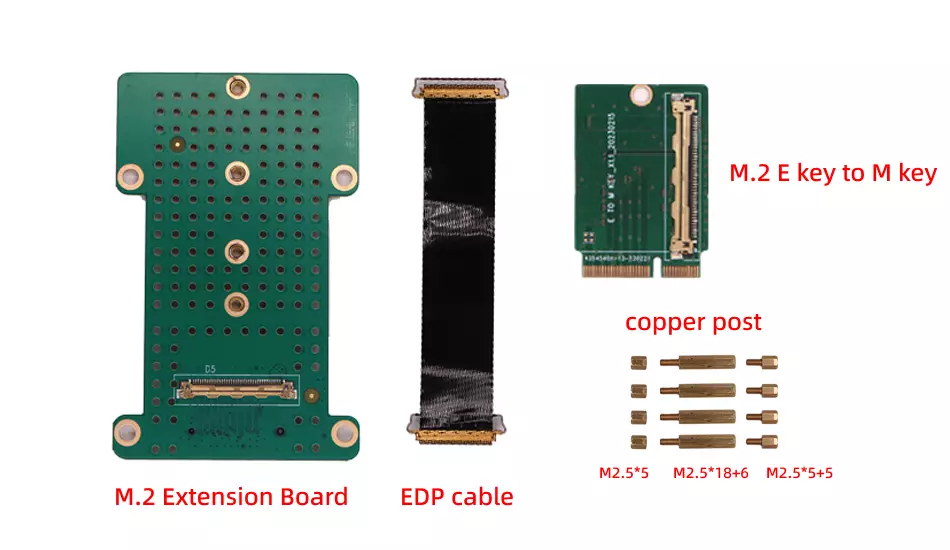
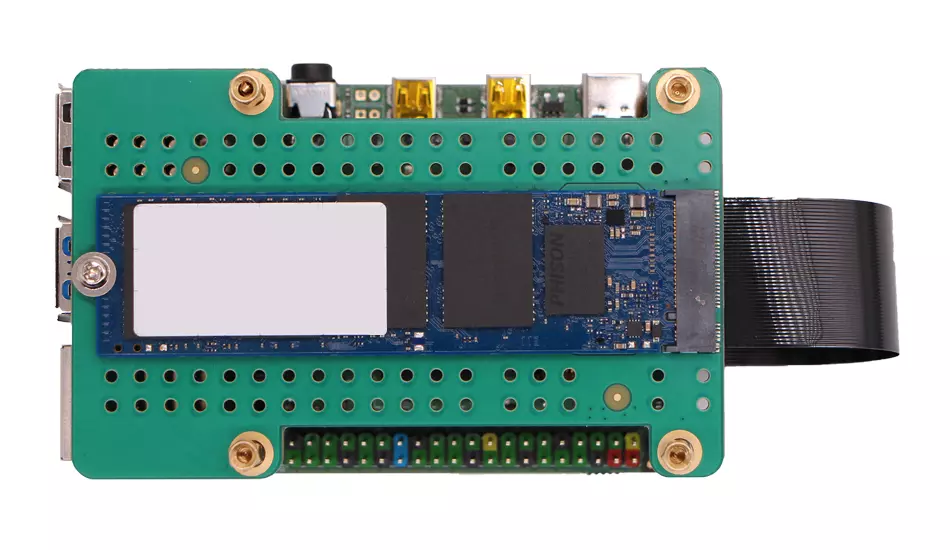
M.2 Extension board
-
Preparation
- The following figure shows the Radxa M.2 expansion board and the included components
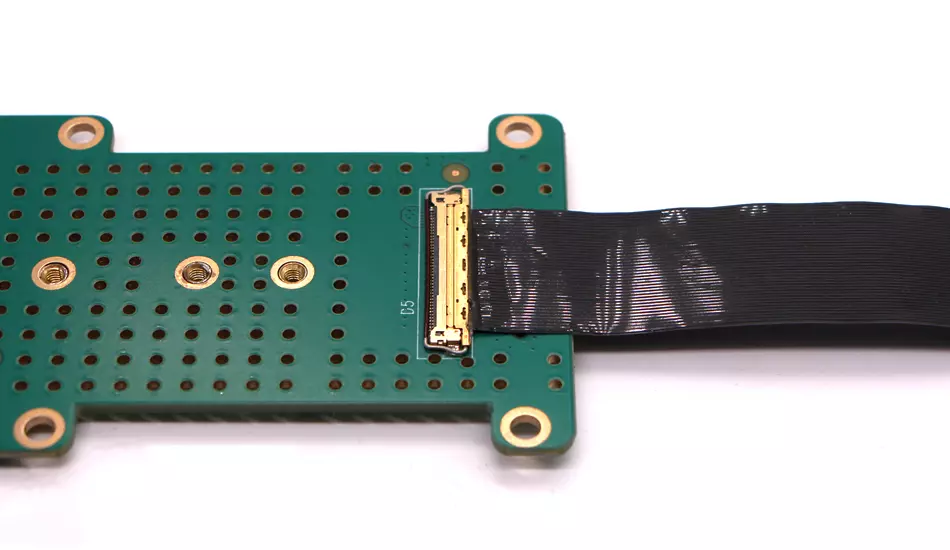
- Please distinguish between the front and back of the IPEX cable, as shown in the picture.
**The IPEX cables we provide for ROCK 5A are orientated in the same direction at both ends. **
- Please note that the loop needs to be snapped into the connector.
-
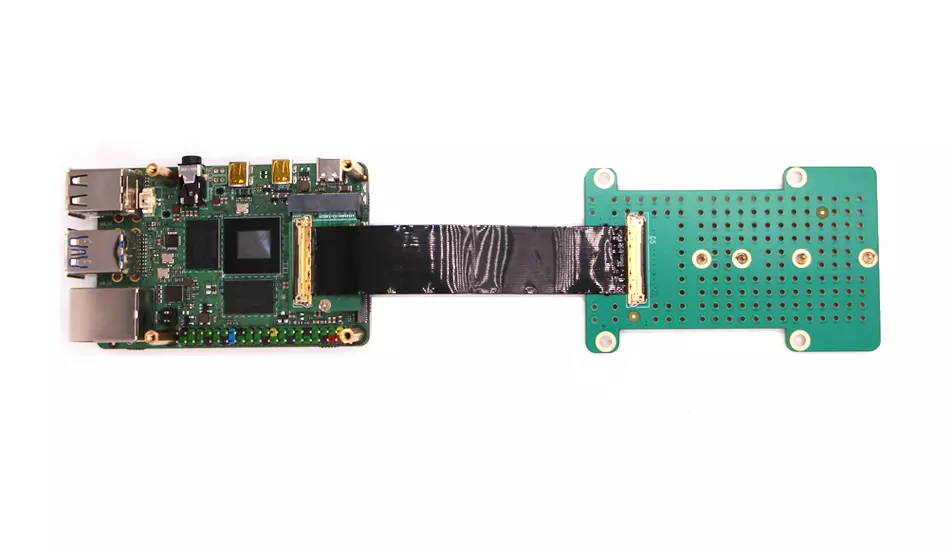
Mounting
- M.2 E-keyboard to M.2 M-keyboard with IPEX cable. **Note that the IPEX cable installed here is face up and the ring clips need to snap onto the connector to ensure retention. **
- M.2 expansion board with IPEX cable. **Note that the IPEX cable installed here is face up, and the ring clips need to snap onto the connector to ensure retention. **
- Please install the M2.5x18+6 copper post and M2.5x5 copper post supplied with the product on ROCK 5A as shown in the figure.
- Connect one end of the IPEX cable to the M.2 E key to M Key board and the other end to the M.2 Extension Board and install the M.2 E key to M key board into the ROCK 5A M.2 E connector as shown.
- Finally, the M.2 expansion board is assembled using M2.5x5+5 copper posts.
-
Viewing Mounts
- You can check if the SSD card is recognised by
lsblk.
radxa@:~$ lsblk NAME MAJ:MIN RM SIZE RO TYPE MOUNTPOINT mmcblk0
179:0 0 14.5G 0 disk ├─mmcblk0p1 179:1 0 16M 0 part /config └─mmcblk0p2
179:2 0 14.4G 0 part / mmcblk0boot0 179:32 0 4M 1 disk mmcblk0boot1 179:64 0
4M 1 disk zram0 254:0 0 3.8G 0 disk [SWAP] nvme0n1 259:0 0 238.5G 0 disk
- At this point you can see that the system has recognised the SSD (nvme0n1).
- You can check if the SSD card is recognised by
WIFI & BT Support Module List
| NO. | Model | Chip | WiFi | BT | WIFI Throughput | Remark |
|---|---|---|---|---|---|---|
| 1 | ROCK Pi Wireless Module A1 (SDIO+UART) --- AP6236 | BCM43436B0 | 2.4G | 4.2 | up:23.5 Mbits/sec down:40.4 Mbits/sec | |
| 2 | ROCK Pi Wireless Module A2 (SDIO+UART) --- AP6256 | BCM43456 | 2.4G&5G | 5.0 | up:196 Mbits/sec down: 187 Mbits/sec | |
| 3 | Radxa wireless A8 | RTL8852BE | 2.4G&5G&WIFI6 | 5.0 | up:600Mbits/sec down:900 Mbits/sec |
-
WIFI Usage
- First enter ROOT user mode
radxa@rock-5a:~$ sudo su
- Turn on WIFI
root@rock-5a:/home/radxa# nmcli r wifi on
- Scan WIFI
root@rock-5a:/home/radxa# nmcli dev wifi
- Bluetooth usage
root@rock-5a:/home/radxa# nmcli dev wifi connect "wifi_name" password
"wifi_password"
-
Bluetooth Usage
- If using the Radxa Wireless A8 module, the following blacklists must be added for BT to work properly.
root@rock-5a:/home/radxa# cat /etc/modprobe.d/blacklist.conf blacklist
pgdrv blacklist btusb blacklist btrtl blacklist btbcm blacklist btintel
root@rock-5a:~# reboot
- Radxa APT includes the broadcom-wifibt-firmware package for Broadcom wireless modules and the intel-wifibt-firmware package for Intel wireless modules. The corresponding packages need to be downloaded
root@rock-5a:/home/radxa# apt-get update -y root@rock-5a
:/home/radxa# apt-get install -y broadcom-wifibt-firmware intel-wifibt-firmware
- Test the status of the Bluetooth module and check the Bluetooth device
root@rock-5a:/home/radxa# systemctl status bluetooth
- Run the Bluetooth device.
root@rock-5a:/home/radxa# systemctl start bluetooth
- Detect Bluetooth devices
root@rock-5a:/home/radxa# hciconfig hci0: Type: Primary Bus: UART BD
Address: 10:2C:6B:49:D5:53 ACL MTU: 1021:8 SCO MTU: 64:1 UP RUNNING RX
bytes:850 acl:0 sco:0 events:58 errors:0 TX bytes:2814 acl:0 sco:0
commands:58 errors:0
- Test: Connect the Bluetooth speaker, first install pulseaudio
root@rock-5a:/home/radxa# apt-get install -y
pulseaudio-module-bluetooth pulseaudio
- Run pulseaudio
root@rock-5a:/home/radxa# pulseaudio --start
- Connect with pulseaudio
root@rock-5a:/home/radxa# bluetoothctl [bluetooth]# default-agent
[bluetooth]# power on [bluetooth]# scan on [bluetooth]# trust
41:42:1A:8D:A9:65 #BT-280 [bluetooth]# pair 41:42:1A:8D:A9:65 [bluetooth]#
connect 41:42:1A:8D:A9:65
- Now you can listen to music